一、什么是AAPT2
在Android开发过程中,我们通过Gradle命令,启动一个构建任务,最终会生成构建产物“APK”文件。常规APK的构建流程如下:
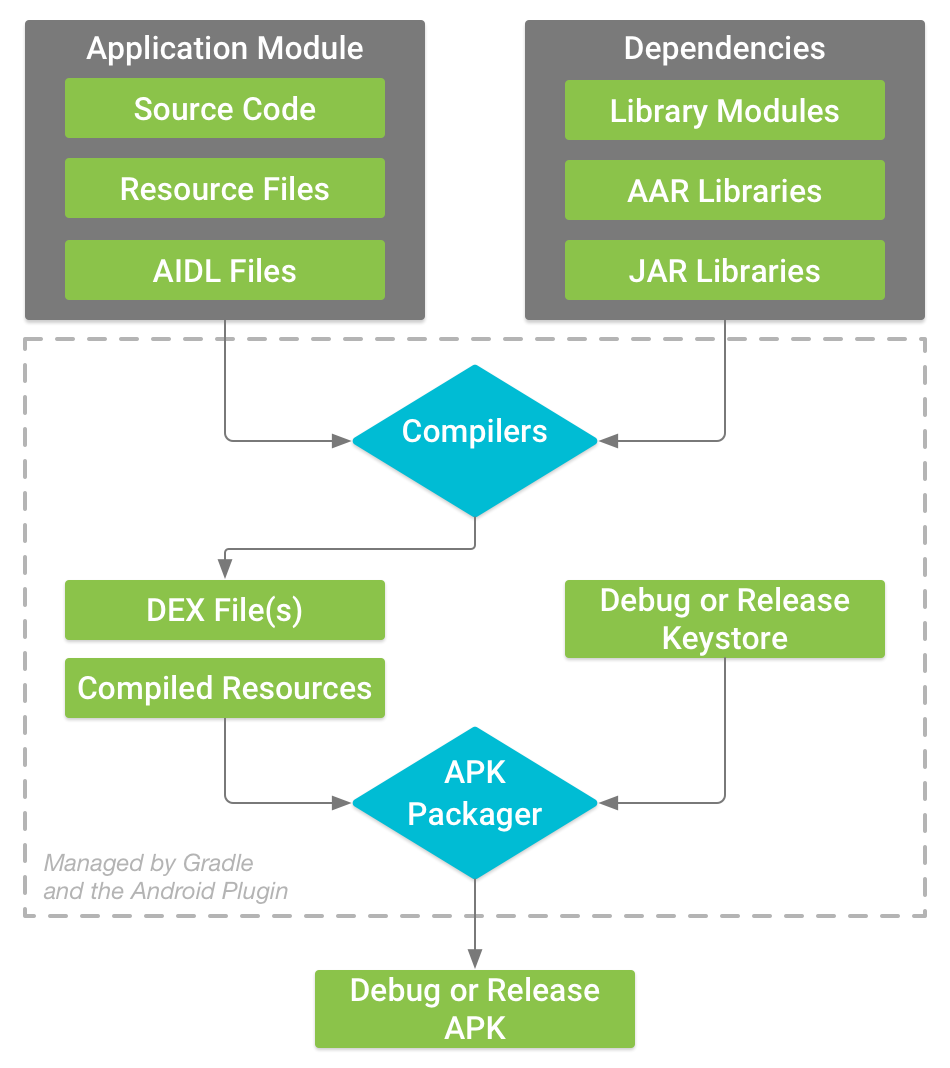
(引用自Google官方文档)
-
编译所有的资源文件,生成资源表和R文件;
-
编译Java文件并把class文件打包为dex文件;
-
打包资源和dex文件,生成未签名的APK文件;
-
签名APK生成正式包。
老版本的Android默认使用AAPT编译器进行资源编译,从Android Studio 3.0开始,AS默认开启了 AAPT2 作为资源编译的编译器,目前看来,AAPT2也是Android发展的主流趋势,学习AAPT2的工作原理可以帮助Android开发更好的掌握APK构建流程,从而帮助解决实际开发中遇到的问题。
AAPT2 的可执行文件随 Android SDK 的 Build Tools 一起发布,在Android Studio的build-tools文件夹中就包含AAPT2工具,目录为(SDK目录/build-tools/version/aapt2)。

二、AAPT2如何工作
在看Android编译流程的时候,我忍不住会想一个问题:
Java文件需要编译才能生class文件,这个我能明白,但资源文件编译到底是干什么的?为什么要对资源做编译?
带着这个问题,让我们深入的学习一下AAPT2。和AAPT不同,AAPT2把资源编译打包过程拆分为两部分,即编译和链接:
编译:将资源文件编译为二进制文件(flat)。
链接:将编译后的文件合并,打包成单独文件。
通过把资源编译拆分为两个部分,AAPT2能够很好的提升资源编译的性能。例如,之前一个资源文件发生变动,AAPT需要做一全量编译,AAPT2只需要重新编译改变的文件,然后和其他未发生改变的文件进行链接即可。
2.1 Compile命令
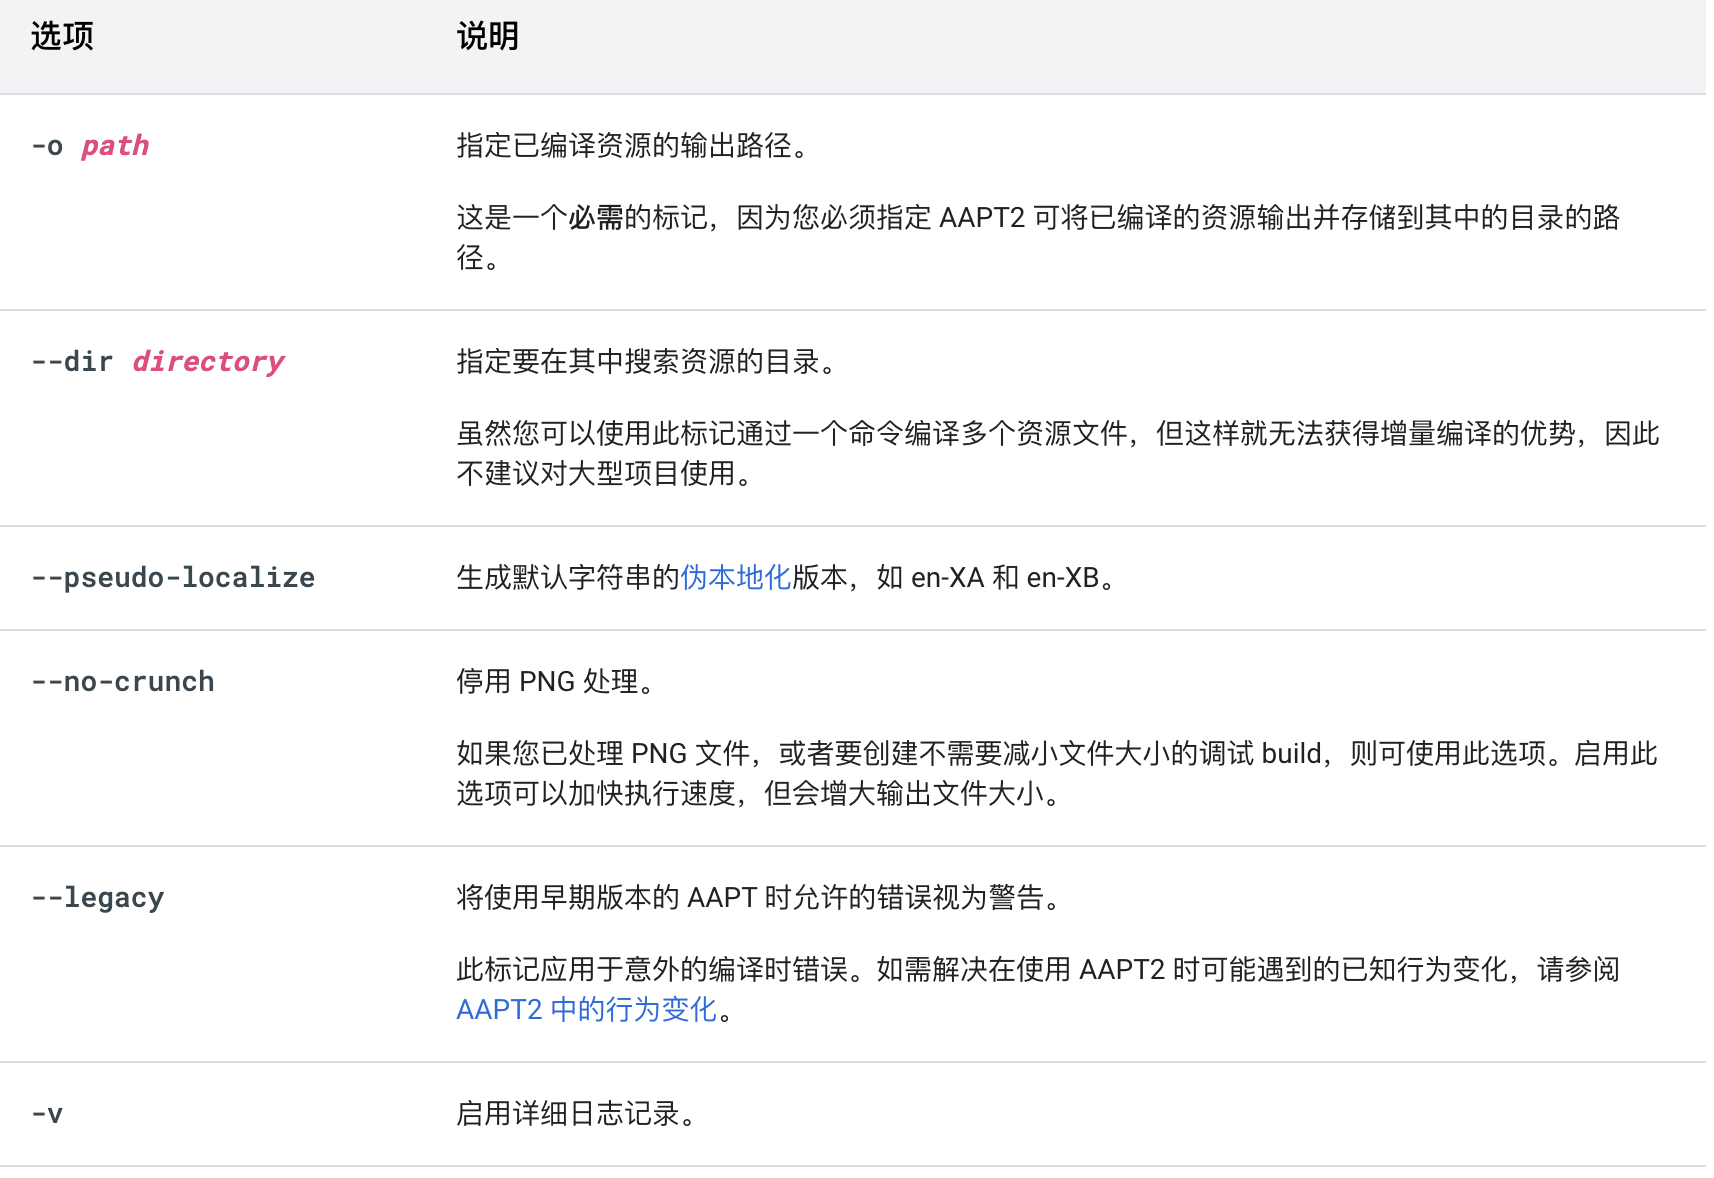
如上文描述,Complie指令用于编译资源,AAPT2提供多个选项与Compile命令搭配使用。
Complie的一般用法如下:
aapt2 compile path-to-input-files [options] -o output-directory/
执行命令后,AAPT2会把资源文件编译为.flat格式的文件,文件对比如下。

Compile命令会对资源文件的路径做校验,输入文件的路径必须符合以下结构:path/resource-type[-config]/file。
例如,把资源文件保存在“aapt2”文件夹下,使用Compile命令编译,则会报错“error: invalid file path '.../aapt2/ic_launcher.png'”。把aapt改成“drawable-hdpi”,编译正常。
在Android Studio中,可以在app/build/intermediates/res/merged/ 目录下找到编译生成的.flat文件。当然Compile也支持编译多个文件;
aapt2 compile path-to-input-files1 path-to-input-files2 [options] -o output-directory/
编译整个目录,需要制定数据文件,编译产物是一个压缩文件,包含目录下所有的资源,通过文件名把资源目录结构扁平化。
aapt2 compile --dir .../res [options] -o output-directory/resource.ap_
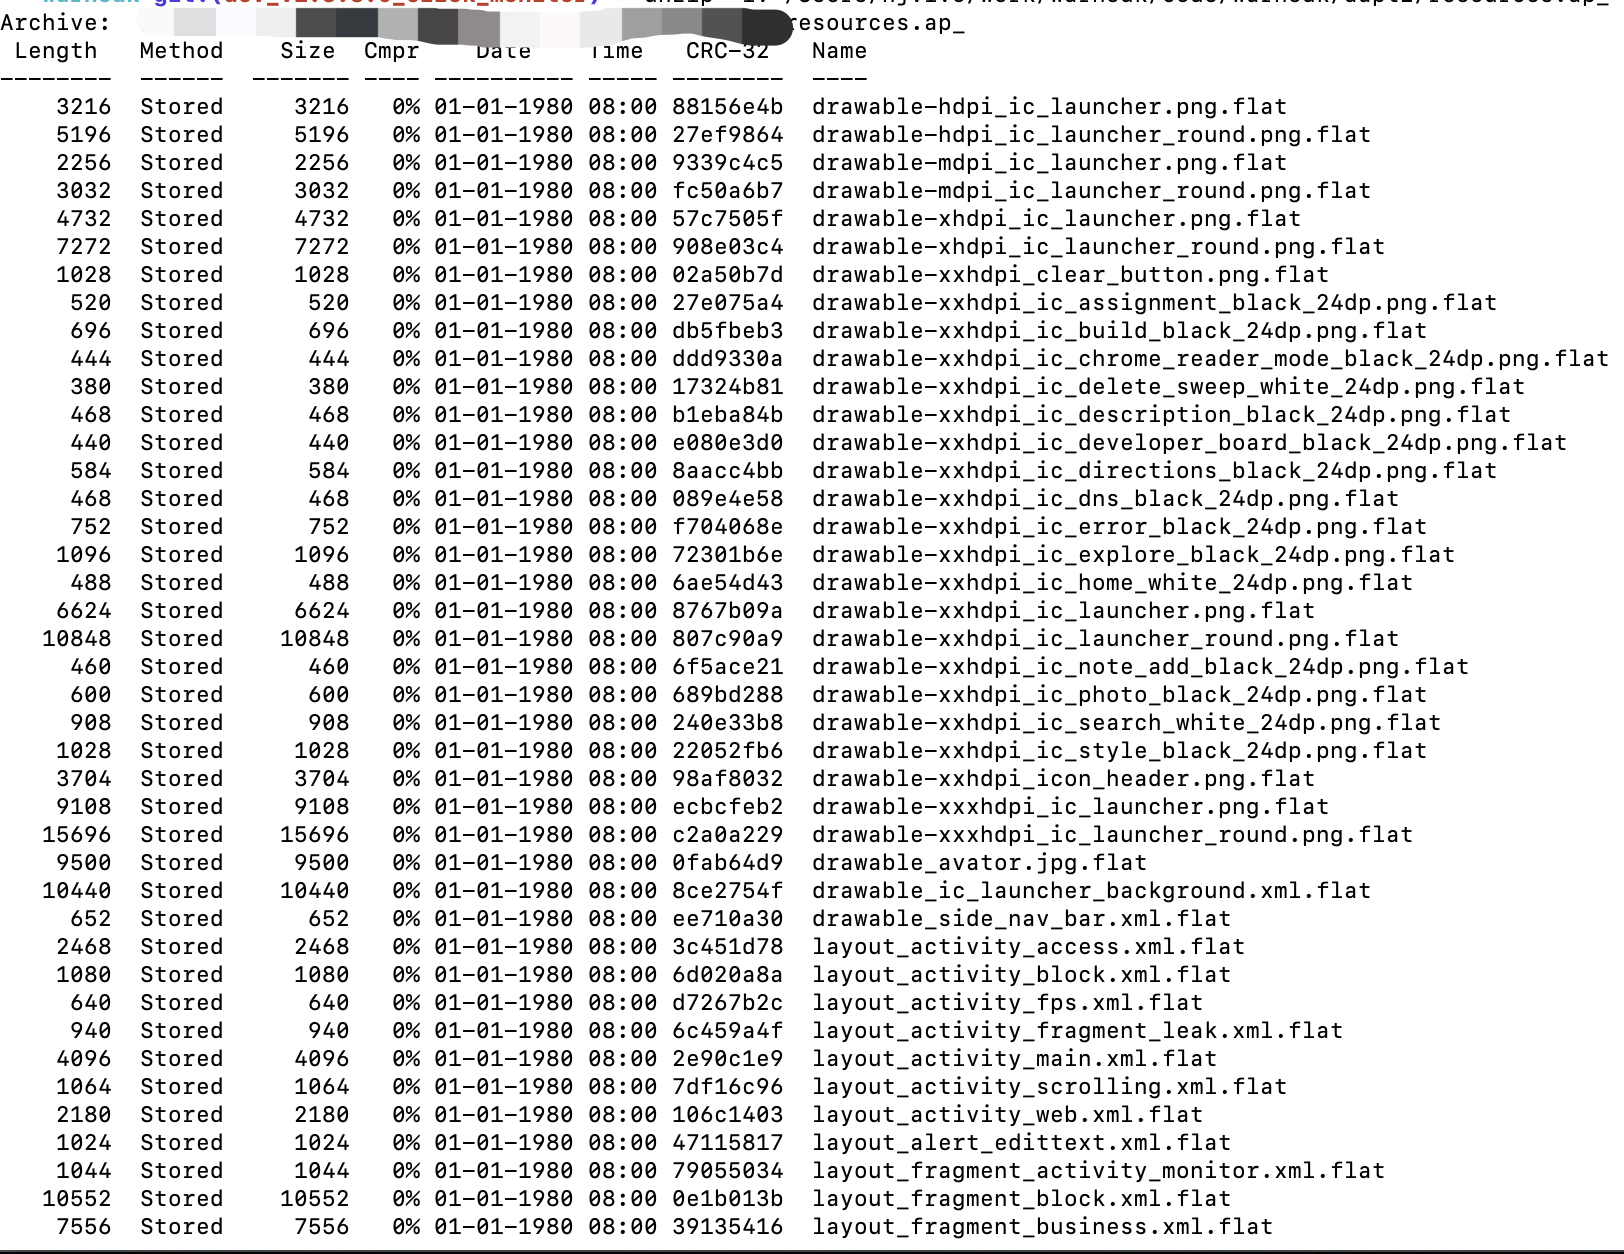
可以看到经过编译后,资源文件(png,xml ... )会被编译成一个FLAT格式的文件,直接把FLAT文件拖拽到as中打开,是乱码的。那么这个FLAT文件到底是什么?
2.2 FLAT文件
FLAT文件是AAPT2编译的产物文件,也叫做AAPT2容器,文件由文件头和资源项两大部分组成:
文件头
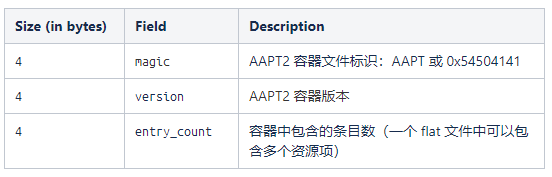
资源项
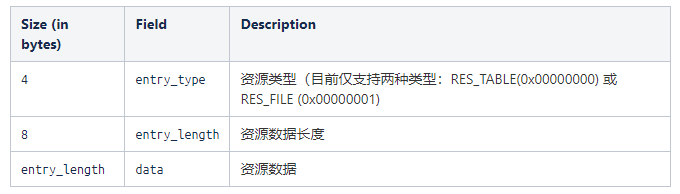
资源项中,按照 entry_type 值分为两种类型:
-
当entry_type 的值等于 0x00000000时,为RES_TABLE类型。
-
当entry_type的值等于 0x00000001时,为RES_FILE类型。
RES_TABLE包含的是protobuf格式的 ResourceTable 结构。数据结构如下:
// Top level message representing a resource table.
message ResourceTable {
    // 字符串池
    StringPool source_pool = 1;
    // 用于生成资源id
    repeated Package package = 2;
    // 资源叠加层相关
    repeated Overlayable overlayable = 3;
    // 工具版本
    repeated ToolFingerprint tool_fingerprint = 4;
}
资源表(ResourceTable)中包含:
StringPool:字符串池,字符串常量池是为了把资源文件中的string复用起来,从而减少体积,资源文件中对应的字符串会被替换为字符串池中的索引。
message StringPool {
  bytes data = 1;
}
Package:包含资源id的相关信息
// 资源id的包id部分,在 [0x00, 0xff] 范围内
message PackageId {
  uint32 id = 1;
}
// 资源id的命名规则
message Package {
  // [0x02, 0x7f) 简单的说,由系统使用
  // 0x7f 应用使用
  // (0x7f, 0xff] 预留Id
  PackageId package_id = 1;
  // 包名
  string package_name = 2;
  // 资源类型,对应string, layout, xml, dimen, attr等,其对应的资源id区间为[0x01, 0xff]
  repeated Type type = 3;
}
资源id的命令方式遵循0xPPTTEEEE的规则,其中PP对应PackageId,一般应用使用的资源为7f,TT对应的是资源文件夹的名成,最后4位为资源的id,从0开始。
RES_FILE类型格式如下:
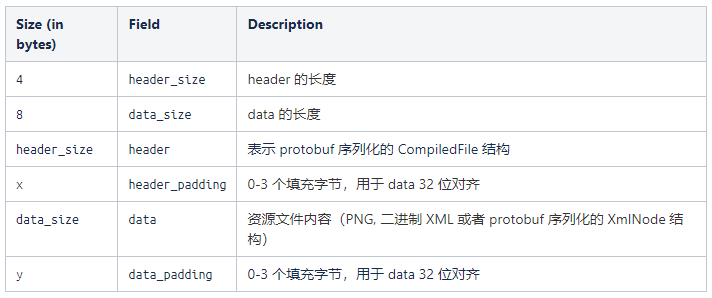
RES_FILE类型的FLAT文件结构可以参考下图;
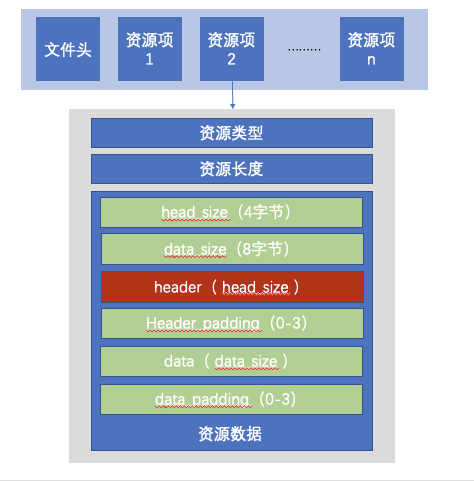
从上图展示的文件格式中可以看出,一个FLAT中可以包含多个资源项,在资源项中,Header字段中保存的是protobuf格式序列化的 CompiledFile 内容。在这个结构中,保存了文件名、文件路径、文件配置和文件类型等信息。data字段中保存资源文件的内容。通过这种方式,一个文件中既保存了文件的外部相关信息,又包含文件的原始内容。
2.3 编译的源码
上文,我们学习了编译命令Compile的用法和编译产物FLAT文件的文件格式,接下来,我们通过查看代码,从源码层面来学习AAPT2的编译流程,本文源码地址。
2.3.1 命令执行流程
根据常识,一般函数的入口都是和main有关,打开Main.cpp,可以找到main函数入口;
int main(int argc, char** argv) {
#ifdef _WIN32
    ......
    //参数格式转换
    argv = utf8_argv.get();
#endif
    //具体的实现MainImpl中
    return MainImpl(argc, argv);
}
在MainImpl中,首先从输入中获取参数部分,然后创建一个MainCommand来执行命令。
int MainImpl(int argc, char** argv) {
    if (argc < 1) {
        return -1;
    }
    // 从下标1开始的输入,保存在args中
    std::vector<StringPiece> args;
    for (int i = 1; i < argc; i++) {
        args.push_back(argv[i]);
    }
    //省略部分代码,这部分代码用于打印信息和错误处理
    //创建一个MainCommand
    aapt::MainCommand main_command(&printer, &diagnostics);
    // aapt2的守护进程模式,
    main_command.AddOptionalSubcommand( aapt::util::make_unique<aapt::DaemonCommand>(&fout, &diagnostics));
    // 调用Execute方法执行命令
    return main_command.Execute(args, &std::cerr);
}
MainCommand继承自Command,在MainCommand初始化方法中会添加多个二级命令,通过类名,可以容易的推测出,这些Command和终端通过命令查看的二级命令一一对应。
explicit MainCommand(text::Printer* printer, IDiagnostics* diagnostics)
 : Command("aapt2"), diagnostics_(diagnostics) {
    //对应Compile 命令
    AddOptionalSubcommand(util::make_unique<CompileCommand>(diagnostics));
    //对应link 命令
    AddOptionalSubcommand(util::make_unique<LinkCommand>(diagnostics));
    AddOptionalSubcommand(util::make_unique<DumpCommand>(printer, diagnostics));
    AddOptionalSubcommand(util::make_unique<DiffCommand>());
    AddOptionalSubcommand(util::make_unique<OptimizeCommand>());
    AddOptionalSubcommand(util::make_unique<ConvertCommand>());
    AddOptionalSubcommand(util::make_unique<VersionCommand>());
}
AddOptionalSubcommand方法定义在基类Command中,内容比较简单,把传入的subCommand保存在数组中。
void Command::AddOptionalSubcommand(std::unique_ptr<Command>&& subcommand, bool experimental) {
    subcommand->full_subcommand_name_ = StringPrintf("%s %s", name_.data(), subcommand->name_.data());
    if (experimental) {
        experimental_subcommands_.push_back(std::move(subcommand));
    } else {
    subcommands_.push_back(std::move(subcommand));
    }
}
接下来,再来分析main_command.Execute的内容,从方法名可以推测这个方法里面有指令执行的相关代码。在MainCommand中并没有Execute方法的实现,那应该是在父类中实现了,再到Command类中搜索,果然在这里。
int Command::Execute(const std::vector<StringPiece>& args, std::ostream* out_error) {
    TRACE_NAME_ARGS("Command::Execute", args);
    std::vector<std::string> file_args;
    for (size_t i = 0; i < args.size(); i++) {
        const StringPiece& arg = args[i];
        // 参数不是 '-'
        if (*(arg.data()) != '-') {
        //是第一个参数
        if (i == 0) {
            for (auto& subcommand : subcommands_) {
                //判断是否是子命令
                if (arg == subcommand->name_ || (!subcommand->short_name_.empty() && arg == subcommand->short_name_)) {
                //执行子命令的Execute 方法,传入参数向后移动一位
                return subcommand->Execute( std::vector<StringPiece>(args.begin() + 1, args.end()), out_error);
            }
        }
        //省略部分代码
    //调用Action方法,在执行二级命令时,file_args保存的是位移后的参数
    return Action(file_args);
}
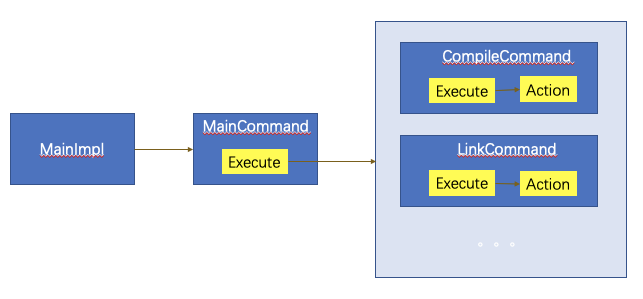
在Execute方法中,会先对参数作判断,如果参数第一位命中二级命令(Compile,link,.....),则调用二级命令的Execute方法。参考上文编译命令的示例可知,一般情况下,在这里就会命中二级命令的判断,从而调用二级命令的Execute方法。
在Command.cpp的同级目录下,可以找到Compile.cpp,其Execute继承自父类。但是由于参数已经经过移位,所以最终会执行Action方法。在Compile.cpp中可以找到Action方法,同样在其他二级命令的实现类中(Link.cpp,Dump.cpp...),其核心处理的处理也都有Action方法中。整体调用的示意图如下:
在开始看Action代码之前,我们先看一下Compile.cpp的头文件Compile.h的内容,在CompileCommand初始化时,会把必须参数和可选参数都初始化定义好。
SetDescription("Compiles resources to be linked into an apk.");
AddRequiredFlag("-o", "Output path", &options_.output_path, Command::kPath);
AddOptionalFlag("--dir", "Directory to scan for resources", &options_.res_dir, Command::kPath);
AddOptionalFlag("--zip", "Zip file containing the res directory to scan for resources", &options_.res_zip, Command::kPath);
AddOptionalFlag("--output-text-symbols", "Generates a text file containing the resource symbols in the
" "specified file", &options_.generate_text_symbols_path, Command::kPath);
AddOptionalSwitch("--pseudo-localize", "Generate resources for pseudo-locales " "(en-XA and ar-XB)", &options_.pseudolocalize);
AddOptionalSwitch("--no-crunch", "Disables PNG processing", &options_.no_png_crunch);
AddOptionalSwitch("--legacy", "Treat errors that used to be valid in AAPT as warnings", &options_.legacy_mode);
AddOptionalSwitch("--preserve-visibility-of-styleables", "If specified, apply the same visibility rules for
" "styleables as are used for all other resources.
" "Otherwise, all stylesables will be made public.", &options_.preserve_visibility_of_styleables);
AddOptionalFlag("--visibility", "Sets the visibility of the compiled resources to the specified
" "level. Accepted levels: public, private, default", &visibility_);
AddOptionalSwitch("-v", "Enables verbose logging", &options_.verbose);
AddOptionalFlag("--trace-folder", "Generate systrace json trace fragment to specified folder.", &trace_folder_);
官网中列出的编译选项并不全,使用compile -h打印信息后就会发现打印的信息和代码中的设置是一致的。
在Action方法的执行流程可以总结为:
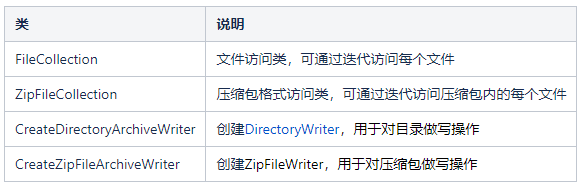
1)会根据传入参数判断资源类型,并创建对应的文件加载器(file_collection)。
2)根据传入的输出路径判断输出文件的类型,并创建对应的归档器(archive_writer),archive_writer在后续的调用链中一直向下传递,最终通过archive_writer把编译后的文件写到输出目录下。
3)调用Compile方法执行编译。
过程1,2中涉及的文件读写对象如下表。
简化的主流程代码如下:
int CompileCommand::Action(const std::vector<std::string>& args) {
    //省略部分代码....
    std::unique_ptr<io::IFileCollection> file_collection;
    //加载输入资源,简化逻辑,下面会省略掉校验的代码
    if (options_.res_dir && options_.res_zip) {
        context.GetDiagnostics()->Error(DiagMessage() << "only one of --dir and --zip can be specified");
        return 1;
    } else if (options_.res_dir) {
        //加载目录下的资源文件...
        file_collection = io::FileCollection::Create(options_.res_dir.value(), &err);
        //...
    }else if (options_.res_zip) {
        //加载压缩包格式的资源文件...
        file_collection = io::ZipFileCollection::Create(options_.res_zip.value(), &err);
        //...
    } else {
        //也是FileCollection,先定义collection,通过循环依次添加输入文件,再拷贝到file_collection
        file_collection = std::move(collection);
    }
    std::unique_ptr<IArchiveWriter> archive_writer;
    //产物输出文件类型
    file::FileType output_file_type = file::GetFileType(options_.output_path);
    if (output_file_type == file::FileType::kDirectory) {
        //输出到文件目录
        archive_writer = CreateDirectoryArchiveWriter(context.GetDiagnostics(), options_.output_path);
    } else {
        //输出到压缩包
        archive_writer = CreateZipFileArchiveWriter(context.GetDiagnostics(), options_.output_path);
    }
    if (!archive_writer) {
        return 1;
    }
    return Compile(&context, file_collection.get(), archive_writer.get(), options_);
}
Compile方法中会编译输入的资源文件名,每个资源文件的处理方式如下:
-
解析输入的资源路径获取资源名,扩展名等信息;
-
根据path判断文件类型,然后给compile_func设置不同的编译函数;
-
生成输出的文件名。输出的就是FLAT文件名,会对全路径拼接,最终生成上文案例中类似的文件名—“drawable-hdpi_ic_launcher.png.flat”;
-
传入各项参数,调用compile_func方法执行编译。
ResourcePathData中包含了资源路径,资源名,资源扩展名等信息,AAPT2会从中获取资源的类型。
 int Compile(IAaptContext* context, io::IFileCollection* inputs, IArchiveWriter* output_writer, CompileOptions& options) {
    TRACE_CALL();
    bool error = false;
    // 编译输入的资源文件
    auto file_iterator  = inputs->Iterator();
    while (file_iterator->HasNext()) {
        // 省略部分代码(文件校验相关...)
        std::string err_str;
        ResourcePathData path_data;
        // 获取path全名,用于后续文件类型判断
        if (auto maybe_path_data = ExtractResourcePathData(path, inputs->GetDirSeparator(), &err_str)) {
            path_data = maybe_path_data.value();
        } else {
            context->GetDiagnostics()->Error(DiagMessage(file->GetSource()) << err_str);
            error = true;
            continue;
        }

        // 根据文件类型,选择编译方法,这里的 CompileFile 是函数指针,指向一个编译方法。
        // 使用使用设置为CompileFile方法
        auto compile_func = &CompileFile;
        // 如果是values目录下的xml资源,使用 CompileTable 方法编译,并修改扩展名为arsc
        if (path_data.resource_dir == "values" && path_data.extension == "xml") {
            compile_func = &CompileTable;
            // We use a different extension (not necessary anymore, but avoids altering the existing // build system logic).
            path_data.extension = "arsc";
        } else if (const ResourceType* type = ParseResourceType(path_data.resource_dir)) {
            // 解析资源类型,如果kRaw类型,执行默认的编译方法,否则执行如下代码。
            if (*type != ResourceType::kRaw) {
                //xml路径或者文件扩展为.xml
                if (*type == ResourceType::kXml || path_data.extension == "xml") {
                    // xml类,使用CompileXml方法编译
                    compile_func = &CompileXml;
                } else if ((!options.no_png_crunch && path_data.extension == "png") || path_data.extension == "9.png") { //如果后缀名是.png并且开启png优化或者是点9图类型
                    // png类,使用CompilePng方法编译
                    compile_func = &CompilePng;
                }
            }
        } else {
            // 不合法的类型,输出错误信息,继续循环
            context->GetDiagnostics()->Error(DiagMessage() << "invalid file path '" << path_data.source << "'");
            error = true;
            continue;
        }
        // 校验文件名中是否有.
        if (compile_func != &CompileFile && !options.legacy_mode && std::count(path_data.name.begin(), path_data.name.end(), '.') != 0) {
            error = true;
            context->GetDiagnostics()->Error(DiagMessage(file->GetSource()) << "file name cannot contain '.' other than for" << " specifying the extension");
            continue;
        }
        // 生成产物文件名,这个方法会生成完成的flat文件名,例如上文demo中的 drawable-hdpi_ic_launcher.png.flat
        const std::string out_path = BuildIntermediateContainerFilename(path_data);
        // 执行编译方法
        if (!compile_func(context, options, path_data, file, output_writer, out_path)) {
            context->GetDiagnostics()->Error(DiagMessage(file->GetSource()) << "file failed to compile"); error = true;
        }
    }
    return error ? 1 : 0;
}
不同的资源类型会有四种编译函数:
-
CompileFile
-
CompileTable
-
CompileXml
-
CompilePng
raw目录下的XML文件不会执行CompileXml,猜测是因为raw下的资源是直接复制到APK中,不会做XML优化编译。values目录下资源除了执行CompileTable编译之外,还会修改资源文件的扩展名,可以认为除了CompileFile,其他编译方法多多少少会对原始资源做处理后,在写编译生成的FLAT文件中。这部分的流程如下图所示:
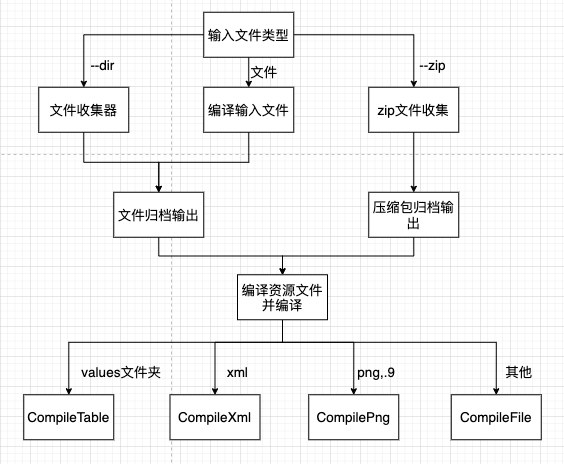
编译命令执行的主流程到这里就结束了,通过源码分析,我们可以知道AAPT2把输入文件编译为FLAT文件。下面,我们在进一步分析4个编译方法。
2.3.2 四种编译函数
CompileFile
函数中先构造ResourceFile对象和原始文件数据,然后调用 WriteHeaderAndDataToWriter 把数据写到输出文件(flat)中。
static bool CompileFile(IAaptContext* context, const CompileOptions& options, const ResourcePathData& path_data, io::IFile* file, IArchiveWriter* writer, const std::string& output_path) {
    TRACE_CALL();
    if (context->IsVerbose()) {
        context->GetDiagnostics()->Note(DiagMessage(path_data.source) << "compiling file");
    }
    // 定义ResourceFile 对象,保存config,source等信息
    ResourceFile res_file;
    res_file.name = ResourceName({}, *ParseResourceType(path_data.resource_dir), path_data.name);
    res_file.config = path_data.config;
    res_file.source = path_data.source;
    res_file.type = ResourceFile::Type::kUnknown; //这类型下可能有xml,png或者其他的什么,统一设置类型为unknow。
    // 原始文件数据
    auto data = file->OpenAsData();
    if (!data) {
        context->GetDiagnostics()->Error(DiagMessage(path_data.source) << "failed to open file ");
        return false;
    }
    return WriteHeaderAndDataToWriter(output_path, res_file, data.get(), writer, context->GetDiagnostics());
}
ResourceFile的内容相对简单,完成文件相关信息的赋值后就会调用通过WriteHeaderAndDataToWriter方法。
在WriteHeaderAndDataToWriter这个方法中,对之前创建的archive_writer(可在本文搜索,这个归档写创建完成后,会一直传下来)做一次包装,经过包装的ContainerWriter则具备普通文件写和protobuf格式序列化写的能力。
pb提供了ZeroCopyStream 接口用户数据读写和序列化/反序列化操作。
WriteHeaderAndDataToWriter的流程可以简单归纳为:
-
IArchiveWriter.StartEntry,打开文件,做好写入准备;
-
ContainerWriter.AddResFileEntry,写入数据;
-
IArchiveWriter.FinishEntry,关闭文件,释放内存。
static bool WriteHeaderAndDataToWriter(const StringPiece& output_path, const ResourceFile& file, io::KnownSizeInputStream* in, IArchiveWriter* writer, IDiagnostics* diag) {
    // 打开文件
    if (!writer->StartEntry(output_path, 0)) {
        diag->Error(DiagMessage(output_path) << "failed to open file");
        return false;
    }
    // Make sure CopyingOutputStreamAdaptor is deleted before we call writer->FinishEntry().
    {
        // 对write做一层包装,用来写protobuf数据
        CopyingOutputStreamAdaptor copying_adaptor(writer);
        ContainerWriter container_writer(©ing_adaptor, 1u);
        //把file按照protobuf格式序列化,序列化后的文件是 pb_compiled_file,这里的file文件是ResourceFile文件,包含了原始文件的路径,配置等信息
        pb::internal::CompiledFile pb_compiled_file;
        SerializeCompiledFileToPb(file, &pb_compiled_file);
        // 再把pb_compiled_file 和 in(原始文件) 写入到产物文件中
        if (!container_writer.AddResFileEntry(pb_compiled_file, in)) {
            diag->Error(DiagMessage(output_path) << "failed to write entry data");
            return false;
        }
    }
    // 退出写状态
    if (!writer->FinishEntry()) {
        diag->Error(DiagMessage(output_path) << "failed to finish writing data");
        return false;
    }
    return true;
}
我们再分别来看这三个方法,首先是StartEntry和FinishEntry,这个方法在Archive.cpp中,ZipFileWriter和DirectoryWriter实现有些区别,但逻辑上是一致的,这里只分析DirectoryWriter的实现。
StartEntry,调用fopen打开文件。
bool StartEntry(const StringPiece& path, uint32_t flags) override {
    if (file_) {
        return false;
    }
    std::string full_path = dir_;
    file::AppendPath(&full_path, path);
    file::mkdirs(file::GetStem(full_path).to_string());
    //打开文件
    file_ = {::android::base::utf8::fopen(full_path.c_str(), "wb"), fclose};
    if (!file_) {
        error_ = SystemErrorCodeToString(errno);
        return false;
    }
    return true;
}
FinishEntry,调用reset释放内存。
bool FinishEntry() override {
    if (!file_) {
        return false;
    }
    file_.reset(nullptr);
    return true;
}
ContainerWriter类定义在Container.cpp这个类文件中。在ContainerWriter类的构造方法中,可以找到文件头的写入代码,其格式和上文“FLAT格式”一节中介绍的一致。
// 在类的构造方法中,写入文件头的信息
ContainerWriter::ContainerWriter(ZeroCopyOutputStream* out, size_t entry_count)
  : out_(out), total_entry_count_(entry_count), current_entry_count_(0u) {
    CodedOutputStream coded_out(out_);
    // 魔法数据,kContainerFormatMagic = 0x54504141u
    coded_out.WriteLittleEndian32(kContainerFormatMagic);
    // 版本号,kContainerFormatVersion = 1u
    coded_out.WriteLittleEndian32(kContainerFormatVersion);
    // 容器中包含的条目数 total_entry_count_是在ContainerReader构造时赋值,值由外部传入
    coded_out.WriteLittleEndian32(static_cast<uint32_t>(total_entry_count_));
    if (coded_out.HadError()) {
        error_ = "failed writing container format header";
    }
}
调用ContainerWriter的AddResFileEntry方法,写入资源项内容。
// file:protobuf格式的信息文件,in:原始文件
bool ContainerWriter::AddResFileEntry(const pb::internal::CompiledFile& file, io::KnownSizeInputStream* in) {
    // 判断条目数量,大于设定数量就直接报错
    if (current_entry_count_ >= total_entry_count_) {
        error_ = "too many entries being serialized";
        return false;
    }
    // 条目++
    current_entry_count_++;
    constexpr const static int kResFileEntryHeaderSize = 12; 、
    //输出流
    CodedOutputStream coded_out(out_);
    //写入资源类型
    coded_out.WriteLittleEndian32(kResFile);

    const ::google::protobuf::uint32
    // ResourceFile 文件长度 ,该部分包含了当前文件的路径,类型,配置等信息
    header_size = file.ByteSize();
    const int header_padding = CalculatePaddingForAlignment(header_size);
    // 原始文件长度
    const ::google::protobuf::uint64 data_size = in->TotalSize();
    const int data_padding = CalculatePaddingForAlignment(data_size);
    // 写入数据长度,计算公式:kResFileEntryHeaderSize(固定12) + ResourceFile文件长度 + header_padding + 原始文件长度 + data_padding
    coded_out.WriteLittleEndian64(kResFileEntryHeaderSize + header_size + header_padding + data_size + data_padding);

    // 写入文件头长度
    coded_out.WriteLittleEndian32(header_size);
    // 写入数据长度
    coded_out.WriteLittleEndian64(data_size);
    // 写入“头信息”
    file.SerializeToCodedStream(&coded_out);
    // 对齐
    WritePadding(header_padding, &coded_out);
    // 使用Copy之前需要调用Trim(至于为什么,其实也不太清楚,好在我们学习AAPT2,了解底层API的功能即可。如果有读者知道,希望赐教)
    coded_out.Trim();
    // 异常判断
    if (coded_out.HadError()) {
        error_ = "failed writing to output"; return false;
    } if (!io::Copy(out_, in)) {  //资源数据(源码中也叫payload,可能是png,xml,或者XmlNode)
        if (in->HadError()) {
            std::ostringstream error;
            error << "failed reading from input: " << in->GetError();
            error_ = error.str();
        } else {
            error_ = "failed writing to output";
        }
        return false;
    }
    // 对其
    WritePadding(data_padding, &coded_out);
    if (coded_out.HadError()) {
        error_ = "failed writing to output";
        return false;
    }
    return true;
}
这样,FLAT文件就完成写入了,并且产物文件除了包含资源内容,还包含了文件名,路径,配置等信息。
CompilePng
该方法和CompileFile流程上是类似的,区别在于会先对PNG图片做处理(png优化和9图处理),处理完成后在写入FLAT文件。
static bool CompilePng(IAaptContext* context, const CompileOptions& options, const ResourcePathData& path_data, io::IFile* file, IArchiveWriter* writer, const std::string& output_path) {
//..省略部分校验代码
BigBuffer buffer(4096);
// 基本一样的代码,区别是type不一样
ResourceFile res_file;
res_file.name = ResourceName({}, *ParseResourceType(path_data.resource_dir), path_data.name);
res_file.config = path_data.config;
res_file.source = path_data.source;
res_file.type = ResourceFile::Type::kPng;
{
// 读取资源内容到data中
auto data = file->OpenAsData();
// 读取结果校验
if (!data) {
context->GetDiagnostics()->Error(DiagMessage(path_data.source) << "failed to open file ");
return false;
}
// 用来保存输出流
BigBuffer crunched_png_buffer(4096);
io::BigBufferOutputStream crunched_png_buffer_out(&crunched_png_buffer);
// 对PNG图片做优化
const StringPiece content(reinterpret_cast<const char*>(data->data()), data->size());
PngChunkFilter png_chunk_filter(content);
std::unique_ptr<Image> image = ReadPng(context, path_data.source, &png_chunk_filter);
if (!image) {
return false;
}
// 处理.9图
std::unique_ptr<NinePatch> nine_patch;
if (path_data.extension == "9.png") {
std::string err;
nine_patch = NinePatch::Create(image->rows.get(), image->width, image->height, &err);
if (!nine_patch) {
context->GetDiagnostics()->Error(DiagMessage() << err); return false;
}
// 移除1像素的边框
image->width -= 2;
image->height -= 2;
memmove(image->rows.get(), image->rows.get() + 1, image->height * sizeof(uint8_t**));
for (int32_t h = 0; h < image->height; h++) {
memmove(image->rows[h], image->rows[h] + 4, image->width * 4);
} if (context->IsVerbose()) {
context->GetDiagnostics()->Note(DiagMessage(path_data.source) << "9-patch: " << *nine_patch);
}
}
// 保存处理后的png到 &crunched_png_buffer_out
if (!WritePng(context, image.get(), nine_patch.get(), &crunched_png_buffer_out, {})) {
return false;
}
// ...省略部分图片校验代码,这部分代码会比较优化后的图片和原图片的大小,如果优化后比原图片大,则使用原图片。(PNG优化后是有可能比原图片还大的)
}
io::BigBufferInputStream buffer_in(&buffer);
// 和 CompileFile 调用相同的方法,写入flat文件,资源文件内容是
return WriteHeaderAndDataToWriter(output_path, res_file, &buffer_in, writer, context->GetDiagnostics());
}
AAPT2 对于 PNG 图片的压缩可以分为三个方面:
-
RGB 是否可以转化成灰度;
-
透明通道是否可以删除;
-
是不是最多只有 256 色(Indexed_color 优化)。
PNG优化,有兴趣的同学可以看看
在完成PNG处理后,同样会调用WriteHeaderAndDataToWriter来写数据,这部分内容可阅读上文分析,不再赘述。
CompileXml
该方法先会解析XML,然后创建XmlResource,其中包含了资源名,配置,类型等信息。通过FlattenXmlToOutStream函数写入输出文件。
static bool CompileXml(IAaptContext* context, const CompileOptions& options,
                       const ResourcePathData& path_data, io::IFile* file, IArchiveWriter* writer,
                       const std::string& output_path) {
  // ...省略校验代码
  std::unique_ptr<xml::XmlResource> xmlres;
  {
    // 打开xml文件
    auto fin = file->OpenInputStream();
    // ...省略校验代码
    // 解析XML
    xmlres = xml::Inflate(fin.get(), context->GetDiagnostics(), path_data.source);
    if (!xmlres) {
      return false;
    }
  }
  //
  xmlres->file.name = ResourceName({}, *ParseResourceType(path_data.resource_dir), path_data.name);
  xmlres->file.config = path_data.config;
  xmlres->file.source = path_data.source;
  xmlres->file.type = ResourceFile::Type::kProtoXml;

  // 判断id类型的资源是否有id合法(是否有id异常,如果有提示“has an invalid entry name”)
  XmlIdCollector collector;
  if (!collector.Consume(context, xmlres.get())) {
    return false;
  }

  // 处理aapt:attr内嵌资源
  InlineXmlFormatParser inline_xml_format_parser;
  if (!inline_xml_format_parser.Consume(context, xmlres.get())) {
    return false;
  }

  // 打开输出文件
  if (!writer->StartEntry(output_path, 0)) {
    context->GetDiagnostics()->Error(DiagMessage(output_path) << "failed to open file");
    return false;
  }

  std::vector<std::unique_ptr<xml::XmlResource>>& inline_documents =
      inline_xml_format_parser.GetExtractedInlineXmlDocuments();

  {
    // 和CompileFile 类似,创建可处理protobuf格式的writer,用于protobuf格式序列化
    CopyingOutputStreamAdaptor copying_adaptor(writer);
    ContainerWriter container_writer(©ing_adaptor, 1u + inline_documents.size());

    if (!FlattenXmlToOutStream(output_path, *xmlres, &container_writer,
                               context->GetDiagnostics())) {
      return false;
    }
    // 处理内嵌的元素(aapt:attr)
    for (const std::unique_ptr<xml::XmlResource>& inline_xml_doc : inline_documents) {
      if (!FlattenXmlToOutStream(output_path, *inline_xml_doc, &container_writer,
                                 context->GetDiagnostics())) {
        return false;
      }
    }
  }
  // 释放内存
  if (!writer->FinishEntry()) {
    context->GetDiagnostics()->Error(DiagMessage(output_path) << "failed to finish writing data");
    return false;
  }
  // 编译选项部分,省略
  return true;
}
在编译XML方法中,并没有像前面两个方法那样创建ResourceFile,而是创建了XmlResource,用于保存XML资源的相关信息,其结构包含如下内容:
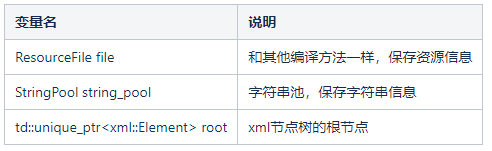
在执行Inflate方法后,XmlResource 中会包含资源信息和XML的dom树信息。InlineXmlFormatParser是用于解析出内联属性aapt:attr。
使用 AAPT 的内嵌资源格式,可以在同一 XML 文件中定义所有多种资源,如果不需要资源复用的话,这种方式更加紧凑。XML 标记告诉 AAPT,该标记的子标记应被视为资源并提取到其自己的资源文件中。属性名称中的值用于指定在父标记内使用内嵌资源的位置。AAPT 会为所有内嵌资源生成资源文件和名称。使用此内嵌格式构建的应用可与所有版本的 Android 兼容。——官方文档
解析后的FlattenXmlToOutStream 中首先会调用SerializeCompiledFileToPb方法,把资源文件的相关信息转化成protobuf格式,然后在调用SerializeXmlToPb把之前解析的Element 节点信息转换成XmlNode(protobuf结构,同样定义在 Resources),然后再把生成XmlNode转换成字符串。最后,再通过上文的AddResFileEntry方法添加到FLAT文件的资源项中。这里可以看出,通过XML生成的FLAT文件文件,存在一个FLAT文件中可包含多个资源项。
static bool FlattenXmlToOutStream(const StringPiece& output_path, const xml::XmlResource& xmlres,
                                  ContainerWriter* container_writer, IDiagnostics* diag) {
  // 序列化CompiledFile部分
  pb::internal::CompiledFile pb_compiled_file;
  SerializeCompiledFileToPb(xmlres.file, &pb_compiled_file);

  // 序列化XmlNode部分
  pb::XmlNode pb_xml_node;
  SerializeXmlToPb(*xmlres.root, &pb_xml_node);

  // 专程string格式的流,这里可以再找源码看看
  std::string serialized_xml = pb_xml_node.SerializeAsString();
  io::StringInputStream serialized_in(serialized_xml);
  // 保存到资源项中
  if (!container_writer->AddResFileEntry(pb_compiled_file, &serialized_in)) {
    diag->Error(DiagMessage(output_path) << "failed to write entry data");
    return false;
  }
  return true;
}
protobuf格式处理的方法(SerializeXmlToPb)在ProtoSerialize.cpp中,其通过遍历和递归的方式实现节点结构的复制,有兴趣的读者的可以查看源码。
CompileTable
CompileTable函数用于处理values下的资源,从上文中可知,values下的资源在编译时会被修改扩展为arsc。最终输出的文件名为*.arsc.flat,效果如下图:
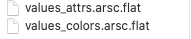
在函数开始,会读取资源文件,完成xml解析并保存为ResourceTable结构,然后在通过SerializeTableToPb将其转换成protobuf格式的pb::ResourceTable,然后调用SerializeWithCachedSizes把protobuf格式的table序列化到输出文件。
static bool CompileTable(IAaptContext* context, const CompileOptions& options,
                         const ResourcePathData& path_data, io::IFile* file, IArchiveWriter* writer,
                         const std::string& output_path) {
  // Filenames starting with "donottranslate" are not localizable
  bool translatable_file = path_data.name.find("donottranslate") != 0;
  ResourceTable table;
  {
    // 读取文件
    auto fin = file->OpenInputStream();
    if (fin->HadError()) {
      context->GetDiagnostics()->Error(DiagMessage(path_data.source)
          << "failed to open file: " << fin->GetError());
      return false;
    }

    // 创建XmlPullParser,设置很多handler,用于xml解析
    xml::XmlPullParser xml_parser(fin.get());

    // 设置解析选项
    ResourceParserOptions parser_options;
    parser_options.error_on_positional_arguments = !options.legacy_mode;
    parser_options.preserve_visibility_of_styleables = options.preserve_visibility_of_styleables;
    parser_options.translatable = translatable_file;
    parser_options.visibility = options.visibility;

    // 创建ResourceParser,并把结果保存到ResourceTable中
    ResourceParser res_parser(context->GetDiagnostics(), &table, path_data.source, path_data.config,
        parser_options);
    // 执行解析
    if (!res_parser.Parse(&xml_parser)) {
      return false;
    }
  }
  // 省略部分校验代码

  // 打开输出文件
  if (!writer->StartEntry(output_path, 0)) {
    context->GetDiagnostics()->Error(DiagMessage(output_path) << "failed to open");
    return false;
  }

  {
    // 和前面一样,创建ContainerWriter 用于写文件
    CopyingOutputStreamAdaptor copying_adaptor(writer);
    ContainerWriter container_writer(©ing_adaptor, 1u);

    pb::ResourceTable pb_table;
    // 把ResourceTable序列化为pb::ResourceTable
    SerializeTableToPb(table, &pb_table, context->GetDiagnostics());
    // 写入数据项pb::ResourceTable
    if (!container_writer.AddResTableEntry(pb_table)) {
      context->GetDiagnostics()->Error(DiagMessage(output_path) << "failed to write");
      return false;
    }
  }

  if (!writer->FinishEntry()) {
    context->GetDiagnostics()->Error(DiagMessage(output_path) << "failed to finish entry");
    return false;
  }
  // ...省略部分代码...
  }

  return true;
}
三、问题和总结
通过上文的学习,我们知道AAPT2是Android资源打包的构建工具,它把资源编译分为编译和链接两个部分。其中,编译是把不同的资源文件,统一编译生成针对 Android 平台进行过优化的二进制格式(flat)。FLAT文件除了包含原始资源文件的内容,还有该资源来源,类型等信息,这样一个文件中包含资源所需的所有信息,于其它依赖接耦。
在本文的开头,我们有如下的问题:
Java文件需要编译才能生.class文件,这个我能明白,但资源文件编译到底是干什么的?为什么要对资源做编译?
那么,本文的答案是:AAPT2的编译时把资源文件编译为FLAT文件,而且从资源项的文件结构可以知道,FLAT文件中部分数据是原始的资源内容,一部分是文件的相关信息。通过编译,生成的中间文件包含的信息比较全面,可用于增量编译。另外,网上的一些资料还表示,二进制的资源体积更小,且加载更快。
AAPT2通过编译,实现把资源文件编译成FLAT文件,接下来则通过链接,来生成R文件和资源表。由于篇幅问题,链接的过程将在下篇文章中分析。
四、参考文档
3.https://booster.johnsonlee.io
作者:vivo互联网前端团队-Shi Xiang