一、MicroService基本描述
微服务(MicroService)架构产生的原因:解决单体应用框架的缺点。
单体应用(Monolith)框架:所有的代码及功能都包含在一个WAR包中的项目组织方式被称为Monolith。
单体应用(Monolith)框架的缺点:
编译难,部署难,测试难;
扩展难;
技术选择难;
微服务的含义:
微服务:对一个大服务的拆分; 每个服务运行在其独立的进程中;服务直接相互交互;独立地部署;各自服务的技术选择很自由。
微服务的优点:
编译容易,部署容易,测试容易;
扩展容易;
技术选择容易;
容错性高;
适用场景:
单体应用架构:中小型项目(功能相对较少) crm 物流 库存管理等
微服务架构:大型项目(功能比较多) 商城 erp等
二、MicroService实现技术-spring提供解决方案(springboot+springcloud)
MicroService只是一种架构思想,提出了微服务的设计原则;
实现:
单个服务:springboot
Spring Boot是一套快速配置脚手架,可以基于Spring Boot快速开发单个微服务;
多个服务(服务治理框架):
由于微服务架构中存在多个微服务,就需要服务治理框架,而springcloud就是是一个基于Spring Boot实现的服务治理工具包:
服务治理框架:
Springcloud:spring家族的(本文所讲);
Dubbo:阿里巴巴开源的,被apache收录进去了.
三:Spring Cloud的架构

五大神兽(核心):
服务发现——Netflix Eureka
客服端负载均衡——Netflix Ribbon/Feign
服务网关——Netflix Zuul
断路器——Netflix Hystrix
分布式配置——Spring Cloud Config
所有组成:19个
Spring Cloud共集成了19个子项目,里面都包含一个或者多个第三方的组件或者框架!
Spring Cloud 工具框架
1、Spring Cloud Config 配置中心,利用git集中管理程序的配置。
2、Spring Cloud Netflix 集成众多Netflix的开源软件
3、Spring Cloud Bus 消息总线,利用分布式消息将服务和服务实例连接在一起,用于在一个集群中传播状态的变化
4、Spring Cloud for Cloud Foundry 利用Pivotal Cloudfoundry集成你的应用程序
5、Spring Cloud Cloud Foundry Service Broker 为建立管理云托管服务的服务代理提供了一个起点。
6、Spring Cloud Cluster 基于Zookeeper, Redis, Hazelcast, Consul实现的领导选举和平民状态模式的抽象和实现。
7、Spring Cloud Consul 基于Hashicorp Consul实现的服务发现和配置管理。
8、Spring Cloud Security 在Zuul代理中为OAuth2 rest客户端和认证头转发提供负载均衡
9、Spring Cloud Sleuth SpringCloud应用的分布式追踪系统,和Zipkin,HTrace,ELK兼容。
10、Spring Cloud Data Flow 一个云本地程序和操作模型,组成数据微服务在一个结构化的平台上。
11、Spring Cloud Stream 基于Redis,Rabbit,Kafka实现的消息微服务,简单声明模型用以在Spring Cloud应用中收发消息。
12、Spring Cloud Stream App Starters 基于Spring Boot为外部系统提供spring的集成
13、Spring Cloud Task 短生命周期的微服务,为SpringBooot应用简单声明添加功能和非功能特性。
14、Spring Cloud Task App Starters
15、Spring Cloud Zookeeper 服务发现和配置管理基于Apache Zookeeper。
16、Spring Cloud for Amazon Web Services 快速和亚马逊网络服务集成。
17、Spring Cloud Connectors 便于PaaS应用在各种平台上连接到后端像数据库和消息经纪服务。
18、Spring Cloud Starters (项目已经终止并且在Angel.SR2后的版本和其他项目合并)
19、Spring Cloud CLI 插件用Groovy快速的创建Spring Cloud组件应用。
当然也在不断增加。。。。
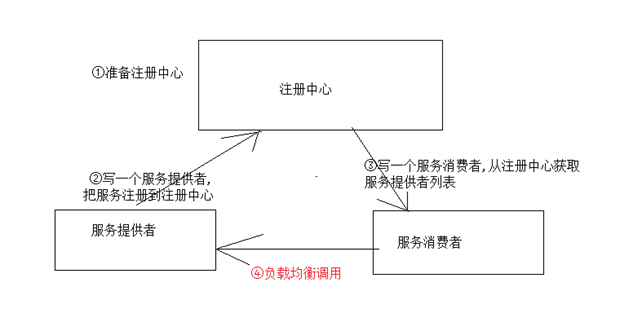
四:Spring cloud入门
4.1 创建一个普通的maven项目并导包
 <properties>
        <project.build.sourceEncoding>UTF-8</project.build.sourceEncoding>
        <project.reporting.outputEncoding>UTF-8</project.reporting.outputEncoding>
        <java.version>1.8</java.version>
        <spring-cloud.version>Finchley.SR1</spring-cloud.version>
        <springboot.version>2.0.5.RELEASE</springboot.version>
    </properties>

    <dependencyManagement>
        <dependencies>
            <dependency>
                <groupId>org.springframework.cloud</groupId>
                <artifactId>spring-cloud-dependencies</artifactId>
                <version>${spring-cloud.version}</version>
                <type>pom</type>
                <scope>import</scope>
            </dependency>
            <dependency>
                <groupId>org.springframework.boot</groupId>
                <artifactId>spring-boot-dependencies</artifactId>
                <version>${springboot.version}</version>
                <type>pom</type>
                <scope>import</scope>
            </dependency>
        </dependencies>
    </dependencyManagement>
4.2 在项目里创建一个项目模块作为注册中心
4.2.1 注册中心模块的pom导包
<dependencies>
        <!--springboot支持-->
        <dependency>
            <groupId>org.springframework.boot</groupId>
            <artifactId>spring-boot-starter-web</artifactId>
        </dependency>
        <dependency>
            <groupId>org.springframework.boot</groupId>
            <artifactId>spring-boot-starter-test</artifactId>
        </dependency>

        <!--Eureka服务端支持-->
        <dependency>
            <groupId>org.springframework.cloud</groupId>
            <artifactId>spring-cloud-starter-netflix-eureka-server</artifactId>
        </dependency>

    </dependencies>
4.2.2 注册中心模块的配置文件配置(application.yml)
在注册中心模块的resources目录下创建配置文件,里面的端口号随便写,但不能是已经存在的。
注意:yml文件的层级结构必须严格遵守。
server:
  port: 4001
eureka:
  instance:
    hostname: localhost
  client:
    registerWithEureka: false #是否要注册到eureka
    fetchRegistry: false #表示是否从Eureka Server获取注册信息
    serviceUrl:
      defaultZone: http://${eureka.instance.hostname}:${server.port}/eureka/ #单机配置
4.2.3 注册中心模块的启动类
以java目录下的至少一级目录作为根目录,在这个根目录里创建启动类
注意:不能直接以java目录作为根目录
@SpringBootApplication
@EnableEurekaServer//标识是eureka服务端
public class EnrekaServerApplication_4001 {
    public static void main(String[] args) {
        SpringApplication.run(EnrekaServerApplication_4001.class);
    }
}
4.2.4 测试
启动启动类,然后在浏览器访问localhost:4001
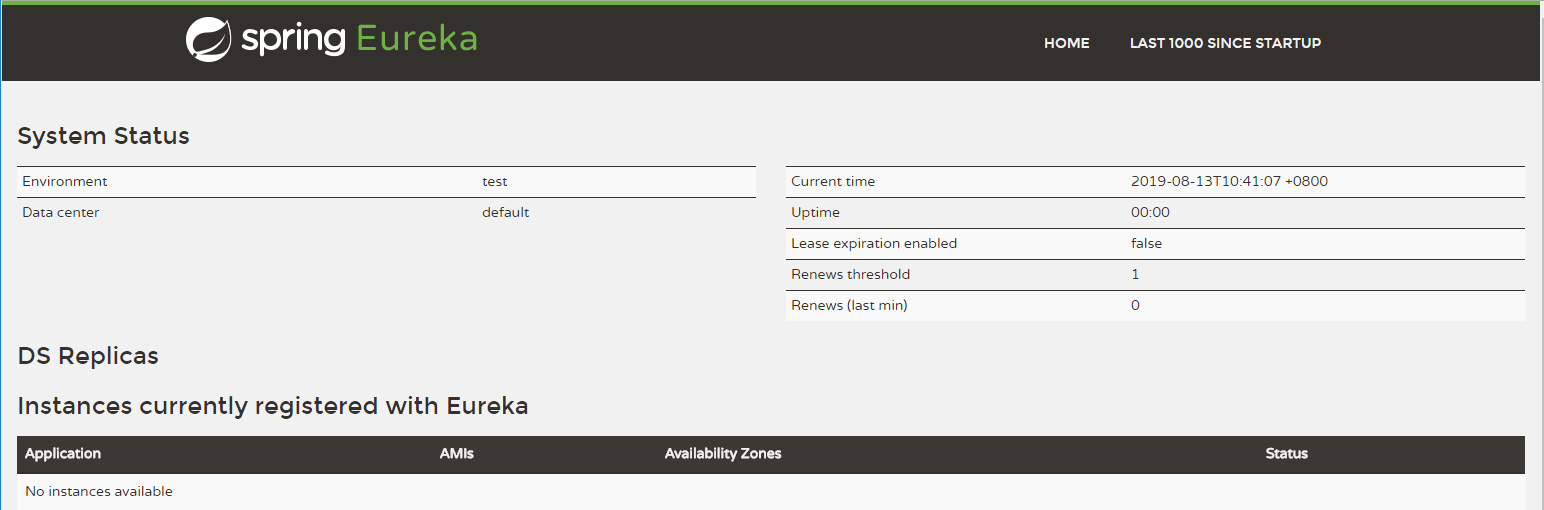
注意:可能会出现自我保护引发的错误,但不影响使用,不用管。

4.3 在主项目里创建一个项目模块作为公共模块
因为提供者和消费者都需要一个domain类,因此创建一个公共模块存放domain类
public class User {
    private Long id;
    private String name;

    public User(Long id, String name) {
        this.id = id;
        this.name = name;
    }

    public User() {
    }

    public Long getId() {
        return id;
    }

    public void setId(Long id) {
        this.id = id;
    }

    public String getName() {
        return name;
    }

    public void setName(String name) {
        this.name = name;
    }
}
4.4 在主项目里创建一个项目模块作为服务提供者
4.4.1 服务提供者模块的pom导包
 <dependencies>
        <!--公共代码依赖-->
        <dependency>
            <groupId>cn.wang</groupId>
            <artifactId>User_interface</artifactId>
            <version>1.0-SNAPSHOT</version>
        </dependency>

        <!--springboot支持-->
        <dependency>
            <groupId>org.springframework.boot</groupId>
            <artifactId>spring-boot-starter-web</artifactId>
        </dependency>
        <dependency>
            <groupId>org.springframework.boot</groupId>
            <artifactId>spring-boot-starter-test</artifactId>
        </dependency>

        <!--eureka客户端支持 :注意:这里导入的客户端,是相对于eureka的注册中心说的,我们是把服务注册到注册中心,注册中心是服务端,我们的服务是客户端-->
        <dependency>
            <groupId>org.springframework.cloud</groupId>
            <artifactId>spring-cloud-starter-netflix-eureka-client</artifactId>
        </dependency>
    </dependencies>
4.4.2 服务提供者模块的application.yml配置文件(注意事项同上)
server:
  port: 5001
spring:
  application:
    name: USER-PROVIDER #不要使用下划线
eureka:
  client:
    serviceUrl:
     defaultZone: http://localhost:4001/eureka/ #告诉服务提供者要把服务注册到哪儿,注册中心的地址
4.4.3 服务提供者模块的启动类(注意事项同上)
@SpringBootApplication
@EnableEurekaClient//表示是eureka的客户端
public class UserProviderApplication_5001 {
    public static void main(String[] args) {
        SpringApplication.run(UserProviderApplication_5001.class);
    }
}
4.4.4 服务提供者模块的controller
@RestController
@RequestMapping("/user")
public class UserController {
    @RequestMapping("/hh/{id}")
    public User getUser(@PathVariable("id")Long id){
        return new User(id,"我是服务者");
    }

}
4.5 在主项目里创建一个项目模块作为服务消费者
4.4.1 服务消费者模块的pom导包
<dependencies>
    <!--公共代码依赖-->
    <dependency>
        <groupId>cn.wang</groupId>
        <artifactId>User_interface</artifactId>
        <version>1.0-SNAPSHOT</version>
    </dependency>

    <!--springboot支持-->
    <dependency>
        <groupId>org.springframework.boot</groupId>
        <artifactId>spring-boot-starter-web</artifactId>
    </dependency>
    <dependency>
        <groupId>org.springframework.boot</groupId>
        <artifactId>spring-boot-starter-test</artifactId>
    </dependency>

</dependencies>
4.4.2 服务消费者模块的配置文件(注意事项同上)
server:
  port: 6001
spring:
  application:
    name: USER-CONSUMER
4.4.3 服务消费者模块的启动类(注意事项同上)
@SpringBootApplication
public class UserConsumerAppliction_6001 {
    public static void main(String[] args) {
        SpringApplication.run(UserConsumerAppliction_6001.class);
    }
}
4.4.4 服务消费者模块的config
作用:把RestTemplate弄成一个bean,方便controller注入RestTemplate对象。
//目的是把RestTemplate实例交给spring管理,就可以直接使用的时候依赖注入就ok了,不再去new对象
@Configuration
public class CfgBean {
    @Bean
    public RestTemplate getRestTemplate(){
        return new RestTemplate();
    }
}
4.4.5 服务消费者模块的controller
//和注册中心没有关系只是普通远程调用而已
@RestController
@RequestMapping("/consumer")
public class UserController {
    public static final String URL_PREFLX="http://localhost:5001";

    @Autowired
    private RestTemplate restTemplate;

    @RequestMapping("/user/{id}")
    public User getUser(@PathVariable("id")Long id){
        //调用远程服务http请求
        String url=URL_PREFLX+"/user/hh/"+id;
        return restTemplate.getForObject(url,User.class );
    }
}
测试:通过启动类启动注册中心、服务提供者、服务消费者。
注册中心测试:localhost:4001
服务提供者测试:localhost:5001/user/hh/id
服务消费者测试:localhost:6001/consumer/user/id