https://github.com/lucasb-eyer/pydensecrf/blob/master/examples/inference.py
1.运行
先运行看看实现的结果:
(deeplearning) userdeMBP:examples user$ python inference.py im1.png anno1.png out1.png
Found a full-black pixel in annotation image, assuming it means 'unknown' label, and will thus not be present in the output!
If 0 is an actual label for you, consider writing your own code, or simply giving your labels only non-zero values.
2  labels  plus "unknown" 0:  {0, 1, 2}
Using generic 2D functions
KL-divergence at 0: -543957.3854815669
KL-divergence at 1: -890605.7866870646
KL-divergence at 2: -919933.3682610085
KL-divergence at 3: -921683.1852052805
KL-divergence at 4: -922674.4361045817
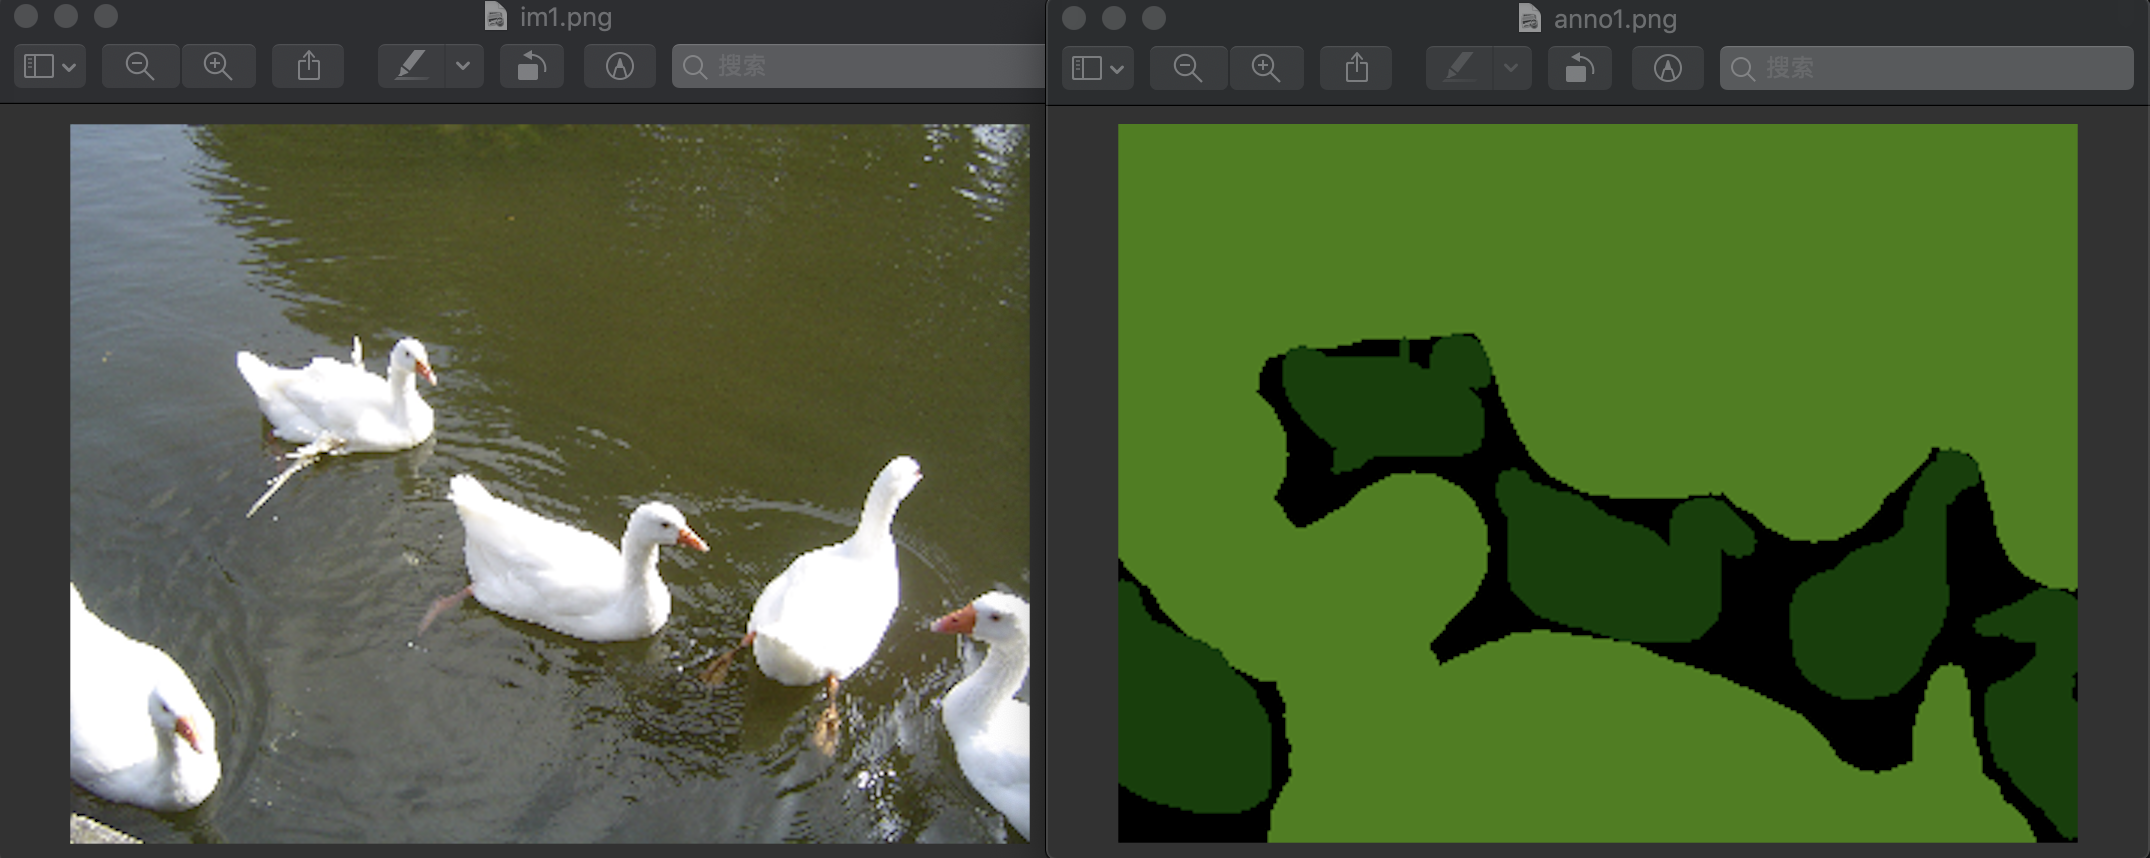
im1.png和anno1.png是输入图片,out1.png为进行crf处理后的输出图片
im1.png和anno1.png为:
得到的输出结果是:
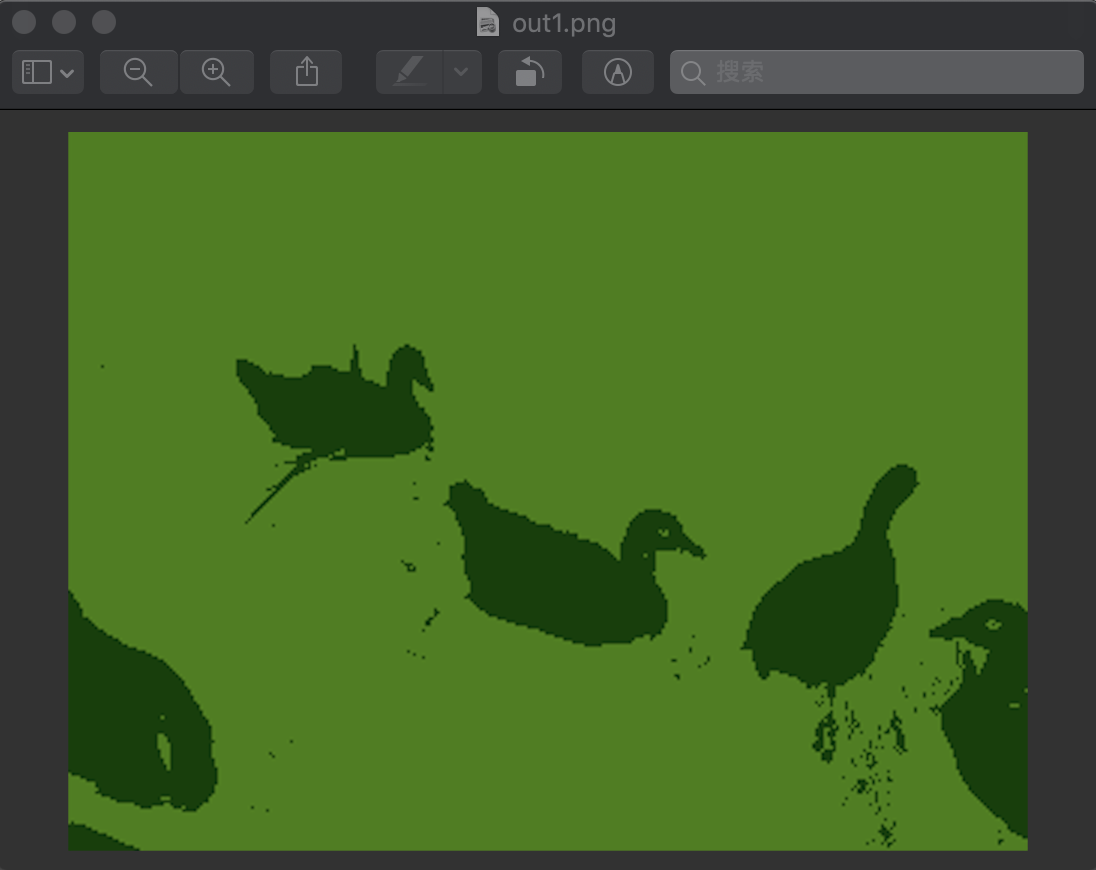
可见效果变得很好
2.代码分析
"""
Adapted from the inference.py to demonstate the usage of the util functions.
"""

import sys
import numpy as np
import pydensecrf.densecrf as dcrf

# Get im{read,write} from somewhere.
try:
    from cv2 import imread, imwrite
except ImportError:
    # Note that, sadly, skimage unconditionally import scipy and matplotlib,
    # so you'll need them if you don't have OpenCV. But you probably have them.
    from skimage.io import imread, imsave
    imwrite = imsave
    # TODO: Use scipy instead.

from pydensecrf.utils import unary_from_labels, create_pairwise_bilateral, create_pairwise_gaussian

if len(sys.argv) != 4:
    print("Usage: python {} IMAGE ANNO OUTPUT".format(sys.argv[0]))
    print("")
    print("IMAGE and ANNO are inputs and OUTPUT is where the result should be written.")
    print("If there's at least one single full-black pixel in ANNO, black is assumed to mean unknown.")
    sys.exit(1)

fn_im = sys.argv[1]#输入的图片
print(fn_im)
fn_anno = sys.argv[2]#输入的图片fn_im经过训练后的网络进行预测得到的结果
print(fn_anno)
fn_output = sys.argv[3]#指定进行crf处理后的结果输出
print(fn_output)

##############################################################
### Read images and annotation读取输入的两个图片fn_im和fn_anno###
##############################################################
img = imread(fn_im)

# Convert the annotation's RGB color to a single 32-bit integer color 0xBBGGRR
#将fn_anno的三个uint8表示的RGB像素值放到一个uint32像素值中表示
#[0,7]位为R层的值,[8,15]为G层的值,[16,23]为B层的值
anno_rgb = imread(fn_anno).astype(np.uint32)#shape为(240, 320, 3)
anno_lbl = anno_rgb[:,:,0] + (anno_rgb[:,:,1] << 8) + (anno_rgb[:,:,2] << 16)#shape变为了(240, 320)

# Convert the 32bit integer color to 1, 2, ... labels.
# Note that all-black, i.e. the value 0 for background will stay 0.
# np.unique该函数是去除数组中的重复数字,并进行排序之后输出
# 这就得到了整张图中有的像素值序列
# #colors返回为[0,16384,4227072],说明图片fn_anno只有这三种像素值
# labels的shape为(76800,),其为anno_lbl中所有的像素值标上了对应的label
# 在这里color=0时,对应的label为0;color=16384时,对应的label为1;color=4227072时,对应的label为2
# 黑色的像素值为0
colors, labels = np.unique(anno_lbl, return_inverse=True)

# But remove the all-0 black, that won't exist in the MAP!
# 移除像素值为0,即黑色的值
HAS_UNK = 0 in colors#若0存在于colors中,则HAS_UNK为True
#在annotation图像中的黑色像素,即color=0的像素,被假设为label='unknown',不会在output中输出
#如果0是一个对你来说有意义的label,那么更改你的代码,或者尽量让你的label为非0的数值
if HAS_UNK:
    print("Found a full-black pixel in annotation image, assuming it means 'unknown' label, and will thus not be present in the output!")
    print("If 0 is an actual label for you, consider writing your own code, or simply giving your labels only non-zero values.")
    colors = colors[1:]#然后将color=0从数组中移除
#else:
#    print("No single full-black pixel found in annotation image. Assuming there's no 'unknown' label!")

# And create a mapping back from the labels to 32bit integer colors.
# np.empty()返回一个随机元素的矩阵,值类型为uint8,大小按照参数定义,这里
colorize = np.empty((len(colors), 3), np.uint8)#colorize.shape为(2,3)
#下面将之前合并成0xBBGGRR格式的像素值又分成三层,得到各层像素值的值
colorize[:,0] = (colors & 0x0000FF)#得到R层的值,为[0,0], dtype=uint8
colorize[:,1] = (colors & 0x00FF00) >> 8#得到G层的值,为[ 64, 128], dtype=uint8
colorize[:,2] = (colors & 0xFF0000) >> 16#得到B层的值,[ 0, 64]

# Compute the number of classes in the label image.
# We subtract one because the number shouldn't include the value 0 which stands
# for "unknown" or "unsure".
# set(labels.flat)返回{0, 1, 2}
# flat将数组变为一个迭代器,可以用for访问数组每一个元素,可以使用索引labels.flat[0]来访问第一个元素
# set(迭代对象) 函数创建一个无序不重复元素集,可进行关系测试,删除重复数据
n_labels = len(set(labels.flat)) - int(HAS_UNK) #返回2,得到除去了label=0后还有两个label
print(n_labels, " labels", (" plus "unknown" 0: " if HAS_UNK else ""), set(labels.flat))

###########################
### Setup the CRF model ###
###########################
#上面处理完图片fn_anno,得到labels和colors
#接下来就是设置CRF模型了

use_2d = False #是否使用二维指定函数DenseCRF2D,这里设置为False,则说明使用的是一般函数DenseCRF
# use_2d = True
if use_2d:
    print("Using 2D specialized functions")

    # Example using the DenseCRF2D code
    d = dcrf.DenseCRF2D(img.shape[1], img.shape[0], n_labels)

    # get unary potentials (neg log probability)
    U = unary_from_labels(labels, n_labels, gt_prob=0.7, zero_unsure=HAS_UNK)
    d.setUnaryEnergy(U)

    # This adds the color-independent term, features are the locations only.
    # 创建颜色无关特征,这里只有位置特征,并添加到CRF中
    d.addPairwiseGaussian(sxy=(3, 3), compat=3, kernel=dcrf.DIAG_KERNEL,
                          normalization=dcrf.NORMALIZE_SYMMETRIC)

    # This adds the color-dependent term, i.e. features are (x,y,r,g,b).
    # 根据原始图像img创建颜色相关特征和位置相关并添加到CRF中,特征为(x,y,r,g,b)
    d.addPairwiseBilateral(sxy=(80, 80), srgb=(13, 13, 13), rgbim=img,
                           compat=10,
                           kernel=dcrf.DIAG_KERNEL,
                           normalization=dcrf.NORMALIZE_SYMMETRIC)
else:
    print("Using generic 2D functions")

    # Example using the DenseCRF class and the util functions
    # 使用DenseCRF类和util函数
    # n_labels为2,从上面对fn_anno的分析可知有两个label
    d = dcrf.DenseCRF(img.shape[1] * img.shape[0], n_labels)

    # get unary potentials (neg log probability)
    # 得到一元势(即去负对数),labels为对所有像素值标注label后的数组,label类型n_labels=2,
    U = unary_from_labels(labels, n_labels, gt_prob=0.7, zero_unsure=HAS_UNK) #U.shape为(2, 76800),即(n_labels,len(labels))
    d.setUnaryEnergy(U) #将一元势添加到CRF中

    # This creates the color-independent features and then add them to the CRF
    # 创建颜色无关特征,这里只有位置特征,并添加到CRF中
    feats = create_pairwise_gaussian(sdims=(3, 3), shape=img.shape[:2]) #shape为(240, 320)
    d.addPairwiseEnergy(feats, compat=3,
                        kernel=dcrf.DIAG_KERNEL,
                        normalization=dcrf.NORMALIZE_SYMMETRIC)

    # This creates the color-dependent features and then add them to the CRF
    # 根据原始图像img创建颜色相关和位置相关特征并添加到CRF中,特征为(x,y,r,g,b)
    feats = create_pairwise_bilateral(sdims=(80, 80), schan=(13, 13, 13),
                                      img=img, chdim=2)
    d.addPairwiseEnergy(feats, compat=10,
                        kernel=dcrf.DIAG_KERNEL,
                        normalization=dcrf.NORMALIZE_SYMMETRIC)


####################################
### Do inference and compute MAP ###
####################################
#上面就将相应的CRF构建好了
#然后要做的就是对img根据fn_anno得到的label和colors结果进行CRF推理
#然后得到输出值fn_output了

# Run five inference steps.迭代5次
Q = d.inference(5)

# Find out the most probable class for each pixel.
# 找出每个像素最可能的类
# np.argmax取出Q元素中最大的值对应的索引,axis=0按列查找
MAP = np.argmax(Q, axis=0)
# MAP,MAP.shape返回
# (array([1, 1, 1, ..., 1, 1, 1]), (76800,))

# 将MAP(标签)转换回相应的颜色并保存图像。
#注意,这里不再有“unknown”标签,不管我们一开始拥有什么。
#colorize返回两个label的color[16384,4227072]对应的RGB的值
#16384对应[  0,  64,   0],4227072对应[  0, 128,  64]
#array([[  0,  64,   0],
#       [  0, 128,  64]], dtype=uint8)
#MAP中1值对应的是4227072即[  0, 128,  64]
MAP = colorize[MAP,:] #MAP.shape为(76800, 3),这就是最后的结果

#将MAP转成img相同的大小,就能够得到最后的结果了
imwrite(fn_output, MAP.reshape(img.shape))

# Just randomly manually run inference iterations
# 这里是手动实现迭代推理
Q, tmp1, tmp2 = d.startInference()
for i in range(5):
    print("KL-divergence at {}: {}".format(i, d.klDivergence(Q)))
    d.stepInference(Q, tmp1, tmp2)