基础入门:
1.就一个字:快;多线程并发执行
2.底层基于python
3.丰富的api
4.运行模式:本地运行;master/minion;salt SSH
5.三大功能:远程执行;配置管理;云管理
6.支持的操作系统比较丰富
安装配置:
- 前提准备
必须先关闭所有机器的iptables和selinux
所有的客户端要加入hosts文件,保证互相用ping hostname能ping通
本次的实验架构如下:
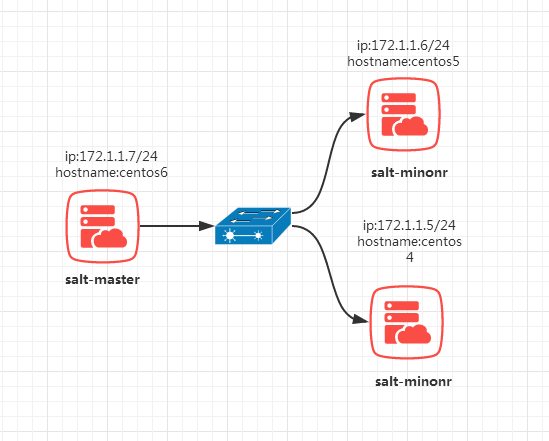
所有机器的hosts文件如下追加:
[root@centos5 ~]# cat /etc/hosts- 172.1.1.5 centos4
172.1.1.6 centos5172.1.1.7 centos6
- 软件安装:centos 64位安装源
rpm -Uvh http://mirrors.yun-idc.com/epel/6/x86_64/epel-release-6-8.noarch.rpmmaster端:yum install salt-master -yminion端:yum install salt-minion -y
加入开机启动:
chkconfig salt-master on #服务端开机自启动chkconfig salt-minion on #客户端开机自启动
- 服务端启动:
/etc/init.d/salt-master start
- 客户端启动:
修改客户端配置文件:
[root@centos6 ~]# vim /etc/salt/minionmaster: 172.1.1.7[root@centos6 ~]# /etc/init.d/salt-minion start #启动服务
开始使用- 首先需要认证:
- minion端的证书文件位置
[root@centos5 ~]# cd /etc/salt/pki/minion/[root@centos5 minion]# lsminion.pem minion.pub
- master端的证书文件位置
[root@centos6 ~]# cd /etc/salt/pki/master/[root@centos6 master]# lsmaster.pem minions minions_denied minions_rejectedmaster.pub minions_autosign minions_pre[root@centos6 master]# tree ././├── master.pem├── master.pub├── minions├── minions_autosign├── minions_denied├── minions_pre│ └── centos6└── minions_rejected
- 查看未认证的主机并实现对minion的增删改查:
- 这是在master端的操作:
- 查操作
[root@centos6 master]# salt-key Accepted Keys: #通过接受的主机列表Denied Keys: #黑名单Unaccepted Keys: #待接收的主机列表centos4centos5centos6Rejected Keys: #拒绝接入的名单
- 具体操作
新增操作之后会将master的公钥放到minion的/etc/salt/pki/minion/ 下salt-key -L #列出
salt-key -A #添加全部未认证的keyssalt-key -a centos* #单个添加(或者通配符)salt-key -D #删除所有salt-key -d centos* #单个删除或者统配
- 远程执行:(在master端)
- 第一个测试指令:用于查看minion的存活状态(需要先salt-key -A) salt '*' test.ping
[root@centos6 master]# salt '*' test.ping #测试指令centos5: Truecentos4: Truecentos6: Minion did not return. [Not connected] #未连接状态
- 远程执行模块salt '*' cmd.run ‘cmd’
[root@centos6 master]# salt '*' cmd.run 'uptime'centos5: 22:42:29 up 20 min, 1 user, load average: 0.00, 0.00, 0.00centos4: 22:40:34 up 20 min, 1 user, load average: 0.12, 0.05, 0.08
- 配置管理
vim /etc/salt/master #打开下面的注释file_roots: base: - /srv/salt
[root@centos6 srv]# mkdir /srv/salt      #配置文件目录的创建[root@centos6 srv]# /etc/init.d/salt-master restart          #重启服务
Stopping salt-master daemon:                               [  OK  ]
Starting salt-master daemon:                               [  OK  ]
- 开始写一个配置吧:先去安装一个apache,并让服务启动
[root@centos6 salt]# cd /srv/salt/[root@centos6 salt]# vim apache.sls (严格控制空格,不要用tab键)- apache-install:
pkg.installed:
- names:
- httpd
- httpd-devel
apache-service:
service.running:
- name: httpd
- enable: True
- reload: True
- [root@centos6 salt]# salt '*' state.sls apache #执行命令
- ‘’返回结果‘’
- centos5:
----------
ID: apache-install
Function: pkg.installed
Name: httpd
Result: True
Comment: Package httpd is already installed.
Started: 23:04:40.668754
Duration: 810.705 ms
Changes:
----------
ID: apache-install
Function: pkg.installed
Name: httpd-devel
Result: True
Comment: Package httpd-devel is already installed.
Started: 23:04:41.479650
Duration: 0.509 ms
Changes:
----------
ID: apache-service
Function: service.running
Name: httpd
Result: True
Comment: Service httpd has been enabled, and is running
Started: 23:04:41.480874
Duration: 507.976 ms
Changes:
----------
httpd:
True
Summary
------------
Succeeded: 3 (changed=1)
Failed: 0
------------
Total states run: 3
centos4:
----------
ID: apache-install
Function: pkg.installed
Name: httpd
Result: True
Comment: Package httpd is already installed.
Started: 23:02:47.847090
Duration: 1554.792 ms
Changes:
----------
ID: apache-install
Function: pkg.installed
Name: httpd-devel
Result: True
Comment: Package httpd-devel is already installed.
Started: 23:02:49.402300
Duration: 0.817 ms
Changes:
----------
ID: apache-service
Function: service.running
Name: httpd
Result: True
Comment: Service httpd has been enabled, and is running
Started: 23:02:49.403861
Duration: 381.817 ms
Changes:
----------
httpd:
True
Summary
------------
Succeeded: 3 (changed=1)
Failed: 0
------------
Total states run: 3
- 牛逼的入口文件:top文件
[root@centos6 salt]# vim top.slsbase:
'centos*':
- apache
- [root@centos6 salt]# salt '*' state.highstate #执行入口文件
- 首先需要认证:
- minion端的证书文件位置
[root@centos5 ~]# cd /etc/salt/pki/minion/[root@centos5 minion]# lsminion.pem minion.pub
- master端的证书文件位置
[root@centos6 ~]# cd /etc/salt/pki/master/[root@centos6 master]# lsmaster.pem minions minions_denied minions_rejectedmaster.pub minions_autosign minions_pre[root@centos6 master]# tree ././├── master.pem├── master.pub├── minions├── minions_autosign├── minions_denied├── minions_pre│ └── centos6└── minions_rejected
- 查看未认证的主机并实现对minion的增删改查:
- 这是在master端的操作:
- 查操作
[root@centos6 master]# salt-keyAccepted Keys: #通过接受的主机列表Denied Keys: #黑名单Unaccepted Keys: #待接收的主机列表centos4centos5centos6Rejected Keys: #拒绝接入的名单
- 具体操作
新增操作之后会将master的公钥放到minion的/etc/salt/pki/minion/ 下
salt-key -L #列出salt-key -A #添加全部未认证的keyssalt-key -a centos* #单个添加(或者通配符)salt-key -D #删除所有salt-key -d centos* #单个删除或者统配
- 远程执行:(在master端)
- 第一个测试指令:用于查看minion的存活状态(需要先salt-key -A) salt '*' test.ping
[root@centos6 master]# salt '*' test.ping #测试指令centos5:Truecentos4:Truecentos6:Minion did not return. [Not connected] #未连接状态
- 远程执行模块salt '*' cmd.run ‘cmd’
[root@centos6 master]# salt '*' cmd.run 'uptime'centos5:22:42:29 up 20 min, 1 user, load average: 0.00, 0.00, 0.00centos4:22:40:34 up 20 min, 1 user, load average: 0.12, 0.05, 0.08
- 配置管理
vim /etc/salt/master #打开下面的注释file_roots:base:- /srv/salt
[root@centos6 srv]# mkdir /srv/salt #配置文件目录的创建[root@centos6 srv]# /etc/init.d/salt-master restart #重启服务 Stopping salt-master daemon: [ OK ] Starting salt-master daemon: [ OK ]
- 开始写一个配置吧:先去安装一个apache,并让服务启动
[root@centos6 salt]# cd /srv/salt/[root@centos6 salt]# vim apache.sls (严格控制空格,不要用tab键)- apache-install: pkg.installed: - names: - httpd - httpd-devel apache-service: service.running: - name: httpd - enable: True - reload: True
- [root@centos6 salt]# salt '*' state.sls apache #执行命令
- ‘’返回结果‘’
- centos5: ---------- ID: apache-install Function: pkg.installed Name: httpd Result: True Comment: Package httpd is already installed. Started: 23:04:40.668754 Duration: 810.705 ms Changes: ---------- ID: apache-install Function: pkg.installed Name: httpd-devel Result: True Comment: Package httpd-devel is already installed. Started: 23:04:41.479650 Duration: 0.509 ms Changes: ---------- ID: apache-service Function: service.running Name: httpd Result: True Comment: Service httpd has been enabled, and is running Started: 23:04:41.480874 Duration: 507.976 ms Changes: ---------- httpd: True Summary ------------ Succeeded: 3 (changed=1) Failed: 0 ------------ Total states run: 3 centos4: ---------- ID: apache-install Function: pkg.installed Name: httpd Result: True Comment: Package httpd is already installed. Started: 23:02:47.847090 Duration: 1554.792 ms Changes: ---------- ID: apache-install Function: pkg.installed Name: httpd-devel Result: True Comment: Package httpd-devel is already installed. Started: 23:02:49.402300 Duration: 0.817 ms Changes: ---------- ID: apache-service Function: service.running Name: httpd Result: True Comment: Service httpd has been enabled, and is running Started: 23:02:49.403861 Duration: 381.817 ms Changes: ---------- httpd: True Summary ------------ Succeeded: 3 (changed=1) Failed: 0 ------------ Total states run: 3
- 牛逼的入口文件:top文件
[root@centos6 salt]# vim top.slsbase: 'centos*': - apache- [root@centos6 salt]# salt '*' state.highstate #执行入口文件