Spring的jdbcTemplate操作
1、Spring框架一站式框架
(1)针对javaee三层,每一层都有解决技术
(2)到dao 层,使用 jdbcTemplate
2、Spring对不同的持久化都进行了封装
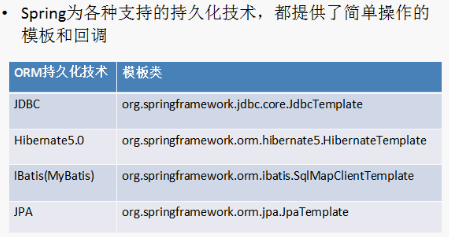
(1)jdbcTemplate 对 jdbc 进行封装
3、jdbcTemplate 使用和 dbutils 使用很相似,都是对数据库进行 crud 操作
4、使用jdbcTemplate 实现增删改查操作
增加:
1、导入 jdbcTemplate 相关jar 包

一定要导入相关数据库驱动的 jar 包
2、创建对象,设置数据库信息
3、创建jdbcTemplate 对象,设置数据源
4、调用 jdbcTemplate 对象里面的方法实现操作
//1、增加操作
    @Test
    public void add(){
        //创建对象,设置数据库信息
        DriverManagerDataSource dataSource=new DriverManagerDataSource();
        dataSource.setDriverClassName("com.mysql.jdbc.Driver");
        dataSource.setUrl("jdbc:mysql://localhost:3306/url_data");
        dataSource.setUsername("root");
        dataSource.setPassword("123");
        //创建jdbcTemplate 对象,设置数据源
        JdbcTemplate jdbcTemplate=new JdbcTemplate(dataSource);
        //调用 jdbcTemplate 对象里面的方法实现操作
        //c创建sql语句
        String sql="insert into user values(?,?)";
        int row=jdbcTemplate.update(sql, "zhansan","man");
        System.out.println("JdbcTemplateDemo1.add()"+row);
    }
修改:
    // 2、修改操作
    @Test
    public void update() {
        // 创建对象,设置数据库信息
        DriverManagerDataSource dataSource = new DriverManagerDataSource();
        dataSource.setDriverClassName("com.mysql.jdbc.Driver");
        dataSource.setUrl("jdbc:mysql://localhost:3306/url_data");
        dataSource.setUsername("root");
        dataSource.setPassword("123");
        // 创建jdbcTemplate 对象,设置数据源
        JdbcTemplate jdbcTemplate = new JdbcTemplate(dataSource);
        // 调用 jdbcTemplate 对象里面的方法实现操作
        // c创建sql语句
        String sql = "update user set sex=? where name=?";
        int row = jdbcTemplate.update(sql, "woman","zhangsan");
        System.out.println("JdbcTemplateDemo1.add()=" + row);
    }
删除:
    // 3、删除操作
    @Test
    public void delete() {
        DriverManagerDataSource dataSource = new DriverManagerDataSource();
        dataSource.setDriverClassName("com.mysql.jdbc.Driver");
        dataSource.setUrl("jdbc:mysql://localhost:3306/url_data");
        dataSource.setUsername("root");
        dataSource.setPassword("123");
        // 创建jdbcTemplate 对象,设置数据源
        JdbcTemplate jdbcTemplate = new JdbcTemplate(dataSource);
        // 调用 jdbcTemplate 对象里面的方法实现操作
        // c创建sql语句
        String sql = "delete from user where name=?";
        int row = jdbcTemplate.update(sql, "zhangsan");
        System.out.println("JdbcTemplateDemo1.add()=" + row);
    }
查看:
jdbcutil  用于 jdbcTemplate 的区别
    /*
     * (1)jdbcutils
     *  QueryRunner  runner = new QueryRunner(datasource);
     *
     *  返回对象
     *  runner.query(sql, new BeanHandler<User>(User.class));
     *
     *  返回list
     *  runner.query(sql, new BeanListHandler<User>(User.class));
     *
     * (2)jdbcTemplate实现查询,有接口RowMapper
     * jdbcTemplate针对这个接口没有实现具体的类,得到不同类型的数据需要自己心境数据的封装
     */
(1)查询返回某一个值
public void count() {
        DriverManagerDataSource dataSource = new DriverManagerDataSource();
        dataSource.setDriverClassName("com.mysql.jdbc.Driver");
        dataSource.setUrl("jdbc:mysql://localhost:3306/url_data");
        dataSource.setUsername("root");
        dataSource.setPassword("123");
        // 创建jdbcTemplate 对象,设置数据源
        JdbcTemplate jdbcTemplate = new JdbcTemplate(dataSource);
        String sql="select count(*) from user";
        //第一个参数是sql 语句
        //迭戈参数 返回类型的class
        int count=jdbcTemplate.queryForObject(sql, Integer.class);
        System.out.println(count);
    }
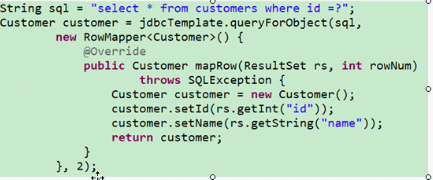
(2)查询返回某一个对象
原始方式:
//原始方式
public void testJdbc() throws SQLException {
        Connection conn=null;
        PreparedStatement pstmt=null;
        ResultSet rs=null;
        //加载驱动
        try {
            Class.forName("com.mysql.jdbc.Driver");
            //创建连接
            conn=(Connection) DriverManager.getConnection("jdbc:mysql://localhost/url_data", "root", "123");
            String sql="select * from user where username=?";
            //预编译
            pstmt=(PreparedStatement) conn.prepareStatement(sql);
            pstmt.setString(1, "lisi");
            rs=pstmt.executeQuery();
            //遍历结果集
            while(rs.next()){
                //得到返回的结果值
                String name=rs.getString("username");
                String sex=rs.getString("sex");
                User user=new User();
                user.setUsername(name);
                user.setSex(sex);
                System.out.println(user);
            }
        } catch (ClassNotFoundException e) {
            e.printStackTrace();
        } catch (SQLException e) {
            e.printStackTrace();
        }finally{
                rs.close();
                pstmt.close();
                conn.close();
        }
    }
jdbc 方式:
    @Test
    public void FindObject() {
        DriverManagerDataSource dataSource = new DriverManagerDataSource();
        dataSource.setDriverClassName("com.mysql.jdbc.Driver");
        dataSource.setUrl("jdbc:mysql://localhost:3306/url_data");
        dataSource.setUsername("root");
        dataSource.setPassword("123");
        // 创建jdbcTemplate 对象,设置数据源
        JdbcTemplate jdbcTemplate = new JdbcTemplate(dataSource);
        String sql="select * from user where name=?";
        //调用jdbcTemplate
        //第一个参数:sql语句
        //第二个人参数:类似于 dbutils 中的接口RowMapper,需要自己写实现类,实现具体方法,实现数据封装
        //第三个参数: 可变参数(sql中传的值)
        User user = jdbcTemplate.queryForObject(sql, new MyRowMapper(),"lisi");
        System.out.println(user.getName());
    }
写一个非public class
class MyRowMapper implements RowMapper<User>{

    //num:行号
    public User mapRow(ResultSet rs, int index) throws SQLException {
        //1、从结果集里面把数据得到
        String name=rs.getString("name");
        String sex=rs.getString("sex");
        //2、把没我们得到的数据封装到对象里面
        User user=new User();
        user.setName(name);
        user.setSex(sex);
        return user;
    }

}
匿名内部类
(3)查询返回 list 集合
    public void FindList(){
        DriverManagerDataSource dataSource = new DriverManagerDataSource();
        dataSource.setDriverClassName("com.mysql.jdbc.Driver");
        dataSource.setUrl("jdbc:mysql://localhost:3306/url_data");
        dataSource.setUsername("root");
        dataSource.setPassword("123");
        // 创建jdbcTemplate 对象,设置数据源
        JdbcTemplate jdbcTemplate = new JdbcTemplate(dataSource);
        String sql="select * from user";
        //调用jdbcTemplate
        //第一个参数:sql 语句
        //第二个参数RowMapper 接口
        //第三个参数:可变参数,可以省略
        List<User> list=jdbcTemplate.query(sql, new MyRowMapperList());
        for(int i=0;i<list.size();i++){
            System.out.println(list.get(i));
        }
    }
实现RowMapper类
class MyRowMapperList implements RowMapper<User>{

    //index:行号
    public User mapRow(ResultSet rs, int index) throws SQLException {
        //1、从结果集里面把数据得到
        String name=rs.getString("name");
        String sex=rs.getString("sex");
        //2、把没我们得到的数据封装到对象里面
        User user=new User();
        user.setName(name);
        user.setSex(sex);
        return user;
    }
5、Spring 配置 c3p0 连接池 和dao 使用jdbcTemplate
(1)Spring 配置 c3p0 连接池
- 导入 jar 包

原始的 c3p0 写法
        ComboPooledDataSource datasource=new ComboPooledDataSource();
        datasource.setDriverClass("com.mysql.jdbc.Driver");
        datasource.setJdbcUrl("jdbc:mysql://localhost:3306/url_data");
        datasource.setUser("root");
        datasource.setPassword("123");
在xml中配置 c3p0
		<!-- 配置  c3p0 -->
		<bean id="dataSource" class="com.mchange.v2.c3p0.ComboPooledDataSource">
			<!-- 注入属性值 -->
			<property name="driverClass" value="com.mysql.jdbc.Driver"></property>
			<property name="jdbcUrl" value="jdbc:mysql://localhost:3306/url_data"></property>
			<property name="user" value="root"></property>
			<property name="password" value="123"></property>
		</bean>
(2)dao 使用jdbcTemplate
1、创建 service 和 dao 对象,配置 service 和 dao 对象
2、创建 JdbcTemplate 对象,把 模板对象注入到 dao 里面
3、在 jdbcTemplate 对象里面注入 dataSource 对象
Service类
package cn.itcast.c3p0;

public class UserService {

    private UserDao userDao;

    public void setUserDao(UserDao userDao) {
        this.userDao = userDao;
    }

    public void add(){
        System.out.println("service add.....");
        userDao.add();
    }
}
dao类
package cn.itcast.c3p0;

import org.springframework.jdbc.core.JdbcTemplate;

public class UserDao {

    //要得到jdbcTemplate 对象
    private JdbcTemplate jdbcTemplate;
public void setJdbcTemplate(JdbcTemplate jdbcTemplate) {
this.jdbcTemplate = jdbcTemplate;
}
public void add(){
        String sql="insert into user values(?,?)";
        jdbcTemplate.update(sql,"大力","man");
    }
}
c3p0.xml 配置:
<?xml version="1.0" encoding="UTF-8"?>
<beans xmlns="http://www.springframework.org/schema/beans"
    xmlns:xsi="http://www.w3.org/2001/XMLSchema-instance"
    xmlns:content="http://www.springframework.org/schema/context"
    xmlns:aop="http://www.springframework.org/schema/aop"
    xmlns:tx="http://www.springframework.org/schema/tx"
    xsi:schemaLocation="
        http://www.springframework.org/schema/beans http://www.springframework.org/schema/beans/spring-beans.xsd
        http://www.springframework.org/schema/tx http://www.springframework.org/schema/tx/spring-tx.xsd
        http://www.springframework.org/schema/aop http://www.springframework.org/schema/aop/spring-aop.xsd
        http://www.springframework.org/schema/tx http://www.springframework.org/schema/tx/spring-tx.xsd">
        <!-- bean definitions here -->

        <!-- 配置  c3p0 -->
        <bean id="dataSource" class="com.mchange.v2.c3p0.ComboPooledDataSource">
            <!-- 注入属性值 -->
            <property name="driverClass" value="com.mysql.jdbc.Driver"></property>
            <property name="jdbcUrl" value="jdbc:mysql://localhost:3306/url_data"></property>
            <property name="user" value="root"></property>
            <property name="password" value="123"></property>
        </bean>
        <!-- 创建service 和 Dao。在Service 中调用dao -->

        <bean id="userService" class="cn.itcast.c3p0.UserService">
            <!-- 注入Dao -->
            <property name="userDao" ref="userDao"></property>
        </bean>

        <bean id="userDao" class="cn.itcast.c3p0.UserDao">
            <!-- 注入jdbctemplate对象 -->
            <property name="jdbcTemplate" ref="jdbcTemplate"></property>
        </bean>


        <!-- 创建JdbcTemplate对象 -->
        <bean id="jdbcTemplate" class="org.springframework.jdbc.core.JdbcTemplate">
            <!-- 把dataSource 传到 jdbcTemplate里面-->
            <property name="dataSource" ref="dataSource"></property>
        </bean>
</beans>
测试:
    public void testC(){
        ApplicationContext context=new ClassPathXmlApplicationContext("c3p0.xml");
        UserService userService=(UserService) context.getBean("userService");
        userService.add();
    }
测试结果:
在数据库 user 表里添加一条数据