MongoDB版本
当前使用的MongoDB版本为4.2.0,下载地址.https://fastdl.mongodb.org/linux/mongodb-linux-x86_64-rhel70-4.2.0.tgz
关闭防火墙
systemctl stop filewalld
集群架构
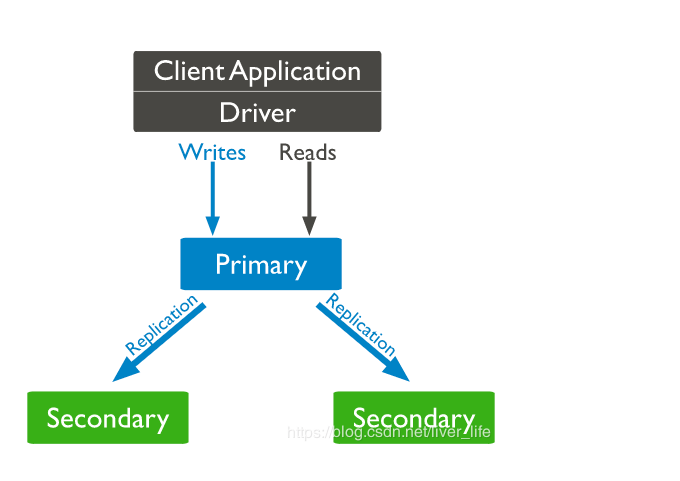
副本集
若要查看具体的文档,可以访问官方文档,文章中很多内容都可以参考https://docs.mongodb.com/manual/,地址
分片
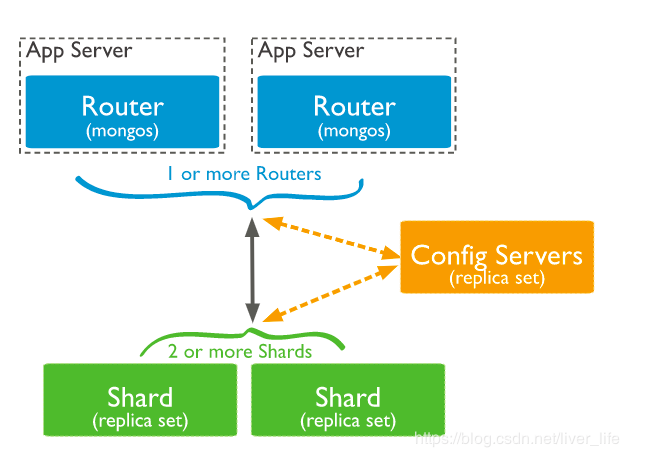
分三步:
(1).shard副本集的建立
(2).config的replica set 建立
(3).mongos 路由的建立
1.shard副本集的建立
共两个shard,shard1和shard2
(1)三台服务器上分别建立这个文件,及创建需要的目录
mkdir /data/shard1 -p
mkdir /data/logs/12305 -p
shard1.conf
storage:
dbPath: /data/shard1/data
journal:
enabled: true
directoryPerDB: true
#syncPeriodSecs: 60
engine: wiredTiger
processManagement:
fork: true
pidFilePath: /data/shard1/mongod.pid
net:
bindIp: 0.0.0.0
port: 12305
systemLog:
destination: file
path: /data/logs/12305/log.txt
logAppend: true
#security:
# keyFile: /data/phpmongo-keyfile
# authorization: enabled
operationProfiling:
slowOpThresholdMs: 100
mode: slowOp
replication:
#oplogSizeMB: 20000
replSetName: shard1
sharding:
clusterRole: shardsvr
重启服务
/usr/bin/mongod -f shard1.conf
(2) 登陆任意的mongo客户端
/usr/bin/mongo --host 主机ip --port 12305
use admin
storage:
dbPath: /data/confser/data
journal:
enabled: true
directoryPerDB: true
#syncPeriodSecs: 60
engine: wiredTiger
processManagement:
fork: true
pidFilePath: /data/confser/mongoconf.pid
net:
bindIp: 0.0.0.0
port: 12201
systemLog:
destination: file
path: /data/logs/12201/log.txt logAppend: true
replication:
oplogSizeMB: 2048
replSetName: csvr
sharding:
clusterRole: configsvr
processManagement:
fork: true
#security:
# keyFile: /data/phpmongo-keyfile
# authorization: enabled
重启服务
/usr/bin/mongod -f confser.conf
(2) 登陆任意的mongo客户端
/usr/bin/mongo --host 主机ip --port 12201
use admin
processManagement:
fork: true
pidFilePath: /data/mongos/mongos.pid
net:
bindIp: 0.0.0.0
port: 12101
systemLog:
destination: file
path: /data/logs/12101/log.txt
logAppend: true
#security:
# keyFile: /data/phpmongo-keyfile
# #authorization: enabled ##is available only for mongod.
sharding:
configDB: csvr/mongoconf-node1:12201,mongoconf-node2:12201,mongoconf-node3:12201
重启服务
/usr/bin/mongos -f mongos.conf
(2) 登陆任意的mongo客户端
/usr/bin/mongo --host 主机ip --port 12101
mongos>use admin
添加分片
use admin
- db.runCommand( { addshard : "shard1/mongoshard1-node1:12305,mongoshard1-node2:12305,mongoshard1-arb01:12305",name:"shard1"} )
- db.runCommand( { addshard : "shard2/mongoshard2-node1:12306,mongoshard2-node2:12306,mongoshard2-arb01:12306",name:"shard2"} )
激活分片
需要注意的是,分片功能是需要手动开启的.
在mongo shell中,这里设置一个测试数据库,用来测试分片的功能.
- db.runCommand( { enablesharding : "testdb" } )
- db.runCommand( { shardcollection : "testdb.users",key : {id: 1} } )
创建测试数据,用来测试分片功能,下面的代码向数据库中插入了200w条数据,由于数据量比较大,所以批量插入的时候,时间会稍微有点久.
- var arr=[];
- for(var i=0;i<2000000;i++){
- var uid = i;
- var name = "mongodb"+i;
- arr.push({"id":uid,"name":name});
- }
- db.users.insertMany(arr);
查询状态
通过sh.status()函数查看当前分片的状态,查看副本集的状态通过rs.status().
库,用来测试分片的功能.
- db.runCommand( { enablesharding : "testdb" } )
- db.runCommand( { shardcollection : "testdb.users",key : {id: 1} } )
创建测试数据,用来测试分片功能,下面的代码向数据库中插入了200w条数据,由于数据量比较大,所以批量插入的时候,时间会稍微有点久.
- var arr=[];
- for(var i=0;i<2000000;i++){
- var uid = i;
- var name = "mongodb"+i;
- arr.push({"id":uid,"name":name});
- }
- db.users.insertMany(arr);
查询状态
通过sh.status()函数查看当前分片的状态,查看副本集的状态通过rs.status().