arduino 套件使用说明书V1.0.pdf,
步进电机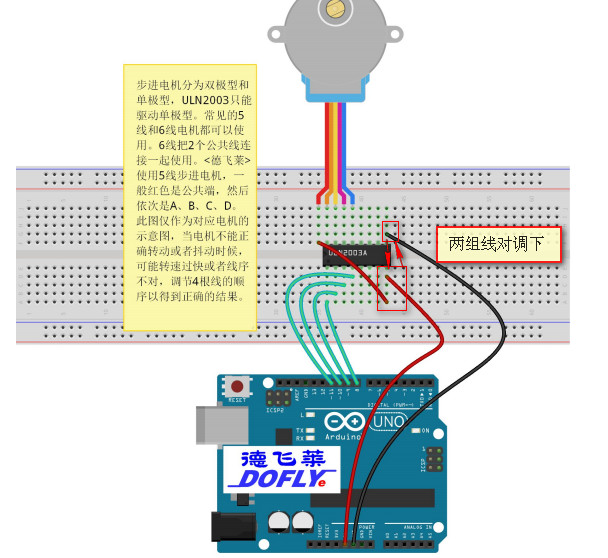
DHT11
传感器另外一脚要接A0


/*
  Web client

 This sketch connects to a website (http://www.google.com)
 using an Arduino Wiznet Ethernet shield.

 Circuit:
 * Ethernet shield attached to pins 10, 11, 12, 13

 created 18 Dec 2009
 by David A. Mellis
 modified 9 Apr 2012
 by Tom Igoe, based on work by Adrian McEwen

 */

#include <SPI.h>
#include <Ethernet.h>

#define DHT11_PIN 1

// Enter a MAC address for your controller below.
// Newer Ethernet shields have a MAC address printed on a sticker on the shield
byte mac[] = { 0xDE, 0xAD, 0xBE, 0xEF, 0xFE, 0xED };
// if you don't want to use DNS (and reduce your sketch size)
// use the numeric IP instead of the name for the server:
//IPAddress server(74,125,232,128);  // numeric IP for Google (no DNS)
char server[] = "192.168.1.95";    // name address for Google (using DNS)

// Set the static IP address to use if the DHCP fails to assign
IPAddress ip(192,168,99,177);

// Initialize the Ethernet client library
// with the IP address and port of the server
// that you want to connect to (port 80 is default for HTTP):
EthernetClient client;


void uploadData(String c,String h){
    // if you get a connection, report back via serial:
  if (client.connect(server, 6543)) {
    Serial.println("connected");
    // Make a HTTP request:
    client.println("GET /DHT11Data.ashx?C="+c+"&h="+h+" HTTP/1.1");
    client.println("Host:192.168.1.95");
    client.println("Connection: close");

    client.println();
    delay(10);
    // if there are incoming bytes available
    // from the server, read them and print them:
    while (client.available()) {
      char c = client.read();
      Serial.print(c);
    }
  }
  else {
    // kf you didn't get a connection to the server:
    Serial.println("connection failed");
  }

    // if the server's disconnected, stop the client:
  if (!client.connected()) {
    Serial.println();
    Serial.println("disconnecting.");
    client.stop();

    // do nothing forevermore:

  }
}

byte read_dht11_dat()
{
  byte i = 0;
  byte result = 0;
  for(i=0;i<8;i++)
  {
    while(!(PINC&_BV(DHT11_PIN)));
    delayMicroseconds(30);
    if(PINC&_BV(DHT11_PIN))
      result|=(1<<(7-i));
    while((PINC&_BV(DHT11_PIN)));
  }
  return result;
}

void setup() {

   DDRC|=_BV(DHT11_PIN);
  PORTC|=_BV(DHT11_PIN);
 // Open serial communications and wait for port to open:
  Serial.begin(9600);
   while (!Serial) {
    ; // wait for serial port to connect. Needed for Leonardo only
  }

  // start the Ethernet connection:
  if (Ethernet.begin(mac) == 0) {
    Serial.println("Failed to configure Ethernet using DHCP");
    // no point in carrying on, so do nothing forevermore:
    // try to congifure using IP address instead of DHCP:
    Ethernet.begin(mac, ip);
  }
  // give the Ethernet shield a second to initialize:
  delay(1000);
  Serial.println("Ready");


}


void loop()
{
  byte dht11_dat[5];
  byte dht11_in;
  byte i;
  PORTC &= ~_BV(DHT11_PIN);
  delay(18);
  PORTC|=_BV(DHT11_PIN);
  delayMicroseconds(40);
  DDRC &= ~_BV(DHT11_PIN);
  delayMicroseconds(40);
  dht11_in = PINC & _BV(DHT11_PIN);
  if(dht11_in)
  {
    Serial.println("dht11 start condition 1 not met");
    return;
  }

  delayMicroseconds(80);
  dht11_in=PINC & _BV(DHT11_PIN);
  if(!dht11_in)

  {
    Serial.println("dht11 start condition 2 not met");
    return;
  }

  delayMicroseconds(80);
  for(i=0;i<5;i++)
    dht11_dat[i]=read_dht11_dat();
  DDRC|=_BV(DHT11_PIN);
  PORTC|=_BV(DHT11_PIN);
  byte dht11_check_sum = dht11_dat[0]+dht11_dat[1]+dht11_dat[2]+dht11_dat[3];
  if(dht11_dat[4]!=dht11_check_sum)
  {
    Serial.println("DHT11 checksum error");
  }

 uploadData(String(dht11_dat[2]) +"." +String(dht11_dat[3]),String(dht11_dat[0]) +"." +String(dht11_dat[1]) );

  Serial.print("Current humdity= ");
  Serial.print(String(dht11_dat[0]));
  Serial.print(".");
  Serial.print(dht11_dat[1],DEC);
  Serial.print("%");
  Serial.print("temperature = ");
  Serial.print(dht11_dat[2],DEC);
  Serial.print(".");
  Serial.print(dht11_dat[3],DEC);
  Serial.println("C");

  delay(1000);
}
调整PWM频率
源代码如下:Here are some usage examples of the function:

// Set pin 9's PWM frequency to 3906 Hz (31250/8 = 3906)
// Note that the base frequency for pins 3, 9, 10, and 11 is 31250 Hz
setPwmFrequency(9, 8);

// Set pin 6's PWM frequency to 62500 Hz (62500/1 = 62500)
// Note that the base frequency for pins 5 and 6 is 62500 Hz
setPwmFrequency(6, 1);

// Set pin 10's PWM frequency to 31 Hz (31250/1024 = 31)
setPwmFrequency(10, 1024);


Please keep in mind that changing the PWM frequency changes the Atmega's timers and disrupts the normal operation of many functions that rely on time (delay(), millis(), Servo library).


/**
* Divides a given PWM pin frequency by a divisor.
*
* The resulting frequency is equal to the base frequency divided by
* the given divisor:
*   - Base frequencies:
*      o The base frequency for pins 3, 9, 10, and 11 is 31250 Hz.
*      o The base frequency for pins 5 and 6 is 62500 Hz.
*   - Divisors:
*      o The divisors available on pins 5, 6, 9 and 10 are: 1, 8, 64,
*        256, and 1024.
*      o The divisors available on pins 3 and 11 are: 1, 8, 32, 64,
*        128, 256, and 1024.
*
* PWM frequencies are tied together in pairs of pins. If one in a
* pair is changed, the other is also changed to match:
*   - Pins 5 and 6 are paired on timer0
*   - Pins 9 and 10 are paired on timer1
*   - Pins 3 and 11 are paired on timer2
*
* Note that this function will have side effects on anything else
* that uses timers:
*   - Changes on pins 3, 5, 6, or 11 may cause the delay() and
*     millis() functions to stop working. Other timing-related
*     functions may also be affected.
*   - Changes on pins 9 or 10 will cause the Servo library to function
*     incorrectly.
*
* Thanks to macegr of the Arduino forums for his documentation of the
* PWM frequency divisors. His post can be viewed at:
*   http://www.arduino.cc/cgi-bin/yabb2/YaBB.pl?num=1235060559/0#4
*/
void setPwmFrequency(int pin, int divisor) {
  byte mode;
  if(pin == 5 || pin == 6 || pin == 9 || pin == 10) {
    switch(divisor) {
      case 1: mode = 0x01; break;
      case 8: mode = 0x02; break;
      case 64: mode = 0x03; break;
      case 256: mode = 0x04; break;
      case 1024: mode = 0x05; break;
      default: return;
    }
    if(pin == 5 || pin == 6) {
      TCCR0B = TCCR0B & 0b11111000 | mode;
    } else {
      TCCR1B = TCCR1B & 0b11111000 | mode;
    }
  } else if(pin == 3 || pin == 11) {
    switch(divisor) {
      case 1: mode = 0x01; break;
      case 8: mode = 0x02; break;
      case 32: mode = 0x03; break;
      case 64: mode = 0x04; break;
      case 128: mode = 0x05; break;
      case 256: mode = 0x06; break;
      case 1024: mode = 0x7; break;
      default: return;
    }
    TCCR2B = TCCR2B & 0b11111000 | mode;
  }
}
关于按钮软件去抖动法
unsigned char btnIsPress=0;
const int buttonPin = 7; // 按键位置
const int ledPin = 13; // led 位置
// 定义变量
int ledState = HIGH; // 当前led 状态
int buttonState=0; // 读取的当前按键状态
int lastButtonState = 0; // 上次读取的按键状态
// 使用长整型变量
long lastDebounceTime = 0; // 上次按键触发时间
long debounceDelay = 50; // 去抖时间,根

void setup() {
  // put your setup code here, to run once:

 pinMode(buttonPin, INPUT);
pinMode(ledPin, OUTPUT);
// 初始化led 的状态
digitalWrite(ledPin, ledState);
 Serial.begin(9600);

}

void loop() {
  // put your main code here, to run repeatedly:
 // checkResetPress();
 checkBtnPress();
}

void checkBtnPress(){
 int reading = digitalRead(buttonPin);

 if (reading != lastButtonState) {
   lastDebounceTime = millis();
 }

if ((millis() - lastDebounceTime) > debounceDelay) {
 if (reading != buttonState) {
    buttonState = reading;
    if (buttonState == HIGH) {
     ledState = !ledState;
    }
  }
 }

 digitalWrite(ledPin, ledState);
 lastButtonState = reading;
}
void checkResetPress(){
  btnIsPress= digitalRead(buttonPin);
  Serial.println(btnIsPress);
  if(btnIsPress==0){
    delay(100);
    btnIsPress= digitalRead(buttonPin);
    if(btnIsPress==0){
       delay(4000);
       btnIsPress= digitalRead(buttonPin);
       if(btnIsPress==0){
           Serial.println("yes!");
       }

    }
  }
}
上面代码中,if (buttonState == HIGH){ledState=!ledState;} 表示只识别脉冲的上升或阶段,因为一次按键相当于一次脉冲,有上升与下降两个边缘,
如果去掉判断,那么没次按钮时,只能发现led闪几下就又恢复原样(按前是灭还是亮)