对于APP的换肤,曾经有一个公司的APP对于“某个”界面有换肤的需求,当时的做法是将换肤的规则定义成配置文件由服务器动态下发,然后根据配置文件的解析再来对界面中的元素进行换肤【如背景、字体颜色、大小之类的】,但是这种方式其实是很麻烦的,当时只是针对一个界面有这个换肤的需求,那如果是整个APP中的不同界面都要进行换肤呢?可想这种方式要实现起来就不知道有多复杂,XML解析也是挺浪费性能的;另外还有一个项目只是对无毒有一个简单的换肤需求,当时的做法应该是人人都能想到的,我贴一下当时的代码:
然后用的时候:
也就是由服务器下发一个皮肤类型的字段,然后本地根据这个类型再到app本地取不同的图片,是不是非常之简单粗暴,当时也没想到更好的方式所以就这么实现了,当然效果没啥问题,但是有一个很大的问题就是包体会随着换肤元素的增加而增加,而且也不是特别灵活。
以上是在自己职业生涯中遇到换肤需求具体实现的两个场景,不过今天要学的换肤肯定不是这两种方式了,是一种比较灵活,也不是每个人都能有思路想出来的一种“黑科技【以我目前的能力而言认为它就是黑科技~~】”,而且也不会增加包的大小,下面一点点来剖析它。
网易云音乐换肤效果分析:
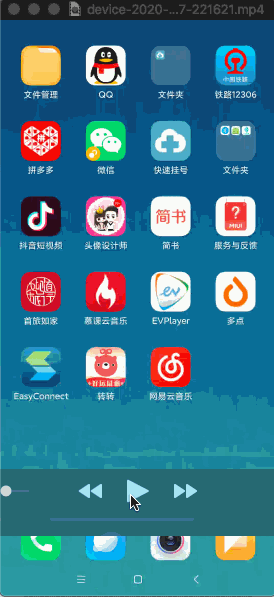
咱们要实现的技术效果跟网易云音乐的功能差不多,先来看一下它的效果,有两种类型,一种是整个APP换肤,还一种是黑天和白天模式,如下:
APP换肤:
上面的效果凑合着看,可以手机上下一个体验一下,反正就是使用一套皮肤之后整个界面的样式都变了,但是大体的布局是一样的。
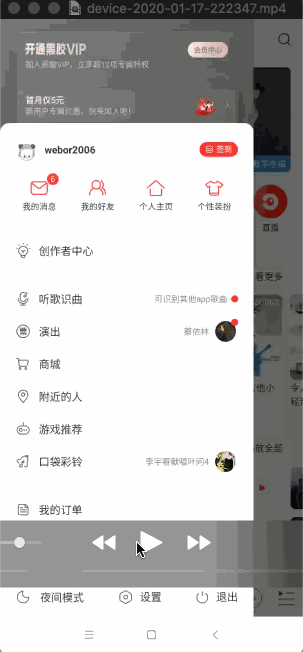
黑白天模式:
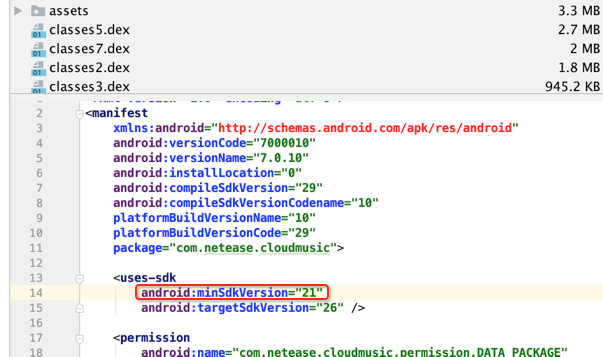
注意,这种换肤功能对于Android系统有一个最低的要求,必须是5.0以上系统,因为在5.0以下是装不上的,反编译了一下云音乐的apk确实是:
为啥?其实是在换肤时会用到这段代码:

DEMO最终效果演示:
嗯,对于上面效果的实现原理是不是还挺值得探究的呢?下面先来贴一下最终咱们要实现的效果,当然界面是简陋版,但是足以道出上面效果的原理了,如下:
换肤:
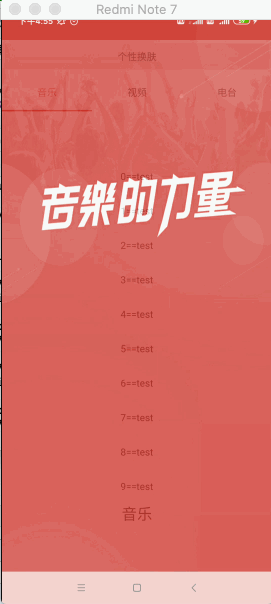
可以看到在app不重启的情况下就实现了整个app的换肤,包含状态栏和底部导航栏,其效果其实跟网易云音乐的差不多。
日夜模式切换:

可以看到切换之后整个的色调都变化了,当然它的实现跟换肤的手法是不一样的,待之后完整实现之后就晓得了。
手写网易云可动态替换的换肤框架:
上面已经展现了对于咱们最终要实现的效果了,下面则从0开始一步步来实现它~~
界面框架搭建:
关于界面的搭建这个不是重点,也比较简单,没啥可说的,直接开撸既可。
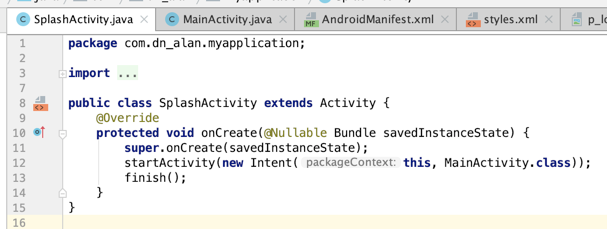
Splash界面:
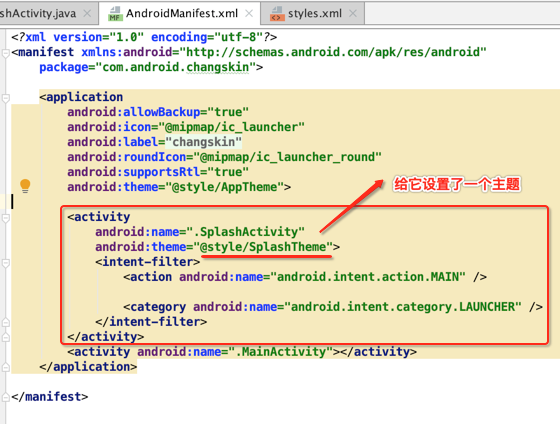
styles.xml:
<resources>

    <!-- Base application theme. -->
    <style name="AppTheme" parent="Theme.AppCompat.Light.DarkActionBar">
        <!-- Customize your theme here. -->
        <item name="colorPrimary">@color/colorPrimary</item>
        <item name="colorPrimaryDark">@color/colorPrimaryDark</item>
        <item name="colorAccent">@color/colorAccent</item>
    </style>

    <style name="SplashTheme" parent="Theme.AppCompat.Light.NoActionBar">
        <item name="android:windowActionBar">false</item>
        <item name="android:windowFullscreen">true</item>
        <item name="android:windowBackground">@drawable/p_login_bg</item>
    </style>

</resources>
其中用到了一张背景图:
【说明】:附件地址为:https://files.cnblogs.com/files/webor2006/p_login_bg.jpg.zip
主界面:
布局文件:
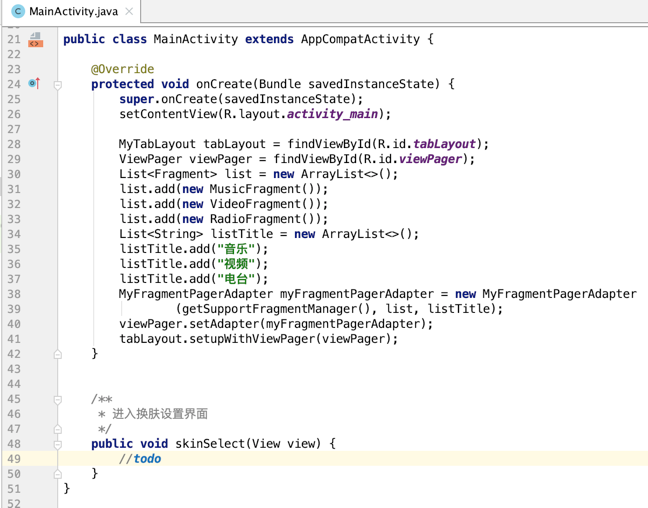
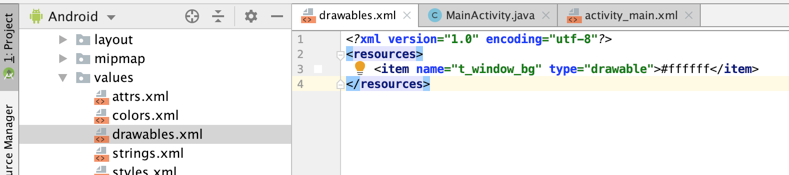
<?xml version="1.0" encoding="utf-8"?>
<LinearLayout xmlns:android="http://schemas.android.com/apk/res/android"
    xmlns:app="http://schemas.android.com/apk/res-auto"
    xmlns:tools="http://schemas.android.com/tools"
    android:layout_width="match_parent"
    android:layout_height="match_parent"
    android:background="@drawable/t_window_bg"
    android:orientation="vertical">

    <Button
        android:layout_width="match_parent"
        android:layout_height="wrap_content"
        android:onClick="skinSelect"
        android:text="个性换肤"
        tools:ignore="MissingPrefix" />


    <com.android.changskin.widget.MyTabLayout
        android:id="@+id/tabLayout"
        android:layout_width="match_parent"
        android:layout_height="?attr/actionBarSize"
        app:tabIndicatorColor="@color/tabSelectedTextColor"
        app:tabTextColor="@color/tab_selector" />

    <androidx.viewpager.widget.ViewPager
        android:id="@+id/viewPager"
        android:layout_width="match_parent"
        android:layout_height="match_parent" />


</LinearLayout>
其中标红的有一个背景资源:
一个标签控件:
public class MyTabLayout extends TabLayout {
    int tabIndicatorColorResId;
    int tabTextColorResId;

    public MyTabLayout(Context context) {
        this(context, null, 0);
    }

    public MyTabLayout(Context context, AttributeSet attrs) {
        this(context, attrs, 0);
    }

    public MyTabLayout(Context context, AttributeSet attrs, int defStyleAttr) {
        super(context, attrs, defStyleAttr);
        TypedArray a = context.obtainStyledAttributes(attrs, R.styleable.TabLayout,
                defStyleAttr, 0);
        tabIndicatorColorResId = a.getResourceId(R.styleable.TabLayout_tabIndicatorColor, 0);
        tabTextColorResId = a.getResourceId(R.styleable.TabLayout_tabTextColor, 0);
        a.recycle();
    }
}
其中用到了两个颜色:
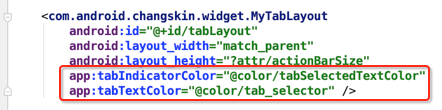
因为要对它进行换肤,所以这里采用引用的色值的方式,而不是写死的:
<?xml version="1.0" encoding="utf-8"?>
<resources>
    <!--toolBar-->
    <color name="colorPrimary">#ffce3d3a</color>
    <color name="colorSkinText">#ffce3d3a</color>
    <!--状态栏(style同时设置底部栏颜色)-->
    <color name="colorPrimaryDark">#ffce3d3a</color>

    <!-- 文字正常主色 -->
    <color name="colorAccent">#1f1f1f</color>

    <color name="tabSelectedTextColor">#ffce3d3a</color>

</resources>
tab_selector.xml:
<?xml version="1.0" encoding="utf-8"?>
<selector xmlns:android="http://schemas.android.com/apk/res/android">
    <item android:color="@color/tabSelectedTextColor" android:state_selected="true" />
    <item android:color="@color/colorAccent" />
</selector>
其中Adapter:
public class MyFragmentPagerAdapter extends FragmentPagerAdapter {

    private List<String> mTitles;
    private List<Fragment> mFragments;


    public MyFragmentPagerAdapter(FragmentManager fragmentManager, List<Fragment> fragments,
                                  List<String> titles) {
        super(fragmentManager);
        mFragments = fragments;
        mTitles = titles;
    }


    @Override
    public Fragment getItem(int position) {
        return mFragments.get(position);
    }

    @Override
    public int getCount() {
        return mFragments.size();
    }


    @Override
    public CharSequence getPageTitle(int position) {
        return mTitles.get(position);
    }
}
其中涉及到三个很简单的Fragemnt:
MusicFragment:
public class MusicFragment extends Fragment {
    private View mView;
    private RecyclerView mRelView;

    @Nullable
    @Override
    public View onCreateView(LayoutInflater inflater, @Nullable ViewGroup container, @Nullable
            Bundle savedInstanceState) {
        mView = inflater.inflate(R.layout.fragment_music, container, false);
        mRelView = (RecyclerView) mView.findViewById(R.id.rel_view);
        //设置布局管理器
        mRelView.setLayoutManager(new LinearLayoutManager(getContext()));
        GirlAdapter girlAdapter = new GirlAdapter();
        mRelView.setAdapter(girlAdapter);
        return mView;
    }

    @Override
    public LayoutInflater onGetLayoutInflater(Bundle savedInstanceState) {
        return super.onGetLayoutInflater(savedInstanceState);
    }
}
<?xml version="1.0" encoding="utf-8"?>
<LinearLayout xmlns:android="http://schemas.android.com/apk/res/android"
    android:layout_width="match_parent"
    android:layout_height="match_parent"
    android:gravity="center"
    android:orientation="vertical">

    <androidx.recyclerview.widget.RecyclerView
        android:id="@+id/rel_view"
        android:layout_width="match_parent"
        android:layout_height="wrap_content" />

    <TextView
        android:layout_width="wrap_content"
        android:layout_height="wrap_content"
        android:text="音乐"
        android:textColor="@color/colorAccent"
        android:textSize="22sp" />
</LinearLayout>
RadioFragment:
public class RadioFragment extends Fragment {

    @Nullable
    @Override
    public View onCreateView(LayoutInflater inflater, @Nullable ViewGroup container, @Nullable
            Bundle savedInstanceState) {
        return inflater.inflate(R.layout.fragment_radio, container, false);
    }
}
<?xml version="1.0" encoding="utf-8"?>
<LinearLayout xmlns:android="http://schemas.android.com/apk/res/android"
    android:layout_width="match_parent"
    android:layout_height="match_parent"
    android:gravity="center"
    android:orientation="vertical">

    <TextView
        android:layout_width="wrap_content"
        android:layout_height="wrap_content"
        android:text="电台"
        android:textColor="@color/colorAccent"
        android:textSize="22sp" />
</LinearLayout>
VideoFragment:
public class VideoFragment extends Fragment {

    @Nullable
    @Override
    public View onCreateView(LayoutInflater inflater, @Nullable ViewGroup container, @Nullable
            Bundle savedInstanceState) {
        return inflater.inflate(R.layout.fragment_video, container, false);
    }
}
<?xml version="1.0" encoding="utf-8"?>
<LinearLayout xmlns:android="http://schemas.android.com/apk/res/android"
    android:layout_width="match_parent"
    android:layout_height="match_parent"
    android:gravity="center"
    android:orientation="vertical">

    <TextView
        android:layout_width="wrap_content"
        android:layout_height="wrap_content"
        android:text="视频"
        android:textColor="@color/colorAccent"
        android:textSize="22sp" />
</LinearLayout>
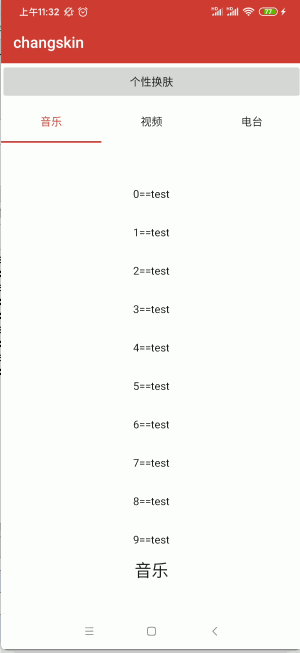
此时运行界面如下:
换肤操作界面:
public class SkinActivity extends Activity {
    @Override
    protected void onCreate(@Nullable Bundle savedInstanceState) {
        super.onCreate(savedInstanceState);
        setContentView(R.layout.activity_skin);
    }

    public void change(View view) {
        //TODO
        Toast.makeText(this, "换肤", Toast.LENGTH_SHORT).show();
    }

    public void restore(View view) {
        //TODO
        Toast.makeText(this, "还原", Toast.LENGTH_SHORT).show();
    }

    /**
     * 夜间模式
     */
    public void night(View view) {
        //TODO
        Toast.makeText(this, "夜间模式", Toast.LENGTH_SHORT).show();
    }

    /**
     * 日间模式
     */
    public void day(View view) {
        //TODO
        Toast.makeText(this, "日间模式", Toast.LENGTH_SHORT).show();
    }
}
<?xml version="1.0" encoding="utf-8"?>
<LinearLayout xmlns:android="http://schemas.android.com/apk/res/android"
    xmlns:app="http://schemas.android.com/apk/res-auto"
    android:layout_width="match_parent"
    android:layout_height="match_parent"
    android:background="@drawable/t_window_bg"
    android:orientation="vertical">

    <LinearLayout
        android:layout_width="match_parent"
        android:layout_height="wrap_content"
        android:orientation="horizontal">

        <Button
            android:layout_width="0dp"
            android:layout_height="wrap_content"
            android:layout_weight="1"
            android:onClick="change"
            android:text="换肤" />

        <Button
            android:layout_width="0dp"
            android:layout_height="wrap_content"
            android:layout_weight="1"
            android:onClick="restore"
            android:text="还原" />
    </LinearLayout>

    <LinearLayout
        android:layout_width="match_parent"
        android:layout_height="wrap_content"
        android:orientation="horizontal">

        <Button
            android:layout_width="0dp"
            android:layout_height="wrap_content"
            android:layout_weight="1"
            android:onClick="day"
            android:text="日间" />

        <Button
            android:layout_width="0dp"
            android:layout_height="wrap_content"
            android:layout_weight="1"
            android:onClick="night"
            android:text="夜间" />
    </LinearLayout>

    <!--测试换肤==>自定义View-->
    <com.android.changskin.widget.CircleView
        android:layout_width="32dp"
        android:layout_height="32dp"
        android:layout_marginTop="50dp"
        android:background="@color/colorAccent"
        app:corcleColor="@color/colorAccent" />

    <!--测试TextView-->
    <Button
        android:layout_width="match_parent"
        android:layout_height="wrap_content"
        android:layout_marginTop="20dp"
        android:gravity="center"
        android:text="测试文字颜色与selector换肤"
        android:textColor="@color/selector_color_test"
        android:textSize="22sp" />

    <TextView
        android:layout_width="match_parent"
        android:layout_height="wrap_content"
        android:layout_marginTop="20dp"
        android:background="@color/colorPrimary"
        android:drawableLeft="@drawable/text_drawable_left"
        android:drawablePadding="8dp"
        android:gravity="center_vertical"
        android:text="测试TextView drawableLeft"
        android:textColor="@color/colorAccent"
        android:typeface="normal" />


</LinearLayout>
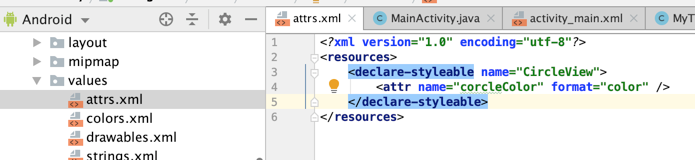
其中有个自定义的View:
public class CircleView extends View {

    private AttributeSet attrs;
    //画笔
    private Paint mTextPain;
    //半径
    private int radius;

    private int corcleColorResId;

    public CircleView(Context context) {
        this(context, null, 0);
    }

    public CircleView(Context context, @Nullable AttributeSet attrs) {
        this(context, attrs, 0);
    }

    public CircleView(Context context, @Nullable AttributeSet attrs, int defStyleAttr) {
        super(context, attrs, defStyleAttr);
        this.attrs = attrs;
        TypedArray typedArray = context.obtainStyledAttributes(attrs, R.styleable.CircleView);
        corcleColorResId = typedArray.getResourceId(R.styleable.CircleView_corcleColor, 0);
        typedArray.recycle();
        mTextPain = new Paint();
        mTextPain.setColor(getResources().getColor(corcleColorResId));
        //开启抗锯齿,平滑文字和圆弧的边缘
        mTextPain.setAntiAlias(true);
        //设置文本位于相对于原点的中间
        mTextPain.setTextAlign(Paint.Align.CENTER);
    }


    @Override
    protected void onDraw(Canvas canvas) {
        super.onDraw(canvas);
        //获取宽度一半
        int width = getWidth() / 2;
        //获取高度一半
        int height = getHeight() / 2;
        //设置半径为宽或者高的最小值
        radius = Math.min(width, height);
        //利用canvas画一个圆
        canvas.drawCircle(width, height, radius, mTextPain);

    }

    public void setCorcleColor(@ColorInt int color) {
        mTextPain.setColor(color);
        invalidate();
    }
}
selector_color_test.xml:
<?xml version="1.0" encoding="utf-8"?>
<selector xmlns:android="http://schemas.android.com/apk/res/android">
    <item android:color="@color/colorSkinText" />
</selector>
【说明】:附件地址为:https://files.cnblogs.com/files/webor2006/text_drawable_left.png.zip
此时界面为:
好,以上是换肤前的框架实现,下面则一点点开启换肤功能的实现。
换肤实现:
思路整理:
在开篇也说了,这种换肤方式跟平常咱们想到的不太一样,也不是人人能想到的,所以下面先来分析一下源码,然后思路就是从分析之后打开的,从哪分析起呢?

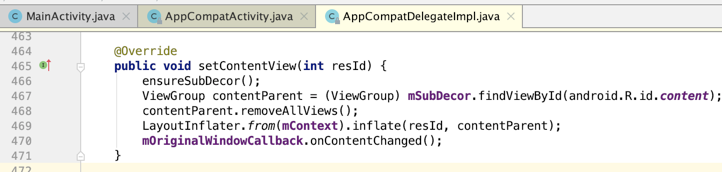
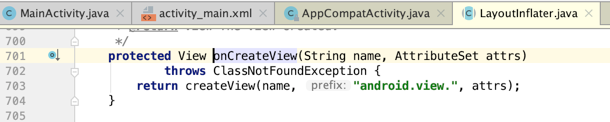
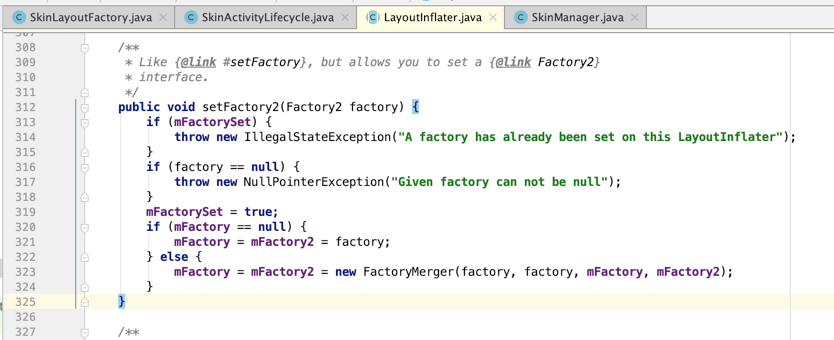
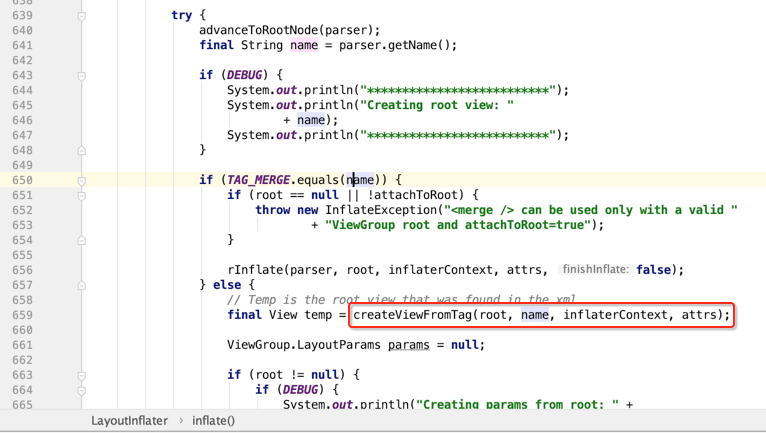
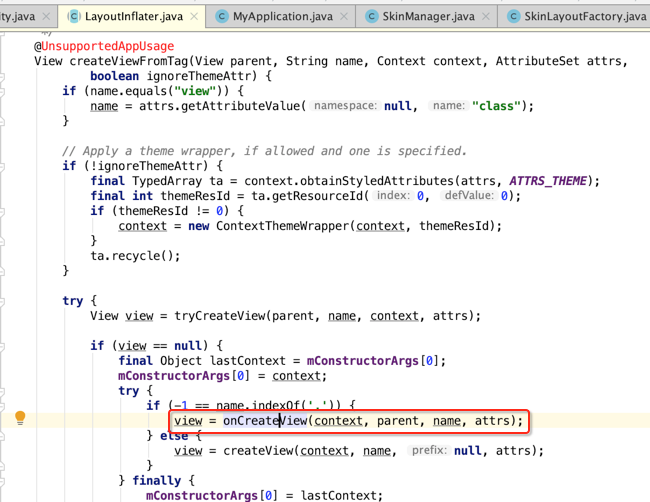
很熟悉吧,往里跟一下:

看它的具体实现:
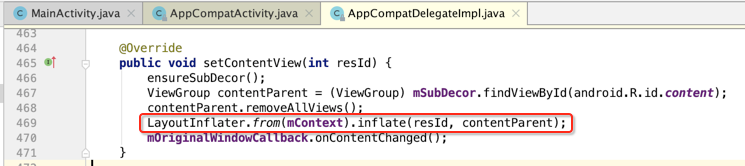
这个布局加载器我们在平常也经常用,看一下它的具体细节:

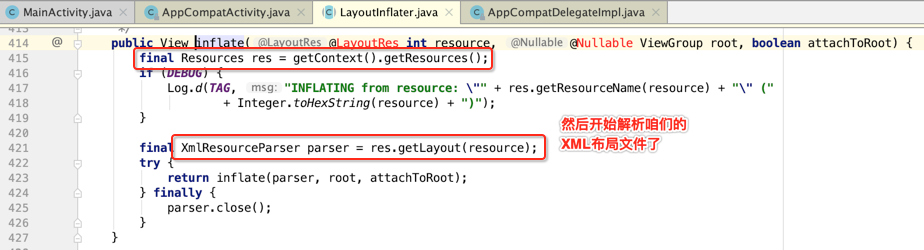
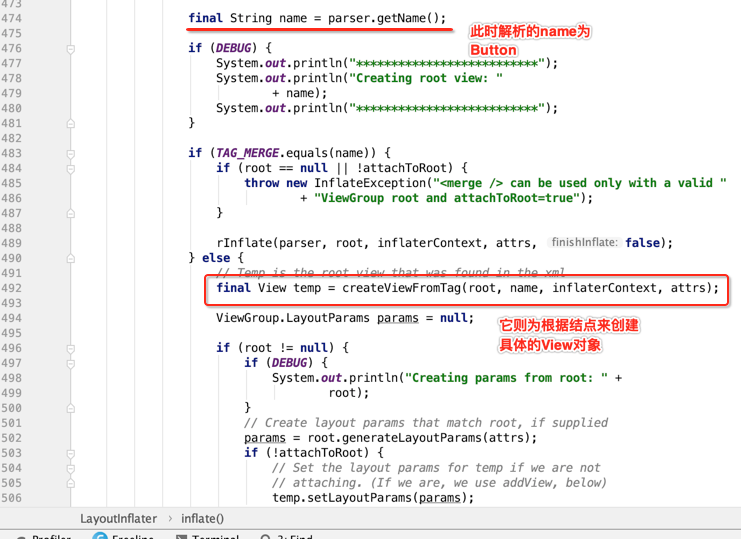
具体的解析细节就不看了,主要是看咱们想要看的,它会找XML中结点一个个进行解析,比如:
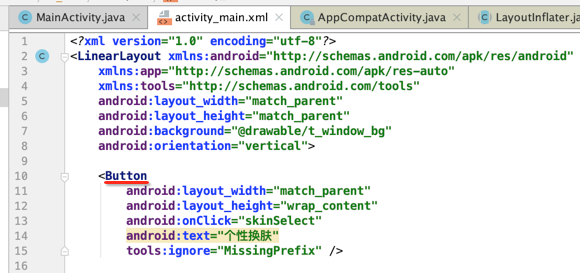
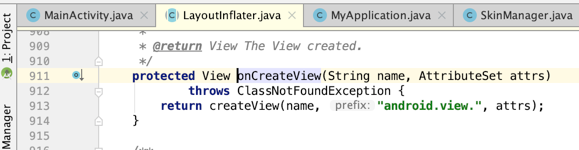
解析到了这个Button结点,那它是如何最终变成View对象的呢?下面大致瞅一下:
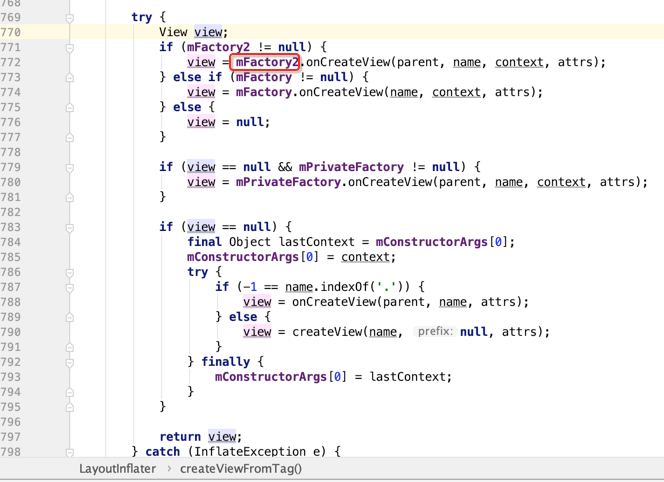
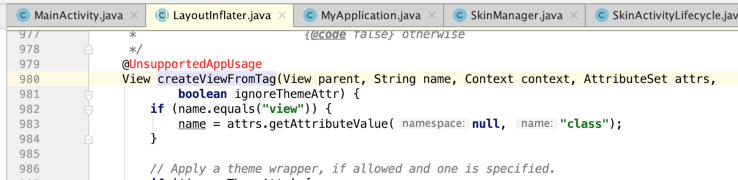
然后再看一下这个创建的细节:

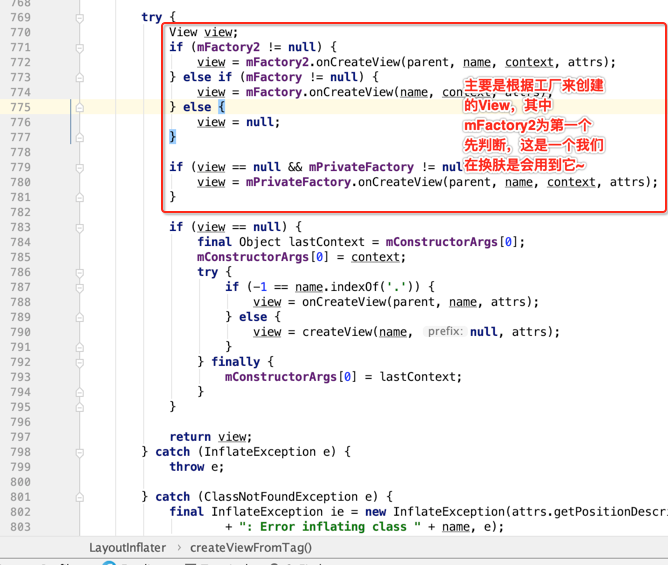
而如果说通过工厂没有创建成功View,而有可能是自定义的View,此时则会往下走:
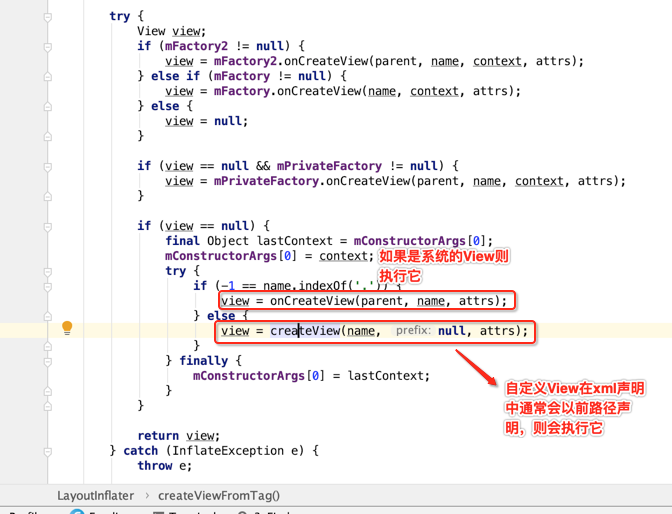
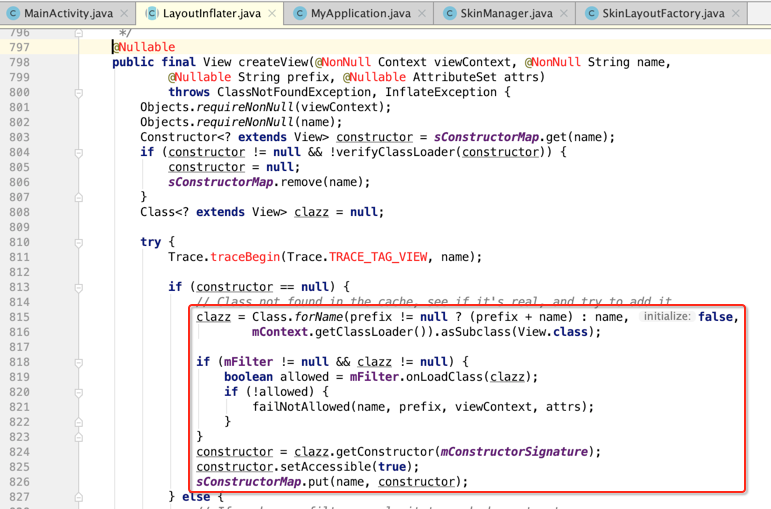
而对于系统的View的创建跟进去瞅一下,看是如何来创建View的:
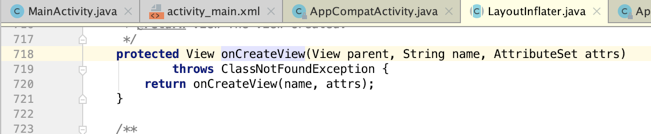
看到木有,所有系统所有的View的包名都是以android.view开头的,所以手动加一个全类名的全缀,而不管是系统View和自定义的View最终都会执行这个createView方法,下面瞅一下:

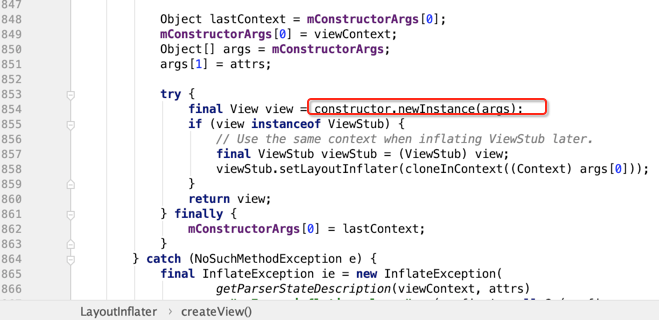
当然这里有缓存的处理以提高性能,最终则通过反射来创建View:
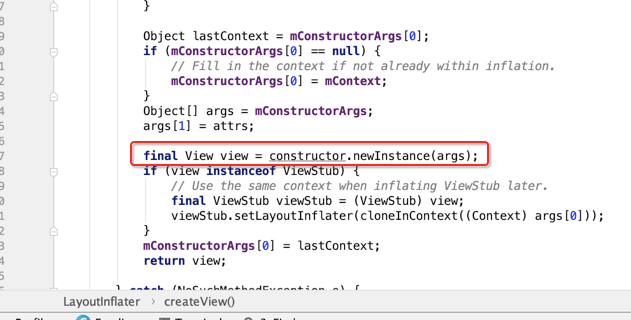
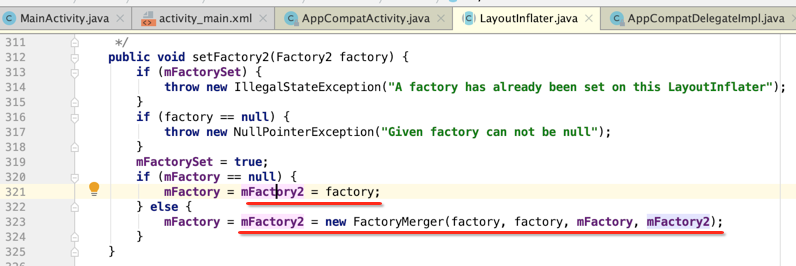
至此整个View就实例化了,那分析这个流程跟咱们换肤功能的实现有啥关系呢?是不是要达到通用换肤的效果则必须要我们创建View之前把所有相关的样式给准备好了?必须是这样的【当然如果不采用这种灵活的换肤比如开篇我所遇到的那两种方式的话另说】,所以接下来咱们就得想办法自己来接管这个View的创建而非交由系统来,这点比较好办,通过上面的工厂既可以达成,如下:
上面标红的工厂是可以进行用户手动设置的:
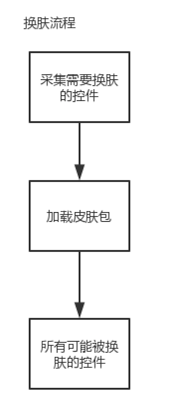
而如果要换肤通过自己来创建View的话则就需要有一个采集控件的过程,也就是需要对要换肤的控件进行采集出来,具体怎么采集这里先不用管,先明白一个实现的思路,下面用图来表述一下:
开始实现:
设置自定义布局工厂:
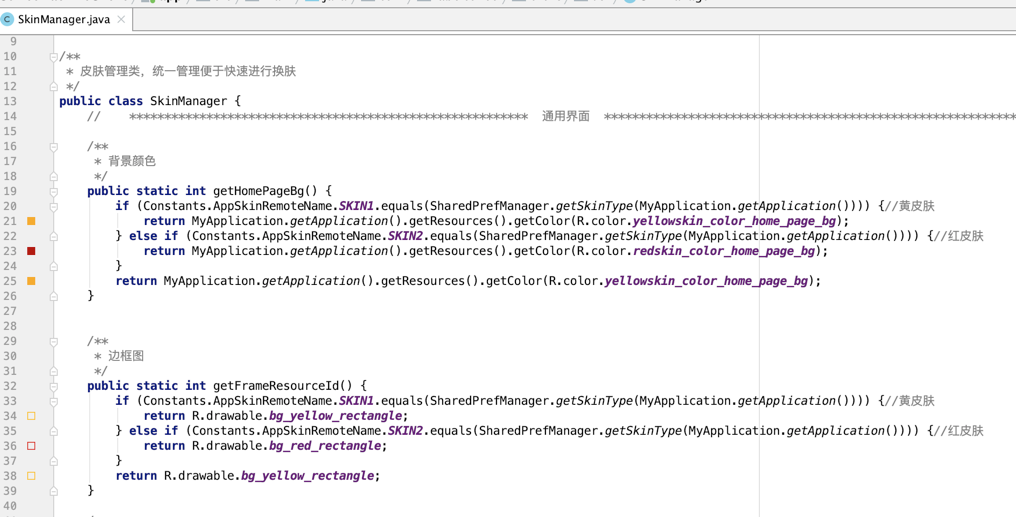
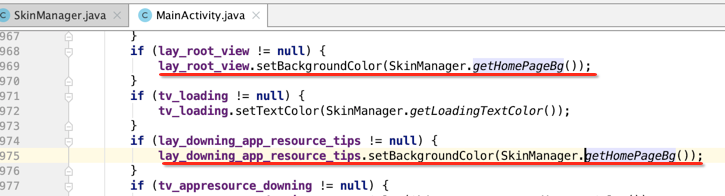
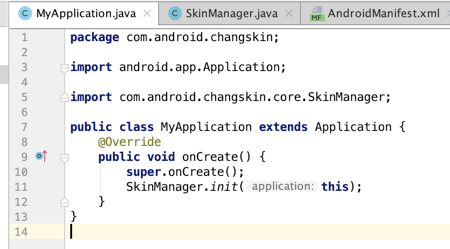
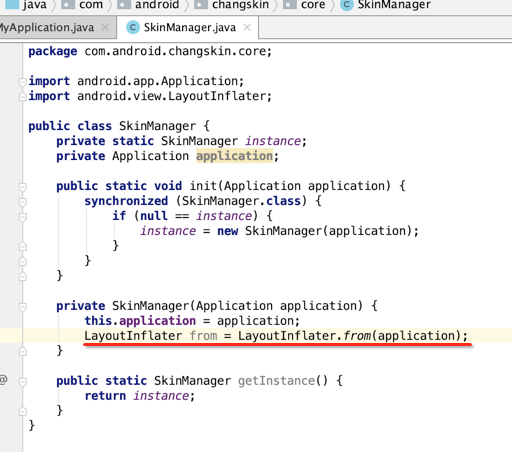
接下来正式进入惊险又刺激的撸码环节。。这里先来新建一个皮肤管理类,在Application中需要进行初始化一下:
public class SkinManager {
    private static SkinManager instance;
    private Application application;

    public static void init(Application application) {
        synchronized (SkinManager.class) {
            if (null == instance) {
                instance = new SkinManager(application);
            }
        }
    }

    private SkinManager(Application application) {
        this.application = application;
    }

    public static SkinManager getInstance() {
        return instance;
    }
}
好,我们知道是要想办法来设置一个工厂来动态创建View:
而对于LayoutInflater的创建我们可以这样:
也可以在具体Activity中来创建:
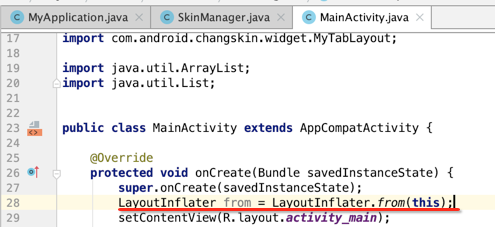
也就是对于context可以是Application也可以是Activity,这俩是不一样的,生命周期不一样,对于具体界面的创建应该是要传当前的Activity的,那么问题来了,我们要想通用的来处里所有Activity的界面,很显然这个LayoutInflater是要在Application中,但是!!它的构造需要传一个指定Activity的Context,那不相互矛盾了么?解决办法其实也很简单,可以在Application中来监听Activity的生命周期既可,如下:
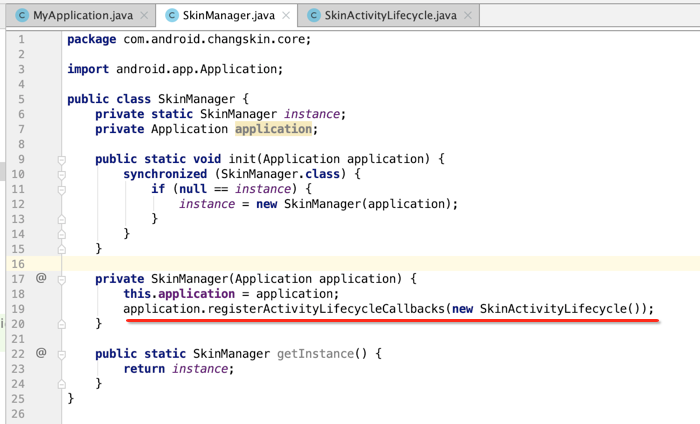
public class SkinActivityLifecycle implements Application.ActivityLifecycleCallbacks {

    @Override
    public void onActivityCreated(Activity activity, Bundle savedInstanceState) {

        LayoutInflater layoutInflater = LayoutInflater.from(activity);
    }

    @Override
    public void onActivityStarted(Activity activity) {

    }

    @Override
    public void onActivityResumed(Activity activity) {

    }

    @Override
    public void onActivityPaused(Activity activity) {

    }

    @Override
    public void onActivityStopped(Activity activity) {

    }

    @Override
    public void onActivitySaveInstanceState(Activity activity, Bundle outState) {

    }

    @Override
    public void onActivityDestroyed(Activity activity) {
    }
}
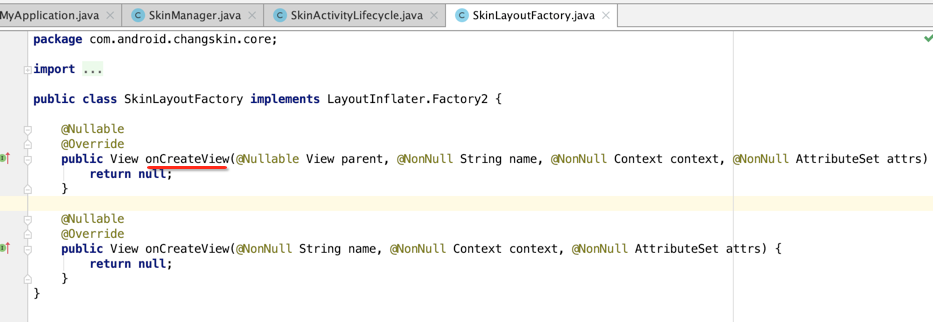
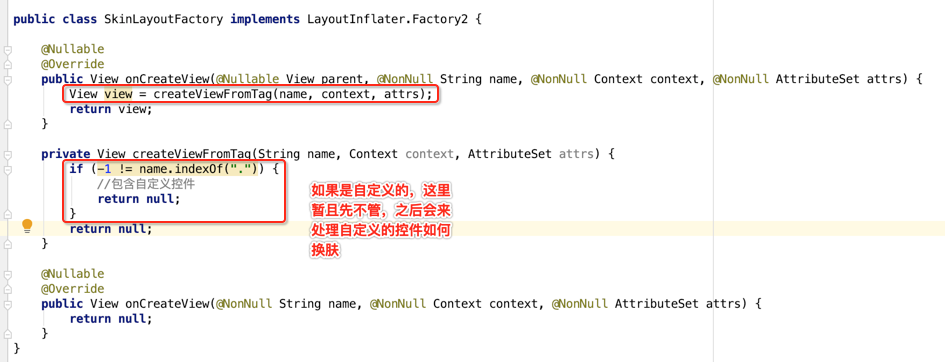
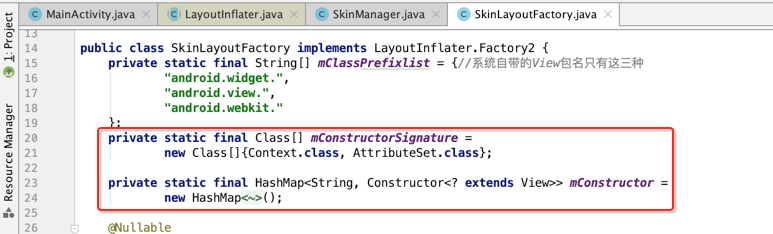
好,此时咱们就可以设置咱们的布局加载器的工厂了,所以创建一个工厂:
public class SkinLayoutFactory implements LayoutInflater.Factory2 {

    @Nullable
    @Override
    public View onCreateView(@Nullable View parent, @NonNull String name, @NonNull Context context, @NonNull AttributeSet attrs) {
        return null;
    }

    @Nullable
    @Override
    public View onCreateView(@NonNull String name, @NonNull Context context, @NonNull AttributeSet attrs) {
        return null;
    }
}

好,接下来则需要我们自己来采集控件了。
采集换肤控件:
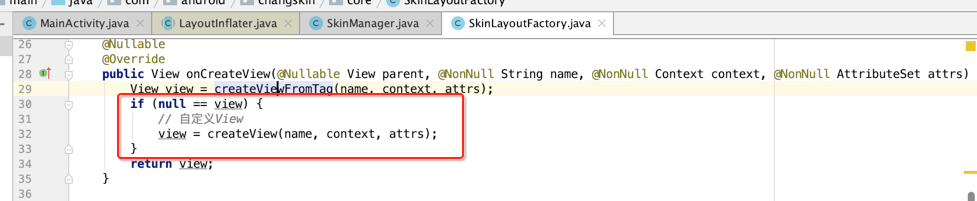
先来实现它里面的onCreateView()方法:
其它里面的代码可以效仿一下之前分析的源码,如下:
所以咱们来实现一下:
接着来处理系统的控件:
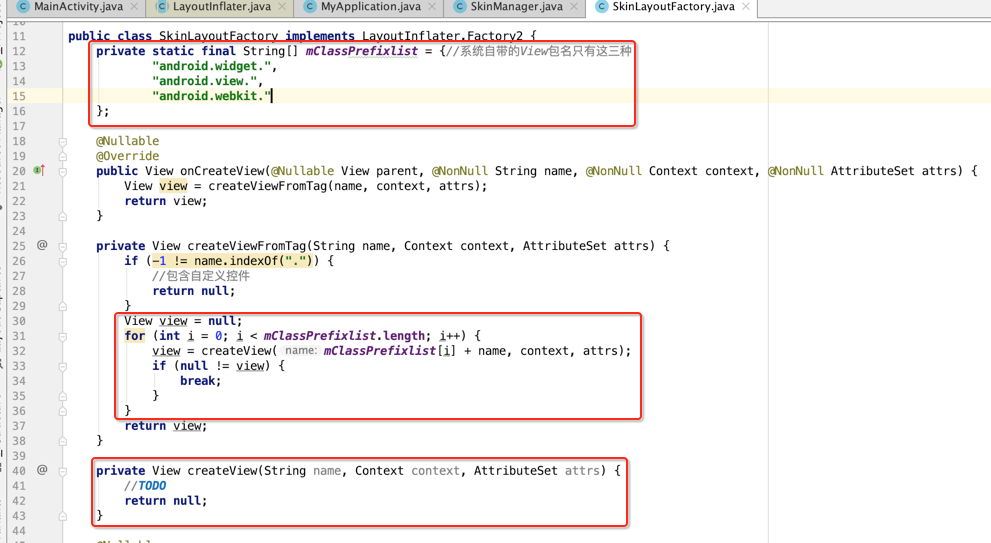
好,接下来则来具体看下如何来创建View了,这里可以继续来校仿LayoutInflater:
总的来说是通过反射来创建View的,所以咱们也来写一样:
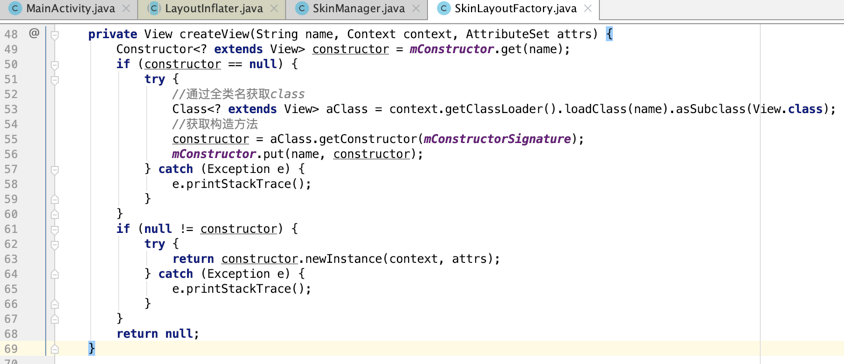
比较容易理解, 但是如果通过反射获取不到View,比如自定义的View,则需要这样处理:
既然拿到了具体的控件,接下来则可以拿到控件里面的属性了,这里又会有一个过滤逻辑,得过滤出需要换肤的属性,关于这块逻辑的处理由于篇幅太长了,放下一篇再继续。