本文在SpringMVC和MyBatis项目框架的基础上整合Spring Security作为权限管理。并且完全实现一套自定义的权限管理规则。
1.权限管理
在本例中所使用的权限管理的思路如下图所示,在系统中存在着许多帐号,同时存在着许多资源,在一个Web系统中一个典型的资源就是访问页面的URL,控制了这个就能够直接控制用户的访问权。
由于资源非常多,直接针对资源与用户进行设置关系会比较繁琐,因此针对同一类或者同一组的资源打个包,称为一组权限,这样将权限分配给用户的时候,一组权限中的资源也就都分配给用户了。
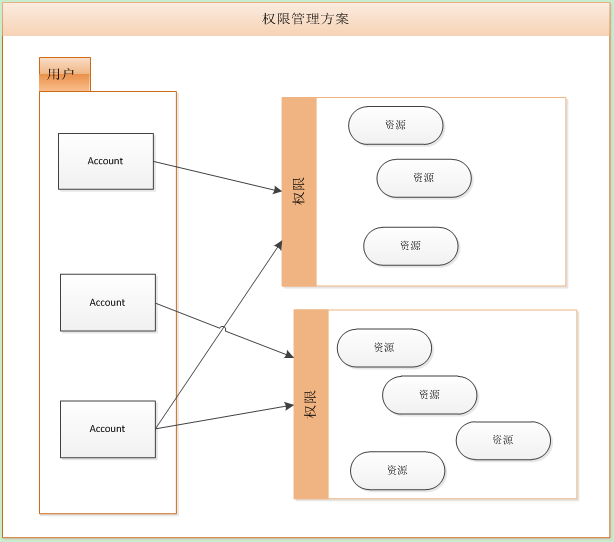
这个只是一个非常简单的权限管理方案,并且只能适用于较小的项目,因为此处给出这个只是为了便于理解自定义的Spring Security认证规则。
2.Spring Security的认证规则
要编写自定义的认证规则,首先需要对Spring Security中的认证规则有一定的了解,下面简单介绍下Spring Security的认证规则。
1)在Spring Security中每个URL都是一个资源,当系统启动的时候,Spring Security会根据配置将所有的URL与访问这个URL所需要的权限的映射数据加载到Spring Security中。
2)当一个请求访问一个资源时,Spring Security会判断这个URL是否需要权限验证,如果不需要,那么直接访问即可。
3)如果这个URL需要进行权限验证,那么Spring Security会检查当前请求来源所属用户是否登录,如果没有登录,则跳转到登录页面,进行登录操作,并加载这个用户的相关信息
4)如果登录,那么判断这个用户所拥有的权限是否包含访问这个URL所需要的权限,如果有则允许访问
5)如果没有权限,那么就给出相应的提示信息
3.自定义认证规则思路
根据上面一小节介绍的Spring Security认证的过程,我们相应的就能够分析出对于这个过程我们如果要修改的话,需要进行哪些方面的改动。
3.1.自定义SecurityMetadataSource
在Spring Security中的 SecurityMetadataSource 处于上面的步骤一中,也就是用于加载URL与权限对应关系的,对于这个我们需要自己进行定义
package com.oolong.customsecurity;

import java.util.ArrayList;
import java.util.Collection;
import java.util.HashMap;
import java.util.List;
import java.util.Map;
import java.util.Set;

import org.apache.log4j.LogManager;
import org.springframework.security.access.ConfigAttribute;
import org.springframework.security.access.SecurityConfig;
import org.springframework.security.web.FilterInvocation;
import org.springframework.security.web.access.intercept.FilterInvocationSecurityMetadataSource;
import org.springframework.stereotype.Component;

/**
 * 加载URL与权限资源,并提供根据URL匹配权限的方法
 * @author weilu2
 * @date 2016年12月17日 上午11:18:52
 *
 */
@Component
public class CustomSecurityMetadataSource
        implements FilterInvocationSecurityMetadataSource {

    private Map<String, List<ConfigAttribute>> resources;

    public CustomSecurityMetadataSource() {
        loadAuthorityResources();
    }

    private void loadAuthorityResources() {
        // 此处在创建时从数据库中初始化权限数据
        // 将权限与资源数据整理成 Map<resource, List<Authority>> 的形式
        // 注意:加载URL资源时,需要对资源进行排序,要由精确到粗略进行排序,让精确的URL优先匹配
        resources = new HashMap<>();

        // 此处先伪造一些数据
        List<ConfigAttribute> authorityList = new ArrayList<>();
        ConfigAttribute auth = new SecurityConfig("AUTH_WELCOME");
        authorityList.add(auth);
        resources.put("/welcome", authorityList);
    }

    @Override
    public Collection<ConfigAttribute> getAttributes(Object object) throws IllegalArgumentException {

        String url = ((FilterInvocation) object).getRequestUrl();

        Set<String> keys = resources.keySet();

        for (String k : keys) {
            if (url.indexOf(k) >= 0) {
                return resources.get(k);
            }
        }
        return null;
    }

    @Override
    public Collection<ConfigAttribute> getAllConfigAttributes() {
        // TODO Auto-generated method stub
        return null;
    }

    @Override
    public boolean supports(Class<?> clazz) {
        return true;
    }

}
在这个类中,实现了FilterInvocationSecurityMetadataSource接口,这个接口中的 getAttributes(Object object)方法能够根据请求的URL,获取这个URL所需要的权限,那么我们就可以在这个类初始化的时候将所有需要的权限加载进来,然后根据我们的规则进行获取,因此这里还需要编写一个加载数据的方法 loadAuthorityResources(),并且在构造函数中调用。
此处加载资源为了简化,只是随意填充了一些数据,实际可以从数据库中获取。
3.2.自定义AccessDecisionManager
编写自定义的决策管理器,决策管理器是Spring Security用来决定对于一个用户的请求是否基于通过的中心控制。
package com.oolong.customsecurity;

import java.util.Collection;
import java.util.Iterator;

import org.apache.log4j.LogManager;
import org.springframework.security.access.AccessDecisionManager;
import org.springframework.security.access.AccessDeniedException;
import org.springframework.security.access.ConfigAttribute;
import org.springframework.security.authentication.InsufficientAuthenticationException;
import org.springframework.security.core.Authentication;
import org.springframework.security.core.GrantedAuthority;
import org.springframework.stereotype.Component;

/**
 * 进行决策,根据URL获得访问这个资源所需要的权限,然后在与当前用户所拥有的权限进行对比
 * 如果当前用户拥有相关权限,就直接返回,否则抛出 AccessDeniedException异常
 * @author weilu2
 * @date 2016年12月17日 上午11:30:40
 *
 */
@Component
public class CustomAccessDecisionManager implements AccessDecisionManager {

    @Override
    public void decide(Authentication authentication, Object object, Collection<ConfigAttribute> configAttributes)
            throws AccessDeniedException, InsufficientAuthenticationException {

        LogManager.getLogger("CustomAccessDecisionManager").info("decide invoke");

        if (configAttributes == null) {
            return;
        }

        if (configAttributes.size() <= 0) {
            return;
        }

        Iterator<ConfigAttribute> authorities = configAttributes.iterator();
        String needAuthority = null;

        while(authorities.hasNext()) {
            ConfigAttribute authority = authorities.next();

            if (authority == null || (needAuthority = authority.getAttribute()) == null) {
                continue;
            }

            LogManager.getLogger("CustomAccessDecisionManager").info("decide == " + needAuthority);

            for (GrantedAuthority ga : authentication.getAuthorities()) {
                if (needAuthority.equals(ga.getAuthority().trim())) {
                    return;
                }
            }
        }
        throw new AccessDeniedException("No Authority");
    }

    @Override
    public boolean supports(ConfigAttribute attribute) {
        return true;
    }

    @Override
    public boolean supports(Class<?> clazz) {
        return true;
    }

}
决策管理器最重要的就是这个 decide()方法,Spring Security会将当前登录用户信息包装到一个 Authentication对象中,并传入这个方法;并且调用 SecurityMetadataSource.getAttributes() 方法获取这个URL相关的权限以参数 Collection<ConfigAttribute> 的形式传入这个方法。
然后这个decide方法获取到这两个信息之后就可以进行对比决策了。如果当前用户允许登录,那么直接return即可。如果当前用户不许运行登录,则抛出一个 AccessDeniedException异常。
3.3.自定义 UserDetailsService 和 AuthenticationProvider
前面说过,要进行验证,除了有URL与权限的映射关系,还需要有用户的权限信息。要编写自定义的用户数据加载,就需要实现这两个接口。
3.3.1.UserDetailsService
package com.oolong.customsecurity;

import java.util.ArrayList;
import java.util.List;

import org.apache.log4j.LogManager;
import org.springframework.security.core.userdetails.UserDetails;
import org.springframework.security.core.userdetails.UserDetailsService;
import org.springframework.security.core.userdetails.UsernameNotFoundException;
import org.springframework.stereotype.Component;

import com.oolong.model.AccountInfoModel;
import com.oolong.model.AuthorityModel;

@Component
public class CustomUserDetailsService implements UserDetailsService {

    @Override
    public UserDetails loadUserByUsername(String username) throws UsernameNotFoundException {

        LogManager.getLogger("CustomUserDetailsService").info("loadUserByUsername invoke");

        // 提供到数据库查询该用户的权限信息
        // 关于角色和权限的转换关系在此处处理,根据用户与角色的关系、角色与权限的关系,
        // 将用户与权限的管理整理出来

        // 此处伪造一些数据
        // 伪造权限
        AuthorityModel authority = new AuthorityModel("AUTH_WELCOME");
        List<AuthorityModel> authorities = new ArrayList<>();
        authorities.add(authority);

        AccountInfoModel account = new AccountInfoModel("oolong", "12345");
        account.setAuthorities(authorities);

        return account;
    }
}
3.3.2.AuthenticationProvider
AuthenticationProvider用于包装UserDetailsService,并将其提供给 Spring Security使用。这个接口中最重要的是实现 retrieveUser() 方法,这个请参考接口的说明进行实现,此处不再赘述。
package com.oolong.customsecurity;

import org.apache.log4j.LogManager;
import org.springframework.beans.factory.annotation.Autowired;
import org.springframework.security.authentication.AuthenticationServiceException;
import org.springframework.security.authentication.BadCredentialsException;
import org.springframework.security.authentication.UsernamePasswordAuthenticationToken;
import org.springframework.security.authentication.dao.AbstractUserDetailsAuthenticationProvider;
import org.springframework.security.core.AuthenticationException;
import org.springframework.security.core.userdetails.UserDetails;
import org.springframework.security.core.userdetails.UserDetailsService;
import org.springframework.security.core.userdetails.UsernameNotFoundException;
import org.springframework.stereotype.Component;

/**
 * 这两个方法用于添加额外的检查功能,此处不需要添加,因此空着,直接实现这个抽象类即可。
 * @author weilu2
 * @date 2016年12月17日 下午12:20:27
 *
 */
@Component
public class CustomUserDetailsAuthenticationProvider extends AbstractUserDetailsAuthenticationProvider {

    @Autowired
    private UserDetailsService userDetailsService;

    public UserDetailsService getUserDetailService() {
        return this.userDetailsService;
    }

    public void setUserDetailService(UserDetailsService userDetailsService) {
        this.userDetailsService = userDetailsService;
    }

    @Override
    protected void additionalAuthenticationChecks(UserDetails userDetails,
            UsernamePasswordAuthenticationToken authentication) throws AuthenticationException {

    }

    @Override
    protected UserDetails retrieveUser(String username, UsernamePasswordAuthenticationToken authentication)
            throws AuthenticationException {

        LogManager.getLogger("CustomUserDetailsAuthenticationProvider").info("retrieveUser invoke");

        if (userDetailsService == null) {
            throw new AuthenticationServiceException("");
        }

        UserDetails userDetails = userDetailsService.loadUserByUsername(username);

        if (userDetails == null) {
            throw new UsernameNotFoundException(username);
        }

        if (userDetails.getUsername().equals(authentication.getPrincipal().toString())
                && userDetails.getPassword().equals(authentication.getCredentials().toString())) {
            return userDetails;
        }

        throw new BadCredentialsException(username + authentication.getCredentials());
    }
}
3.4.UserDetails和GrantedAuthority
这两个接口非常简单,请参考源码,此处不再赘述
4.配置
上面编写的这些自定义的实现都有了,但是仅仅这样是没有用的,如何配置能够让它们起作用呢?
package com.oolong.config;

import org.springframework.beans.factory.annotation.Autowired;
import org.springframework.context.annotation.Bean;
import org.springframework.context.annotation.ComponentScan;
import org.springframework.context.annotation.Configuration;
import org.springframework.security.config.annotation.authentication.builders.AuthenticationManagerBuilder;
import org.springframework.security.config.annotation.web.builders.HttpSecurity;
import org.springframework.security.config.annotation.web.configuration.EnableWebSecurity;
import org.springframework.security.config.annotation.web.configuration.WebSecurityConfigurerAdapter;
import org.springframework.security.web.access.ExceptionTranslationFilter;
import org.springframework.security.web.access.intercept.FilterSecurityInterceptor;

import com.oolong.customsecurity.CustomAccessDecisionManager;
import com.oolong.customsecurity.CustomSecurityMetadataSource;
import com.oolong.customsecurity.CustomUserDetailsAuthenticationProvider;
import com.oolong.customsecurity.TempHook;

@Configuration
@ComponentScan(basePackageClasses={TempHook.class})
@EnableWebSecurity
public class SecurityConfig extends WebSecurityConfigurerAdapter {

    @Autowired
    private CustomUserDetailsAuthenticationProvider customAuthenticationProvider;

    @Autowired
    private CustomAccessDecisionManager customAccessDecisionManager;

    @Autowired
    private CustomSecurityMetadataSource customSecurityMetadataSource;

    @Override
    protected void configure(AuthenticationManagerBuilder auth) throws Exception {
        auth.authenticationProvider(customAuthenticationProvider);
    }

    @Override
    protected void configure(HttpSecurity http) throws Exception {
        http.addFilterAfter(customFilterSecurityInterceptor(), ExceptionTranslationFilter.class);
        http.formLogin();
    }

    @Bean
    public FilterSecurityInterceptor customFilterSecurityInterceptor() {
        FilterSecurityInterceptor fsi = new FilterSecurityInterceptor();
        fsi.setAccessDecisionManager(customAccessDecisionManager);
        fsi.setSecurityMetadataSource(customSecurityMetadataSource);

        return fsi;
    }
}
在Spring MVC中,Spring Security是通过过滤器发挥作用的,因此我们就爱那个决策管理器与数据加载放到一个过滤器中,然后将这个过滤器插入到系统的过滤器链中。
此外,我们向系统中提供了一个用于检索用户的 AuthenticationProvicer。
还有,别忘记了,告诉系统,如果用户没有权限应该怎么办,http.formLogin(),告诉Spring Security要跳转到表单登录页面。
参考