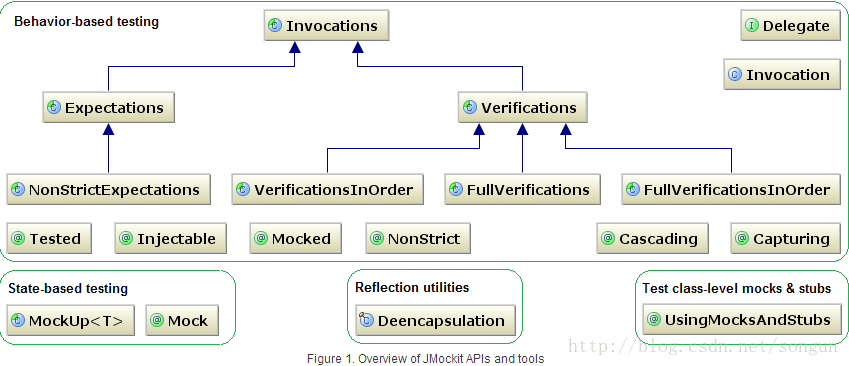
一、在eclipse下建立JMockit工程
1、下载最新版JMockit(jmockit-1.4.zip);
2、解压后的文件夹包含有:library jars, source files, samples, API javadocs, and additional documentation;
3、将jmockit.jar添加到项目classpath中;
特别的:
1)确保classpath中Jar包的顺序:jmockit的jar包必须在junit之前(通过Order and Export" 标签上下移动);
2)eclipse项目所用JRE来自于JDK,而不是“简洁”版的JRE,因为后者缺少本地类库“attach”。

二、行为和状态的测试
基于行为(Behavior-based)的mock是站在目标测试代码外面的角度的,通常主要模拟行为,而基于状态
(State-based)的是站在目标测试代码内部的。我们可以对传入的参数进行检查、匹配,才返回某些结果。
Mockup用于State-based测试。
二、声明和使用mock类型
1、字段,期望块的字段与期望块内的局部属性字段使用@Mocked来声明Mock类型。
2、参数,方法的参数声明来引入一个Mock类型。
第一种情况,属性字段是属于测试类或者一个mockit.Expectations子类(一个expectation期望块的内部的局部
属性字段)。
第二种情况,参数必须是属于某个测试方法(@Test标签下的方法)。
在所有的情况,一个mock属性字段或者参数声明,都可以通过使用@Mocked声明。对于方法mock的参数或者
在expectations期望块中定义的mock属性字段来说,该注解是可选的,而对于定义在测试类(XXXTest类)中的
属性字段,@Mocked标签是必须,这是为了防止和该测试类的其它不需要mock的字段属性产生冲突。
package main;


import static org.junit.Assert.*;


import java.io.Serializable;


import org.junit.Test;


import mockit.Expectations;

import mockit.Mocked;

import mockit.NonStrictExpectations;

import mockit.Verifications;


/*

* 一个用户接口(外部依赖)

*/

interface Dependency {

String doSomething(boolean b);

}


// 声明变量类型MultiMock(它实现两个接口,作用域是整个测试类)

public class MultiMocksTest<MultiMock extends Dependency & Runnable> {


@Mocked

MultiMock multiMock;


@Test

public void mockFieldWithTwoInterfaces() {

new NonStrictExpectations() {

{

multiMock.doSomething(false);

result = "test";

}

};


multiMock.run();

assertEquals("test", multiMock.doSomething(false));


// 验证run()方法执行一次

new Verifications() {

{

multiMock.run();

}

};

}


@Test

// 声明变量类型M,它实现两个接口,作用域为该测试方法

// final M mock 前的@Mocked注解是可选的

public <M extends Dependency & Serializable> void mockParameterWithTwoInterfaces(

@Mocked final M mock) {

new Expectations() {

{

mock.doSomething(true);

result = "";

}

};


assertEquals("", multiMock.doSomething(true));

}

}
3、对于一个返回值不为void类型的方法,Expectations中如何模拟方法返回值:
1)其返回值可以通过Expectations的result属性域来记录
2)Expectations的returns(Object)方法来记录
例如,方法返回一个Throwable异常类,只需将一个类型实验赋给result(注意,异常类只能通过result方式
赋值)。
package main;


import mockit.Expectations;


import org.junit.Test;


public class UnitUnderTest {


// 1、构造方法

private OutWork work = new OutWork();


public void doSomthing() {

// 2、intReturningMethod()方法

int n = work.intReturningMethod();


for (int i = 0; i < n; i++) {

String s;

try {

// 3、stringReturningMethod()方法

s = work.stringReturningMethod();

} catch (Exception e) {

// 处理异常

e.printStackTrace();

}

}


// 其它逻辑...

}


@Test

public void test() {

new Expectations() {

OutWork work;

{

// 1、构造方法模拟

new OutWork();


// 2、intReturningMethod()方法模拟

work.intReturningMethod();

result = 3;


// 3、stringReturningMethod()方法模拟

work.stringReturningMethod();

// 方法分别返回三个值,两个字符串,一个异常

returns("str1", "str2");

result = new Exception("testException");

}

};


new UnitUnderTest().doSomthing();

}

}


class OutWork {

public int intReturningMethod() {

return 0;

}


public String stringReturningMethod() {

return "";

}

}
三、从严格到非严格
1、@Mocked+Expections块:会进行隐式校验(执行顺序和次数)
2、@Mocked+NonStrictExpections块:NonStrictExpections块中的Incovation可以非严格执行(不执行或者
执行N次,除非显示地指定执行次数)。
package main;

/*

* 用于Mock的接口

*/

public interface WinportUrlService {

public boolean hasWinport(String id);

public String getMsg();

public Throwable getWinportUrlThrowException(String id);

}


package main;


import static org.junit.Assert.*;

import mockit.Expectations;

import mockit.Mocked;

import mockit.NonStrictExpectations;


import org.junit.Test;


public class IntroductionTest {


// @Mocked注解+Expectations/NonStrictExpectations块

@Mocked

private WinportUrlService winportUrlService = null;


@Test

public void testNoExceptions() {

final String memberId = "test";

// 未指定期望块,方法返回默认值

assertEquals(false, winportUrlService.hasWinport(memberId));

assertEquals(null, winportUrlService.getMsg());

assertEquals(null, winportUrlService.getWinportUrlThrowException(memberId));

}


@Test

public void testWithExpectations() {

final String memerId = "test";


// 步骤一:record


// 严格期望块

new Expectations() {

{

// 下面的Invocation必须严格执行

winportUrlService.hasWinport(memerId);

result = false;// 也可以是returns(false)


// 未指定执行次数

}

};


// 非严格期望块

new NonStrictExpectations() {

{

// 下面的Invocation非严格执行

winportUrlService.getMsg();

result = "test";// 也可以是returns("test")


// 未指定执行次数

}

};


// 步骤二:replay阶段


// hasWinport必须严格执行一次

assertEquals(false, winportUrlService.hasWinport(memerId));


// getMsg可以不执行或执行多次

assertEquals("test", winportUrlService.getMsg());

assertEquals("test", winportUrlService.getMsg());


// 下面的Invocation失败

// winportUrlService.getWinportUrlThrowException(memerId);

}

}
3、@NonStrict:可以在replay中调用或不调用。@NonStrict可以避免需要记录调用构造函数,或任何不感兴
趣的方法。
注意:@NonStrict它是针对类的属性非严格,类的属性适用于类中的所有测试方法。这个非严格的范围比
NonStrictExpections块的作用范围大很多,一旦使用了@NonStrict,Expections中的Incovation就变成了非严
格的invocation,因此其它测试方法还想在该属性的基础上使用Expections块是不可能的了。如果是这种情况
就需要这样使用(@Mocked+NonStrictExpectations块)。
package main;


import static org.junit.Assert.*;

import mockit.Expectations;

import mockit.NonStrict;


import org.junit.Test;


public class IntroductionTest2 {


// @NonStrict注解

@NonStrict

private WinportUrlService winportUrlService = null;


@Test

public void testWithExpectations() {

final String memberId = "test";


// 步骤一:record


// 用了@NonStrict,Expectation中的invocation就变成了非严格的invocation

new Expectations() {

{

// 下面的Invocation非严格执行

winportUrlService.hasWinport(memberId);

result = false;// 也可以是returns(false)


// 未指定执行次数

}

};


// 步骤二:replay阶段


// hasWinport可以不执行或执行多次

assertEquals(false, winportUrlService.hasWinport(memberId));

assertEquals(false, winportUrlService.hasWinport(memberId));


// 下面的Invocation成功

winportUrlService.getWinportUrlThrowException(memberId);


}

}
4、此外,若不指定执行次数,Expections块默认必须执行一次,NonStrictExpections块中的Invocation可执行
N次或不执行;若显式地指定执行次数(N次),二者的Invocation都必须执行N次