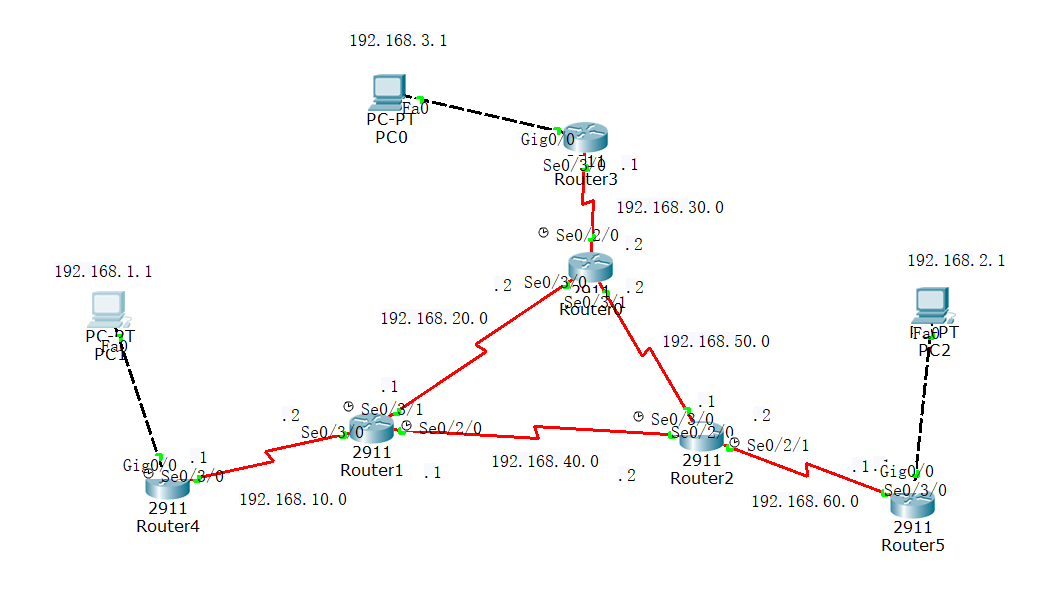
我们将以上面的拓扑图进行本次ospf的实验,目的是能当三台pc机互通
先配置好pc机的IP地址,注意一定要给pc机设置好网关,接下来配置路由器的IP地址
router4
enable 进入特权模式
config t 进入全局配置模式
interface g0/0
ip address 192.168.1.254 255.255.255.0
no shu
exit
interface s0/3/0
ip address 192.168.10.1 255.255.255.0
no shu
router1
enable
config t
interface s0/3/0
ip address 192.168.10.2 255.255.255.0
clock rate 6400 同步时间
no shu
exit
interface s0/3/1
ip address 192.168.20.1 255.255.255.0
clock rate 6400
no shu
exit
interface s0/2/0
ip address 192.168.40.1 255.255.255.0
clock rate 6400
no shu
router2
enable
config t
interface s0/3/0
ip address 192.168.50.1 255.255.255.0
clock rate 6400 同步时间
no shu
exit
interface s0/2/1
ip address 192.168.60.2 255.255.255.0
clock rate 6400
no shu
exit
interface s0/2/0
ip address 192.168.40.2 255.255.255.0
clock rate 6400
no shu
router0
enable
config t
interface s0/3/0
ip address 192.168.20.2 255.255.255.0
clock rate 6400 同步时间
no shu
exit
interface s0/3/1
ip address 192.168.50.2 255.255.255.0
clock rate 6400
no shu
exit
interface s0/2/0
ip address 192.168.30.2 255.255.255.0
clock rate 6400
no shu
router3
enable
config t
interface g0/0
ip address 192.168.3.254 255.255.255.0
no shu
exit
interface s0/3/0
ip address 192.168.30.1 255.255.255.0
no shu
router5
enable
config t
interface g0/0
ip address 192.168.2.254 255.255.255.0
no shu
exit
interface s0/3/0
ip address 192.168.60.1 255.255.255.0
no shu
路由器的IP地址配置完毕
配置ospf
router4
在全局配置模式下
router ospf 1
router-id 1.1.1.1
network 192.168.1.0 0.0.0.255 area 0
network 192.168.10.0 0.0.0.255 area 0
router1
在全局配置模式下
router ospf 1
router-id 2.2.2.2
network 192.168.10.0 0.0.0.255 area 0
network 192.168.20.0 0.0.0.255 area 0
network 192.168.40.0 0.0.0.255 area 0
router0
在全局配置模式下
router ospf 1
router-id 3.3.3.3
network 192.168.30.0 0.0.0.255 area 0
network 192.168.20.0 0.0.0.255 area 0
network 192.168.50.0 0.0.0.255 area 0
router2
在全局配置模式下
router ospf 1
router-id 4.4.4.4
network 192.168.40.0 0.0.0.255 area 0
network 192.168.50.0 0.0.0.255 area 0
network 192.168.60.0 0.0.0.255 area 0
router3
在全局配置模式下
router ospf 1
router-id 5.5.5.5
network 192.168.3.0 0.0.0.255 area 0
network 192.168.30.0 0.0.0.255 area 0
router5
在全局配置模式下
router ospf 1
router-id 6.6.6.6
network 192.168.2.0 0.0.0.255 area 0
network 192.168.60.0 0.0.0.255 area 0
ospf全部配置完毕,等待路由器之间相互学习,可以在特权模式下使用show ip route来查看路由表的学习情况
学习完毕可以使用ping命令,三台pc机就可以互通了,到此实验完成