安装Docker
使用如下脚本一键安装docker:
[root@harbor ~]# cat dockerInstall.sh
#!/bin/bash
Version="20.10.4-3.el7"
# 下载docker安装源
wget -P /etc/yum.repos.d/ https://mirrors.aliyun.com/docker-ce/linux/centos/docker-ce.repo
# 安装docker
yum -y install docker-ce-$Version || echo -e '�33[1;31m安装失败,请检查网络和yum源配置!�33[0m'
# 使用国内镜像加速
# 阿里云(需要登录账号分配地址)
# 网易云 https://vgunv6qp.mirror.aliyuncs.com
# 腾讯云 https://mirror.ccs.tencentyun.com
# 中科大 https://docker.mirrors.ustc.edu.cn
# docker中国 https://registry.docker-cn.com
mkdir -p /etc/docker
tee /etc/docker/daemon.json <<-'EOF'
{
"registry-mirrors": [
"https://mirror.ccs.tencentyun.com",
"https://docker.mirrors.ustc.edu.cn",
"https://registry.docker-cn.com"
]
}
EOF
# 重新加载配置并启动docker
systemctl daemon-reload
systemctl enable --now docker
docker version && echo -e "�33[1;32m${Version}安装成功!�33[0m" || echo -e '�33[1;31m安装失败!�33[0m'
安装DockerCompose
DockerCompose下载后直接移动到/usr/bin目录下,加上执行权限即可。
[root@harbor ~]# mv docker-compose-Linux-x86_64 /usr/bin/docker-compose
[root@harbor ~]# chmod +x /usr/bin/docker-compose
[root@harbor ~]# ll /usr/bin/docker-compose
-rwxr-xr-x 1 root root 12211728 Mar  2 17:30 /usr/bin/docker-compose
[root@harbor ~]# docker-compose -v
docker-compose version 1.28.5, build c4eb3a1f
部署Harbor
安装
这里以最新的2.2版本为例:
# 解压
[root@harbor ~]# tar xvf harbor-offline-installer-v2.2.0.tgz -C /usr/local
[root@harbor ~]# cd /usr/local/harbor


# 复制配置文件并修改,这里修改了服务器地址和admin管理账号的登录密码
# 并将https相关的内容注释掉了,为了简单我们先不配置https
# 后面单独配置一次带https的harbor
[root@harbor harbor]# cp harbor.yml.tmpl harbor.yml
[root@harbor harbor]# vim harbor.yml
hostname: harbor.wuvikr.top
harbor_admin_password: 12345678
#https:
  # https port for harbor, default is 443
#  port: 443
  # The path of cert and key files for nginx
#  certificate: /your/certificate/path
#  private_key: /your/private/key/path


# 这里使用harbor.wuvikr.top作为harbor服务器域名。
# 因为是本地使用,这里我们自己在hosts文件里面加上。
# 为了后续访问方便,本地机器最后也在hosts文件里添加一下。
[root@harbor certs.d]# cat /etc/hosts
127.0.0.1   localhost localhost.localdomain localhost4 localhost4.localdomain4
::1         localhost localhost.localdomain localhost6 localhost6.localdomain6
192.168.0.59 harbor.wuvikr.top


# 运行安装脚本
# 这里会检查Docker和DockerCompose的版本是否符合要求
# 没有问题的话就会开始拉取镜像并启动了
# 运行install.sh脚本的时候会自动加载harbor.yml文件中的配置
[root@harbor harbor]# ./install.sh

[Step 0]: checking if docker is installed ...

Note: docker version: 20.10.4

[Step 1]: checking docker-compose is installed ...

Note: docker-compose version: 1.28.5

[Step 2]: loading Harbor images ...
...
[Step 3]: preparing environment ...
...
[Step 4]: preparing harbor configs ...
...
[Step 5]: starting Harbor ...
...

# 注意:
# 如果后续重新配置了harbor.yml文件,需要先停止harbor服务。
# 然后运行prepare脚本进行配置重载才行。


# 可以看到拉取了很多镜像
[root@harbor harbor]# docker images
REPOSITORY                      TAG       IMAGE ID       CREATED      SIZE
goharbor/chartmuseum-photon     v2.2.0    7d2b0430a45d   7 days ago   165MB
goharbor/redis-photon           v2.2.0    dab1804560b2   7 days ago   68.9MB
goharbor/trivy-adapter-photon   v2.2.0    658abcdfe7e3   7 days ago   120MB
goharbor/notary-server-photon   v2.2.0    5117cee34e76   7 days ago   101MB
goharbor/notary-signer-photon   v2.2.0    5d8879c476a8   7 days ago   98.4MB
goharbor/harbor-registryctl     v2.2.0    6833a758fcfb   7 days ago   128MB
goharbor/registry-photon        v2.2.0    c5797c8f62f1   7 days ago   77.2MB
goharbor/nginx-photon           v2.2.0    39fcd9da1a47   7 days ago   40.2MB
goharbor/harbor-log             v2.2.0    27a38464bdcd   7 days ago   108MB
goharbor/harbor-jobservice      v2.2.0    62b4ae79b159   7 days ago   163MB
goharbor/harbor-core            v2.2.0    049ef19b7080   7 days ago   148MB
goharbor/harbor-portal          v2.2.0    d9eff87cd8b5   7 days ago   51MB
goharbor/harbor-db              v2.2.0    2f84c1cc9b71   7 days ago   174MB
goharbor/prepare                v2.2.0    c632fc058adf   7 days ago   165MB
goharbor/harbor-exporter        v2.2.0    700422c549b0   7 days ago   76.1MB


# 这里我们先关闭一下harbor,改用service来启动,方便后续管理
# 需要在harbor安装目录下,否者需要使用-f参数来指定docker-compose.yml文件位置
[root@harbor harbor]# docker-compose down
Stopping harbor-jobservice ... done
Stopping nginx             ... done
Stopping harbor-core       ... done
Stopping registryctl       ... done
Stopping redis             ... done
Stopping registry          ... done
Stopping harbor-portal     ... done
Stopping harbor-db         ... done
Stopping harbor-log        ... done
Removing harbor-jobservice ... done
Removing nginx             ... done
Removing harbor-core       ... done
Removing registryctl       ... done
Removing redis             ... done
Removing registry          ... done
Removing harbor-portal     ... done
Removing harbor-db         ... done
Removing harbor-log        ... done
Removing network harbor_harbor


# 编写service文件
[root@harbor harbor]# cat > /lib/systemd/system/harbor.service <<EOF
[Unit]
Description=Docker Harbor
After=docker.service systemd-networkd.service systemd-resolved.service
Requires=docker.service
Documentation=http://github.com/vmware/harbor

[Service]
Type=simple
Restart=on-failure
ExecStart=/usr/bin/docker-compose -f /usr/local/harbor/docker-compose.yml up
ExecStop=/usr/bin/docker-compose -f /usr/local/harbor/docker-compose.yml down
RestartSec=5

[Install]
WantedBy=multi-user.target
EOF

# 改用systemclt来启动Harbor
[root@harbor harbor]# systemctl enable --now harbor.service

# 查看一下容器是否真的都起来了
[root@harbor harbor]# docker-compose ps
      Name                     Command                  State                 Ports
---------------------------------------------------------------------------------------------
harbor-core         /harbor/entrypoint.sh            Up (healthy)
harbor-db           /docker-entrypoint.sh            Up (healthy)
harbor-jobservice   /harbor/entrypoint.sh            Up (healthy)
harbor-log          /bin/sh -c /usr/local/bin/ ...   Up (healthy)   127.0.0.1:1514->10514/tcp
harbor-portal       nginx -g daemon off;             Up (healthy)
nginx               nginx -g daemon off;             Up (healthy)   0.0.0.0:80->8080/tcp
redis               redis-server /etc/redis.conf     Up (healthy)
registry            /home/harbor/entrypoint.sh       Up (healthy)
registryctl         /home/harbor/start.sh            Up (healthy)
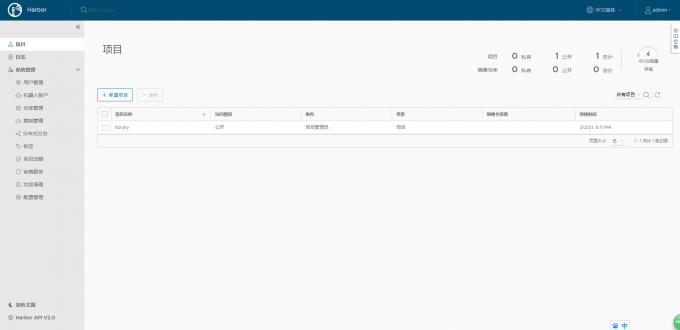
登录Web界面
在浏览器输入harbor.wuvikr.top 跳转到Harbor的Web登录界面。
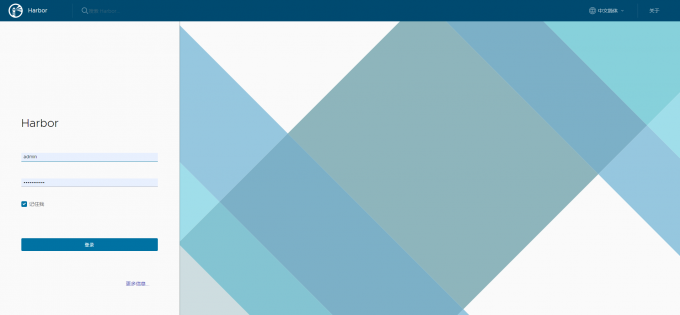
默认管理员帐号为admin,密码为我们自己修改的12345678。
Harbor的使用
Docker登录Harbor仓库
默认docker不支持http连接,直接login会报如下错误:
[root@harbor harbor]#docker login harbor.wuvikr.top
Username: admin
Password:
Error response from daemon: Get https://192.168.0.59/v2/: dial tcp 192.168.0.59:443: connect: connection refused
需要去配置docker,来让它支持http链接。
-
方法一:直接编辑docker.service文件
# 在ExecStart后面跟上--insecure-registry参数指定不安全的仓库地址 ExecStart=/usr/bin/dockerd -H fd:// --containerd=/run/containerd/containerd.sock --insecure-registry 192.168.0.59 -
方法二(推荐):编辑/etc/docker/daemon.json文件
[root@harbor harbor]#cat /etc/docker/daemon.json
{
    "registry-mirrors": [
        "https://mirror.ccs.tencentyun.com",
        "https://docker.mirrors.ustc.edu.cn",
        "https://registry.docker-cn.com"
    ],
    "insecure-registries": [
        "192.168.0.59"
    ]
}
修改完成后重新加载配置并重启docker服务:
[root@harbor harbor]#systemctl daemon-reload
[root@harbor harbor]#systemctl restart docker.service
再次登录harbor:
[root@harbor harbor]#docker login harbor.wuvikr.top
Username: admin
Password:
WARNING! Your password will be stored unencrypted in /root/.docker/config.json.
Configure a credential helper to remove this warning. See
https://docs.docker.com/engine/reference/commandline/login/#credentials-store

Login Succeeded
上传镜像到Harbor仓库
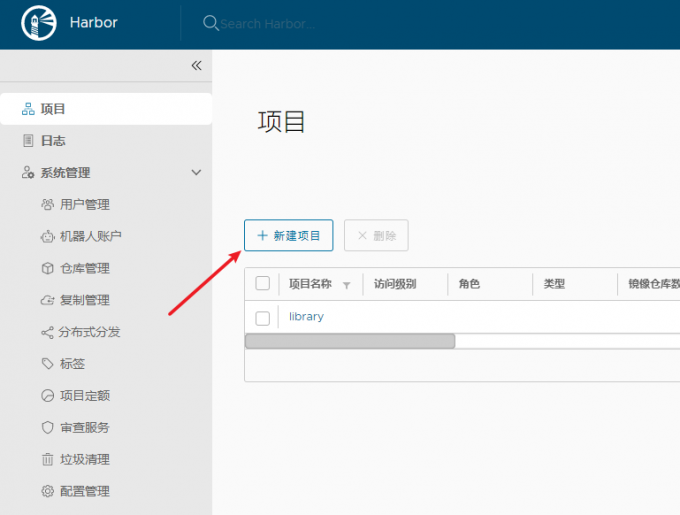
上传到Harbor仓库的镜像命令必须满足以下格式:
Harbor主机名/项目名/镜像名:版本号
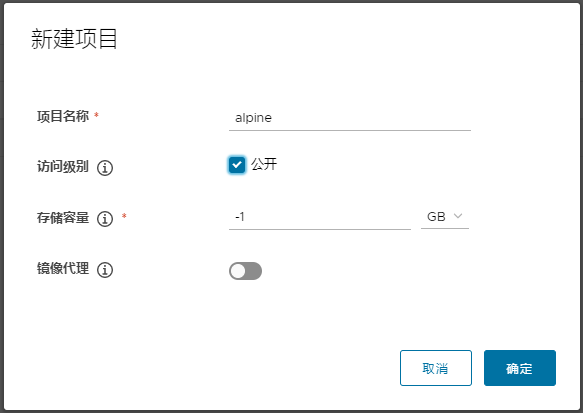
因此,首先要在Harbor的Web端建立一个项目:
点击新建项目,填写项目信息。
创建好项目之后,就可以开始上传镜像了:
# 给要上传的镜像打标签
[root@harbor harbor]#docker tag alpine:latest 192.168.0.59/alpine/alpine:latest


# 上传镜像
[root@harbor harbor]#docker push 192.168.0.59/alpine/alpine:latest
The push refers to repository [192.168.0.59/alpine/alpine]
c04d1437198b: Pushed
latest: digest: sha256:d0710affa17fad5f466a70159cc458227bd25d4afb39514ef662ead3e6c99515 size: 528
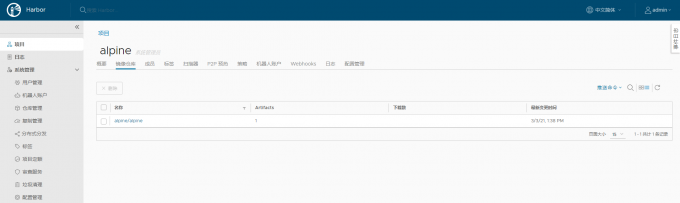
打开web界面,点击刚刚创建的alpine项目,就能看到我们刚刚上传的镜像了:
拉取上传的镜像
切换到另一台机器上拉取我们刚刚上传的镜像。
拉取镜像无需登录,但也必须修改配置,将harbor服务器地址,加入到insecure-registries的列表中去。配置方法与上面一样,修改一下daemon.json文件即可。
# 拉取镜像
[root@centos7 ~]# docker pull 192.168.0.59/alpine/alpine:latest
latest: Pulling from alpine/alpine
Digest: sha256:d0710affa17fad5f466a70159cc458227bd25d4afb39514ef662ead3e6c99515
Status: Downloaded newer image for 192.168.0.59/alpine/alpine:latest


# 查看镜像
[root@centos7 ~]# docker images 192.168.0.59/alpine/alpine
REPOSITORY                   TAG                 IMAGE ID            CREATED             SIZE
192.168.0.59/alpine/alpine   latest              7731472c3f2a        6 weeks ago         5.61MB
Harbor配置HTTPS认证
创建证书
这里采用openssl命令工具生成自签名证书的方式来演示,如果是生产环境,安全要求很高的话还是去买个证书吧。
# 创建目录
[root@harbor ~]# mkdir /usr/local/harbor/certs
[root@harbor ~]# cd /usr/local/harbor/certs

# 生成CA证书
[root@harbor certs]# openssl req -newkey rsa:2048 -nodes -x509 -subj "/C=CN/ST=Shanghai/L=Shanghai/O=wuvikr/OU=IT/CN=ca.wuvikr.top/emailAddress=ca.wuvikr.top" -set_serial 01 -keyout ca.key -days 3650 -out ca.crt

# 生成harbor证书申请
[root@harbor certs]# openssl req -newkey rsa:2048 -nodes -subj "/C=CN/ST=Shanghai/L=Shanghai/O=wuvikr/OU=devops/CN=harbor.wuvikr.top" -set_serial 02 -keyout harbor.key -out harbor.csr

# 为harbor颁发证书
[root@harbor certs]# openssl x509 -req -in harbor.csr -CA ca.crt -CAkey ca.key -CAcreateserial -out harbor.crt

# 查看证书
[root@harbor certs]# ls
ca.crt  ca.key  ca.srl  harbor.crt  harbor.csr  harbor.key
修改harbor.yml
打开之前被我们注释掉的https配置,并配置好crt和key的路径:
[root@harbor harbor]# vim harbor.yml
https:
  # https port for harbor, default is 443
  port: 443
  # The path of cert and key files for nginx
  certificate: /root/harbor/certs/Harbor.crt
  private_key: /root/harbor/certs/Harbor.key
停止harbor服务,重新加载配置:
# 停止服务
[root@harbor harbor]#systemctl stop harbor.service

# 使用prepare脚本重新加载harbor.yml中的配置
[root@harbor harbor]#./prepare
prepare base dir is set to /root/harbor
Clearing the configuration file: /config/portal/nginx.conf
Clearing the configuration file: /config/log/logrotate.conf
Clearing the configuration file: /config/log/rsyslog_docker.conf
Clearing the configuration file: /config/nginx/nginx.conf
Clearing the configuration file: /config/core/env
Clearing the configuration file: /config/core/app.conf
Clearing the configuration file: /config/registry/passwd
Clearing the configuration file: /config/registry/config.yml
Clearing the configuration file: /config/registry/root.crt
Clearing the configuration file: /config/registryctl/env
Clearing the configuration file: /config/registryctl/config.yml
Clearing the configuration file: /config/db/env
Clearing the configuration file: /config/jobservice/env
Clearing the configuration file: /config/jobservice/config.yml
Generated configuration file: /config/portal/nginx.conf
Generated configuration file: /config/log/logrotate.conf
Generated configuration file: /config/log/rsyslog_docker.conf
Generated configuration file: /config/nginx/nginx.conf
Generated configuration file: /config/core/env
Generated configuration file: /config/core/app.conf
Generated configuration file: /config/registry/config.yml
Generated configuration file: /config/registryctl/env
Generated configuration file: /config/registryctl/config.yml
Generated configuration file: /config/db/env
Generated configuration file: /config/jobservice/env
Generated configuration file: /config/jobservice/config.yml
loaded secret from file: /data/secret/keys/secretkey
Generated configuration file: /compose_location/docker-compose.yml
Clean up the input dir


# 稍等一会harbor会自动启动起来
# 查看一下,可以看到nginx的443端口已经打开了
[root@harbor harbor]#docker-compose ps
      Name                  Command                   State                    Ports
---------------------------------------------------------------------------------------------
harbor-core         /harbor/entrypoint.sh     Up (health: starting)
harbor-db           /docker-entrypoint.sh     Up (health: starting)
harbor-jobservice   /harbor/entrypoint.sh     Up (health: starting)
harbor-log          /bin/sh -c                Up (health: starting)   127.0.0.1:1514->10514/t
                    /usr/local/bin/ ...                               cp
harbor-portal       nginx -g daemon off;      Up (health: starting)
nginx               nginx -g daemon off;      Up (health: starting)   0.0.0.0:80->8080/tcp,
                                                                      0.0.0.0:443->8443/tcp
redis               redis-server              Up (health: starting)
                    /etc/redis.conf
registry            /home/harbor/entrypoint   Up (health: starting)
                    .sh
registryctl         /home/harbor/start.sh     Up (health: starting)
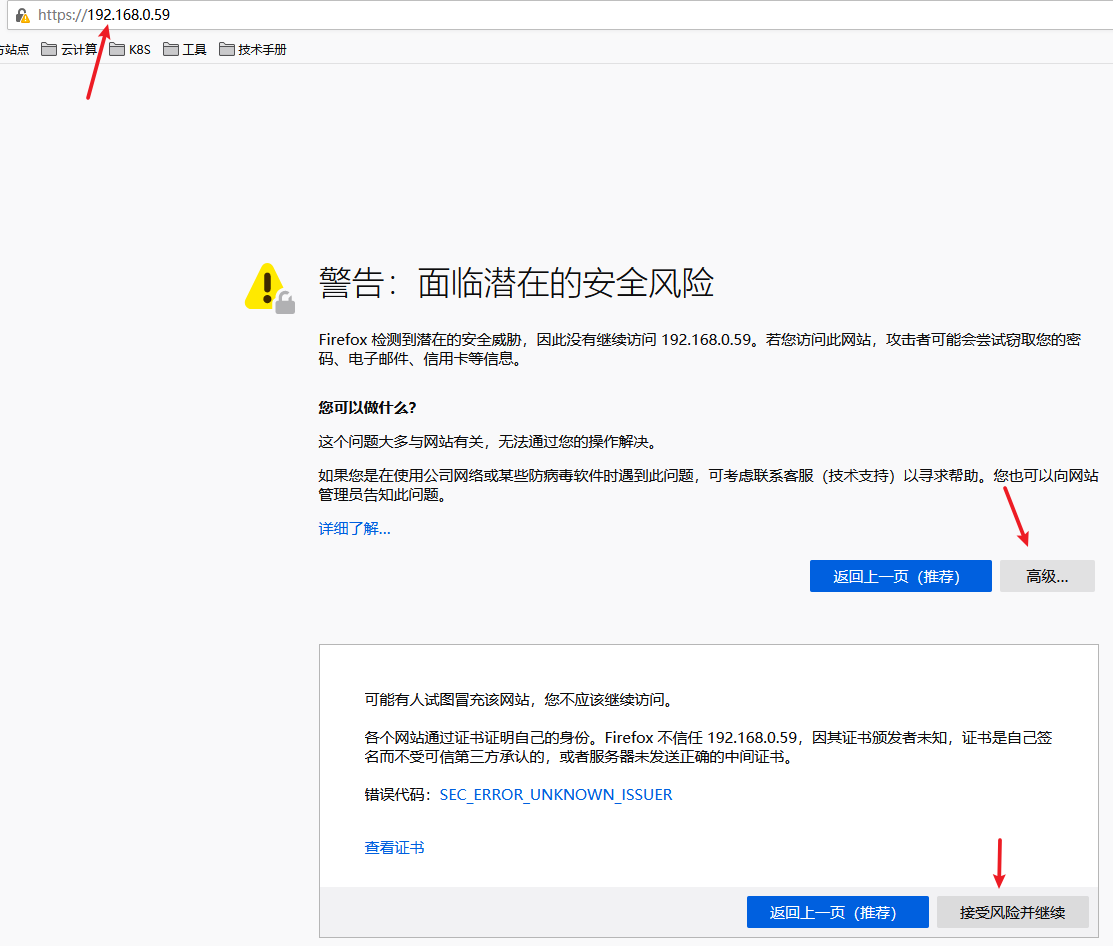
这时候我们在浏览器输入Harbor的ip地址登录会发现自动跳转到HTTPS连接上去了。
因为这里使用的是自签名证书,所以不被信任,下面的截图中我使用的是火狐浏览器,可以选择高级,接受风险并继续登录进去,其他浏览器操作类似。
HTTPS下Harbor的使用
在使用HTTPS证书的情况下,在一台新的客户端机器上,如果直接使用docker login会有如下错误:
[root@harbor ~]# docker login harbor.wuvikr.top
Username: admin
Password:
Error response from daemon: Get https://192.168.0.59/v2/: x509: cannot validate certificate for 192.168.0.59 because it doesn't contain any IP SANs
客户端需要下载ca的证书,下载完成后需要在/etc/docker/目录下建立 certs.d/harbor.wuvikr.top 目录,将证书放在该目录下,需要注意的是这个目录名需要和证书中的一致,我这里创建证书的时候CN=harbor.wuvikr.top,所以目录名就是这个。
[root@harbor ~]# mkdir -pv /etc/docker/certs.d/harbor.wuvikr.top
[root@harbor ~]# mv ca.crt /etc/docker/certs.d/harbor.wuvikr.top/

# 目录结构
[root@harbor ~]#tree /etc/docker/certs.d/
/etc/docker/certs.d/
└── harbor.wuvikr.top
    └── ca.crt

1 directory, 1 file
这时候我们再次登录就没有问题了:
[root@harbor ~]#docker login harbor.wuvikr.top
Username: admin
Password:
WARNING! Your password will be stored unencrypted in /root/.docker/config.json.
Configure a credential helper to remove this warning. See
https://docs.docker.com/engine/reference/commandline/login/#credentials-store

Login Succeeded
Harbor的高可用
在第二台机器上安装部署好 Harbor ,安装方法和前面介绍的一致,最好使用相同的版本。
安装完成后登录管理界面,点击 系统管理 -> 仓库管理 -> 新建目标 设置要复制的仓库信息。
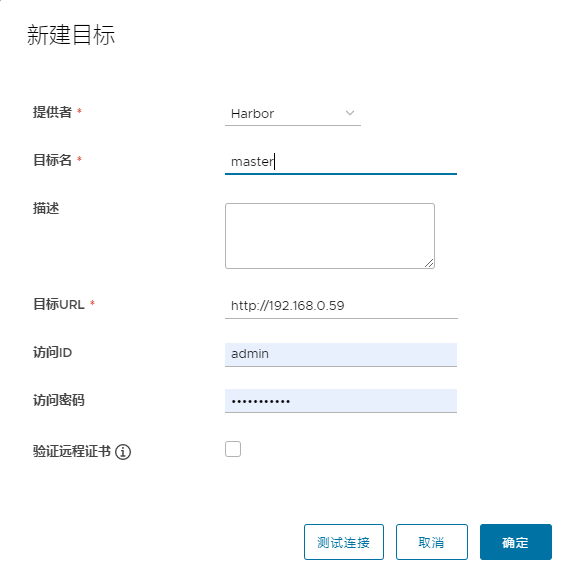
其中带 * 号的为必填项,目标名随便取,重要的是目标URL和帐号密码要填写正确,然后我这里没开启http,因此将验证远程证书一项的勾选给去掉,设置好后可以点击一下测试连接,没问题后选择确定。
这里设置好后再点击 系统管理 -> 复制管理 -> 新建规则 设置复制规则。
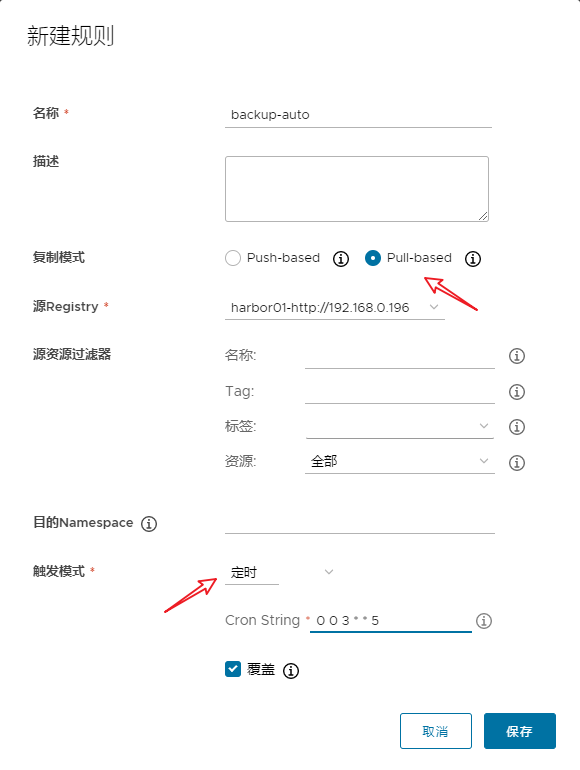
这里的复制模式选择 Pull 模式,然后触发模式我这里选择定时,下面是一个 corntab 式的定时设置,不同的是这里可以精确到秒。当然也可以设置为手动触发的模式,设置好之后就可以使用了。
这里只是第二台机器到第一台机器的单向复制,如果仅作备份这样就可以了,如果是使用 VIP 随机往这两台机器上调度的高可用模式则还需要去第一台机器上,按照上面的步骤也操作一遍,实现双向复制。