Spring Security是什么?
Spring Security 提供了基于javaEE的企业应有个你软件全面的安全服务。这里特别强调支持使用SPring框架构件的项目,Spring框架是企业软件开发javaEE方案的领导者。如果你还没有使用Spring来开发企业应用程序,我们热忱的鼓励你仔细的看一看。熟悉Spring特别是一来注入原理两帮助你更快更方便的使用Spring Security。中文文档地址: https://www.springcloud.cc/spring-security-zhcn.html
人们使用Spring Secruity的原因有很多,单大部分都发现了javaEE的Servlet规范或EJB规范中的安全功能缺乏典型企业应用场景所需的深度。提到这些规范,重要的是要认识到他们在WAR或EAR级别无法移植。因此如果你更换服务器环境,这里有典型的大量工作去重新配置你的应用程序员安全到新的目标环境。使用Spring Security 解决了这些问题,也为你提供许多其他有用的,可定制的安全功能。正如你可能知道的两个应用程序的两个主要区域是“认证”和“授权”(或者访问控制)。这两个主要区域是Spring Security 的两个目标。“认证”,是建立一个他声明的主题的过程(一个“主体”一般是指用户,设备或一些可以在你的应用程序中执行动作的其他系统)。“授权”指确定一个主体是否允许在你的应用程序执行一个动作的过程。为了抵达需要授权的店,主体的身份已经有认证过程建立。这个概念是通用的而不只在Spring Security中。在身份验证层,Spring Security 的支持多种认证模式。这些验证绝大多数都是要么由第三方提供,或由相关的标准组织,如互联网工程任务组开发。另外Spring Security 提供自己的一组认证功能。具体而言,Spring Security 目前支持所有这些技术集成的身份验证:
-
HTTP BASIC 认证头 (基于 IETF RFC-based 标准)
-
HTTP Digest 认证头 ( IETF RFC-based 标准)
-
HTTP X.509 客户端证书交换 ( IETF RFC-based 标准)
-
LDAP (一个非常常见的方法来跨平台认证需要, 尤其是在大型环境)
-
Form-based authentication (用于简单的用户界面)
-
OpenID 认证
-
Authentication based on pre-established request headers (such as Computer Associates Siteminder) 根据预先建立的请求有进行验证
-
JA-SIG Central Authentication Service (CAS,一个开源的SSO系统 )
-
............
很多独立软件供应商,因为灵活的身份验证模式二选择Spring Security。这样做允许他们快速的集成到他们的终端客户需求的解决方案而不用进行大量工程或者改变客户的环境。如果上面的验证机制不符合你的需求,Spring Security 是一个开放的平台,要实现你 自己的验证机制检查。Spring Security 的许多企业用户需要与不遵循任何安全标准的“遗留”系统集成,Spring Security可以很好的与这类系统集成。无论何种身份验证机制,Spring Security提供一套的授权功能。这里有三个主要的热点区域,授权web请求、授权方法是否可以被调用和授权访问单个域对象的实例。为了帮助让你分别了解这些差异,认识在Servlet规范网络模式安全的授权功能,EJB容器管理的安全性和文件系统的安全。
SpringBoot 集成 Security 实现自定义登录:
那么接下去我将使用springboot 2.0.1 版本集成spring security。本文中部介绍默认的配置下的使用方式,直接自定义实现。
1.导入依赖:
<dependency>
    <groupId>org.springframework.boot</groupId>
    <artifactId>spring-boot-starter-security</artifactId>
</dependency>
2.相关配置:在Security 中给我们提供了一个配置适配器,供开发者来配置自定义的实现。配置全局属性,这个类就是 WebSecurityConfigurerAdapter,我们只需要集成该类,实现对应方法即可:
@Configuration
@EnableWebSecurity// 开启Security
@EnableGlobalMethodSecurity(prePostEnabled = true)//开启Spring方法级安全
public class SecurityConfig extends WebSecurityConfigurerAdapter {
    // Secutiry 处理链
//    SecurityContextPersistenceFilter
//    --> UsernamePasswordAuthenticationFilter
//    --> BasicAuthenticationFilter
//    --> ExceptionTranslationFilter
//    --> FilterSecurityInterceptor
    @Autowired
    private MyAuthenticationSuccessHandler myAuthenticationSuccessHandler;

    @Autowired
    private MyAuthenticationProvider myAuthenticationProvider;

    @Autowired
    private MyAuthenctiationFailureHandler myAuthenctiationFailureHandler;

    @Autowired
    private MyUserDetailService myUserDetailService;//密码加密
    @Bean
    public PasswordEncoder passwordEncoder() {
        return new BCryptPasswordEncoder();
    }

    // 自定义认证配置
    @Override
    protected void configure(AuthenticationManagerBuilder auth) throws Exception {
        auth.authenticationProvider(myAuthenticationProvider);
    }

    @Override
    protected void configure(HttpSecurity http) throws Exception {
        //关闭Security功能
//        http.csrf().disable()
//                .authorizeRequests()
//                .anyRequest().permitAll()
//                .and().logout().permitAll();

        http.authorizeRequests()
                    .antMatchers("/wuzz/test4","/code/*").permitAll() //不需要保护的资源,可以多个
                    .antMatchers("/wuzz/**").authenticated()// 需要认证得资源,可以多个
                    .and()
                .formLogin().loginPage("http://localhost:8080/#/login")//自定义登陆地址
                    .loginProcessingUrl("/authentication/form") //登录处理地址
                    .successHandler(myAuthenticationSuccessHandler) // 登陆成功处理器
                    .failureHandler(myAuthenctiationFailureHandler) // 登陆失败处理器
                    .permitAll()
                    .and()
                    .userDetailsService(myUserDetailService)//设置userDetailsService,处理用户信息
        ;
        http.headers().cacheControl(); //禁用缓存
        http.csrf().disable(); //禁用csrf校验
    }

    //忽略的uri
//    @Override
//    public void configure(WebSecurity web) throws Exception {
//        web.ignoring()
//                .antMatchers( "/api/**", "/resources/**", "/static/**", "/public/**", "/webui/**", "/h2-console/**"
//                        , "/configuration/**",  "/swagger-resources/**", "/api-docs", "/api-docs/**", "/v2/api-docs/**"
//                        ,  "/**/*.css", "/**/*.js","/**/*.ftl", "/**/*.png ", "/**/*.jpg", "/**/*.gif ", "/**/*.svg", "/**/*.ico", "/**/*.ttf", "/**/*.woff");
//    }
}
例如上面的配置,我们就完成了基本的自定义登录的实现流程。可能有些小伙伴还不清理里面的配置是什么意思,那么我们接下去来说明一下关键的几个接口。
- AuthenticationSuccessHandler :成功处理器,用于登陆成功后的处理。
- AuthenticationFailureHandler:失败处理器,用于登陆失败的处理。
- AuthenticationProvider :认证器,服务用户登录的认证。
- UserDetailsService:用户信息的构建。
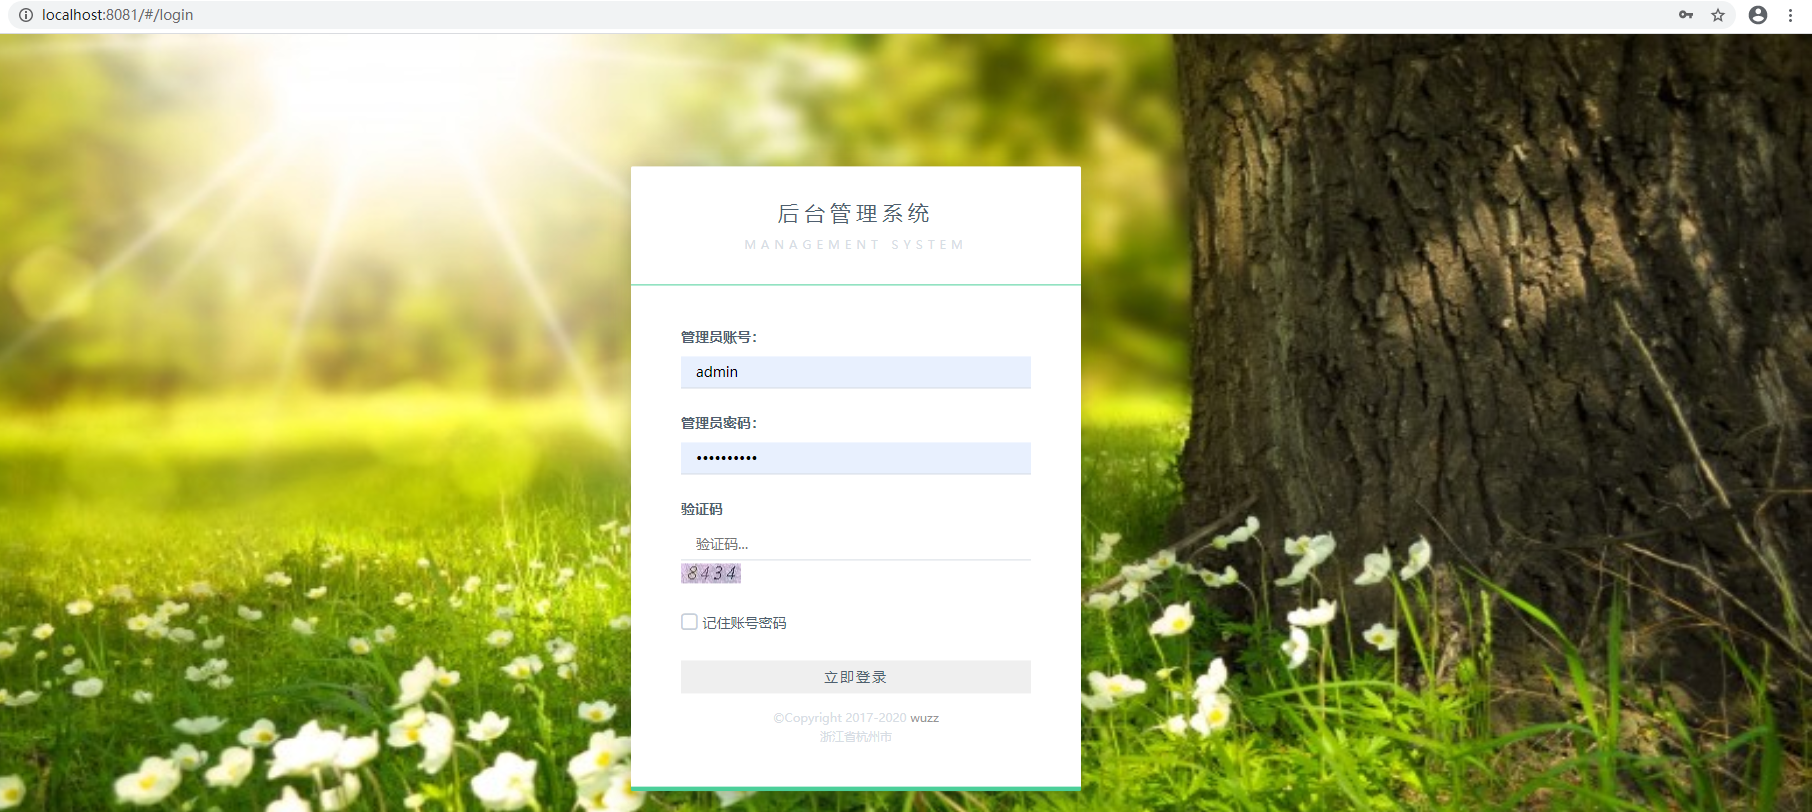
以上接口就是自定义登录流程关键的四个。我们只需要实现他们指定的方法,编写自己的业务逻辑,就可以实现自定义登录认证流程。默认情况下,认证地址 loginPage 又默认的实现。loginProcessingUrl 是/login。默认用户为user、密码在启动日志中由打印。但是在当下前后端分离盛行的情况下。我们都需要自定义登陆页面。同手我们也希望登陆成功后能返回一些用户信息的JSON串等等。所以我们这里还需要搞个页面。但是页面的请求一定要采用表单的方式登录,不然会获取不到信息导致登陆失败。由于我这里重点介绍是Security。前端用的是 Vue,有兴趣的同学可以参考 https://www.cnblogs.com/wuzhenzhao/category/1697454.html。装好后需要安装一些插件,配置网络等等可以自行百度。下面是前端页面的代码
<template xmlns:v-on="http://www.w3.org/1999/xhtml">
    <div id="app">
      <div class="login-page">
      <section class="login-contain">
        <header>
          <h1>后台管理系统</h1>
          <p>management system</p>
        </header>
        <div class="form-content">
          <ul>
            <li>
              <div class="form-group">
                <label class="control-label">管理员账号:</label>
                <input type="text" placeholder="管理员账号..." class="form-control form-underlined" v-model="username"/>
              </div>
            </li>
            <li>
              <div class="form-group">
                <label class="control-label">管理员密码:</label>
                <input type="password" placeholder="管理员密码..." class="form-control form-underlined" id="adminPwd" v-model="password"/>
              </div>
            </li>
            <li>
              <div class="form-group">
                <label class="control-label">验证码</label>
                <input type="text" placeholder="验证码..." class="form-control form-underlined" id="imageCode" v-model="imageCode"/>
                <img src="http://localhost:8889/code/image">
              </div>

            </li>
            <li>
              <label class="check-box">
                <input type="checkbox" name="remember" v-model="checked"/>
                <span>记住账号密码</span>
              </label>
            </li>
            <li>
              <button class="btn btn-lg btn-block" id="entry" v-on:click="login">立即登录</button>
            </li>
            <li>
              <p class="btm-info">©Copyright 2017-2020 <a href="#" target="_blank" title="DeathGhost">wuzz</a></p>
              <address class="btm-info">浙江省杭州市</address>
            </li>
          </ul>
        </div>
      </section>
      <div class="mask"></div>
      <div class="dialog">
        <div class="dialog-hd">
          <strong class="lt-title">标题</strong>
          <a class="rt-operate icon-remove JclosePanel" title="关闭"></a>
        </div>
        <div class="dialog-bd">
          <!--start::-->
          <p>这里是基础弹窗,可以定义文本信息,HTML信息这里是基础弹窗,可以定义文本信息,HTML信息。</p>
          <!--end::-->
        </div>
        <div class="dialog-ft">
          <button class="btn btn-info JyesBtn">确认</button>
          <button class="btn btn-secondary JnoBtn">关闭</button>
        </div>
      </div>
    </div>
    </div>
</template>
<script>
import '../other/javascript/login.js'
import qs from 'qs'
export default {
  name: 'Login',
  data () {
    return {
      checked: false,
      msg: 'Welcome to Your Vue.js Home',
      username: '',
      password: '',
      imageCode: ''
    }
  },
  methods: {
    login: function () {
      this.$axios({
        method: 'POST',
        headers: {
          'Content-Type': 'application/x-www-form-urlencoded'
        },
        // 在请求之前对data传参进行格式转换
        transformRequest: [function (data) {
          data = qs.stringify(data)
          return data
        }],
        url: '/api/authentication/form',
        data: {
          'username': this.username,
          'password': this.password,
          'imageCode': this.imageCode,
          'remember-me': this.checked
        }
      }).then(function (res) {
        alert(JSON.stringify(res.data))
      }).catch(function (err) {
        alert(err)
      })
    }
  }
}
</script>
对于代码中验证码部分以及记住我部分会在后面的章节中说明,这里小伙伴们自己可以先注释掉,避免出现其他错误。成果启动后页面如下:
3.AuthenticationSuccessHandler 实现:
@Configuration("myAuthenticationSuccessHandler")
public class MyAuthenticationSuccessHandler implements AuthenticationSuccessHandler {

    private Logger logger = LoggerFactory.getLogger(getClass());

    @Override
    public void onAuthenticationSuccess(HttpServletRequest request, HttpServletResponse response,
                                        Authentication authentication) throws IOException, ServletException {
        logger.info("登录成功");
        response.setContentType("application/json;charset=UTF-8");
        response.getWriter().write(JSONObject.toJSONString(authentication));
    }

}
实现非常简单,就是将认证信息通过JSon字符串的形式发送给前端,可以自定义发送内容。
4.AuthenticationFailureHandler 实现:
@Configuration("myAuthenctiationFailureHandler")
public class MyAuthenctiationFailureHandler implements AuthenticationFailureHandler {

    private Logger logger = LoggerFactory.getLogger(getClass());

    @Override
    public void onAuthenticationFailure(HttpServletRequest request, HttpServletResponse response,
                                        AuthenticationException exception) throws IOException, ServletException {

        logger.info("登录失败");
        // 错误码设置,这里先注释掉。登陆失败由前端处理
//        response.setStatus(HttpStatus.INTERNAL_SERVER_ERROR.value());
        response.setContentType("application/json;charset=UTF-8");
        response.getWriter().write(JSONObject.toJSONString(exception.getLocalizedMessage()));

    }
}
这里的实现跟成功处理器一样,登陆失败后信息会被封装到 AuthenticationException 类中。返回信息即可。
5.AuthenticationProvider 实现:
@Configuration("myAuthenticationProvider")
public class MyAuthenticationProvider implements AuthenticationProvider {

    @Autowired
    private MyUserDetailService myUserDetailService;

    @Autowired
    private PasswordEncoder passwordEncoder;

    @Override
    public Authentication authenticate(Authentication authentication) throws AuthenticationException {

        String userName = authentication.getName();// 这个获取表单输入中的用户名
        String password = (String) authentication.getCredentials();
        UserDetails userDetails = myUserDetailService.loadUserByUsername(userName);
        String encodePassword = passwordEncoder.encode(password);
        if (!passwordEncoder.matches(password,encodePassword)) {
            throw new UsernameNotFoundException("用户名或者密码不正确");
        }

        Collection<? extends GrantedAuthority> authorities = userDetails.getAuthorities();

        return new UsernamePasswordAuthenticationToken(userDetails, encodePassword, authorities);

    }

    @Override
    public boolean supports(Class<?> aClass) {
        return true;
    }
}
这个类的实现就是通过 UserDetailService 返回的用户信息进行跟表单中获取的用户信息进行比对,比如密码。等等。
6.UserDetailsService 实现:
@Configuration("myUserDetailService")
public class MyUserDetailService implements UserDetailsService {

    @Autowired
    private PasswordEncoder passwordEncoder;

    @Override
    public UserDetails loadUserByUsername(String username) throws UsernameNotFoundException {
        // 根据用户名查找用户信息
        //根据查找到的用户信息判断用户是否被冻结
        String password = passwordEncoder.encode("123456");
        System.out.println("数据库密码是:" + password);
        return new User(username, password,
                true, true, true, true,
                AuthorityUtils.commaSeparatedStringToAuthorityList("admin"));
    }
}
这个实现主要是构造用户信息。但是这里没有连接数据库,只有admin、密码123456才能认证成功。
通过以上这些配置就可以实现自定义的登录流程。
Spring Security 认证原理:
其核心就是一组过滤器链,项目启动后将会自动配置。最核心的就是 Basic Authentication Filter 用来认证用户的身份,一个在spring security中一种过滤器处理一种认证方式
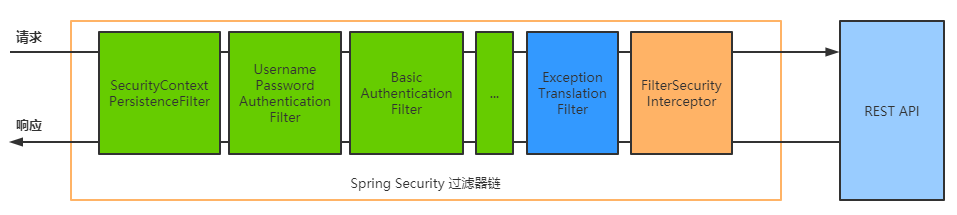
其中绿色部分的每一种过滤器代表着一种认证方式,主要工作检查当前请求有没有关于用户信息,如果当前的没有,就会跳入到下一个绿色的过滤器中,请求成功会打标记。绿色认证方式可以配置,比如短信认证,微信。比如如果我们不配置BasicAuthenticationFilter的话,那么它就不会生效。
我们主要来看一下上述这些拦截器的 doFilter 方法的主要逻辑。
SecurityContextPersistenceFilter#doFilter:
public void doFilter(ServletRequest req, ServletResponse res, FilterChain chain)
            throws IOException, ServletException {
        HttpServletRequest request = (HttpServletRequest) req;
        HttpServletResponse response = (HttpServletResponse) res;

        if (request.getAttribute(FILTER_APPLIED) != null) {
            // ensure that filter is only applied once per request
            // 确保每次请求只调用过一次

            chain.doFilter(request, response);
            return;
        }
        final boolean debug = logger.isDebugEnabled();
        request.setAttribute(FILTER_APPLIED, Boolean.TRUE);
        if (forceEagerSessionCreation) {
            HttpSession session = request.getSession();

            if (debug && session.isNew()) {
                logger.debug("Eagerly created session: " + session.getId());
            }
        }
     // 将 request/response 对象交给HttpRequestResponseHolder维持
        HttpRequestResponseHolder holder = new HttpRequestResponseHolder(request,
                response);
     //通过SecurityContextRepository接口的实现类装载SecurityContext实例
      //HttpSessionSecurityContextRepository将产生SecurityContext实例的任务交给SecurityContextHolder.createEmptyContext()
     //SecurityContextHolder再根据策略模式的不同,
     //把任务再交给相应策略类完成SecurityContext的创建
     //如果没有配置策略名称,则默认为
     //ThreadLocalSecurityContextHolderStrategy,
     //该类直接通过new SecurityContextImpl()创建实例
        SecurityContext contextBeforeChainExecution = repo.loadContext(holder);

        try {
        //将产生的SecurityContext再通过SecurityContextHolder->ThreadLocalSecurityContextHolderStrategy设置到ThreadLocal
            SecurityContextHolder.setContext(contextBeforeChainExecution);
        //继续把请求流向下一个过滤器执行
            chain.doFilter(holder.getRequest(), holder.getResponse());
        }
        finally {//先从SecurityContextHolder获取SecurityContext实例
            SecurityContext contextAfterChainExecution = SecurityContextHolder
                    .getContext();
            // Crucial removal of SecurityContextHolder contents - do this before anything
            // else.
        //关键性地除去SecurityContextHolder内容 - 在任何事情之前执行此操作 //再把SecurityContext实例从SecurityContextHolder中清空 //若没有清空,会受到服务器的线程池机制的影响
            SecurityContextHolder.clearContext();
        //将SecurityContext实例持久化到session中
            repo.saveContext(contextAfterChainExecution, holder.getRequest(),
                    holder.getResponse());
            request.removeAttribute(FILTER_APPLIED);
            if (debug) {
                logger.debug("SecurityContextHolder now cleared, as request processing completed");
            }
        }
}
通过了上面的拦截器后,随后的一个是登陆用户密码验证过滤器 UsernamePasswordAuthenticationFilter ,这个可谓是非常重要的一个过滤器了,他的拦截方法定义在父类中:AbstractAuthenticationProcessingFilter#doFilter
public void doFilter(ServletRequest req, ServletResponse res, FilterChain chain)
            throws IOException, ServletException {
        HttpServletRequest request = (HttpServletRequest) req;
        HttpServletResponse response = (HttpServletResponse) res;
    //判断form-login标签是否包含login-processing-url属性
    //如果没有采用默认的url:j_spring_security_check
    //如果拦截的url不需要认证,直接跳过
     if (!requiresAuthentication(request, response)) {
            chain.doFilter(request, response);
            return;
        }
        Authentication authResult;
        //。。。。
        try {
            // 子类完成
            authResult = attemptAuthentication(request, response);
            if (authResult == null) {
                // return immediately as subclass has indicated that it hasn't completed
                // authentication
                return;
            }
        //session策略处理认证信息
            sessionStrategy.onAuthentication(authResult, request, response);
        }
        // 异常处理
        // Authentication success
        if (continueChainBeforeSuccessfulAuthentication) {
            chain.doFilter(request, response);
        }
      //认证成功处理
      //1.向SecurityContext中设置Authentication认证信息
      //2.如果有remember me服务,则查找请求参数中是否包含_spring_security_remember_me,如果该参数值为true、yes、on、1则执行remember me功能:添加cookie、入库。为下次请求时自动登录做准备
      //3.发布认证成功事件
      //4.执行跳转
        successfulAuthentication(request, response, chain, authResult);
}
UsernamePasswordAuthenticationFilter #attemptAuthentication
public Authentication attemptAuthentication(HttpServletRequest request,
            HttpServletResponse response) throws AuthenticationException {
        if (postOnly && !request.getMethod().equals("POST")) {
            throw new AuthenticationServiceException(
                    "Authentication method not supported: " + request.getMethod());
        }
     // 获取表单输入的账号密码
        String username = obtainUsername(request);
        String password = obtainPassword(request);

        if (username == null) {
            username = "";
        }

        if (password == null) {
            password = "";
        }

        username = username.trim();
     // 构造token
        UsernamePasswordAuthenticationToken authRequest = new UsernamePasswordAuthenticationToken(
                username, password);

        // Allow subclasses to set the "details" property
        setDetails(request, authRequest);
     // 调用认证管理器进行认证
        return this.getAuthenticationManager().authenticate(authRequest);
}
这里默认是走 org.springframework.security.authentication.ProviderManager 认证:
public Authentication authenticate(Authentication authentication)
            throws AuthenticationException {
        Class<? extends Authentication> toTest = authentication.getClass();
        AuthenticationException lastException = null;
        Authentication result = null;
        boolean debug = logger.isDebugEnabled();
        // 获取provisers集合
        for (AuthenticationProvider provider : getProviders()) {
            if (!provider.supports(toTest)) {//判断是否支持当前类型
                continue;
            }

            if (debug) {
                logger.debug("Authentication attempt using "
                        + provider.getClass().getName());
            }

            try {
                // 默认获取到DaoAuthenticationProvider 进行认证
                result = provider.authenticate(authentication);

                if (result != null) {
                    copyDetails(authentication, result);
                    break;
                }
            }
            //.......
            // 如果抛出异常,则result为null,且如果没有自定义的认证类,会直接返回异常信息

        }

        if (result == null && parent != null) {
            // Allow the parent to try.
            try {//调用parent认证,其实这里就会调到我们自定义的provider
                result = parent.authenticate(authentication);
            }
            catch (ProviderNotFoundException e) {
                // ignore as we will throw below if no other exception occurred prior to
                // calling parent and the parent
                // may throw ProviderNotFound even though a provider in the child already
                // handled the request
            }
            catch (AuthenticationException e) {
                lastException = e;
            }
        }

        if (result != null) {
            if (eraseCredentialsAfterAuthentication
                    && (result instanceof CredentialsContainer)) {
                // Authentication is complete. Remove credentials and other secret data
                // from authentication
                ((CredentialsContainer) result).eraseCredentials();
            }

            eventPublisher.publishAuthenticationSuccess(result);
            return result;
        }

        // Parent was null, or didn't authenticate (or throw an exception).

        if (lastException == null) {
            lastException = new ProviderNotFoundException(messages.getMessage(
                    "ProviderManager.providerNotFound",
                    new Object[] { toTest.getName() },
                    "No AuthenticationProvider found for {0}"));
        }

        prepareException(lastException, authentication);

        throw lastException;
}
以上这个方法进入会获取到一个 DaoAuthenticationProvider ,调用的是父类 AbstractUserDetailsAuthenticationProvider 的 authenticate 方法
public Authentication authenticate(Authentication authentication)
            throws AuthenticationException {
        Assert.isInstanceOf(UsernamePasswordAuthenticationToken.class, authentication,
                messages.getMessage(
                        "AbstractUserDetailsAuthenticationProvider.onlySupports",
                        "Only UsernamePasswordAuthenticationToken is supported"));

        // Determine username
        String username = (authentication.getPrincipal() == null) ? "NONE_PROVIDED"
                : authentication.getName();

        boolean cacheWasUsed = true;
        UserDetails user = this.userCache.getUserFromCache(username);

        if (user == null) {
            cacheWasUsed = false;

            try {//调用自定义的 UserDetailsService获取用户信息
                user = retrieveUser(username,
                        (UsernamePasswordAuthenticationToken) authentication);
            }
            //。。。。。。异常捕获
        }

        try {//前置检查,检查的是userDetail 里面的 前3个boolean类型的属性
            preAuthenticationChecks.check(user);
            additionalAuthenticationChecks(user,
                    (UsernamePasswordAuthenticationToken) authentication);
        }
        //。。。。。。异常捕获
        // 后置检查,检查剩下来的那个参数
        postAuthenticationChecks.check(user);

        if (!cacheWasUsed) {
            this.userCache.putUserInCache(user);
        }

        Object principalToReturn = user;

        if (forcePrincipalAsString) {
            principalToReturn = user.getUsername();
        }
     // 创建成功的认证信息,即登陆成功
        return createSuccessAuthentication(principalToReturn, authentication, user);
}
然后回到 AbstractAuthenticationProcessingFilter 类的 doFilter 方法,现在是认证成功了 ,会走 successfulAuthentication(request, response, chain, authResult);
protected void successfulAuthentication(HttpServletRequest request,
            HttpServletResponse response, FilterChain chain, Authentication authResult)
            throws IOException, ServletException {

        if (logger.isDebugEnabled()) {
            logger.debug("Authentication success. Updating SecurityContextHolder to contain: "
                    + authResult);
        }
      // 设置认证信息
        SecurityContextHolder.getContext().setAuthentication(authResult);
        // 主要是处理是否启用记住我功能
        rememberMeServices.loginSuccess(request, response, authResult);

        // Fire event
        if (this.eventPublisher != null) {
            eventPublisher.publishEvent(new InteractiveAuthenticationSuccessEvent(
                    authResult, this.getClass()));
        }
     //调用自定义的成功处理器
        successHandler.onAuthenticationSuccess(request, response, authResult);
    }
这样就完成了认证流程。