shrio官网:https://shiro.apache.org/
Apache Shiro是一个功能强大且易于使用的Java安全框架,可执行身份验证,授权,加密和会话管理。借助Shiro易于理解的API,您可以快速轻松地保护任何应用程序 - 从最小的移动应用程序到最大的Web和企业应用程序。spring中也有自带的安全框架spring security。shrio是通过对其的再封装,实现了自己的一套全新架构。话不多说,直接进入正题:
1.出了springboot的依赖之外,还需要导入依赖
<dependency>
    <groupId>org.apache.shiro</groupId>
    <artifactId>shiro-spring</artifactId>
    <version>1.4.0</version>
</dependency>
<!--redis-->
<dependency>
    <groupId>org.springframework.boot</groupId>
    <artifactId>spring-boot-starter-data-redis</artifactId>
</dependency>
2..直接上配置类:下面会对配置的一些重要bean进行稍加解释
import org.apache.shiro.crypto.hash.SimpleHash;
import org.apache.shiro.session.mgt.SessionManager;
import org.apache.shiro.spring.LifecycleBeanPostProcessor;
import org.apache.shiro.spring.security.interceptor.AuthorizationAttributeSourceAdvisor;
import org.apache.shiro.spring.web.ShiroFilterFactoryBean;
import org.apache.shiro.web.mgt.DefaultWebSecurityManager;
import org.apache.shiro.web.session.mgt.DefaultWebSessionManager;
import org.springframework.aop.framework.autoproxy.DefaultAdvisorAutoProxyCreator;
import org.springframework.beans.factory.annotation.Qualifier;
import org.springframework.boot.autoconfigure.condition.ConditionalOnMissingBean;
import org.springframework.context.annotation.Bean;
import org.springframework.context.annotation.Configuration;
import org.springframework.context.annotation.DependsOn;

import javax.servlet.Filter;
import java.util.LinkedHashMap;
import java.util.Map;

@Configuration
public class ShiroConfig {
    /**
     * LifecycleBeanPostProcessor,这是个DestructionAwareBeanPostProcessor的子类,
     * 负责org.apache.shiro.util.Initializable类型bean的生命周期的,初始化和销毁。
     * 主要是AuthorizingRealm类的子类,以及EhCacheManager类。
     */
    @Bean(name = "lifecycleBeanPostProcessor")
    public LifecycleBeanPostProcessor lifecycleBeanPostProcessor() {
        return new LifecycleBeanPostProcessor();
    }

    /**
     * HashedCredentialsMatcher,这个类是为了对密码进行编码的,
     * 防止密码在数据库里明码保存,当然在登陆认证的时候,
     * 这个类也负责对form里输入的密码进行编码。
     */
    @Bean(name = "hashedCredentialsMatcher")
    public HashedCredentialsMatcher hashedCredentialsMatcher() {
        HashedCredentialsMatcher credentialsMatcher = new HashedCredentialsMatcher();
        credentialsMatcher.setHashAlgorithmName("MD5");
        credentialsMatcher.setHashIterations(1024);
        credentialsMatcher.setStoredCredentialsHexEncoded(true);
        return credentialsMatcher;
    }

//    public static void main(String[] args) {
//        String hashAlgorithmName = "MD5";
//        String credentials = "123456";
//        int hashIterations = 1024;
//        Object obj = new SimpleHash(hashAlgorithmName, credentials, null, hashIterations);
//        System.out.println(obj);
//    }
    /**
     * ShiroRealm,这是个自定义的认证类,继承自AuthorizingRealm,
     * 负责用户的认证和权限的处理,可以参考JdbcRealm的实现。
     */
    @Bean(name = "shiroRealm")
    @DependsOn("lifecycleBeanPostProcessor")
    public CustomRealm shiroRealm() {
        CustomRealm realm = new CustomRealm();//这个类需要自己编写 下面会贴出其实现
//        realm.setCredentialsMatcher(hashedCredentialsMatcher());
        return realm;
    }

    /**
     * EhCacheManager,缓存管理,用户登陆成功后,把用户信息和权限信息缓存起来,
     * 然后每次用户请求时,放入用户的session中,如果不设置这个bean,每个请求都会查询一次数据库。
     */
//    @Bean(name = "ehCacheManager")
//    @DependsOn("lifecycleBeanPostProcessor")
//    public EhCacheManager getEhCacheManager(){
//        EhCacheManager ehcacheManager = new EhCacheManager();
//        ehcacheManager.setCacheManagerConfigFile("classpath:ehcache.xml");
//        return ehcacheManager;
//    }

    /**
     * SecurityManager,权限管理,这个类组合了登陆,登出,权限,session的处理,是个比较重要的类。
     * //
     */
    @Bean(name = "securityManager")
    public DefaultWebSecurityManager securityManager(@Qualifier("shiroRealm") CustomRealm shiroRealm, @Qualifier("defaultWebSessionManager") SessionManager sessionManager) {
        DefaultWebSecurityManager securityManager = new DefaultWebSecurityManager();
        securityManager.setRealm(shiroRealm);
//        securityManager.setCacheManager(getEhCacheManager());
        securityManager.setSessionManager(sessionManager);
        return securityManager;
    }

    /**
     * ShiroFilterFactoryBean,是个factorybean,为了生成ShiroFilter。
     * 它主要保持了三项数据,securityManager,filters,filterChainDefinitionManager。
     */
    @Bean
    public ShiroFilterFactoryBean shiroFilterFactoryBean(org.apache.shiro.mgt.SecurityManager securityManager) {
        ShiroFilterFactoryBean shiroFilterFactoryBean = new ShiroFilterFactoryBean();
        shiroFilterFactoryBean.setSecurityManager(securityManager);

        Map<String, Filter> filters = new LinkedHashMap<>();
//        filters.put("user",new ShiroUserFilter());
//        LogoutFilter logoutFilter = new LogoutFilter();
//        logoutFilter.setRedirectUrl("/api/1.0/loginout");
//        filters.put("logout",null);
//        shiroFilterFactoryBean.setFilters(filters);
        Map<String, String> filterChainDefinitionManager = new LinkedHashMap<String, String>();
//        filterChainDefinitionManager.put("/logout", "logout");//登出URL
        filterChainDefinitionManager.put("/login", "anon");//登陆URL
        filterChainDefinitionManager.put("/nologin", "anon");//未登录跳转的URL
        filterChainDefinitionManager.put("/test", "anon");
//      filterChainDefinitionManager.put("/user/edit/**", "authc,perms[user:edit]");// 这里为了测试,固定写死的值,也可以从数据库或其他配置中读取,此处是用权限控制
//        filterChainDefinitionManager.put("/**", "authc");
        filterChainDefinitionManager.put("/**", "user");
        shiroFilterFactoryBean.setFilterChainDefinitionMap(filterChainDefinitionManager);
        shiroFilterFactoryBean.setLoginUrl("/login");
        shiroFilterFactoryBean.setFilters(filters);
//        shiroFilterFactoryBean.setUnauthorizedUrl("/api/1.0/unauth");
        return shiroFilterFactoryBean;
    }

    /**
     * DefaultAdvisorAutoProxyCreator,Spring的一个bean,由Advisor决定对哪些类的方法进行AOP代理。
     */
    @Bean
    @ConditionalOnMissingBean
    public DefaultAdvisorAutoProxyCreator defaultAdvisorAutoProxyCreator() {
        DefaultAdvisorAutoProxyCreator defaultAAP = new DefaultAdvisorAutoProxyCreator();
        defaultAAP.setProxyTargetClass(true);
        return defaultAAP;
    }

    /**
     * AuthorizationAttributeSourceAdvisor,shiro里实现的Advisor类,
     * 内部使用AopAllianceAnnotationsAuthorizingMethodInterceptor来拦截用以下注解的方法。
     */
    @Bean
    public AuthorizationAttributeSourceAdvisor authorizationAttributeSourceAdvisor(org.apache.shiro.mgt.SecurityManager securityManager) {
        AuthorizationAttributeSourceAdvisor aASA = new AuthorizationAttributeSourceAdvisor();
        aASA.setSecurityManager(securityManager);
        return aASA;
    }

    @Bean("defaultWebSessionManager")
    public DefaultWebSessionManager configWebSessionManager(@Qualifier("redisSessionDao") RedisSessionDao sessionDao) {
        MySessionManager manager = new MySessionManager();
        manager.setSessionDAO(sessionDao);// 设置SessionDao
        manager.setDeleteInvalidSessions(true);// 删除过期的session
        manager.setSessionValidationSchedulerEnabled(false);// 是否定时检查session
        return manager;
    }
}
LifecycleBeanPostProcessor: 这个类 实现了DestructionAwareBeanPostProcessor接口,而DestructionAwareBeanPostProcessor接口继承了spring的 BeanPostProcessor。知道LifecycleBeanPostProcessor将Initializable和Destroyable的实现类统一在其内部自动分别调用了Initializable.init()和Destroyable.destroy()方法,从而达到管理shiro bean生命周期的目的。
public class LifecycleBeanPostProcessor implements DestructionAwareBeanPostProcessor, PriorityOrdered {

    private static final Logger log = LoggerFactory.getLogger(LifecycleBeanPostProcessor.class);

    private int order;

    public LifecycleBeanPostProcessor() {
        this(LOWEST_PRECEDENCE);
    }

    public LifecycleBeanPostProcessor(int order) {
        this.order = order;
    }

    public Object postProcessBeforeInitialization(Object object, String name) throws BeansException {
        if (object instanceof Initializable) {
            try {
                if (log.isDebugEnabled()) {
                    log.debug("Initializing bean [" + name + "]...");
                }

                ((Initializable) object).init();
            } catch (Exception e) {
                throw new FatalBeanException("Error initializing bean [" + name + "]", e);
            }
        }
        return object;
    }
    public Object postProcessAfterInitialization(Object object, String name) throws BeansException {
        // Does nothing after initialization
        return object;
    }

    public void postProcessBeforeDestruction(Object object, String name) throws BeansException {
        if (object instanceof Destroyable) {
            try {
                if (log.isDebugEnabled()) {
                    log.debug("Destroying bean [" + name + "]...");
                }

                ((Destroyable) object).destroy();
            } catch (Exception e) {
                throw new FatalBeanException("Error destroying bean [" + name + "]", e);
            }
        }
    }

    public int getOrder() {
        // LifecycleBeanPostProcessor needs Order. See https://issues.apache.org/jira/browse/SHIRO-222
        return order;
    }
}
spring的后置处理器BeanPostProcessor的作用是在spring初始化bean的前后进行一些特定操作。如果自己实现了多个后置处理器,并想按照自己的意愿顺序去执行这些处理器,那么这时候可以通过getOrder()方法去实现。order越小,执行优先级越高。
- DefaultWebSecurityManager: shiro的默认安全管理器,是整个配置的核心,必不可少的。可以通过设置自定义的realm,缓存管理器,会话管理器等等。
- ShiroFilterFactoryBean:核心过滤工厂类,里面可以配置需要过滤的路径,以及未登录,登陆等跳转地址。
- DefaultWebSessionManager:会话管理器。可以设置自定义的sessionDao sessionManager。
配置过程中涉及了自定义的sessionDao,自定义realm,自定义的sessionManager.其中的会话管理是通过redis去实现的,下面先贴出这3个实现类的 代码。
3.RedisSessionDao:实现自己的sessionDao的管理需要继承AbstractSessionDAO类,实现其中对于Session的增删改查的一些基本功能,并将该sessionDao配置好:
import org.apache.shiro.session.Session;
import org.apache.shiro.session.UnknownSessionException;
import org.apache.shiro.session.mgt.eis.AbstractSessionDAO;
import org.apache.shiro.util.Assert;
import org.springframework.beans.factory.annotation.Autowired;
import org.springframework.beans.factory.annotation.Value;
import org.springframework.data.redis.connection.RedisConnection;
import org.springframework.data.redis.core.RedisCallback;
import org.springframework.data.redis.core.StringRedisTemplate;
import org.springframework.stereotype.Component;

import java.io.*;
import java.util.Collection;
import java.util.Collections;
import java.util.concurrent.TimeUnit;

@Component("redisSessionDao")
public class RedisSessionDao extends AbstractSessionDAO {

    @Value("${session.expireTime}")
    private long expireTime;

    @Autowired
    private StringRedisTemplate redisTemplate;

    // 创建session,保存到数据库
    @Override
    protected Serializable doCreate(Session session) throws UnknownSessionException {
        System.out.println("创建Session.......");
        Assert.notNull(session);
        if (session.getId() == null) {
            Serializable sessionId = generateSessionId(session);
            assignSessionId(session, sessionId);
        }
        String sessionId = session.getId().toString();


        //判断session是否已经存在
        Boolean exist = redisTemplate.execute(new RedisCallback<Boolean>() {
            public Boolean doInRedis(RedisConnection connection) {
                Boolean result = connection.exists(sessionId.getBytes());
                return result;
            }
        });

        if (exist) {
            throw new RuntimeException("session " + sessionId + "已经存在");
        }
        Boolean success = redisTemplate.execute(new RedisCallback<Boolean>() {
            public Boolean doInRedis(RedisConnection connection) {
                Boolean result = connection.setNX(sessionId.getBytes(), sessionToByte(session));
                return result;
            }
        });

        if (!success) {
            throw new RuntimeException("session " + sessionId + "创建失败");
        }
        //设置Session超时间间
        redisTemplate.expire(sessionId, expireTime, TimeUnit.MINUTES);

        return session.getId();
    }

    // 获取session
    @Override
    protected Session doReadSession(Serializable sessionId) {
        System.out.println("查询Session.......");
        Session session = redisTemplate.execute(new RedisCallback<Session>() {
            public Session doInRedis(RedisConnection connection) {
                byte[] bytes = connection.get(sessionId.toString().getBytes());
                if (null == bytes || bytes.length == 0) {
                    return null;
                }
                return ByteToSession(bytes);

            }
        });
        return session;
    }

    // 更新session的最后一次访问时间
    @Override
    public void update(Session session) {
        Assert.notNull(session);
        if (session.getId() == null) {
            throw new RuntimeException("sessionId is null");
        }
        String sessionId = session.getId().toString();
        //判断session是否已经存在
        Boolean exist = redisTemplate.execute(new RedisCallback<Boolean>() {
            public Boolean doInRedis(RedisConnection connection) {
                Boolean result = connection.exists(sessionId.getBytes());
                return result;
            }
        });

        if (!exist) {
            throw new RuntimeException("session " + sessionId + "不存在");
        }

        Boolean success = redisTemplate.execute(new RedisCallback<Boolean>() {
            public Boolean doInRedis(RedisConnection connection) {
                try {
                    connection.set(sessionId.getBytes(), sessionToByte(session));
                } catch (Exception e) {
                    return false;
                }
                return true;
            }
        });

        if (!success) {
            throw new RuntimeException("session " + sessionId + "更新失败");
        }
        System.out.println("更新Session.......");
        //设置Session超时间间
        redisTemplate.expire(sessionId, expireTime, TimeUnit.MINUTES);

    }

    // 删除session
    @Override
    public void delete(Session session) {
        System.out.println("删除Session.......");
        redisTemplate.delete(session.getId().toString());
    }

    @Override
    public Collection<Session> getActiveSessions() {
        return Collections.emptySet();
    }

    /**
     * session转成字节数组流
     *
     * @param session
     * @return
     */
    private byte[] sessionToByte(Session session) {
        ByteArrayOutputStream bo = new ByteArrayOutputStream();
        byte[] bytes = null;
        try {
            ObjectOutput oo = new ObjectOutputStream(bo);
            oo.writeObject(session);
            bytes = bo.toByteArray();
        } catch (IOException e) {
            e.printStackTrace();
        }
        return bytes;
    }

    /**
     * 获取redis中的流转session
     *
     * @param bytes
     * @return
     */
    private Session ByteToSession(byte[] bytes) {
        Session session = null;
        try {
            ByteArrayInputStream bi = new ByteArrayInputStream(bytes);
            ObjectInputStream oi = new ObjectInputStream(bi);

            Object o = oi.readObject();
            session = (Session) o;
            bi.close();
            oi.close();
        } catch (Exception e) {
            System.out.println("translation" + e.getMessage());
            e.printStackTrace();
        }
        return session;
    }
}
4.CustomRealm :该类是实现自己的认证(doGetAuthorizationInfo()方法)及登陆(doGetAuthenticationInfo()方法); 有了这个实现类,才能自己对登录和权限进行控制
import org.apache.shiro.authc.AuthenticationException;
import org.apache.shiro.authc.AuthenticationInfo;
import org.apache.shiro.authc.AuthenticationToken;
import org.apache.shiro.authc.SimpleAuthenticationInfo;
import org.apache.shiro.authz.AuthorizationInfo;
import org.apache.shiro.authz.SimpleAuthorizationInfo;
import org.apache.shiro.crypto.hash.SimpleHash;
import org.apache.shiro.realm.AuthorizingRealm;
import org.apache.shiro.subject.PrincipalCollection;
import org.springframework.beans.factory.annotation.Autowired;

public class CustomRealm extends AuthorizingRealm {

    @Autowired
    private LoginServiceImpl loginServiceImpl;

    @Override
    protected AuthorizationInfo doGetAuthorizationInfo(PrincipalCollection principalCollection) {
        //获取登录用户名
        String name = (String) principalCollection.getPrimaryPrincipal();
        //根据用户名去数据库查询用户信息
        User user = loginServiceImpl.getUserByName(name);
        //添加角色和权限
        SimpleAuthorizationInfo simpleAuthorizationInfo = new SimpleAuthorizationInfo();
        for (Role role : user.getRoles()) {
            //添加角色
            simpleAuthorizationInfo.addRole(role.getRoleName());
            //添加权限
            for (Permissions permissions : role.getPermissions()) {
                simpleAuthorizationInfo.addStringPermission(permissions.getPermissionsName());
            }
        }
        return simpleAuthorizationInfo;
    }

    @Override
    protected AuthenticationInfo doGetAuthenticationInfo(AuthenticationToken authenticationToken) throws AuthenticationException {
        //加这一步的目的是在Post请求的时候会先进认证,然后在到请求
        if (authenticationToken.getPrincipal() == null) {
            return null;
        }
        //获取用户信息
        String name = authenticationToken.getPrincipal().toString();
        User user = loginServiceImpl.getUserByName(name);
        if (user == null) {
            //这里返回后会报出对应异常
            return null;
        } else {
            //这里验证authenticationToken和simpleAuthenticationInfo的信息
            String hashAlgorithmName = "MD5";
            int hashIterations = 1024;
            Object obj = new SimpleHash(hashAlgorithmName, user.getPassword(), null, hashIterations);
            SimpleAuthenticationInfo simpleAuthenticationInfo = new SimpleAuthenticationInfo(name, user.getPassword().toString(), getName());
            return simpleAuthenticationInfo;
        }
    }
}
5.MySessionManager :实现默认的session管理器DefaultWebSessionManager,复写了其中的getSessionId方法。
import org.apache.shiro.session.Session;
import org.apache.shiro.session.UnknownSessionException;
import org.apache.shiro.session.mgt.SessionKey;
import org.apache.shiro.spring.web.ShiroFilterFactoryBean;
import org.apache.shiro.web.servlet.ShiroHttpServletRequest;
import org.apache.shiro.web.session.mgt.DefaultWebSessionManager;
import org.apache.shiro.web.session.mgt.WebSessionKey;
import org.apache.shiro.web.util.WebUtils;
import org.springframework.beans.factory.annotation.Autowired;
import org.springframework.util.StringUtils;

import javax.servlet.ServletRequest;
import javax.servlet.ServletResponse;
import javax.servlet.http.HttpServletRequest;
import java.io.Serializable;

public class MySessionManager extends DefaultWebSessionManager {

    public static final String AUTHORIZATION = "token";

    private static final String REFERENCED_SESSION_ID_SOURCE = "Stateless request";

    @Autowired
    private RedisSessionDao redisSessionDao;

    public MySessionManager() {
        super();
    }

    /**
     * 获取session
     * 优化单次请求需要多次访问redis的问题
     * @param sessionKey
     * @return
     * @throws UnknownSessionException
     */
    @Override
    protected Session retrieveSession(SessionKey sessionKey) throws UnknownSessionException {
        Serializable sessionId = getSessionId(sessionKey);

        ServletRequest request = null;
        if (sessionKey instanceof WebSessionKey) {
            request = ((WebSessionKey) sessionKey).getServletRequest();
        }

        if (request != null && null != sessionId) {
            Object sessionObj = request.getAttribute(sessionId.toString());
            if (sessionObj != null) {
                System.out.println("read session from request");
                return (Session) sessionObj;
            }
        }
        Session session = super.retrieveSession(sessionKey);
        if (request != null && null != sessionId) {
            request.setAttribute(sessionId.toString(), session);
        }
        return session;
    }


    @Override
    protected Serializable getSessionId(ServletRequest request, ServletResponse response) {
        HttpServletRequest req = (HttpServletRequest) request;
        String id = WebUtils.toHttp(request).getHeader(AUTHORIZATION);
        ShiroFilterFactoryBean bean = ApplicationContextUtils.getBean(ShiroFilterFactoryBean.class);
        String loginUrl = bean.getLoginUrl();
        String requestURI = req.getRequestURI();
        if (StringUtils.isEmpty(id) && !requestURI.equals(loginUrl)) {
            //可以使用全局异常捕获返回到前端
            throw new RuntimeException("请登录");
        }
        //避免sessionId过期自动创建session问题
        if(!StringUtils.isEmpty(id)) {
            Session session = redisSessionDao.doReadSession(id);
            if (session ==null) {
                throw new RuntimeException("There is no session with id [" + id + "]");
            }
        }

        request.setAttribute(ShiroHttpServletRequest.REFERENCED_SESSION_ID_SOURCE, REFERENCED_SESSION_ID_SOURCE);
        request.setAttribute(ShiroHttpServletRequest.REFERENCED_SESSION_ID, id);
        request.setAttribute(ShiroHttpServletRequest.REFERENCED_SESSION_ID_IS_VALID, Boolean.TRUE);
        return id;
    }
}
6.配置 application.properties:
spring.redis.database=0
spring.redis.host=192.168.1.101
spring.redis.port=6379
spring.redis.password=wuzhenzhao
session.expireTime=30
通过以上的配置,就可以进行登陆了,demo中用到的类如下:
//*******************************************************
// ********************用户--角色--权限**********************
ublic class User {

    private String id;
    private String username;
    private String password;
    /**
     * 用户对应的角色集合
     */
    private Set<Role> roles;
    //省略get/set/构造
}
public class Role {
    private String id;
    private String roleName;
    /**
     * 角色对应权限集合
     */
    private Set<Permissions> permissions;
    //省略get/set/构造
}
public class Permissions {
    private String id;
    private String permissionsName;
    //省略get/set/构造
}
//********************************************************
//************************登录服务************************
@Service("loginServiceImpl")
public class LoginServiceImpl {

    public User getUserByName(String getMapByName) {
        //模拟数据库查询,正常情况此处是从数据库或者缓存查询。
        return getMapByName(getMapByName);
    }

    /**
     * 模拟数据库查询
     * @param userName
     * @return
     */
    private User getMapByName(String userName){
        //共添加两个用户,两个用户都是admin一个角色,
        //wsl有query和add权限,zhangsan只有一个query权限
        Permissions permissions1 = new Permissions("1","query");
        Permissions permissions2 = new Permissions("2","add");
        Set<Permissions> permissionsSet = new HashSet<>();
        permissionsSet.add(permissions1);
        permissionsSet.add(permissions2);
        Role role = new Role("1","admin",permissionsSet);
        Set<Role> roleSet = new HashSet<>();
        roleSet.add(role);
        User user = new User("1","wuzz","123456",roleSet);
        Map<String ,User> map = new HashMap<>();
        map.put(user.getUsername(), user);

        Permissions permissions3 = new Permissions("3","query");
        Set<Permissions> permissionsSet1 = new HashSet<>();
        permissionsSet1.add(permissions3);
        Role role1 = new Role("2","user",permissionsSet1);
        Set<Role> roleSet1 = new HashSet<>();
        roleSet1.add(role1);
        User user1 = new User("2","zhangsan","123456",roleSet1);
        map.put(user1.getUsername(), user1);
        return map.get(userName);
    }
}
//*****************************************************
//*************************上下文帮助类**********************
@Component
public class ApplicationContextUtils implements ApplicationContextAware {
    /**
     * 上下文对象实例
     */
    private static ApplicationContext applicationContext;

    @Autowired
    public void setApplicationContext(ApplicationContext applicationContext) throws BeansException {
        this.applicationContext = applicationContext;
    }

    /**
     * 获取applicationContext
     *
     * @return
     */
    public static ApplicationContext getApplicationContext() {
        return applicationContext;
    }

    /**
     * 通过name获取 Bean.
     *
     * @param name 参数传入要获取的实例的类名 首字母小写,这是默认的
     * @return
     */
    public static Object getBean(String name) {
        return getApplicationContext().getBean(name);
    }

    /**
     * 通过class获取Bean.
     *
     * @param clazz
     * @param <T>
     * @return
     */
    public static <T> T getBean(Class<T> clazz) {
        return getApplicationContext().getBean(clazz);
    }

    /**
     * 通过name,以及Clazz返回指定的Bean
     *
     * @param name
     * @param clazz
     * @param <T>
     * @return
     */
    public static <T> T getBean(String name, Class<T> clazz) {
        return getApplicationContext().getBean(name, clazz);
    }

}
//****************************************************
//************************接口测试类*************************
@RestController
public class LoginController {

    @RequestMapping(value = "/login", method = RequestMethod.POST)
    public String login(User user) {
        //添加用户认证信息
        Subject subject = SecurityUtils.getSubject();
        UsernamePasswordToken usernamePasswordToken = new UsernamePasswordToken(
                user.getUsername(),
                user.getPassword()
        );
        try {
            //进行验证,这里可以捕获异常,然后返回对应信息
            subject.login(usernamePasswordToken);
//            subject.checkRole("admin");
//            subject.checkPermissions("query", "add");
        } catch (AuthenticationException e) {
            e.printStackTrace();
            return "账号或密码错误!";
        } catch (AuthorizationException e) {
            e.printStackTrace();
            return "没有权限";
        }
        String id = (String) subject.getSession().getId();
        return id;
    }

    //注解验角色和权限
//    @RequiresRoles("admin")
    @RequiresPermissions("add")
    @RequestMapping(value = "/index", method = RequestMethod.GET)
    public String index() {
        return "index!";
    }


//    @RequestMapping(value = "/logout", method = RequestMethod.GET)
//    public String logout() {
//        Subject subject = SecurityUtils.getSubject();
//        subject.logout();
//        return "redirect:/login";
//    }

    @RequestMapping(value = "/nologin", method = RequestMethod.GET)
    public String nologin() {

        return "nologin!";
    }

    @RequestMapping(value = "/", method = RequestMethod.GET)
    public String tttt() {

        String id = (String) SecurityUtils.getSubject().getSession().getId();
        return id;
    }

    @RequestMapping("/wuzz/logout")
    public String logout() {
        Subject subject = SecurityUtils.getSubject();
        subject.logout();
        return "login out.....";
    }

    @RequestMapping(value = "/test", method = RequestMethod.GET)
    public String test() {

        return "test!";
    }
}
权限控制可以通过shiro的注解进行对对应的角色,或者权限的控制。shiro整合中 Subject 与 principal 是比较重要的两个名词,个人理解前者像是一系列的登陆用户组成的一个实体,就好比一个人有多种登陆账号,而后者便是实际登陆该系统的账号密码。 跟其源码可以发现 Subject 的创建时通过 org.apache.shiro.subject 接口里面的内部类Builder里的这个方法去创建,
public Subject buildSubject() {
  return this.securityManager.createSubject(this.subjectContext);
}
而实际上创建subject的是DefaultSecurityManager类,也就是我们配置的DefaultWebSecurityManager类的父类里面的
public Subject createSubject(SubjectContext subjectContext) {
        //create a copy so we don't modify the argument's backing map:
        SubjectContext context = copy(subjectContext);

        //ensure that the context has a SecurityManager instance, and if not, add one:
        context = ensureSecurityManager(context);

        //Resolve an associated Session (usually based on a referenced session ID), and place it in the context before
        //sending to the SubjectFactory.  The SubjectFactory should not need to know how to acquire sessions as the
        //process is often environment specific - better to shield the SF from these details:
        context = resolveSession(context);

        //Similarly, the SubjectFactory should not require any concept of RememberMe - translate that here first
        //if possible before handing off to the SubjectFactory:
        context = resolvePrincipals(context);

        Subject subject = doCreateSubject(context);

        //save this subject for future reference if necessary:
        //(this is needed here in case rememberMe principals were resolved and they need to be stored in the
        //session, so we don't constantly rehydrate the rememberMe PrincipalCollection on every operation).
        //Added in 1.2:
        save(subject);

        return subject;
}
通过该方法去绑定session,principl...等等需要绑定的信息。注:需要满足自己的业务需求。可以通过重写shiro里面的一些列管理器,过滤器,再配置进指定的管理器中就可以。这些过滤器如下图:
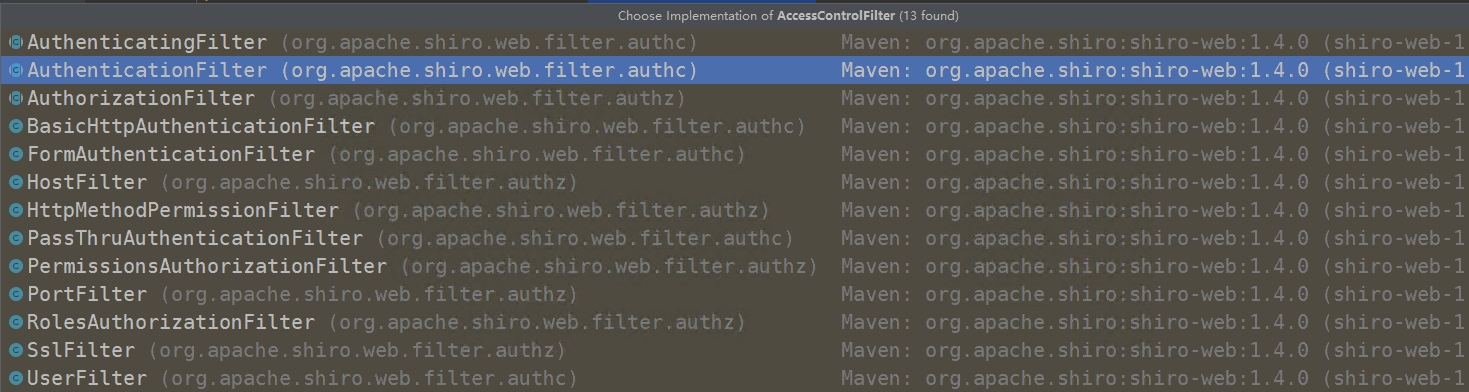
通过集成对应的过滤器,重写方法,例如:
public class ShiroUserFilter extends UserFilter {

    @Override
    protected boolean isAccessAllowed(ServletRequest request, ServletResponse response, Object mappedValue) {
        if (isLoginRequest(request, response)) {
            return super.isAccessAllowed(request, response, mappedValue);
        } else {
            String id = WebUtils.toHttp(request).getHeader(MySessionManager.AUTHORIZATION);
            if (StringUtils.isEmpty(id)) {

                try {
                    super.redirectToLogin(request,response);
                } catch (IOException e) {
                    e.printStackTrace();
                }

            }
            Subject subject = getSubject(request, response);
            // If principal is not null, then the user is known and should be allowed access.
            return subject.getPrincipal() != null;
        }
    }
}
然后通过以下方式注入:
Map<String, Filter> filters = new LinkedHashMap<>();
filters.put("user",new ShiroUserFilter());
shiroFilterFactoryBean.setFilters(filters);