Scenario
You have built an ASP.NET Web Application using Visual Studio 2010, and want to enable customers to automatically install and deploy it on servers via an easy setup program.
Specifically, you want to create a standard Windows setup program that will create and configure the application on IIS, copy all of the application’s files to the appropriate location on the server, and ensure that ASP.NET 4.0 is correctly mapped to run the application. You also want the setup program to prompt the customer for the database location that the new application should use, and have the setup program automatically update the web.config file with the database connectionstring settings the customer provided.
One solution to consider using is the built-in "Setup Project" support that is built-in to Visual Studio 2010. Setup Projects can be used to pipe the compilation outputs from VS 2010 Web Application Projects as well as Web Site Projects , to create encapsulated Windows setup programs. The below walkthrough demonstrates step-by-step how to create and use one.
1) Create a VS 2010 Web Application Project
To begin with, we’ll start with an empty instance of Visual Studio and create a new VS 2010 Web Application project (select File->New->WebSite->ASP.NET Web Application). For the purposes of this simple sample we’ll have two pages in the project:

Now,the file should be published to the object machine(right clikc the WebSite "E:/website\Web" select publish website,choose a folder as you like)

2) Add a VS 2010 Setup Project to the Solution
Now that we have a simple ASP.NET application built, we’ll want to add a VS 2010 Setup Project to the solution. Choose the File->Add->New Project menu item to add one into your solution

Note that the “Setup Project” type shows up under the “Other Project Types->Setup and Deployment” node in the New Project dialog above. Name it whatever you want and hit ok. It will then show up in your solution explorer as a separate project.
Now,The solution is shown as below:
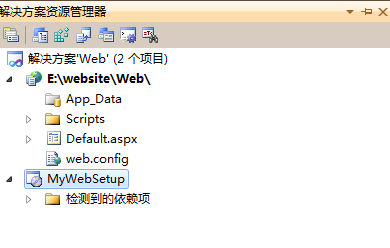
3)Add Installer Project Class Library
The next step is add a Installer Project Class Library
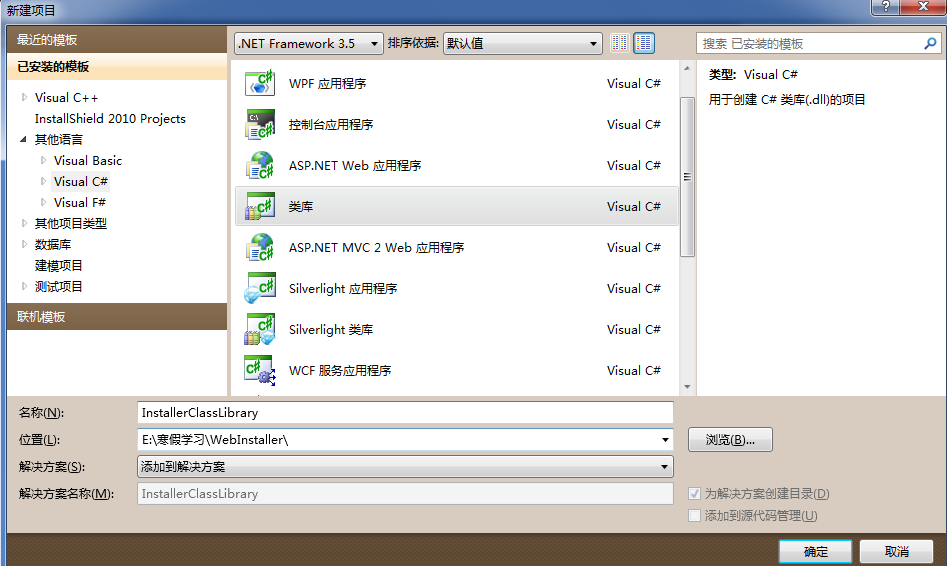
To continue,delete the class1.cs from the InstallerClassLibrary,and add "The installer class":
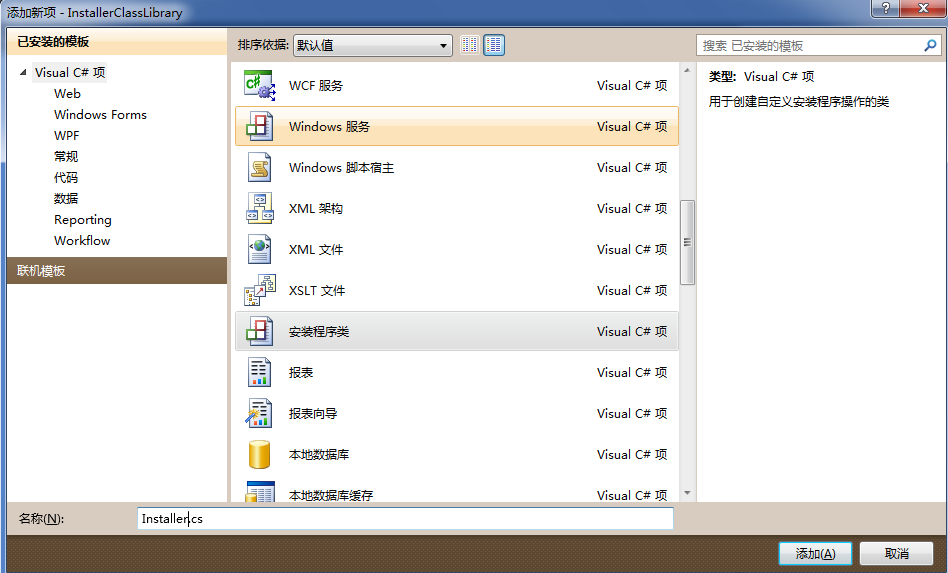
Now,the solution is shown as below:

In this "InstallerClassLibrary",add the reference of "System.EnterpriseServices" and "System.DirectoryServices".It's needed when operating the IIS

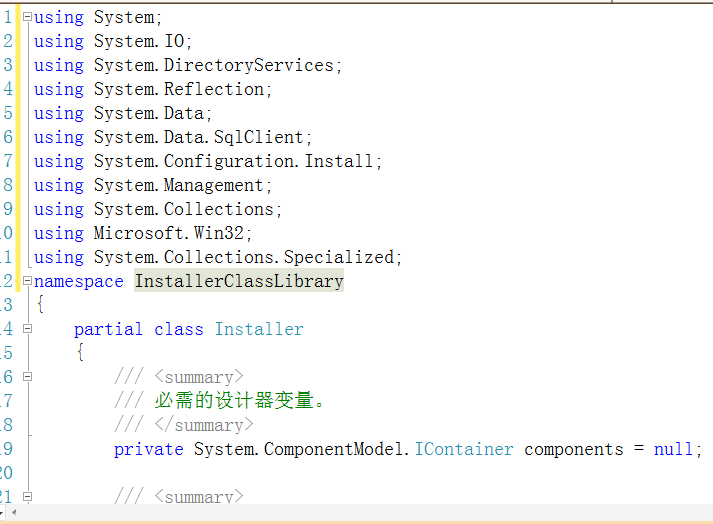
In the "Installer.Designer.cs" file,to add
using System;

using System.IO;

using System.DirectoryServices;

using System.Reflection;

using System.Data;

using System.Data.SqlClient;

using System.Configuration.Install;

using System.Management;

using System.Collections;

using Microsoft.Win32;

using System.Collections.Specialized;
The file was modified as below:
Prepare a DBSQL.txt file,in which including the SQL script you need to execute after connecting the dabase(Attentation:you should not inlcude more than one "GO
Block of statements" in the file)
Add this file to the "InstallerClassLibrary" ClassLibrary,and set the property "Embedded resources"
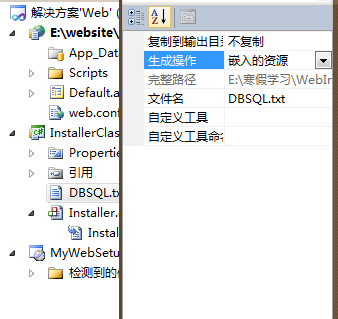
4)Make the Setup.exe
Back to the MyWebSetup project,choose the file system,as shown below:
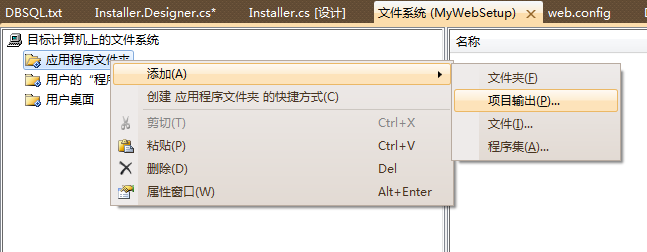
And then:
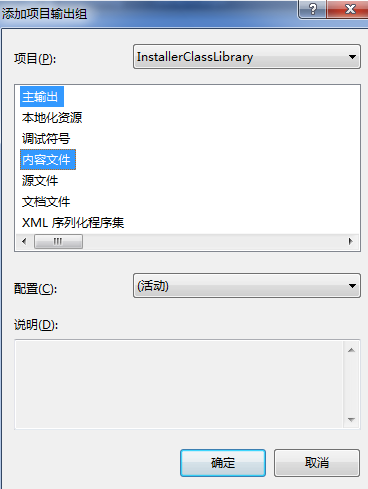
add a folder named "bin",add the file *.bll in bin folder(in the published website) generated when you publish the website to this new bin folder
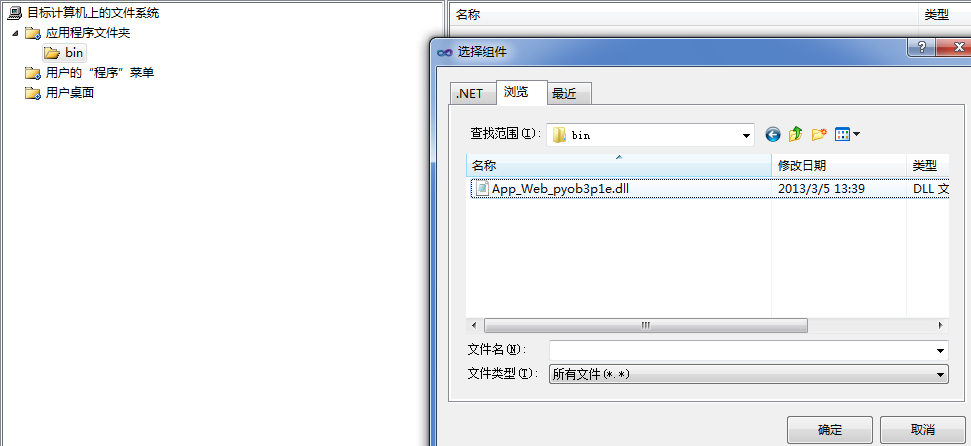
And add the other file generated in the published website to the "Application Program folder"

5) Edit the user interface
Edit the user interface,just to set some initial parameters:
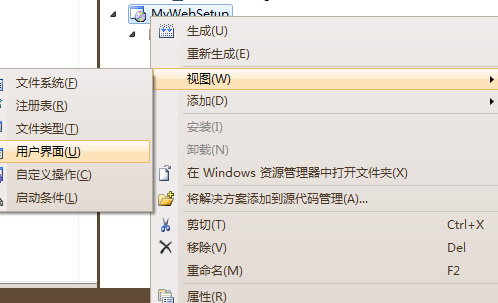
And then
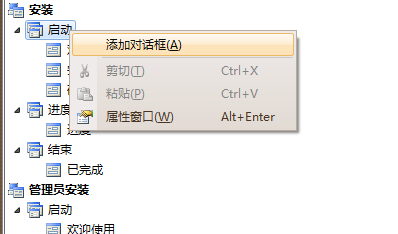
then:

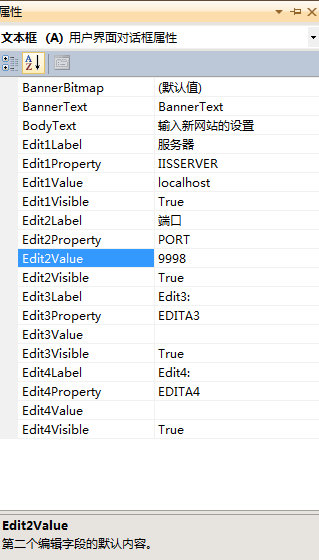
The "TextBox(A)" is the set of the IIS
we just set two input box here,the properties are IISSERVER and PORT,and the values are localost and 9998,and the rest of all you could adjust as you like
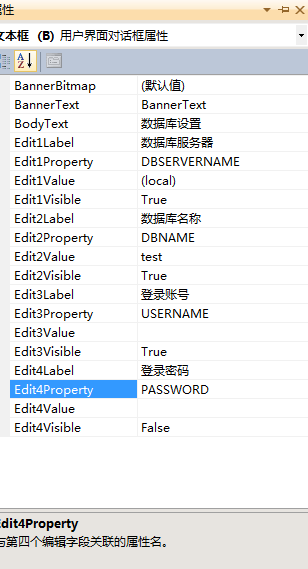
and all the same,we add "TextBox(B)" as the set of the dabase,I think you can get it done,just a piece of cake
The next step is,open the customer operater panel:
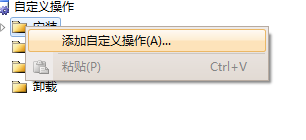
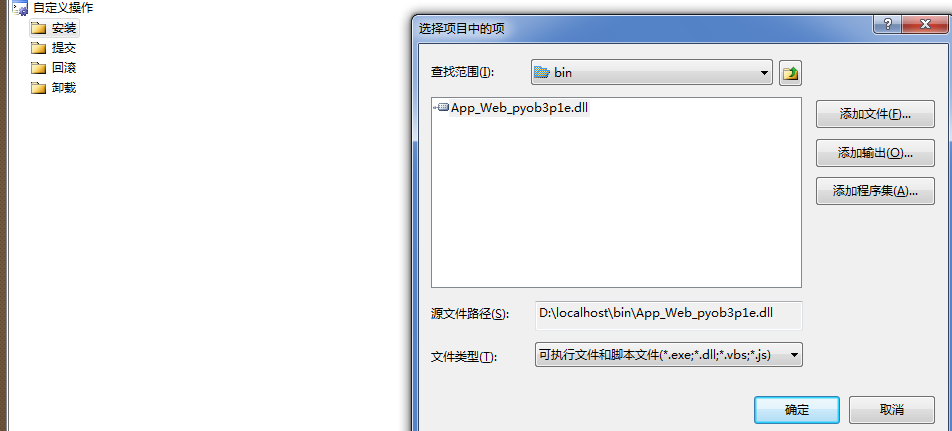
in CustomeActionData,we add:
/dbname=[DBNAME] /server=[DBSERVERNAME] /user=[USERNAME] /pwd=[PASSWORD] /iis=[IISSERVER] /port=[PORT] /targetdir="[TARGETDIR]/"

If you reach here,congritulations,you are patience!!!
up to now,the basic installer program work is ok,on "MyWebSetup" project,click the "generate" and then "install",everything is ok.
Howere,to comsummate the installer,we need to modify the Installer.Designer.cs file
6)modify the "Install program file"
open Installer.Designer.cs file,modifed the file
declare some variable:
  private System.Data.SqlClient.SqlConnection sqlConn;
        private System.Data.SqlClient.SqlCommand Command;

        private string DBName;

        private string ServerName;

        private string AdminName;

        private string AdminPwd;


private string iis;

        private string port;

        private string dir;

        public static string VirDirSchemaName = "IIsWebVirtualDir";


        private string _target;

        private DirectoryEntry _iisServer;

        private ManagementScope _scope;

        private ConnectionOptions _connection;
the method to connect the database server
#region ConnectDatabase

        private bool ConnectDatabase()

        {

            if (Command.Connection.State != ConnectionState.Open)

            {

                try

                {

                    Command.Connection.Open();

                }

                catch(Exception e)

                {

                    return false;

                }

            }

            return true;

        }

        #endregion
If you can't connect your database server,check your connection string(at first,your database should set 'master')
method to read SQL file
#region GetSql  read SQL from file
        private string GetSql(string Name)

        {

            try

            {

                Assembly Asm = Assembly.GetExecutingAssembly();

                Stream strm = Asm.GetManifestResourceStream(Asm.GetName().Name + "." + Name);

                StreamReader reader = new StreamReader(strm);

                return reader.ReadToEnd();

            }

            catch (Exception getException)

            {

                throw new ApplicationException(getException.Message);

            }

        }

        #endregion
method to execute sql script
#region ExecuteSql

        private void ExecuteSql(string DataBaseName, string sqlstring)

        {

            Command = new System.Data.SqlClient.SqlCommand(sqlstring, sqlConn);

            if (ConnectDatabase())

            {

                try

                {

                    Command.Connection.ChangeDatabase(DataBaseName);

                    Command.ExecuteNonQuery();

                }

                finally

                {

                    Command.Connection.Close();

                }

            }

        }

        #endregion
method to create database and database tables
#region CreateDBAndTable

        protected bool CreateDBAndTable(string DBName)

        {


            bool Restult = false;

            try

            {

                ExecuteSql("master", "USE MASTER IF EXISTS (SELECT NAME FROM SYSDATABASES WHERE NAME='" + DBName + "') DROP DATABASE " + DBName);

                ExecuteSql("master", "CREATE DATABASE " + DBName);

                ExecuteSql(DBName, GetSql("DBSQL.txt"));


                Restult = true;


            }

            Catch


{

            }

            return Restult;

        }

        #endregion
从备份文件恢复数据库及数据库表
#region RestoreDB 从备份文件恢复数据库及数据库表
///
/// 从备份文件恢复数据库及数据库表
///
///数据库名
///配件中数据库脚本资源的名称
///
protected bool RestoreDB(string DBName)
{
dir = this.Context.Parameters["targetdir"];
bool Restult = false;
string MSQL = "RESTORE DATABASE " + DBName +
" FROM DISK = '" + dir + @"data.bak' " +
" WITH MOVE 'Test' TO '" + @"c:/" + DBName + ".mdf', " +
" MOVE 'Test_log' TO '" + @"c:/" + DBName + ".ldf' ";
try
{
ExecuteSql("master", "USE MASTER IF EXISTS (SELECT NAME FROM SYSDATABASES WHERE NAME='" + DBName + "') DROP DATABASE " + DBName);
ExecuteSql("master", MSQL);
Restult = true;
}
finally
{
// 删除备份文件
try
{
File.Delete(dir + @"data.bak");
}
catch
{
}
}
return Restult;
}
#endregion
这里可以到注册表读取SQL Server的安装路径,把恢复后的数据库文件放到data目录地下。在本例中,只是实现了恢复,并未进行标准的操作。其中Test和Test_log时备份时数据库的文件信息。如果想要从备份文件中恢复,请把文件包含到项目里并且设置和DBSQL.txt一样,嵌入到程序里。最后执行删除。不过我想应该有办法不把文件先安装到目标机器上,而是有方法想读取DBSQL.txt文件一样,直接恢复数据库,不过确实没想到办法,失败!
网站安装好后,需要设置web.config文件,这里只涉及到连接字符串到设置,其他的可以同理修改。
#region WriteWebConfig 修改web.config的连接数据库的字符串
private bool WriteWebConfig()
{
System.IO.FileInfo FileInfo = new System.IO.FileInfo(this.Context.Parameters["targetdir"] + "/web.config");
if (!FileInfo.Exists)
{
throw new InstallException("Missing config file :" + this.Context.Parameters["targetdir"] + "/web.config");
}
System.Xml.XmlDocument xmlDocument = new System.Xml.XmlDocument();
xmlDocument.Load(FileInfo.FullName);
bool FoundIt = false;
foreach (System.Xml.XmlNode Node in xmlDocument["configuration"]["appSettings"])
{
if (Node.Name == "add")
{
if (Node.Attributes.GetNamedItem("key").Value == "ConnectionString")
{
Node.Attributes.GetNamedItem("value").Value = String.Format("Persist Security Info=False;Data Source={0};database={1};User ID={2};Password={3};Packet Size=4096;Pooling=true;Max Pool Size=100;Min Pool Size=1", ServerName, DBName, AdminName, AdminPwd);
FoundIt = true;
}
}
}
if (!FoundIt)
{
throw new InstallException("Error when writing the config file: web.config");
}
xmlDocument.Save(FileInfo.FullName);
return FoundIt;
}
#endregion
#region WriteRegistryKey 写注册表。安装部署中,直接有一个注册表编辑器,可以在那里面设置。
private void WriteRegistryKey()
{
// 写注册表
RegistryKey hklm = Registry.LocalMachine;
RegistryKey wangwei= hklm.OpenSubKey("SOFTWARE", true);
RegistryKey F = cqfeng.CreateSubKey("wangwei");
F.SetValue("FilePath", "kkkk");
}
#endregion
#region Connect 连接IIS服务器
public bool Connect()
{
if (iis == null)
return false;
try
{
_iisServer = new DirectoryEntry("IIS://" + iis + "/W3SVC/1");
_target = iis;
_connection = new ConnectionOptions();
_scope = new ManagementScope(@"//" + iis + @"/root/MicrosoftIISV2", _connection);
_scope.Connect();
}
catch
{
return false;
}
return IsConnected();
}
public bool IsConnected()
{
if (_target == null || _connection == null || _scope == null) return false;
return _scope.IsConnected;
}
#endregion
#region IsWebSiteExists 判断网站是否已经存在
public bool IsWebSiteExists(string serverID)
{
try
{
string siteName = "W3SVC/" + serverID;
ManagementObjectSearcher searcher = new ManagementObjectSearcher(_scope, new ObjectQuery("SELECT * FROM IIsWebServer"), null);
ManagementObjectCollection webSites = searcher.Get();
foreach (ManagementObject webSite in webSites)
{
if ((string)webSite.Properties["Name"].Value == siteName)
return true;
}
return false;
}
catch
{
return false;
}
}
#endregion
#region GetNextOpenID 获得一个新的ServerID
private int GetNextOpenID()
{
DirectoryEntry iisComputer = new DirectoryEntry("IIS://localhost/w3svc");
int nextID = 0;
foreach (DirectoryEntry iisWebServer in iisComputer.Children)
{
string sname = iisWebServer.Name;
try
{
int name = int.Parse(sname);
if (name > nextID)
{
nextID = name;
}
}
catch
{
}
}
return ++nextID;
}
#endregion
#region CreateWebsite 添加网站
public string CreateWebSite(string serverID, string serverComment, string defaultVrootPath, string HostName, string IP, string Port)
{
try
{
ManagementObject oW3SVC = new ManagementObject(_scope, new ManagementPath(@"IIsWebService='W3SVC'"), null);
if (IsWebSiteExists(serverID))
{
return "Site Already Exists...";
}
ManagementBaseObject inputParameters = oW3SVC.GetMethodParameters("CreateNewSite");
ManagementBaseObject[] serverBinding = new ManagementBaseObject[1];
serverBinding[0] = CreateServerBinding(HostName, IP, Port);
inputParameters["ServerComment"] = serverComment;
inputParameters["ServerBindings"] = serverBinding;
inputParameters["PathOfRootVirtualDir"] = defaultVrootPath;
inputParameters["ServerId"] = serverID;
ManagementBaseObject outParameter = null;
outParameter = oW3SVC.InvokeMethod("CreateNewSite", inputParameters, null);
// 启动网站
string serverName = "W3SVC/" + serverID;
ManagementObject webSite = new ManagementObject(_scope, new ManagementPath(@"IIsWebServer='" + serverName + "'"), null);
webSite.InvokeMethod("Start", null);
return (string)outParameter.Properties["ReturnValue"].Value;
}
catch (Exception ex)
{
return ex.Message;
}
}
public ManagementObject CreateServerBinding(string HostName, string IP, string Port)
{
try
{
ManagementClass classBinding = new ManagementClass(_scope, new ManagementPath("ServerBinding"), null);
ManagementObject serverBinding = classBinding.CreateInstance();
serverBinding.Properties["Hostname"].Value = HostName;
serverBinding.Properties["IP"].Value = IP;
serverBinding.Properties["Port"].Value = Port;
serverBinding.Put();
return serverBinding;
}
catch
{
return null;
}
}
#endregion
好了,准备工作已经做完,现在开始写最重要的Install方法了
整个方法写完后如下:
#region Install 安装
///
/// 安装数据库
///
///
public override void Install(IDictionary stateSaver)
{
base.Install(stateSaver);
dir = this.Context.Parameters["dir"];
DBName = this.Context.Parameters["DBNAME"].ToString();
ServerName = this.Context.Parameters["server"].ToString();
AdminName = this.Context.Parameters["user"].ToString();
AdminPwd = this.Context.Parameters["pwd"].ToString();
iis = this.Context.Parameters["iis"].ToString(); ;
port = this.Context.Parameters["port"].ToString();
string connStr = "Persist Security Info=False;server=(local);database=master;Integrated Security=SSPI;Packet Size=4096;Pooling=true;Max Pool Size=100;Min Pool Size=1";
this.sqlConn = new SqlConnection(connStr);
//写入获取的安装程序中的变量,此段代码为调试用可以不添加
this.sqlConn.ConnectionString = "Packet size=4096;User ID=" + AdminName + ";Data Source=" + ServerName + ";Password=" + AdminPwd + ";Persist Security Info=False;Integrated Security=false";
// 执行SQL 安装数据库 可选择时恢复或者时直接创建
if(!CreateDBAndTable(DBName))
{
throw new ApplicationException("创建数据库时出现严重错误!");
}
// 从备份数据库文件恢复数据库
/*
if (!RestoreDB(DBName))
{
throw new ApplicationException("恢复数据库时出现严重错误!");
}
*/
// 添加网站
Connect();
//string serverID = GetNextOpenID().ToString();
//string serverComment = websitenName;
// 下面的信息为测试,可以自己编写文本框来接收用户输入信息
string serverID = "8888";
string serverComment = "wangwei";
string defaultVrootPath = this.Context.Parameters["targetdir"];
if (defaultVrootPath.EndsWith(@"/"))
{
defaultVrootPath = defaultVrootPath.Substring(0, defaultVrootPath.Length-1);
}
string HostName = "";
string IP = "";
string Port = port;
string sReturn = CreateWebSite(serverID, serverComment, defaultVrootPath, HostName, IP, Port);
// 修改web.config
if (!WriteWebConfig())
{
throw new ApplicationException("设置数据库连接字符串时出现错误");
}
// 写注册表
WriteRegistryKey();
}
#endregion
删除时的方法。在本文中未详细操作,比如删除站点,删除数据库等。如果需要,请你自己补足
#region Uninstall 删除
public override void Uninstall(IDictionary savedState)
{
if (savedState == null)
{
throw new ApplicationException("未能卸载!");
}
else
{
base.Uninstall(savedState);
}
}
#endregion
Now,compile and setup
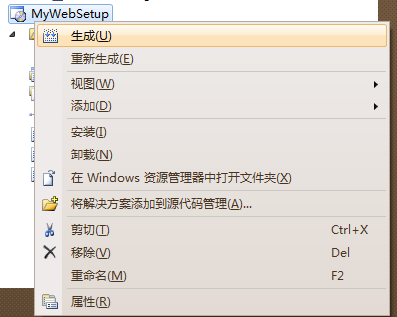


When you finished the setup,you will find everything is ok!