前言:iOS的Core Animation,有很多概念,包括Layer(层)、Animation(动画)和Timing(时序)、Layout(布局)和constraint(约束)、Transaction(处理)。其中Layer是最基础的。
Layer有多种,最基本的是CALayer,它也是其他种类Layer的父类。CALayer的子类有:
- CAScrollLayer,用于简化显示层的一部分
- CATextLayer,便于从字符串生成内容是文本的层
- CATiledLayer,可用于显示复杂的图片
- CAOpenGLLayer,提供OpenGLES渲染环境
一、CALayer是什么?
CALayer是个简单的类,它是用来在屏幕上显示内容展示的矩形区域。咋一看,和UIView的描述是一样的,但它们确确实实不同,有很多的区别。每个UIView都有一个根CALayer,UIView在这个layer上描绘东西。我们通过CALayer *myLayer = myView.layer;来访问view的layer。
二、CALayer有那些属性?
- 层的大小和位置
- 层的背景颜色
- 层的内容(图像,core graphics) layer.content
- 层的的圆角,半径
- 层的阴影设置
三、CALayer的一些用法
错误:"_OBJC_CLASS_$_CALayer", referenced from:
解决办法:在你的Frameworks里面添加QuartzCore.framework,步骤:target---》build phases ->Link Binary With Libraries
要加上#import <QuartzCore/QuartzCore.h>
- (void)viewDidLoad
{
    [super viewDidLoad];


    UIView *myView = [[UIView alloc] init];
    [self.view addSubview:myView];

    myView.backgroundColor = [UIColor greenColor];
    myView.frame = CGRectMake(50, 50, 200, 200);
   //下面将添加我们下面介绍的一些方法,为了看的清楚,我们都提出来介绍
   ...
}
1、利用layer加阴影:
 //设置 CALayer 背景(shodow)的位置
myView.layer.shadowPath = [UIBezierPath bezierPathWithRect:myView.frame].CGPath;
 //很重要的属性,可以用此属性来防止子元素大小溢出父元素,如若防止溢出,请设为 true
myView.layer.masksToBounds = NO;
 //shadow 在 X 和 Y 轴 上延伸的方向,即 shadow 的大小
myView.layer.shadowOffset = CGSizeMake(10, 10);
 //shadow 的渐变距离,从外围开始,往里渐变 shadowRadius 距离
myView.layer.shadowRadius = 5;
//shadow 的透明效果
myView.layer.shadowOpacity = 0.5;
myView.layer.shadowColor = [UIColor redColor].CGColor;
效果如下:
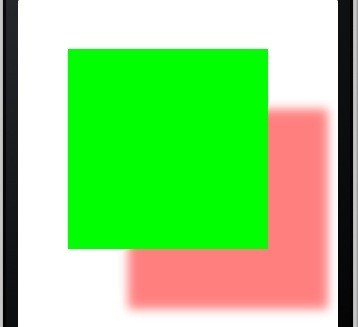
这里面重点要讲的是shadowPath,它表示背景的位置,我们一般设的参数为[UIBezierPath bezierPathWithRect:myView.bounds].CGPath;打印myView.bounds,数值为(0,0,200,200),这里觉得很奇怪,bounds和frame有什么区别联系了?为什么阴影的shadowPath位置是(0,0,200,200)但其实不在这个位置了?
为了弄清楚这个问题,我直接把shadowPath = [UIBezierPath bezierPathWithRect:CGRectMake(50, 50, 200, 200)].CGPath;得到的效果如右上图。可以看的很清楚,bezierPathWithRect:的参数坐标是以myView的起点为坐标的。
bounds和frame有什么区别联系了?直观上说,bounds和frame所表示的长和宽是一样的,
frame指的是:该view在父view坐标系统中的位置和大小。(参照点是父亲的坐标系统)
bounds指的是:该view在本身坐标系统中 的位置和大小。(参照点是本身坐标系统)
2、加边框
// 边框颜色和宽度,很常用
myView.layer.borderWidth = 3;
myView.layer.borderColor = [[UIColor blueColor] CGColor];

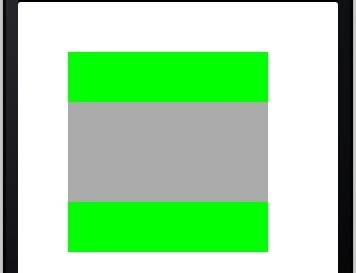
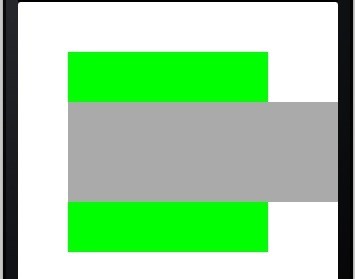
图1 加边框 图2 不允许溢出 图3 允许溢出
3、masksToBounds
myView.layer.masksToBounds = NO;
UIButton *btn = [[UIButton alloc] initWithFrame:CGRectMake(0,50, 300,100)];
btn.backgroundColor = [UIColor lightGrayColor];
[myView addSubview:btn];
允许溢出,设为NO,不允许溢出,设为YES.
4、layer自己也有边界、透明度
myView.layer.bounds = CGRectMake(0, 0, 300, 300);//边界
myView.layer.opacity = 0.5;//透明度
myView.layer.cornerRadius = 5;//圆角
四、新建layer,再layer上贴图,或自己绘图


//
//  ViewController.m
//  CALayerFun
//
//  Created by rongfzh on 13-2-20.
//  Copyright (c) 2013年 rongfzh. All rights reserved.
//

#import "ViewController.h"
#import <QuartzCore/QuartzCore.h>

@interface ViewController ()

@end

@implementation ViewController

- (void)viewDidLoad
{
    self.view.layer.backgroundColor = [UIColor orangeColor].CGColor;
    self.view.layer.cornerRadius = 20.0;
    self.view.layer.frame = CGRectInset(self.view.layer.frame,20, 20);


    CALayer *sublayer = [CALayer layer];
    sublayer.backgroundColor = [UIColor purpleColor].CGColor;
    sublayer.shadowOffset = CGSizeMake(0, 3);
    sublayer.shadowRadius = 5.0;
    sublayer.shadowColor = [UIColor blackColor].CGColor;
    sublayer.shadowOpacity = 0.8;
    sublayer.frame = CGRectMake(30, 30, 128, 192);
    sublayer.borderColor = [UIColor blackColor].CGColor;
    sublayer.borderWidth = 2.0;
    sublayer.cornerRadius = 10.0;
    [self.view.layer addSublayer:sublayer];

//贴图
    CALayer *imageLayer = [CALayer layer];
    imageLayer.frame = sublayer.bounds;
    imageLayer.cornerRadius = 10.0;
    imageLayer.contents = (id)[UIImage imageNamed:@"snaguosha.png"].CGImage;
    imageLayer.masksToBounds = YES;
    [sublayer addSublayer:imageLayer];

//绘图,调用setNeedsDisplay
    CALayer *customDrawn = [CALayer layer];
    customDrawn.delegate = self;
    customDrawn.backgroundColor = [UIColor greenColor].CGColor;
    customDrawn.frame = CGRectMake(30, 250, 280, 200);
    customDrawn.shadowOffset = CGSizeMake(0, 3);
    customDrawn.shadowRadius = 5.0;
    customDrawn.shadowColor = [UIColor blackColor].CGColor;
    customDrawn.shadowOpacity = 0.8;
    customDrawn.cornerRadius = 10.0;
    customDrawn.borderColor = [UIColor blackColor].CGColor;
    customDrawn.borderWidth = 2.0;
    customDrawn.masksToBounds = YES;
    [self.view.layer addSublayer:customDrawn];
    [customDrawn setNeedsDisplay];
    [super viewDidLoad];

}


static inline double radians (double degrees) { return degrees * M_PI/180; }

void MyDrawColoredPattern (void *info, CGContextRef context) {

    CGColorRef dotColor = [UIColor colorWithHue:0 saturation:0 brightness:0.07 alpha:1.0].CGColor;
    CGColorRef shadowColor = [UIColor colorWithRed:1 green:1 blue:1 alpha:0.1].CGColor;

    CGContextSetFillColorWithColor(context, dotColor);
    CGContextSetShadowWithColor(context, CGSizeMake(0, 1), 1, shadowColor);

    CGContextAddArc(context, 3, 3, 4, 0, radians(360), 0);
    CGContextFillPath(context);

    CGContextAddArc(context, 16, 16, 4, 0, radians(360), 0);
    CGContextFillPath(context);

}

- (void)drawLayer:(CALayer *)layer inContext:(CGContextRef)context {

    CGColorRef bgColor = [UIColor colorWithHue:0 saturation:0 brightness:0.15 alpha:1.0].CGColor;
    CGContextSetFillColorWithColor(context, bgColor);
    CGContextFillRect(context, layer.bounds);

    static const CGPatternCallbacks callbacks = { 0, &MyDrawColoredPattern, NULL };

    CGContextSaveGState(context);
    CGColorSpaceRef patternSpace = CGColorSpaceCreatePattern(NULL);
    CGContextSetFillColorSpace(context, patternSpace);
    CGColorSpaceRelease(patternSpace);

    CGPatternRef pattern = CGPatternCreate(NULL,
                                           layer.bounds,
                                           CGAffineTransformIdentity,
                                           24,
                                           24,
                                           kCGPatternTilingConstantSpacing,
                                           true,
                                           &callbacks);
    CGFloat alpha = 1.0;
    CGContextSetFillPattern(context, pattern, &alpha);
    CGPatternRelease(pattern);
    CGContextFillRect(context, layer.bounds);
    CGContextRestoreGState(context);
}

- (void)didReceiveMemoryWarning
{
    [super didReceiveMemoryWarning];
    // Dispose of any resources that can be recreated.
}

@end
关于第四步,具体可参考:http://blog.csdn.net/totogo2010/article/details/8605092