Netty源码分析第四章: pipeline
第三节: handler的删除
上一小节我们学习了添加handler的逻辑操作, 这一小节我们学习删除handler的相关逻辑
如果用户在业务逻辑中进行ctx.pipeline().remove(this)这样的写法, 或者ch.pipeline().remove(new SimpleHandler())这样的写法, 则就是对handler进行删除, 我们学习过添加handler的逻辑, 所以对handler删除操作理解起来也会比较容易
我们首先跟到defaultChannelPipeline的remove(handler)的方法中:
public final ChannelPipeline remove(ChannelHandler handler) {
    remove(getContextOrDie(handler));
    return this;
}
方法体里有个remove()方法, 传入一个 getContextOrDie(handler) 参数, 这个 getContextOrDie(handler) , 其实就是根据handler拿到其包装类HandlerContext对象
我们跟到getContextPrDie这个方法中:
private AbstractChannelHandlerContext getContextOrDie(ChannelHandler handler) {
    AbstractChannelHandlerContext ctx = (AbstractChannelHandlerContext) context(handler);
    //代码省略
}
这里仍然会通过context(handler)方法去寻找, 再跟进去:
public final ChannelHandlerContext context(ChannelHandler handler) {
    if (handler == null) {
        throw new NullPointerException("handler");
    }
    //从头遍历节点
    AbstractChannelHandlerContext ctx = head.next;
    for (;;) {
        if (ctx == null) {
            return null;
        }
        //找到handler
        if (ctx.handler() == handler) {
            return ctx;
        }
        ctx = ctx.next;
    }
}
这里我们看到寻找的方法也非常的简单, 就是从头结点开始遍历, 遍历到如果其包装的handler对象是传入的handler对象, 则返回找到的handlerContext
回到remove(handler)方法:
public final ChannelPipeline remove(ChannelHandler handler) {
    remove(getContextOrDie(handler));
    return this;
}
继续跟到remove方法中:
private AbstractChannelHandlerContext remove(final AbstractChannelHandlerContext ctx) {

    //当前删除的节点不能是head, 也不能是tail
    assert ctx != head && ctx != tail;

    synchronized (this) {
        //执行删除操作
        remove0(ctx);
        if (!registered) {
            callHandlerCallbackLater(ctx, false);
            return ctx;
        }

        //回调删除handler事件
        EventExecutor executor = ctx.executor();
        if (!executor.inEventLoop()) {
            executor.execute(new Runnable() {
                @Override
                public void run() {
                    callHandlerRemoved0(ctx);
                }
            });
            return ctx;
        }
    }
    callHandlerRemoved0(ctx);
    return ctx;
}
首先要断言删除的节点不能是tail和head
然后通过remove0(ctx)进行实际的删除操作, 跟到remove0(ctx)中:
private static void remove0(AbstractChannelHandlerContext ctx) {
    //当前节点的前置节点
    AbstractChannelHandlerContext prev = ctx.prev;
    //当前节点的后置节点
    AbstractChannelHandlerContext next = ctx.next;
    //前置节点的下一个节点设置为后置节点
    prev.next = next;
    //后置节点的上一个节点设置为前置节点
    next.prev = prev;
}
这里的操作也非常简单, 做了一个指针移动的操作, 熟悉双向链表的小伙伴应该不会陌生, 删除节点逻辑大概如下图所示:
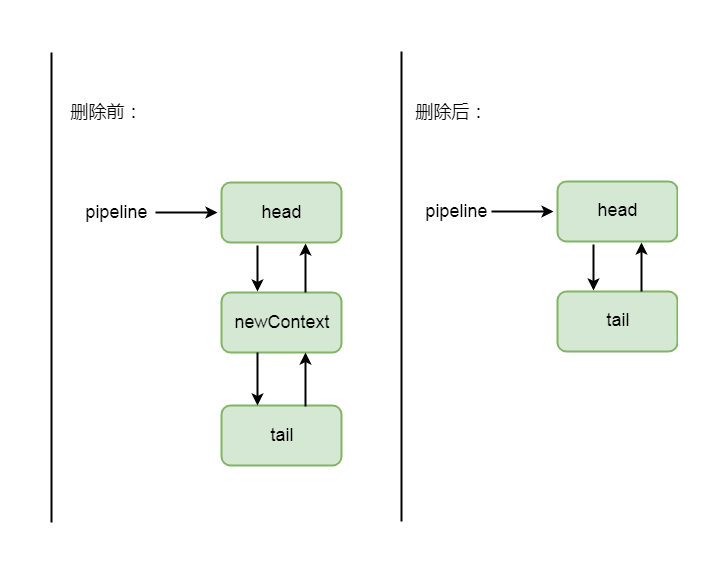
4-3-1
回到remove(ctx)方法:
private AbstractChannelHandlerContext remove(final AbstractChannelHandlerContext ctx) {

    //当前删除的节点不能是head, 也不能是tail
    assert ctx != head && ctx != tail;

    synchronized (this) {
        //执行删除操作
        remove0(ctx);
        if (!registered) {
            callHandlerCallbackLater(ctx, false);
            return ctx;
        }

        //回调删除handler事件
        EventExecutor executor = ctx.executor();
        if (!executor.inEventLoop()) {
            executor.execute(new Runnable() {
                @Override
                public void run() {
                    callHandlerRemoved0(ctx);
                }
            });
            return ctx;
        }
    }
    callHandlerRemoved0(ctx);
    return ctx;
}
我们继续往下看, 如果当前线程不是eventLoop线程则将回调删除事件封装成task放在taskQueue中让eventLoop线程进行执行, 否则, 则直接执行回调删除事件
跟到callHandlerRemoved0(ctx)方法中:
private void callHandlerRemoved0(final AbstractChannelHandlerContext ctx) {
    try {
        try {
            //调用handler的handlerRemoved方法
            ctx.handler().handlerRemoved(ctx);
        } finally {
            //将当前节点状态设置为已移除
            ctx.setRemoved();
        }
    } catch (Throwable t) {
        fireExceptionCaught(new ChannelPipelineException(
                ctx.handler().getClass().getName() + ".handlerRemoved() has thrown an exception.", t));
    }
}
与添加handler的逻辑一样, 这里会调用当前handler的handlerRemoved方法, 如果用户没有重写该方法, 则会调用其父类的方法, 方法体在ChannelHandlerAdapter类中有定义, 我们跟进去
public void handlerRemoved(ChannelHandlerContext ctx) throws Exception {

}
同添加handler一样, 也是一个空实现, 这里用户可以通过重写来添加自己需要的逻辑
以上就是删除handler的相关操作