1.导出数据成Excel方法代码(生成的excel表格中可实现合并行列,按照特定的样式排列展示数据)
/**
* 导出excel
* @param title 导出表的标题
* @param fileNames 生成excel文件的文件名
* @param response
*/
public static void exportExcel(String title, String fileNames, HttpServletResponse response) throws Exception{
String fileName= new String(fileNames.getBytes("UTF-8"),"iso-8859-1");
OutputStream output = response.getOutputStream();
response.reset();
response.setHeader("Content-disposition", "attachment; filename="+fileName);
response.setContentType("application/msexcel");
try {
HSSFWorkbook workbook; // 创建工作簿对象
workbook = new HSSFWorkbook();
HSSFSheet sheet = workbook.createSheet(title); // 创建工作表
// 如果这行没有了,整个公式都不会有自动计算的效果的
sheet.setForceFormulaRecalculation(true);
// 设置字体
HSSFFont font = workbook.createFont();
// 设置字体大小
font.setFontHeightInPoints((short) 11);
// 设置字体名字
font.setFontName("Courier New");
// 设置样式;
HSSFCellStyle style = workbook.createCellStyle();
// 在样式用应用设置的字体;
style.setFont(font);
// 设置自动换行;
style.setWrapText(false);
//横向居中
style.setAlignment(HorizontalAlignment.CENTER);
//纵向居中
style.setVerticalAlignment( VerticalAlignment.CENTER);
// 设置底边框;
style.setBorderBottom(BorderStyle.THIN);
// 设置左边框;
style.setBorderLeft(BorderStyle.THIN);
// 设置右边框;
style.setBorderRight(BorderStyle.THIN);
// 设置顶边框;
style.setBorderTop(BorderStyle.THIN);
//设置列的样式
sheet.setDefaultColumnStyle(0,style);
sheet.setDefaultColumnStyle(1,style);
sheet.setDefaultColumnStyle(2,style);
sheet.setDefaultColumnStyle(3,style);
sheet.setDefaultColumnStyle(4,style);
sheet.setDefaultColumnStyle(5,style);
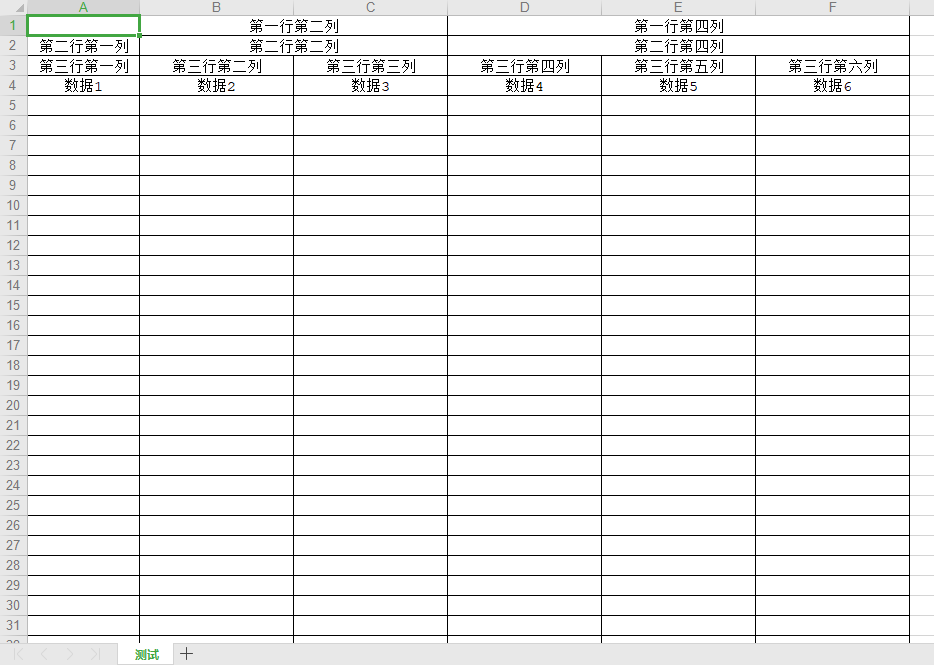
//合并表格行,合并列数为列名的长度,第一个参数为起始行号,第二个参数为终止行号,第三个参数为起始列好,第四个参数为终止列号
sheet.addMergedRegion(new CellRangeAddress(0, 0, 1,2 ));
sheet.addMergedRegion(new CellRangeAddress(0, 0, 3,5 ));
sheet.addMergedRegion(new CellRangeAddress(1, 1, 1,2 ));
sheet.addMergedRegion(new CellRangeAddress(1, 1, 3,5 ));
//创建行,传入参数0,表明创建的是第一行
HSSFRow row = sheet.createRow(0);
//创建第二列,即第二个单元格
row.createCell(1).setCellValue("第一行第二列");
row.createCell(3).setCellValue("第一行第四列");
//创建第二行
HSSFRow row1 = sheet.createRow(1);
//创建第二行的第一列
row1.createCell(0).setCellValue("第二行第一列");
row1.createCell(1).setCellValue("第二行第二列");
row1.createCell(3).setCellValue("第二行第四列");
//创建第三行
HSSFRow row2 = sheet.createRow(2);
//创建第二行的第一列
row2.createCell(0).setCellValue("第三行第一列");
row2.createCell(1).setCellValue("第三行第二列");
row2.createCell(2).setCellValue("第三行第三列");
row2.createCell(3).setCellValue("第三行第四列");
row2.createCell(4).setCellValue("第三行第五列");
row2.createCell(5).setCellValue("第三行第六列");
//创建第四行
HSSFRow row3 = sheet.createRow(3);
//创建第三行的第一列
row3.createCell(0).setCellValue("数据1");
row3.createCell(1).setCellValue("数据2");
row3.createCell(2).setCellValue("数据3");
row3.createCell(3).setCellValue("数据4");
row3.createCell(4).setCellValue("数据5");
row3.createCell(5).setCellValue("数据6");
// 让列宽随着导出的列长自动适应
for (int colNum = 0; colNum < 6; colNum++) {
int columnWidth = sheet.getColumnWidth(colNum) / 256;
for (int rowNum = 0; rowNum < sheet.getLastRowNum(); rowNum++) {
HSSFRow currentRow;
// 当前行未被使用过
if (sheet.getRow(rowNum) == null) {
currentRow = sheet.createRow(rowNum);
} else {
currentRow = sheet.getRow(rowNum);
}
if (currentRow.getCell(colNum) != null) {
HSSFCell currentCell = currentRow.getCell(colNum);
if (currentCell.getCellType() == HSSFCell.CELL_TYPE_STRING) {
int length = currentCell.getStringCellValue()
.getBytes().length;
if (columnWidth < length) {
columnWidth = length;
}
}
}
}
if (colNum == 0) {
sheet.setColumnWidth(colNum, (columnWidth - 2) * 256);
} else {
sheet.setColumnWidth(colNum, (columnWidth + 4) * 256);
}
}
workbook.write(output);
} catch (Exception e) {
e.printStackTrace();
}
if (output != null) {
try {
output.close();
} catch (IOException e) {
e.printStackTrace();
}
}
}
2.service层调用该方法
ExcelMBang.exportExcel("测试","测试表.xlsx",response);
3.结果如图
4.使用的poi jar包版本
<poi.version>3.17</poi.version>