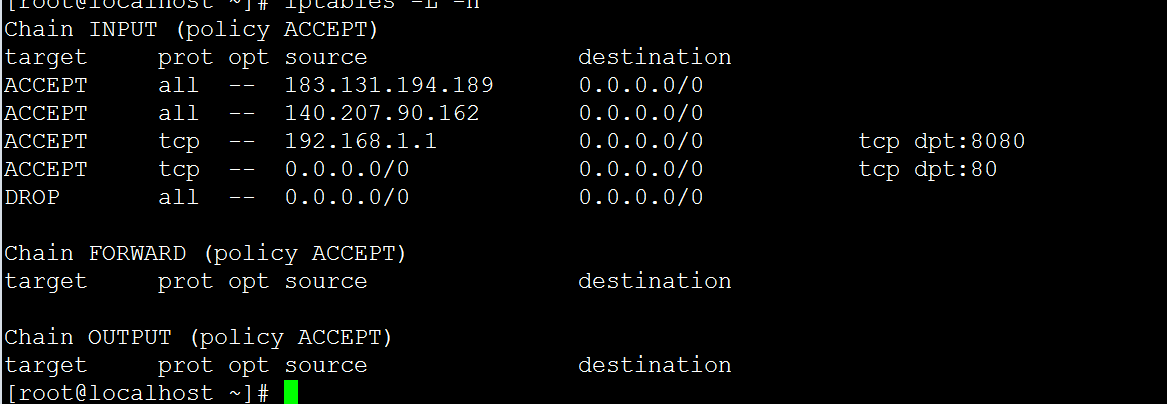
防火墙添加,分为三种类型
1,允许指定ip访问服务器所有端口
2,允许指定端口被所有人访问,比如80
3,允许指定ip+端口访问服务器
然后拒绝所有的未定义ip和端口的访问
这次配合pillar一起给iptable做规则定制
文件路径:
/srv/pillar/top.sls pillar的入口文件
/srv/pillar/iptable/init.sls iptable的信息文件
/srv/salt/base/init/iptable.sls iptables规则文件
top.sls内容
base:
  '*':
    - iptable
init.sls内容:
firewall:
# 针对ip的iptables规则
  ip-firewall:
    allow:
      - 140.207.90.162
      - 183.131.194.189
    deny:
      - 0.0.0.0

# 针对port的iptables规则
  port-firewall:
    ports:
      - 80

# 针对ip+port的iptables规则
  ip+port-firewall:
    port:
      - 8080
    port-allow:
      - 192.168.1.1
iptable.sls内容:
{% for name, ipinfo in pillar['firewall'].iteritems() %}
{% if 'allow' in ipinfo %}
{% for ip in ipinfo['allow'] %}
{{ name }}_allow_{{ip}}:
  iptables.insert:
    - table: filter
    - chain: INPUT
    - position: 1
    - source: {{ ip }}
    - jump: ACCEPT
    - save: True
{% endfor %}
{% elif 'ports' in ipinfo %}
{% for ports in ipinfo['ports'] %}
{{ name }}_ports_{{ ports }}:
  iptables.insert:
    - table: filter
    - chain: INPUT
    - position: 1
    - proto: tcp
    - dport: {{ ports }}
    - jump: ACCEPT
    - save: True
{% endfor %}
{% elif 'port' in ipinfo %}
{% for port in ipinfo['port'] %}
{% for portip in ipinfo['port-allow'] %}
{{ port }}_{{ portip }}_port_allow:
  iptables.insert:
    - table: filter
    - chain: INPUT
    - position: 1
    - proto: tcp
    - source: {{ portip }}
    - dport: {{ port }}
    - jump: ACCEPT
    - save: True
{% endfor %}
{% endfor %}
{{ name }}_deny:
  iptables.append:
    - table: filter
    - chain: INPUT
    - jump: DROP
    - save: True
{% elif 'deny' in ipinfo %}
{% for ip in ipinfo['deny'] %}
{{ name }}_deny_{{ip}}:
  iptables.insert:
    - table: filter
    - chain: INPUT
    - position: 1
    - source: {{ ip }}
    - jump: DROP
    - save: True
{% endfor %}
{% endif %}
{% endfor %}
简单说下
init.sls就是把要添加的ip端口都放在文件中,然后用salt的模板会吧sls文件生成字典,然后iptable.sls里面的东西就是把字典内容循环读出来然后判断把不同的ip添加成对应的规则就可以了
下面是终极效果图:
