一.HashMap的组成以及数据结构
在 JDK 1.7 中 HashMap 是以数组加链表的形式组成的,JDK 1.8 之后新增了红黑树的组成结构,当链表大于 8 并且容量大于 64 时,链表结构会转换成红黑树结构,它的组成结构如下图所示:
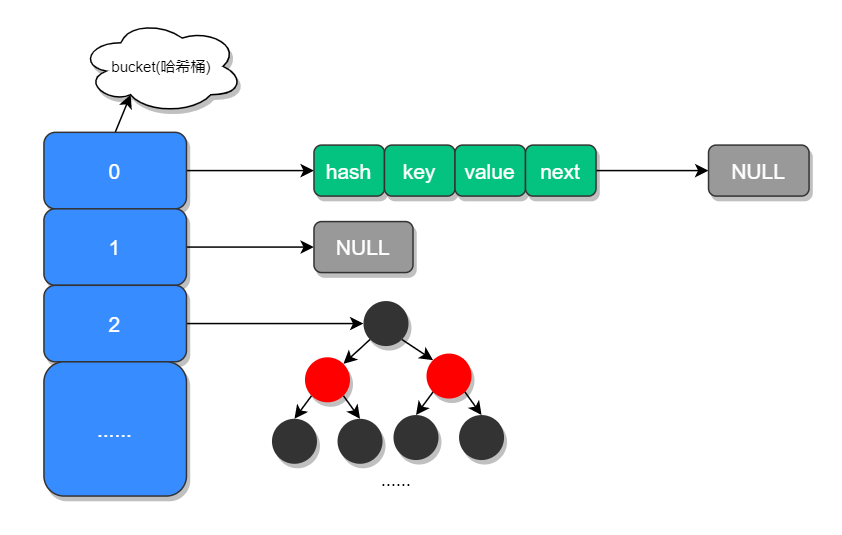
数组中的元素我们称之为哈希桶,它的定义如下:
static class Node<K,V> implements Map.Entry<K,V> {

    final int hash;

    final K key;

    V value;

    Node<K,V> next;


    Node(int hash, K key, V value, Node<K,V> next) {

        this.hash = hash;

        this.key = key;

        this.value = value;

        this.next = next;

    }


    public final K getKey()        { return key; }

    public final V getValue()      { return value; }

    public final String toString() { return key + "=" + value; }


    public final int hashCode() {

        return Objects.hashCode(key) ^ Objects.hashCode(value);

    }


    public final V setValue(V newValue) {

        V oldValue = value;

        value = newValue;

        return oldValue;

    }


    public final boolean equals(Object o) {

        if (o == this)

            return true;

        if (o instanceof Map.Entry) {

            Map.Entry<?,?> e = (Map.Entry<?,?>)o;

            if (Objects.equals(key, e.getKey()) &&

                Objects.equals(value, e.getValue()))

                return true;

        }

        return false;

    }

}
可以看出每个哈希桶中包含了四个字段:hash、key、value、next,其中 next 表示链表的下一个节点。
1.1 添加红黑树的原因
JDK 1.8 之所以添加红黑树是因为一旦链表过长,会严重影响 HashMap 的性能,而红黑树具有快速增删改查的特点,这样就可以有效的解决链表过长时操作比较慢的问题。
1.1.1 正常情况节点不会到8个
链表长度到达8个节点的概率只有亿份之六
在HashMap的类的头部有这样的源码注释
* Because TreeNodes are about twice the size of regular nodes, we
     * use them only when bins contain enough nodes to warrant use
     * (see TREEIFY_THRESHOLD). And when they become too small (due to
     * removal or resizing) they are converted back to plain bins.  In
     * usages with well-distributed user hashCodes, tree bins are
     * rarely used.  Ideally, under random hashCodes, the frequency of
     * nodes in bins follows a Poisson distribution
     * (http://en.wikipedia.org/wiki/Poisson_distribution) with a
     * parameter of about 0.5 on average for the default resizing
     * threshold of 0.75, although with a large variance because of
     * resizing granularity. Ignoring variance, the expected
     * occurrences of list size k are (exp(-0.5) * pow(0.5, k) /
     * factorial(k)). The first values are:
     *
     * 0:    0.60653066
     * 1:    0.30326533
     * 2:    0.07581633
     * 3:    0.01263606
     * 4:    0.00157952
     * 5:    0.00015795
     * 6:    0.00001316
     * 7:    0.00000094
     * 8:    0.00000006
     * more: less than 1 in ten million
     *
     * The root of a tree bin is normally its first node.  However,
     * sometimes (currently only upon Iterator.remove), the root might
     * be elsewhere, but can be recovered following parent links
     * (method TreeNode.root()).
二. HashMap成员变量分析
HashMap 源码中包含了以下几个属性:
// HashMap 初始化长度

static final int DEFAULT_INITIAL_CAPACITY = 1 << 4; // aka 16


// HashMap 最大长度

static final int MAXIMUM_CAPACITY = 1 << 30; // 1073741824


// 默认的加载因子 (扩容因子)

static final float DEFAULT_LOAD_FACTOR = 0.75f;


// 当链表长度大于此值且容量大于 64 时

static final int TREEIFY_THRESHOLD = 8;


// 转换链表的临界值,当元素小于此值时,会将红黑树结构转换成链表结构

static final int UNTREEIFY_THRESHOLD = 6;


// 最小树容量

static final int MIN_TREEIFY_CAPACITY =
1.什么是加载因子
加载因子也叫扩容因子或负载因子,用来判断什么时候进行扩容的,假如加载因子是 0.5,HashMap 的初始化容量是 16,那么当 HashMap 中有 16*0.5=8 个元素时,HashMap 就会进行扩容。
那加载因子为什么是 0.75 而不是 0.5 或者 1.0 呢?
这其实是出于容量和性能之间平衡的结果:
-
当加载因子设置比较大的时候,扩容的门槛就被提高了,扩容发生的频率比较低,占用的空间会比较小,但此时发生 Hash 冲突的几率就会提升,因此需要更复杂的数据结构来存储元素,这样对元素的操作时间就会增加,运行效率也会因此降低;
-
而当加载因子值比较小的时候,扩容的门槛会比较低,因此会占用更多的空间,此时元素的存储就比较稀疏,发生哈希冲突的可能性就比较小,因此操作性能会比较高。
所以综合了以上情况就取了一个 0.5 到 1.0 的平均数 0.75 作为加载因子。
HashMap 源码中三个重要方法:查询、新增和数据扩容。
三. HashMap 三个重要方法
1.查询
先来看查询源码:
public V get(Object key) {

    Node<K,V> e;

    // 对 key 进行哈希操作

    return (e = getNode(hash(key), key)) == null ? null : e.value;

}

final Node<K,V> getNode(int hash, Object key) {

    Node<K,V>[] tab; Node<K,V> first, e; int n; K k;

    // 非空判断

    if ((tab = table) != null && (n = tab.length) > 0 &&

        (first = tab[(n - 1) & hash]) != null) {

        // 判断第一个元素是否是要查询的元素

        if (first.hash == hash && // always check first node

            ((k = first.key) == key || (key != null && key.equals(k))))

            return first;

        // 下一个节点非空判断

        if ((e = first.next) != null) {

            // 如果第一节点是树结构,则使用 getTreeNode 直接获取相应的数据

            if (first instanceof TreeNode)

                return ((TreeNode<K,V>)first).getTreeNode(hash, key);

            do { // 非树结构,循环节点判断

                // hash 相等并且 key 相同,则返回此节点

                if (e.hash == hash &&

                    ((k = e.key) == key || (key != null && key.equals(k))))

                    return e;

            } while ((e = e.next) != null);

        }

    }

    return null;

}
从以上源码可以看出,当哈希冲突时我们需要通过判断 key 值是否相等,才能确认此元素是不是我们想要的元素。
2.新增
public V put(K key, V value) {

    // 对 key 进行哈希操作

    return putVal(hash(key), key, value, false, true);

}

final V putVal(int hash, K key, V value, boolean onlyIfAbsent,

               boolean evict) {

    Node<K,V>[] tab; Node<K,V> p; int n, i;

    // 哈希表为空则创建表

    if ((tab = table) == null || (n = tab.length) == 0)

        n = (tab = resize()).length;

    // 根据 key 的哈希值计算出要插入的数组索引 i

    if ((p = tab[i = (n - 1) & hash]) == null)

        // 如果 table[i] 等于 null,则直接插入

        tab[i] = newNode(hash, key, value, null);

    else {

        Node<K,V> e; K k;

        // 如果 key 已经存在了,直接覆盖 value

        if (p.hash == hash &&

            ((k = p.key) == key || (key != null && key.equals(k))))

            e = p;

        // 如果 key 不存在,判断是否为红黑树

        else if (p instanceof TreeNode)

            // 红黑树直接插入键值对

            e = ((TreeNode<K,V>)p).putTreeVal(this, tab, hash, key, value);

        else {

            // 为链表结构,循环准备插入

            for (int binCount = 0; ; ++binCount) {

                // 下一个元素为空时

                if ((e = p.next) == null) {

                    p.next = newNode(hash, key, value, null);

                    // 转换为红黑树进行处理

                    if (binCount >= TREEIFY_THRESHOLD - 1) // -1 for 1st

                        treeifyBin(tab, hash);

                    break;

                }

                //  key 已经存在直接覆盖 value

                if (e.hash == hash &&

                    ((k = e.key) == key || (key != null && key.equals(k))))

                    break;

                p = e;

            }

        }

        if (e != null) { // existing mapping for key

            V oldValue = e.value;

            if (!onlyIfAbsent || oldValue == null)

                e.value = value;

            afterNodeAccess(e);

            return oldValue;

        }

    }

    ++modCount;

    // 超过最大容量,扩容

    if (++size > threshold)

        resize();

    afterNodeInsertion(evict);

    return null;

}
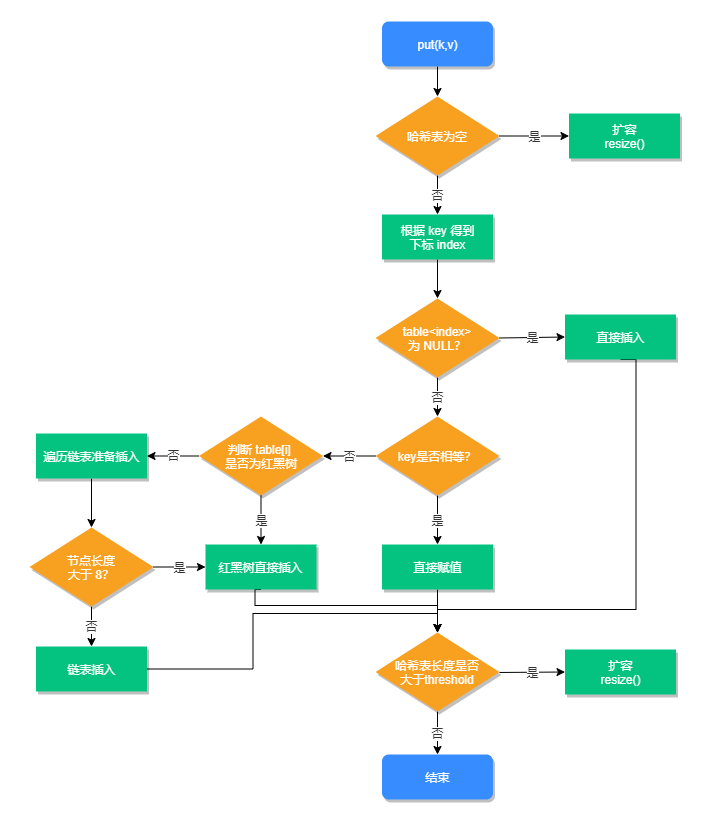
新增方法的执行流程,如下图所示:
3.扩容方法
源码如下
final Node<K,V>[] resize() {

    // 扩容前的数组

    Node<K,V>[] oldTab = table;

    // 扩容前的数组的大小和阈值

    int oldCap = (oldTab == null) ? 0 : oldTab.length;

    int oldThr = threshold;

    // 预定义新数组的大小和阈值

    int newCap, newThr = 0;

    if (oldCap > 0) {

        // 超过最大值就不再扩容了

        if (oldCap >= MAXIMUM_CAPACITY) {

            threshold = Integer.MAX_VALUE;

            return oldTab;

        }

        // 扩大容量为当前容量的两倍,但不能超过 MAXIMUM_CAPACITY

        else if ((newCap = oldCap << 1) < MAXIMUM_CAPACITY &&

                 oldCap >= DEFAULT_INITIAL_CAPACITY)

            newThr = oldThr << 1; // double threshold

    }

    // 当前数组没有数据,使用初始化的值

    else if (oldThr > 0) // initial capacity was placed in threshold

        newCap = oldThr;

    else {               // zero initial threshold signifies using defaults

        // 如果初始化的值为 0,则使用默认的初始化容量

        newCap = DEFAULT_INITIAL_CAPACITY;

        newThr = (int)(DEFAULT_LOAD_FACTOR * DEFAULT_INITIAL_CAPACITY);

    }

    // 如果新的容量等于 0

    if (newThr == 0) {

        float ft = (float)newCap * loadFactor;

        newThr = (newCap < MAXIMUM_CAPACITY && ft < (float)MAXIMUM_CAPACITY ?

                  (int)ft : Integer.MAX_VALUE);

    }

    threshold = newThr;

    @SuppressWarnings({"rawtypes","unchecked"})

    Node<K,V>[] newTab = (Node<K,V>[])new Node[newCap];

    // 开始扩容,将新的容量赋值给 table

    table = newTab;

    // 原数据不为空,将原数据复制到新 table 中

    if (oldTab != null) {

        // 根据容量循环数组,复制非空元素到新 table

        for (int j = 0; j < oldCap; ++j) {

            Node<K,V> e;

            if ((e = oldTab[j]) != null) {

                oldTab[j] = null;

                // 如果链表只有一个,则进行直接赋值

                if (e.next == null)

                    newTab[e.hash & (newCap - 1)] = e;

                else if (e instanceof TreeNode)

                    // 红黑树相关的操作

                    ((TreeNode<K,V>)e).split(this, newTab, j, oldCap);

                else { // preserve order

                    // 链表复制,JDK 1.8 扩容优化部分

                    Node<K,V> loHead = null, loTail = null;

                    Node<K,V> hiHead = null, hiTail = null;

                    Node<K,V> next;

                    do {

                        next = e.next;

                        // 原索引

                        if ((e.hash & oldCap) == 0) {

                            if (loTail == null)

                                loHead = e;

                            else

                                loTail.next = e;

                            loTail = e;

                        }

                        // 原索引 + oldCap

                        else {

                            if (hiTail == null)

                                hiHead = e;

                            else

                                hiTail.next = e;

                            hiTail = e;

                        }

                    } while ((e = next) != null);

                    // 将原索引放到哈希桶中

                    if (loTail != null) {

                        loTail.next = null;

                        newTab[j] = loHead;

                    }

                    // 将原索引 + oldCap 放到哈希桶中

                    if (hiTail != null) {

                        hiTail.next = null;

                        newTab[j + oldCap] = hiHead;

                    }

                }

            }

        }

    }

    return newTab;

}
从以上源码可以看出,JDK 1.8 在扩容时并没有像 JDK 1.7 那样,重新计算每个元素的哈希值,而是通过高位运算(e.hash & oldCap)来确定元素是否需要移动,比如 key1 的信息如下:
key1.hash = 10 0000 1010
oldCap = 16 0001 0000
使用 e.hash & oldCap 得到的结果,高一位为 0,当结果为 0 时表示元素在扩容时位置不会发生任何变化,而 key 2 信息如下:
key2.hash = 10 0001 0001
oldCap = 16 0001 0000
这时候得到的结果,高一位为 1,当结果为 1 时,表示元素在扩容时位置发生了变化,新的下标位置等于原下标位置 + 原数组长度,如下图所示:
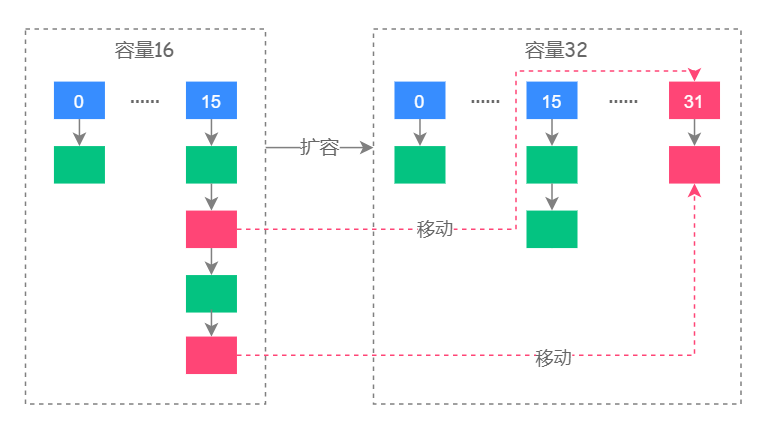
其中红色的虚线图代表了扩容时元素移动的位置。
四. HashMap 死循环分析
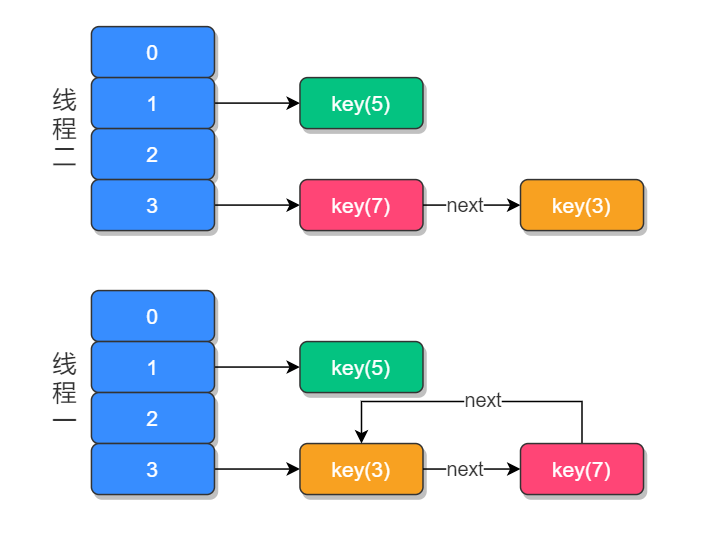
以 JDK 1.7 为例,假设 HashMap 默认大小为 2,原本 HashMap 中有一个元素 key(5),我们再使用两个线程:t1 添加元素 key(3),t2 添加元素 key(7),当元素 key(3) 和 key(7) 都添加到 HashMap 中之后,线程 t1 在执行到 Entry<K,V> next = e.next; 时,交出了 CPU 的使用权,源码如下:
void transfer(Entry[] newTable, boolean rehash) {

    int newCapacity = newTable.length;

    for (Entry<K,V> e : table) {

        while(null != e) {

            Entry<K,V> next = e.next; // 线程一执行此处

            if (rehash) {

                e.hash = null == e.key ? 0 : hash(e.key);

            }

            int i = indexFor(e.hash, newCapacity);

            e.next = newTable[i];

            newTable[i] = e;

            e = next;

        }

    }

}
那么此时线程 t1 中的 e 指向了 key(3),而 next 指向了 key(7) ;之后线程 t2 重新 rehash 之后链表的顺序被反转,链表的位置变成了 key(5) → key(7) → key(3),其中 “→” 用来表示下一个元素。
当 t1 重新获得执行权之后,先执行 newTalbe[i] = e 把 key(3) 的 next 设置为 key(7),而下次循环时查询到 key(7) 的 next 元素为 key(3),于是就形成了 key(3) 和 key(7) 的循环引用,因此就导致了死循环的发生,如下图所示:
当然发生死循环的原因是 JDK 1.7 链表插入方式为首部倒序插入,这个问题在 JDK 1.8 得到了改善,变成了尾部正序插入。
有人曾经把这个问题反馈给了 Sun 公司,但 Sun 公司认为这不是一个问题,因为 HashMap 本身就是非线程安全的,如果要在多线程下,建议使用 ConcurrentHashMap 替代,但这个问题在面试中被问到的几率依然很大,所以在这里需要特别说明一下。