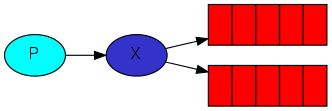
前面的两节中,主要介绍的都是一个生产者对应一个消费者,但是有时候是一个生产者对应多个消费者,这时候,我们就应该使用RabbitMQ的消息发布于订阅功能。
生产者:
import com.rabbitmq.client.ConnectionFactory;
import com.rabbitmq.client.Connection;
import com.rabbitmq.client.Channel;
public class ClientSend2 {
private static final String exchange_name="my_exchange";
private static final String exchange_type="fanout";
public static void main(String[] args)
throws java.io.IOException{
ConnectionFactory factory=new ConnectionFactory();
factory.setHost("localhost");
factory.setVirtualHost("my_mq");
factory.setUsername("zhxia");
factory.setPassword("123456");
Connection connection=factory.newConnection();
Channel channel=connection.createChannel();
channel.exchangeDeclare(exchange_name, exchange_type); //声明exchange,以及类型
String message="This mesaage is just for test!"+Math.random();
channel.basicPublish(exchange_name, "", null, message.getBytes()); //将消息绑定了队列
System.out.println("Message send:"+message);
channel.close();
connection.close();
}
}
消费者:
import com.rabbitmq.client.ConnectionFactory;
import com.rabbitmq.client.Connection;
import com.rabbitmq.client.Channel;
import com.rabbitmq.client.QueueingConsumer;
public class ClientReceive2 {
private static final String exchange_name="my_exchange";
private static final String exchange_type="fanout";
public static void main(String[] args)
throws java.io.IOException,java.lang.InterruptedException{
ConnectionFactory factory=new ConnectionFactory();
factory.setHost("localhost");
factory.setVirtualHost("my_mq");
factory.setUsername("zhxia");
factory.setPassword("123456");
Connection connection=factory.newConnection();
Channel channel=connection.createChannel();
channel.exchangeDeclare(exchange_name, exchange_type);
//创建两个队列,将它们都绑定到同一个exchange
String queue_name1=channel.queueDeclare().getQueue();
channel.queueBind(queue_name1, exchange_name, "");
String queue_name2=channel.queueDeclare().getQueue();
channel.queueBind(queue_name2, exchange_name, "");
System.out.println("Wait for message received!");
//创建两个消费者,分别与两个队列相关联
QueueingConsumer consumer1=new QueueingConsumer(channel);
channel.basicConsume(queue_name1, true, consumer1);
QueueingConsumer consumer2=new QueueingConsumer(channel);
channel.basicConsume(queue_name2,true, consumer2);
//两个消费者分别从各自的队列里面收取消息
while(true){
QueueingConsumer.Delivery deliver=consumer1.nextDelivery();
String message=new String(deliver.getBody());
System.out.println("Message received[consumer1]:"+message);
QueueingConsumer.Delivery deliver1=consumer2.nextDelivery();
String message1=new String(deliver1.getBody());
System.out.println("Message received[consumer2]:"+message1);
Thread.sleep(500);
}
}
}