前文回顾:
1 插件学习篇
4 SWT编程须知
前面几篇都提到了SWT的布局,布局系统也为规整的UI提供了保障。那么如何设计一个布局呢?
Eclipse的布局机制,提供了两个对象概念,Layout(描述内部布局方式)以及GridData(描述本身布局方式)。
什么是Layout?
首先说一下Layout,layout定义了一个空间内部的布局格式。比如我们把箱子作为一个整体,那么箱子内部该怎么去设计,怎么放置东西进去,就需要用layout来指定。

而常用的布局方式,就包括FillLayout,gridLayout,RowLayout,以及FormLayout。
下面就针对这几种布局进行一下介绍:
Filllayout
也叫做填充布局,它会让里面的子空间以填充的方式进行布局。
比如我们采用如下的设计方式:
FillLayout layout = new FillLayout();
shell.setLayout(layout);
for(int i=0;i<10;i++){
    Button button = new Button(shell,SWT.PUSH);
    button.setText("Button"+i);
}
正常的布局是这样的:
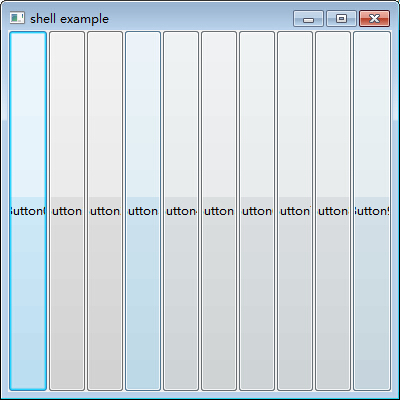
经过拉伸就变成了这样:

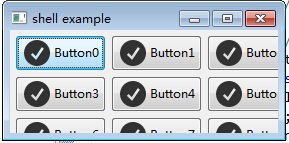
RowLayout
也叫行布局,它会让内部的子空间以行为单位进行排列,遇到边界时,自动换成下一行。
     RowLayout layout = new RowLayout();
        shell.setLayout(layout);
        for(int i=0;i<10;i++){
            Button button = new Button(shell,SWT.PUSH);
            Image img = new Image(null,"icons\ok.png");
            button.setImage(img);
            button.setText("Button"+i);
        }
得到的结果是这样的:

当压缩边界的时候,会自动换行

GridLayout
也叫做网格布局,它以规定网格的形式,指定每一行有多少列,元素会以每列几个的方式进行排列,超出的部分挤到下一行。
       GridLayout layout = new GridLayout();
        layout.numColumns = 3;
        shell.setLayout(layout);
        for(int i=0;i<10;i++){
            Button button = new Button(shell,SWT.PUSH);
            Image img = new Image(null,"icons\ok.png");
            button.setImage(img);
            button.setText("Button"+i);
        }
当指定每行有3个子控件时,无论怎么改变窗口的大小,都不会改变排列的方式

当改变窗口大小时,不会发生变化
FormLayout
感觉这个是最难使用的了,它会以一个Form表单的形式提供布局。先看一下使用方式吧:
       FormLayout layout = new FormLayout();
        shell.setLayout(layout);

        Button cancelButton = new Button(shell,SWT.PUSH);
        cancelButton.setText("Cancel");
        FormData formData1 = new FormData();
        formData1.right = new FormAttachment(100,-5); //第一个数字式百分比,也就是说  【宽度-5】
        formData1.bottom = new FormAttachment(100,-5); //第一个数字式百分比,也就是说  【高度-5】
        cancelButton.setLayoutData(formData1);

        Button okButton = new Button(shell,SWT.PUSH);
        okButton.setText("OK");
        FormData formData2 = new FormData();
        formData2.right = new FormAttachment(100,-60);
        formData2.bottom = new FormAttachment(100,-5);
        okButton.setLayoutData(formData2);

        Text text = new Text(shell,SWT.MULTI | SWT.BORDER | SWT.V_SCROLL | SWT.H_SCROLL);
        FormData formData3 = new FormData();
        formData3.top = new FormAttachment(0,5);
        formData3.bottom = new FormAttachment(cancelButton,-5);//底部距离 【底部控件-5个像素】
        formData3.left = new FormAttachment(0,5);
        formData3.right = new FormAttachment(100,-5);
        text.setLayoutData(formData3);
        Color color = new Color(null,255,0,0);
        text.setForeground(color);
可以看到他提供了一个FormData的布局方式,通过FormAttachment实现,这个类需要两个参数,第一个是宽度(left或者right)或者高度(top或者bottom)的百分比,第二个参数是它相对加上的值。如果是负数,就是减去的像素值。而且提供Control类型的参数,也就是控件类型的参数。如果第一个参数指定一个控件,比如上面指定的那个bottom,那么他会自动获取这个控件对应的高度,在进行加减。
这样就保证了,某些控件的相对位置保持不变。
下面看一下效果:

拉伸后编程

什么是GridData呢?又该如何使用呢?
下面介绍一下GridData,这个也是一个重量级的参数:
这个参数用于指定目标如何摆放,它描述了以表格为单位的布局。
它描述了空间本身的一个布局摆放的方式:

并且搭配之前的GridLayout布局,通过每行有几列的方式,控制布局。先看一下都有什么参数,以及参数描述的意义:
  GridData griddata = new GridData(SWT.FILL,SWT.FILL,false,false,1,1);

  一般都是上面这样的参数格式:

  第一个参数:水平方向如何对齐

  第二个参数:竖直方向如何对齐

  第三个参数:是否占用水平的剩余空间

  第四个参数:是否占用竖直的剩余空间

  第五个参数:水平的列数

  第六个参数:竖直的行数
这样一来,举个例子就简单了。
比如我们指定了一个表格是三行三列的,那么通过设定
  第一个控件参数是(SWT.FILL,SWT.FILL,false,false,1,1);

  第二个参数是(SWT,SWT,false,false,1,2);

  第三个参数是(SWT.FILL_BOTH);

  第四个得到如下的布局:(SWT.FILL,SWT.FILL,false,false,1,1);
这样我们得到如下的布局:

感觉上面的图顿时拉低了文章的档次,凑合看吧。可以看到第二个控件,通过指定真的占用了两列。
但是第三个的FILL_BOTH并没有按照预期占用了剩余的所有控件,这就说明,填充布局还是不会垮行到下一列的布局的。
另外添加两个小知识,就是使用颜色以及图片。
颜色通常使用RGB来指定:
Color color = new Color(null,255,0,0);
text.setForeground(color);
颜色的第一参数是Device,可以填写为null;
而图片也图普通的控件一样,需要指定一个ImgData来指定图片的URL即可:
Image img = new Image(null,"icons\ok.png");
button.setImage(img);
下面是这个例子所用到的代码:


package com.xingoo.plugin.swttest.test;

import org.eclipse.swt.SWT;
import org.eclipse.swt.graphics.Color;
import org.eclipse.swt.graphics.Image;
import org.eclipse.swt.layout.FillLayout;
import org.eclipse.swt.layout.FormAttachment;
import org.eclipse.swt.layout.FormData;
import org.eclipse.swt.layout.FormLayout;
import org.eclipse.swt.layout.GridData;
import org.eclipse.swt.layout.GridLayout;
import org.eclipse.swt.layout.RowLayout;
import org.eclipse.swt.widgets.Button;
import org.eclipse.swt.widgets.Shell;
import org.eclipse.swt.widgets.Text;

import com.xingoo.plugin.swttest.Abstract.AbstractExample;

public class LayoutTest extends AbstractExample{
    public static void main(String[] args) {
        new LayoutTest().run();
    }

    public void todo(Shell shell) {
        //////////////////////////////////////////////////////
        //FillLayout
        //////////////////////////////////////////////////////
//        FillLayout layout = new FillLayout();
//        shell.setLayout(layout);
//        for(int i=0;i<10;i++){
//            Button button = new Button(shell,SWT.PUSH);
//            button.setText("Button"+i);
//
////            Image img = new Image(null,"icons\ok.png");
////            button.setImage(img);
//        }
        //////////////////////////////////////////////////////
        //RowLayout
        //////////////////////////////////////////////////////
//        RowLayout layout = new RowLayout();
//        shell.setLayout(layout);
//        for(int i=0;i<10;i++){
//            Button button = new Button(shell,SWT.PUSH);
//            Image img = new Image(null,"icons\ok.png");
//            button.setImage(img);
//            button.setText("Button"+i);
//        }
        //////////////////////////////////////////////////////
        //GridLayout
        //////////////////////////////////////////////////////
//        GridLayout layout = new GridLayout();
//        layout.numColumns = 3;
//        shell.setLayout(layout);
//        for(int i=0;i<10;i++){
//            Button button = new Button(shell,SWT.PUSH);
//            Image img = new Image(null,"icons\ok.png");
//            button.setImage(img);
//            button.setText("Button"+i);
//        }
        GridLayout layout = new GridLayout();
        layout.numColumns = 3;
        shell.setLayout(layout);
        Button btn1 = new Button(shell,SWT.PUSH);
        GridData gd1 = new GridData(SWT.FILL,SWT.FILL,false,false,1,1);
        gd1.widthHint = 100;
        gd1.heightHint = 100;
        btn1.setLayoutData(gd1);
        Button btn2 = new Button(shell,SWT.PUSH);
        GridData gd2 = new GridData(SWT.FILL,SWT.FILL,false,false,1,2);
        gd2.widthHint = 100;
        gd2.heightHint = 100;
        btn2.setLayoutData(gd2);
        Button btn3 = new Button(shell,SWT.PUSH);
        GridData gd3 = new GridData(GridData.FILL_BOTH);
//        gd3.widthHint = 100;
//        gd3.heightHint = 100;
        btn3.setLayoutData(gd3);
        Button btn4 = new Button(shell,SWT.PUSH);
        GridData gd4 = new GridData(SWT.FILL,SWT.FILL,false,false,1,1);
        gd4.widthHint = 100;
        gd4.heightHint = 100;
        btn4.setLayoutData(gd4);
        //////////////////////////////////////////////////////
        //FormLayout
        //////////////////////////////////////////////////////
//        FormLayout layout = new FormLayout();
//        shell.setLayout(layout);
//
//        Button cancelButton = new Button(shell,SWT.PUSH);
//        cancelButton.setText("Cancel");
//        FormData formData1 = new FormData();
//        formData1.right = new FormAttachment(100,-5); //第一个数字式百分比,也就是说  【宽度-5】
//        formData1.bottom = new FormAttachment(100,-5); //第一个数字式百分比,也就是说  【高度-5】
//        cancelButton.setLayoutData(formData1);
//
//        Button okButton = new Button(shell,SWT.PUSH);
//        okButton.setText("OK");
//        FormData formData2 = new FormData();
//        formData2.right = new FormAttachment(100,-60);
//        formData2.bottom = new FormAttachment(100,-5);
//        okButton.setLayoutData(formData2);
//
//        Text text = new Text(shell,SWT.MULTI | SWT.BORDER | SWT.V_SCROLL | SWT.H_SCROLL);
//        FormData formData3 = new FormData();
//        formData3.top = new FormAttachment(0,5);
//        formData3.bottom = new FormAttachment(cancelButton,-5);//底部距离 【底部控件-5个像素】
//        formData3.left = new FormAttachment(0,5);
//        formData3.right = new FormAttachment(100,-5);
//        text.setLayoutData(formData3);
//        Color color = new Color(null,255,0,0);
//        text.setForeground(color);
    }
}
当然,最好是参考前几篇例子,可以真正体会到布局的妙处!