主要用到知识:1.Servlet 2.request从客户端得到参数 3.response向客户端响应
4.字符编码解决乱码问题 5.jsp的使用 6.验证码
7.Cookie的使用 8.Session的使用 9.具体功能登录时自动补全用户名
10.jsp页面的用户信息校验,如果为null,则跳转登录。
////使用一个VerifyCodeServlet专门来生成验证码
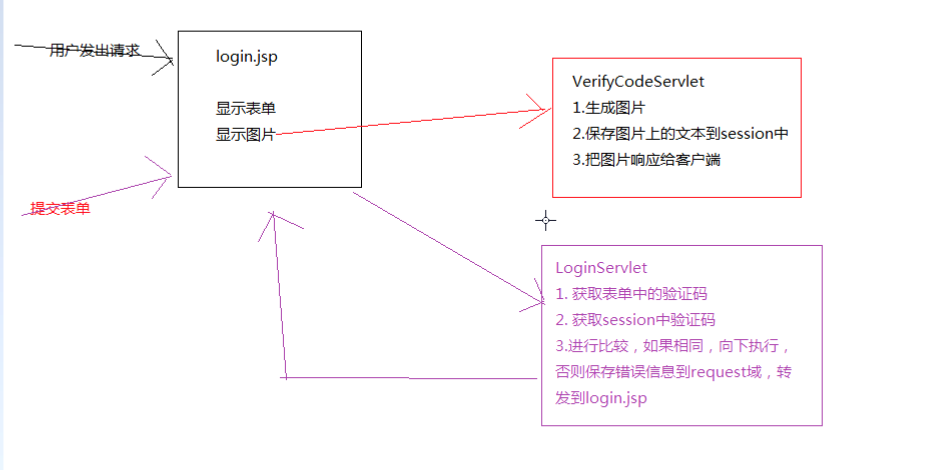
login.jsp页面:
1 <%@ page language="java" import="java.util.*" pageEncoding="UTF-8"%> 2 <% 3 String path = request.getContextPath(); 4 String basePath = request.getScheme()+"://"+request.getServerName()+":"+request.getServerPort()+path+"/"; 5 %> 6 7 <!DOCTYPE HTML PUBLIC "-//W3C//DTD HTML 4.01 Transitional//EN"> 8 <html> 9 <head> 10 <base href="<%=basePath%>"> 11 12 <title>My JSP 'login.jsp' starting page</title> 13 14 <meta http-equiv="pragma" content="no-cache"> 15 <meta http-equiv="cache-control" content="no-cache"> 16 <meta http-equiv="expires" content="0"> 17 <meta http-equiv="keywords" content="keyword1,keyword2,keyword3"> 18 <meta http-equiv="description" content="This is my page"> 19 <!-- 20 <link rel="stylesheet" type="text/css" href="styles.css"> 21 --> 22 23 <script type="text/javascript"> 24 function _change(){ 25 //1.得到img元素 26 //2.修改其src为/XJS_Session/VerifyCodeServlet 27 var imgEle=document.getElementById("img"); 28 //有缓冲,加参数---时间 29 imgEle.src="/XJS_Session/VerifyCodeServlet?a="+new Date().getTime(); 30 } 31 </script> 32 </head> 33 34 <body> 35 <h1>登录</h1> 36 <% 37 String uname=""; 38 //读名为username的cookie 39 Cookie[] cookies=request.getCookies(); 40 if(cookies!=null){ 41 for(Cookie c:cookies){ 42 //如果为空显示:"" 43 //如果不为显示:Cookie值 44 if("username".equals(c.getName())){ 45 uname=c.getValue(); 46 } 47 } 48 } 49 %> 50 51 <% 52 String message="";//一个空字符串 53 String msg=(String)request.getAttribute("msg");//获取错误信息 54 if(msg!=null){ 55 message=msg; 56 } 57 %> 58 <font color="red"><b><%=message %></b></font> 59 <form action="/XJS_Session/LoginServlet" method="post"> 60 用户名:<input type="text" name="username" value="<%=uname %>"><br> 61 密 码:<input type="password" name="password"><br> 62 验证码:<input type="text" name="verifyCode" size="7"> 63 <img id="img" src="/XJS_Session/VerifyCodeServlet"><br> 64 <a href="javascript:_change()">看不清,换一张</a> 65 <input type="submit" value="提交"> 66 </form> 67 </body> 68 </html>
LoginServlet.java:
 1 public class LoginServlet extends HttpServlet {
 2
 3     public void doPost(HttpServletRequest request, HttpServletResponse response)
 4             throws ServletException, IOException {
 5             /*
 6              * 校验验证码
 7              * 1.从session中获取正确的验证码
 8              * 2.从表单中获取用户输入的验证码
 9              * 4.如果相同,向下运行,否则保存错误信息到request域,转发到login.jsp
10              */
11             HttpSession session1 = request.getSession();
12             String vcode1 = (String) session1.getAttribute("session_vcode");
13             String vcode2 = request.getParameter("verifyCode");
14             System.out.println("1:"+vcode1+" 2:"+vcode2);
15             if(!vcode1.equalsIgnoreCase(vcode2)){//不相等----不区分大小写
16                 request.setAttribute("msg", "验证码错误!");
17                 RequestDispatcher rd=request.getRequestDispatcher("/login.jsp");
18                 rd.forward(request, response);
19                 return;//错误结束,就不向下执行
20             }
21
22
23
24
25             request.setCharacterEncoding("utf-8");
26             String username = request.getParameter("username");
27             String password = request.getParameter("password");
28             System.out.println("username:"+username+", password:"+password);
29             if(username!="" && password!=""){
30                 if("xjs".equals(username) && "0309".equals(password)){
31                     //设置Cookie
32                     response.setContentType("text/html;charset=utf-8");
33                     Cookie cookie=new Cookie("username",username);
34                     cookie.setMaxAge(60*60);
35                     response.addCookie(cookie);//把它显示到用户名文本框中
36
37
38                     //登录成功
39                     HttpSession session=session1;
40                     session.setAttribute("username", username);
41                     session.setAttribute("password", password);
42                     //重定向到succ1.jsp
43                     response.sendRedirect("/XJS_Session/succ1.jsp");
44                 }
45                     else{
46                     System.out.println("username:"+username+", password:"+password);
47                     //输入的用户名和密码不存在
48                     request.setAttribute("msg", "用户名和密码不存在!!!");
49                     //用转发
50                     RequestDispatcher rd=request.getRequestDispatcher("/login.jsp");
51                     rd.forward(request, response);
52                 }
53             }else{
54                 request.setAttribute("msg", "用户名或密码不能为空!!!");
55                 //用转发---如果用重定向的话显示错误信息就不能使用request
56                 RequestDispatcher rd=request.getRequestDispatcher("/login.jsp");
57                 rd.forward(request, response);
58             }
59     }
60 }
=============================验证码===========================
VerifyCode.java:
  1 package com.xjs.commons;
  2
  3 import java.awt.BasicStroke;
  4 import java.awt.Color;
  5 import java.awt.Font;
  6 import java.awt.Graphics2D;
  7 import java.awt.image.BufferedImage;
  8 import java.io.IOException;
  9 import java.io.OutputStream;
 10 import java.util.Random;
 11
 12 import javax.imageio.ImageIO;
 13
 14 public class VerifyCode {
 15     private int w = 70;
 16     private int h = 35;
 17      private Random r = new Random();
 18      // {"宋体", "华文楷体", "黑体", "华文新魏", "华文隶书", "微软雅黑", "楷体_GB2312"}
 19     private String[] fontNames  = {"宋体", "华文楷体", "黑体", "微软雅黑", "楷体_GB2312"};
 20     // 可选字符
 21     private String codes  = "23456789abcdefghjkmnopqrstuvwxyzABCDEFGHJKMNPQRSTUVWXYZ";
 22     // 背景色
 23     private Color bgColor  = new Color(255, 255, 255);
 24     // 验证码上的文本
 25     private String text ;
 26
 27     // 生成随机的颜色
 28     private Color randomColor () {
 29         int red = r.nextInt(150);
 30         int green = r.nextInt(150);
 31         int blue = r.nextInt(150);
 32         return new Color(red, green, blue);
 33     }
 34
 35     // 生成随机的字体
 36     private Font randomFont () {
 37         int index = r.nextInt(fontNames.length);
 38         String fontName = fontNames[index];//生成随机的字体名称
 39         int style = r.nextInt(4);//生成随机的样式, 0(无样式), 1(粗体), 2(斜体), 3(粗体+斜体)
 40         int size = r.nextInt(5) + 24; //生成随机字号, 24 ~ 28
 41         return new Font(fontName, style, size);
 42     }
 43
 44     // 画干扰线
 45     private void drawLine (BufferedImage image) {
 46         int num  = 3;//一共画3条
 47         Graphics2D g2 = (Graphics2D)image.getGraphics();
 48         for(int i = 0; i < num; i++) {//生成两个点的坐标,即4个值
 49             int x1 = r.nextInt(w);
 50             int y1 = r.nextInt(h);
 51             int x2 = r.nextInt(w);
 52             int y2 = r.nextInt(h);
 53             g2.setStroke(new BasicStroke(1.5F));
 54             g2.setColor(Color.BLUE); //干扰线是蓝色
 55             g2.drawLine(x1, y1, x2, y2);//画线
 56         }
 57     }
 58
 59     // 随机生成一个字符
 60     private char randomChar () {
 61         int index = r.nextInt(codes.length());
 62         return codes.charAt(index);
 63     }
 64
 65     // 创建BufferedImage
 66     private BufferedImage createImage () {
 67         BufferedImage image = new BufferedImage(w, h, BufferedImage.TYPE_INT_RGB);
 68         Graphics2D g2 = (Graphics2D)image.getGraphics();
 69         g2.setColor(this.bgColor);
 70         g2.fillRect(0, 0, w, h);
 71          return image;
 72     }
 73
 74     // 调用这个方法得到验证码
 75     public BufferedImage getImage () {
 76         BufferedImage image = createImage();//创建图片缓冲区
 77         Graphics2D g2 = (Graphics2D)image.getGraphics();//得到绘制环境
 78         StringBuilder sb = new StringBuilder();//用来装载生成的验证码文本
 79         // 向图片中画4个字符
 80         for(int i = 0; i < 4; i++)  {//循环四次,每次生成一个字符
 81             String s = randomChar() + "";//随机生成一个字母
 82             sb.append(s); //把字母添加到sb中
 83             float x = i * 1.0F * w / 4; //设置当前字符的x轴坐标
 84             g2.setFont(randomFont()); //设置随机字体
 85             g2.setColor(randomColor()); //设置随机颜色
 86             g2.drawString(s, x, h-5); //画图
 87         }
 88         this.text = sb.toString(); //把生成的字符串赋给了this.text
 89         drawLine(image); //添加干扰线
 90         return image;
 91     }
 92
 93     // 返回验证码图片上的文本
 94     public String getText () {
 95         return text;
 96     }
 97
 98     // 保存图片到指定的输出流
 99     public static void output (BufferedImage image, OutputStream out)
100                 throws IOException {
101         ImageIO.write(image, "JPEG", out);
102     }
103 }
VerifyCodeServlet.java:
 1 import java.awt.image.BufferedImage;
 2 import java.io.IOException;
 3 import java.io.PrintWriter;
 4
 5 import javax.servlet.ServletException;
 6 import javax.servlet.http.HttpServlet;
 7 import javax.servlet.http.HttpServletRequest;
 8 import javax.servlet.http.HttpServletResponse;
 9
10 import com.xjs.commons.VerifyCode;
11
12 public class VerifyCodeServlet extends HttpServlet {
13
14     public void doGet(HttpServletRequest request, HttpServletResponse response)
15             throws ServletException, IOException {
16         /**
17          * 1.生成图片
18          * 2.保存图片上的文本到session中
19          * 3.把图片响应到客户端
20          */
21         VerifyCode vc=new VerifyCode();
22         BufferedImage bi=vc.getImage();
23         request.getSession().setAttribute("session_vcode", vc.getText());
24         //参数输出流,ServletOutputStream  getOutputStream();返回输入流---跟getWriter()方法不能同时使用,跟JavaSE中的输出流类似
25         VerifyCode.output(bi, response.getOutputStream());
26     }
27 }
////////////////////
succ1.jsp和succ2.jsp:
 1   <body>
 2    <%
 3
 4            if(session.getAttribute("username")==null&&session.getAttribute("password")==null){
 5                //重定向到login.jsp
 6                response.sendRedirect("/XJS_Session/login.jsp");
 7                return;//别的就不执行了
 8            }
 9     %>
10     <%
11         String username=(String)session.getAttribute("username");
12         String password=(String)session.getAttribute("password");
13         out.print("用户名:"+username);
14         out.print("密码:"+password);
15
16      %>
17   </body>