前言
最近没更新新篇幅了,今天就来点干活,过多的也不说了下面着手干!干!干!
准备环境
centos7.5
apr-1.6.3.tar.gz
apr-util-1.6.1.tar.gz
httpd-2.4.34.tar.bz2
php-7.1.18.tar.bz2
mariadb-10.2.16-linux-x86_64.tar.gz
wordpress-4.9.4-zh_CN.tar.gz
编译HTTP
1、安装包组以及相关包
yum groupinstall "development tools"
yum install pcre-devel openssl-devel expat-devel
2、创建用户与解压
useradd  -r -s /sbin/nologin apache
tar xf httpd-2.4.34.tar.bz2
tar xf apr-1.6.3.tar.gz
tar xf apr-util-1.6.1.tar.gz
3、移动apr目录
mv apr-1.6.3 httpd-2.4.34/srclib/apr
mv apr-util-1.6.1 httpd-2.4.34/srclib/apr-util
4、源码编译
cd httpd-2.4.34/

./configure --prefix=/app/httpd24
--enable-so
--enable-ssl
--enable-cgi
--enable-rewrite
--with-zlib
--with-pcre
--enable-modules=most
--enable-mpms-shared=all
--with-mpm=prefork
--with-included-apr

make && make install
5、设置环境变量
echo 'PATH=/app/httpd24/bin:$PATH' > /etc/profile.d/lamp.sh
6、编辑配置文件
vim /app/httpd24/conf/httpd.conf

user apache
group apache


取消下面注释
LoadModule proxy_module modules/mod_proxy.so
LoadModule proxy_fcgi_module modules/mod_proxy_fcgi.so

在下面行添加index.php
IfModule dir_module>
    DirectoryIndex index.php index.html
</IfModule>

添加子配置文件
Include conf/extra/php.conf
7、编辑子配置文件
vim  /app/httpd24/conf/extra/php.conf

添加以下内容
AddType application/x-httpd-php .php
AddType application/x-httpd-php-source .phps

ProxyRequests Off
ProxyPassMatch ^/(.*.php)$ fcgi://127.0.0.1:9000/app/httpd24/htdocs/$1
8、启动服务
apachectl
二进制安装MYSQL
1、在前几篇里有提到详细的安装过程,这里就直接干活代码
useradd -r -s /sbin/nologin mysql

tar xvf mariadb-10.2.16-linux-x86_64.tar.gz  -C /usr/local/

cd /usr/local/

ln -s mariadb-10.2.16-linux-x86_64/ mysql

chown -R mysql.mysql mysql/

mkdir /app/mysql

chown mysql.mysql /app/mysql

cd /usr/local/mysql/

scripts/mysql_install_db  --datadir=/app/mysql --user=mysql

mkdir /etc/mysql/

cp support-files/my-huge.cnf  /etc/mysql/my.cnf

vim /etc/mysql/my.cnf

datadir=/app/mysql

cp support-files/mysql.server  /etc/init.d/mysqld

chkconfig --add mysqld

chkconfig --list

service mysqld start

vim /etc/profile.d/lamp.sh

PATH=/app/httpd24/bin:/usr/local/mysql/bin:$PATH

mysql -e "create database wpdb;grant all on wpdb.* to wpuser@'localhost' identified by 'centos'"
备注:这里可以跑下mysql安全脚本,做下安全巩固--请看https://www.cnblogs.com/xsuid/p/9368389.html
PHP编译安装
1、安装包与解压
yum install libxml2-devel bzip2-devel libmcrypt-devel

tar xvf php-7.1.18.tar.bz2
2、源码编译
cd php-7.1.18/
./configure --prefix=/app/php
--enable-mysqlnd
--with-mysqli=mysqlnd
--with-openssl
--with-pdo-mysql=mysqlnd
--enable-mbstring
--with-freetype-dir
--with-jpeg-dir
--with-png-dir
--with-zlib
--with-libxml-dir=/usr
--enable-xml
--enable-sockets
--enable-fpm
--with-config-file-path=/etc
--with-config-file-scan-dir=/etc/php.d
--enable-maintainer-zts
--disable-fileinfo

make -j 4 && make install
3、环境变量
vim  /etc/profile.d/lamp.sh
PATH=/app/php/bin:/app/httpd24/bin:/usr/local/mysql/bin:$PATH
4、php设置
cp php.ini-production /etc/php.ini
cp sapi/fpm/init.d.php-fpm /etc/init.d/php-fpm
PHP配置文件

chmod +x /etc/init.d/php-fpm
chkconfig --add php-fpm
chkconfig php-fpm on
启动程序

cd /app/php/etc
cp php-fpm.conf.default php-fpm.conf
cp php-fpm.d/www.conf.default php-fpm.d/www.conf
php fastcgi配置文件,根据情况来更改
5、启动服务
service php-fpm start
安装wordpress
tar xvf wordpress-4.9.4-zh_CN.tar.gz
cp -a wordpress/* /app/httpd24/htdocs/
cd /app/httpd24/htdocs/

mv wp-config-sample.php wp-config.php

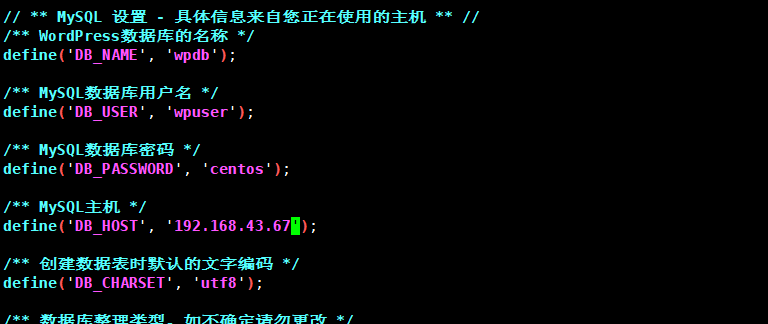
vim wp-config.php
根据上面mysql创建信息更改
附加虚拟主机的实现
编辑文件
vim /etc/httpd/conf.d/vhosts.conf
DirectoryIndex  index.php
<VirtualHost *:80>
ServerName www.pma.com
DocumentRoot /var/www/html/
ProxyRequests Off
ProxyPassMatch ^/(.*.php)$ fcgi://127.0.0.1:9000/var/www/html/pma/$1
<Directory "/var/www/html">
Require all granted
</Directory>
</VirtualHost>

<VirtualHost *:80>
ServerName www.wordpress.com
DocumentRoot /var/www/html/
ProxyRequests Off
ProxyPassMatch ^/(.*.php)$ fcgi://127.0.0.1:9000/var/www/html/wordpress/$1
<Directory "/var/www/html">
Require all granted
</Directory>
</VirtualHost>

<VirtualHost *:80>
ServerName www.forum.com
DocumentRoot /var/www/html/
ProxyRequests Off
ProxyPassMatch ^/(.*.php)$ fcgi://127.0.0.1:9000/var/www/html/forum/$1
<Directory "/var/www/html">
Require all granted
</Directory>
</VirtualHost>


