前言
最近公司的Android项目需要用到摄像头做条码或二维码的扫描,Google一下,发现一个以Apache License 2.0 开源的 ZXing项目。Zxing项目里的Android实现太过复杂多余东西太多,得对其进行简化。
前提条件
下载源代码: 点击这里
编译核心库:Zxing的主页上有介绍具体步骤,大家也可以参照这篇博文:android 条码识别软件开发全解析(续2详解绝杀!)
导入项目
打开Eclipse 导入 源码中的 Android 项目,然后右击项目 选择“Build path”——》"Add External Archives" 把核心库 core.jar文件加入到项目中。
此时编译一下项目,会发现报错,“ Multiple substitutions specified in non-positional format; did you mean to add the formatted="false" attribute?”之类的。打开raw 下的Values 发现错误是在一个<String>上。这里把 “preferences_custom_product_search_summary” 里的 %s %f 全部都改成 %1$s %1$f(因为我们用不到多国语言,建议只保留默认的Value ,其他全部删除)。
原因:由于新的SDK采用了新版本的aapt(Android项目编译器),这个版本的aapt编译起来会比老版本更加的严格,然后在Android最新的开发文档的描述String的部分,已经说明如何去设置 %s 等符号
“If you need to format your strings using String.format(String, Object...) , then you can do so by putting your format arguments in the string resource. For example, with the following resource:
<string name="welcome_messages">Hello, %1$s! You have %2$d new messages.</string>
In this example, the format string has two arguments: %1$s is a string and %2$d is a decimal number. You can format the string with arguements from your application...“
经过以上步骤后项目应该就可以运行了。
但是ZXing的android项目东西太多了,有很多是我们不需要的,得新建另一个项目简化它。
简化
在开始前大致介绍一下简化ZXing需要用到各个包 、类的职责。
CaptureActivity。这个是启动Activity 也就是扫描器(如果是第一安装,它还会跳转到帮助界面)。
CaptureActivityHandler 解码处理类,负责调用另外的线程进行解码。
DecodeThread 解码的线程。
com.google.zxing.client.android.camera 包,摄像头控制包。
ViewfinderView 自定义的View,就是我们看见的拍摄时中间的框框了。
新建另一个项目
新建另一个项目将启动的Activity命名为CaptureActivity,并导入核心库。项目新建完成后我们打开 CaptureActivity 的布局文件,我这里为main。把里面的XML修改为:
<FrameLayout xmlns:android="http://schemas.android.com/apk/res/android"
   android:layout_width="fill_parent" android:layout_height="fill_parent">
   <SurfaceView android:id="@+id/preview_view"
       android:layout_width="fill_parent" android:layout_height="fill_parent"
       android:layout_centerInParent="true" />

   <com.Zxing.Demo.view.ViewfinderView
       android:id="@+id/viewfinder_view" android:layout_width="fill_parent"
       android:layout_height="fill_parent" android:background="@android:color/transparent" />
   <TextView android:layout_width="wrap_content"
       android:id="@+id/txtResult"
       android:layout_height="wrap_content" android:text="@string/hello" />

</FrameLayout>
可以看到在XML里面用到了 ViewfinderView 自定义view 。所以新建一个View 的包,然后把:ViewfinderView 和 ViewfinderResultPointCallback 靠到里面(记得对应修改XML里面的包)。
打开 CaptureActivity 覆盖 onCreate 方法:
@Override
public void onCreate(Bundle savedInstanceState) {
    super.onCreate(savedInstanceState);
    setContentView(R.layout.main);
    //初始化 CameraManager
     CameraManager.init(getApplication());

    viewfinderView = (ViewfinderView) findViewById(R.id.viewfinder_view);
    txtResult = (TextView) findViewById(R.id.txtResult);
    hasSurface = false;
    inactivityTimer = new InactivityTimer(this);
}
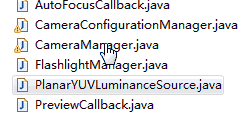
这里调用到的 CameraManager 类是控制摄像头的包里的类。新建一个camera包把:com.google.zxing.client.android.camera 里面的类全部拷入,另外我把PlanarYUVLuminanceSource也拷入到这个包里面。根据错误的提示来修正代码,主要是修改正包结构。(整 个简化的流程都是如此:“根据错误提示,修改代码”)。
在修改的过程中,有很多是关于R 资源的问题,在此我们需要将Values 里面的两个xml资源文件拷入项目中:colos.xml 和ids.xml 。 ctrl+b 一下看看error 是不是少了很多。在CameraManager中有些地方需要用到项目的配置,这里需要把配置直接写入代码中:
//SharedPreferences prefs = PreferenceManager.getDefaultSharedPreferences(context);
//是否使用前灯
//if (prefs.getBoolean(PreferencesActivity.KEY_FRONT_LIGHT, false)) {
//        FlashlightManager.enableFlashlight();
//}
FlashlightManager.enableFlashlight();
使用摄像头需要加入相应的权限:
<uses-permission android:name="android.permission.CAMERA"></uses-permission>
<uses-permission android:name="android.permission.WRITE_EXTERNAL_STORAGE"></uses-permission>
<uses-feature android:name="android.hardware.camera" />
<uses-feature android:name="android.hardware.camera.autofocus" />
<uses-permission android:name="android.permission.VIBRATE"/>
<uses-permission android:name="android.permission.FLASHLIGHT"/>
当View 和 camera 包里的错误修正完成后,我们继续来看CaptureActivity。
覆盖onResume方法初始化摄像头:
@Override
    protected void onResume() {
        super.onResume();
        SurfaceView surfaceView = (SurfaceView) findViewById(R.id.preview_view);
        SurfaceHolder surfaceHolder = surfaceView.getHolder();
        if (hasSurface) {
            initCamera(surfaceHolder);
        } else {
            surfaceHolder.addCallback(this);
            surfaceHolder.setType(SurfaceHolder.SURFACE_TYPE_PUSH_BUFFERS);
        }
        decodeFormats = null;
        characterSet = null;

        playBeep = true;
        AudioManager audioService = (AudioManager) getSystemService(AUDIO_SERVICE);
        if (audioService.getRingerMode() != AudioManager.RINGER_MODE_NORMAL) {
            playBeep = false;
        }
        initBeepSound();
        vibrate = true;
    }
initCamera
private void initCamera(SurfaceHolder surfaceHolder) {
    try {
        CameraManager.get().openDriver(surfaceHolder);
    } catch (IOException ioe) {
        return;
    } catch (RuntimeException e) {
        return;
    }
    if (handler == null) {
        handler = new CaptureActivityHandler(this, decodeFormats,
                characterSet);
    }
}
initCamera
@Override
public void surfaceChanged(SurfaceHolder holder, int format, int width,
    int height) {

}

@Override
public void surfaceCreated(SurfaceHolder holder) {
if (!hasSurface) {
    hasSurface = true;
    initCamera(holder);
}

}

@Override
public void surfaceDestroyed(SurfaceHolder holder) {
hasSurface = false;

}
initCamera () 方法用于初始化摄像头,如果排除了所有的error ,运行项目时就可以看到大致扫描界面了。 surfaceHolder.addCallback(this);表示让CaptureActivity实现其callback接口。
handler = new CaptureActivityHandler(this, decodeFormats, characterSet) 用于进行扫描解码处理。
解码
上面的步骤主要都是用于对摄像头的控制,而解码的真正工作入口是在CaptureActivityHandler 里面的。新建一个Decoding包把以下文件拷入包中:
CaptureActivityHandler
DecodeFormatManager
DecodeHandler
DecodeThread
FinishListener
InactivityTimer
Intents
由于我们的包结构和Zxing 项目的有所不同所以需要注意一下类的可访问性
同样开始ctrl+B 编译一下,然后开始修正错误。
在CaptureActivityHandler 里 把 handleMessage 里的部分方法先注释掉如:“decode_succeeded ”分支,这是解码成功时调用 CaptureActivity 展示解码的结果。
在DecodeThread 类里,修改部分涉及Preference配置的代码:
DecodeThread(CaptureActivity activity,
               Vector<BarcodeFormat> decodeFormats,
               String characterSet,
               ResultPointCallback resultPointCallback) {

    this.activity = activity;
    handlerInitLatch = new CountDownLatch(1);

    hints = new Hashtable<DecodeHintType, Object>(3);

//    // The prefs can't change while the thread is running, so pick them up once here.
//    if (decodeFormats == null || decodeFormats.isEmpty()) {
//      SharedPreferences prefs = PreferenceManager.getDefaultSharedPreferences(activity);
//      decodeFormats = new Vector<BarcodeFormat>();
//      if (prefs.getBoolean(PreferencesActivity.KEY_DECODE_1D, true)) {
//        decodeFormats.addAll(DecodeFormatManager.ONE_D_FORMATS);
//      }
//      if (prefs.getBoolean(PreferencesActivity.KEY_DECODE_QR, true)) {
//        decodeFormats.addAll(DecodeFormatManager.QR_CODE_FORMATS);
//      }
//      if (prefs.getBoolean(PreferencesActivity.KEY_DECODE_DATA_MATRIX, true)) {
//        decodeFormats.addAll(DecodeFormatManager.DATA_MATRIX_FORMATS);
//      }
//    }
    if (decodeFormats == null || decodeFormats.isEmpty()) {
         decodeFormats = new Vector<BarcodeFormat>();
         decodeFormats.addAll(DecodeFormatManager.ONE_D_FORMATS);
         decodeFormats.addAll(DecodeFormatManager.QR_CODE_FORMATS);
         decodeFormats.addAll(DecodeFormatManager.DATA_MATRIX_FORMATS);

    }

    hints.put(DecodeHintType.POSSIBLE_FORMATS, decodeFormats);

    if (characterSet != null) {
      hints.put(DecodeHintType.CHARACTER_SET, characterSet);
    }

    hints.put(DecodeHintType.NEED_RESULT_POINT_CALLBACK, resultPointCallback);
  }
这里是设置 解码的类型,我们现在默认将所有类型都加入。
错误类型基本上都是:包结构、PreferencesActivity 的配置 、类可访问性的问题。根据错误提示耐心把错误解决。
返回解码结果
还记得在 CaptureActivityHandler 的 messagehandler 里注销掉的Case分支吗?现在CaptureActivity 里实现它。
public void handleDecode(Result obj, Bitmap barcode) {
    inactivityTimer.onActivity();
    viewfinderView.drawResultBitmap(barcode);
     playBeepSoundAndVibrate();
    txtResult.setText(obj.getBarcodeFormat().toString() + ":"
            + obj.getText());
}
最后
ZXing的简化已基本完成,有几位是可以运行成功的?呵呵。
下面是CaptureActivity的源码:
public class CaptureActivity extends Activity implements Callback {

    private CaptureActivityHandler handler;
    private ViewfinderView viewfinderView;
    private boolean hasSurface;
    private Vector<BarcodeFormat> decodeFormats;
    private String characterSet;
    private TextView txtResult;
    private InactivityTimer inactivityTimer;
    private MediaPlayer mediaPlayer;
    private boolean playBeep;
    private static final float BEEP_VOLUME = 0.10f;
    private boolean vibrate;

    /** Called when the activity is first created. */
    @Override
    public void onCreate(Bundle savedInstanceState) {
        super.onCreate(savedInstanceState);
        setContentView(R.layout.main);
        //初始化 CameraManager
        CameraManager.init(getApplication());

        viewfinderView = (ViewfinderView) findViewById(R.id.viewfinder_view);
        txtResult = (TextView) findViewById(R.id.txtResult);
        hasSurface = false;
        inactivityTimer = new InactivityTimer(this);
    }

    @Override
    protected void onResume() {
        super.onResume();
        SurfaceView surfaceView = (SurfaceView) findViewById(R.id.preview_view);
        SurfaceHolder surfaceHolder = surfaceView.getHolder();
        if (hasSurface) {
            initCamera(surfaceHolder);
        } else {
            surfaceHolder.addCallback(this);
            surfaceHolder.setType(SurfaceHolder.SURFACE_TYPE_PUSH_BUFFERS);
        }
        decodeFormats = null;
        characterSet = null;

        playBeep = true;
        AudioManager audioService = (AudioManager) getSystemService(AUDIO_SERVICE);
        if (audioService.getRingerMode() != AudioManager.RINGER_MODE_NORMAL) {
            playBeep = false;
        }
        initBeepSound();
        vibrate = true;
    }

    @Override
    protected void onPause() {
        super.onPause();
        if (handler != null) {
            handler.quitSynchronously();
            handler = null;
        }
        CameraManager.get().closeDriver();
    }

    @Override
    protected void onDestroy() {
        inactivityTimer.shutdown();
        super.onDestroy();
    }

    private void initCamera(SurfaceHolder surfaceHolder) {
        try {
            CameraManager.get().openDriver(surfaceHolder);
        } catch (IOException ioe) {
            return;
        } catch (RuntimeException e) {
            return;
        }
        if (handler == null) {
            handler = new CaptureActivityHandler(this, decodeFormats,
                    characterSet);
        }
    }

    @Override
    public void surfaceChanged(SurfaceHolder holder, int format, int width,
            int height) {

    }

    @Override
    public void surfaceCreated(SurfaceHolder holder) {
        if (!hasSurface) {
            hasSurface = true;
            initCamera(holder);
        }

    }

    @Override
    public void surfaceDestroyed(SurfaceHolder holder) {
        hasSurface = false;

    }

    public ViewfinderView getViewfinderView() {
        return viewfinderView;
    }

    public Handler getHandler() {
        return handler;
    }

    public void drawViewfinder() {
        viewfinderView.drawViewfinder();

    }

    public void handleDecode(Result obj, Bitmap barcode) {
        inactivityTimer.onActivity();
        viewfinderView.drawResultBitmap(barcode);
         playBeepSoundAndVibrate();
        txtResult.setText(obj.getBarcodeFormat().toString() + ":"
                + obj.getText());
    }

    private void initBeepSound() {
        if (playBeep && mediaPlayer == null) {
            // The volume on STREAM_SYSTEM is not adjustable, and users found it
            // too loud,
            // so we now play on the music stream.
            setVolumeControlStream(AudioManager.STREAM_MUSIC);
            mediaPlayer = new MediaPlayer();
            mediaPlayer.setAudioStreamType(AudioManager.STREAM_MUSIC);
            mediaPlayer.setOnCompletionListener(beepListener);

            AssetFileDescriptor file = getResources().openRawResourceFd(
                    R.raw.beep);
            try {
                mediaPlayer.setDataSource(file.getFileDescriptor(),
                        file.getStartOffset(), file.getLength());
                file.close();
                mediaPlayer.setVolume(BEEP_VOLUME, BEEP_VOLUME);
                mediaPlayer.prepare();
            } catch (IOException e) {
                mediaPlayer = null;
            }
        }
    }

    private static final long VIBRATE_DURATION = 200L;

    private void playBeepSoundAndVibrate() {
        if (playBeep && mediaPlayer != null) {
            mediaPlayer.start();
        }
        if (vibrate) {
            Vibrator vibrator = (Vibrator) getSystemService(VIBRATOR_SERVICE);
            vibrator.vibrate(VIBRATE_DURATION);
        }
    }

    /**
     * When the beep has finished playing, rewind to queue up another one.
     */
    private final OnCompletionListener beepListener = new OnCompletionListener() {
        public void onCompletion(MediaPlayer mediaPlayer) {
            mediaPlayer.seekTo(0);
        }
    };
简化过的包结构图:
简化后的ZXing 更加方便我们了解ZXing项目 是如何解码的。只要仔细查看源码,进行单点跟踪调试,相信大家很容易能理解。

