一、服务器端开发时序图
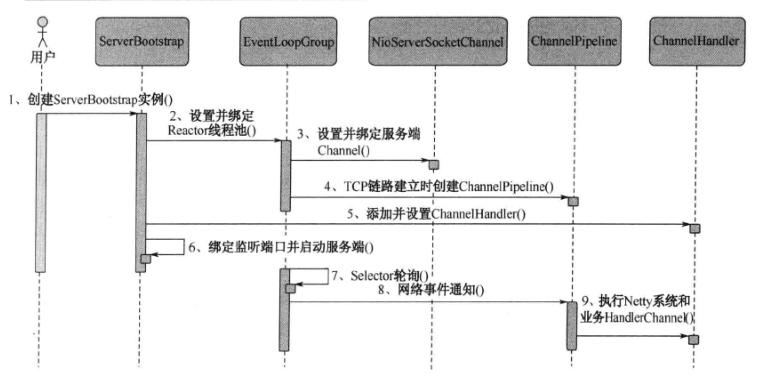
图片来源:Netty权威指南(第2版)
二、Netty服务器端开发步骤
使用Netty进行服务器端开发主要有以下几个步骤:
1、创建ServerBootstrap实例
ServerBootstrap b=new ServerBootstrap();
ServerBootstrap是Netty服务器端的启动辅助类,提供了一系列的方法用于设置服务器端启动相关的参数。
2、设置并绑定Reactor线程池
EventLoopGroup bossGruop=new NioEventLoopGroup();//用于服务器端接受客户端的连接
EventLoopGroup workGroup=new NioEventLoopGroup();//用于网络事件的处理
Netty的线程池是EventLoopGroup,它实际上是EventLoop的数组,EventLoop职责是处理所有注册到本线程多路复用器Selector上的Channel,Selector的轮询操作是由绑定的EventLoop线程run方法驱动。
3、设置并绑定服务器端Channel
b.group(bossGruop, workGroup).channel(NioServerSocketChannel.class)
Netty对原生的NIO类库进行封装,作为NIO服务端,需要创建ServerSocketChannel,对应的实现是NioServerSocketChannel。
4、链路建立的时候创建并初始化ChannelPipeline
b.group(bossGruop, workGroup).channel(NioServerSocketChannel.class).childHandler(new ChannelInitializer<SocketChannel>()
ChannelPipeline的本质是一个负责处理网络事件的职责链,负责管理和执行ChannelHandler。网络事件以事件流的形式在ChannelPipeline中流转,由ChannelPipeline根据Channel|Handler的执行策略调度ChannelHandler的执行。典型的网络事件有:
- 链路注册
- 链路激活
- 链路断开
- 接收到请求信息
- 请求信息接收并处理完毕
- 发送应答消息
- 链路发生异常
- 用户自定义事件
5、添加并设置ChannelHandler
b.group(bossGruop, workGroup).channel(NioServerSocketChannel.class).childHandler(new ChannelInitializer<SocketChannel>()
 {
   @Override
   protected void initChannel(SocketChannel arg0) throws Exception
   {
    arg0.pipeline().addLast(new HelloServerHandler());

   }
 }).option(ChannelOption.SO_BACKLOG, 1024);
ChannelHandler是Netty提供给用户定制和扩展的接口,例如消息编解码、心跳、安全认证、TSL/SSL认证
6、绑定并启动监听窗口
ChannelFuture f=b.bind(port).sync();
经过一系列初始化和检测工作后,会启动监听端口,并将ServerSocketChannel注册到Selector上监听客户端连接
7、Selector轮询
由Reactor线程NioEventLoop负责调度和执行Selector轮询操作,选择准备就绪的Channel集合
8、当轮询到准备就绪的Channel之后,就由Reactor线程NioEventLoop执行ChannelPipeline的相应方法,最终调度并执行ChannelHandler
public class HelloServerHandler extends ChannelHandlerAdapter
三、Netty服务器开发示例代码
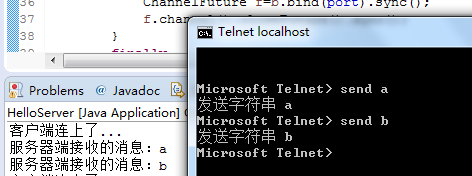
需求:服务器端实现,每连接一个客户端,在服务器控制台打印客户端输入的字符。(注:本代码使用的netty是netty-all-5.0.0.Alpha1-sources.jar版本)
服务器端代码如下:
import io.netty.bootstrap.ServerBootstrap;
import io.netty.channel.ChannelFuture;
import io.netty.channel.ChannelInitializer;
import io.netty.channel.ChannelOption;
import io.netty.channel.EventLoopGroup;
import io.netty.channel.nio.NioEventLoopGroup;
import io.netty.channel.socket.SocketChannel;
import io.netty.channel.socket.nio.NioServerSocketChannel;
//Netty服务器端
public class HelloServer
{
    private int port;

    public HelloServer(int port)
    {
        super();
        this.port = port;
    }
    private void bind() throws InterruptedException
    {
        EventLoopGroup bossGruop=new NioEventLoopGroup();//用于服务器端接受客户端的连接
        EventLoopGroup workGroup=new NioEventLoopGroup();//用于网络事件的处理
        try
        {
            ServerBootstrap b=new ServerBootstrap();
            b.group(bossGruop, workGroup).channel(NioServerSocketChannel.class).childHandler(new ChannelInitializer<SocketChannel>()
            {
                @Override
                protected void initChannel(SocketChannel arg0) throws Exception
                {
                    arg0.pipeline().addLast(new HelloServerHandler());

                }
            }).option(ChannelOption.SO_BACKLOG, 1024);//指定此套接口排队的最大连接个数
            ChannelFuture f=b.bind(port).sync();
            f.channel().closeFuture().sync();
        }
        finally
        {
            bossGruop.shutdownGracefully();
            workGroup.shutdownGracefully();
        }
    }
    public static void main(String[] args) throws InterruptedException
    {
        new HelloServer(8080).bind();
    }
}
import io.netty.buffer.ByteBuf;
import io.netty.channel.ChannelHandlerAdapter;
import io.netty.channel.ChannelHandlerContext;

//自定义的ChannelHandler
public class HelloServerHandler extends ChannelHandlerAdapter
{
    @Override
    public void channelActive(ChannelHandlerContext ctx) throws Exception
    {
        System.out.println("客户端连上了...");
    }
    @Override
    public void channelRead(ChannelHandlerContext ctx, Object msg) throws Exception
    {
        ByteBuf buf=(ByteBuf) msg;
        byte[] req=new byte[buf.readableBytes()];
        buf.readBytes(req);
        System.out.println("服务器端接收的消息:"+new String(req));
    }
    @Override
    public void channelReadComplete(ChannelHandlerContext ctx) throws Exception
    {
        ctx.flush();
    }
    @Override
    public void exceptionCaught(ChannelHandlerContext ctx, Throwable cause) throws Exception
    {
        ctx.close();
    }
}
客户端:使用telnet模拟客户端输入,

按住“ctrl+]”,然后输入指令send a