一、工具
JDK1.7
Eclipse
Maven
这里Eclipse集成Maven的这一步就省了!
二、编码
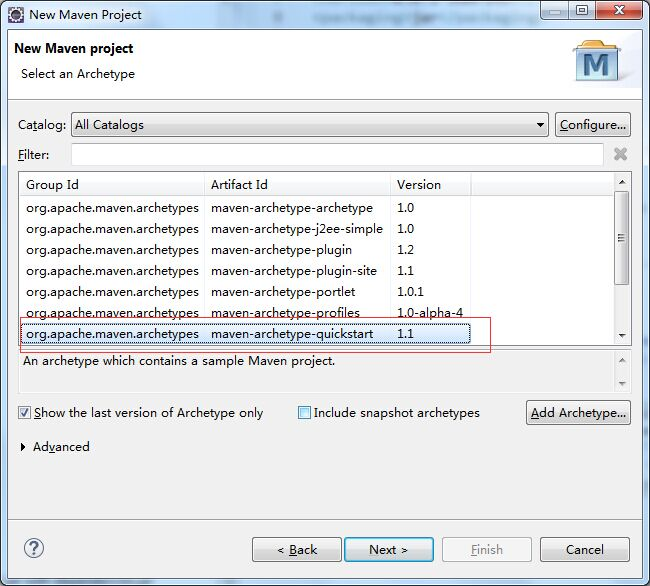
新建Maven Project 命名为:SpringBootDemo 选项如图
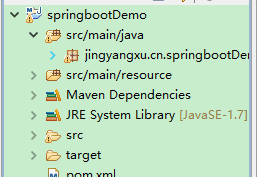
2、修改工程目录,添加源文件夹后目录如下:
3、修改pom.xml文件如下:


  1 <project xmlns="http://maven.apache.org/POM/4.0.0" xmlns:xsi="http://www.w3.org/2001/XMLSchema-instance"
  2     xsi:schemaLocation="http://maven.apache.org/POM/4.0.0 http://maven.apache.org/xsd/maven-4.0.0.xsd">
  3     <modelVersion>4.0.0</modelVersion>
  4
  5     <groupId>jingyangxu.cn</groupId>
  6     <artifactId>springbootDemo</artifactId>
  7     <version>0.0.1-SNAPSHOT</version>
  8     <packaging>jar</packaging>
  9
 10     <name>springbootDemo</name>
 11     <url>http://maven.apache.org</url>
 12
 13     <properties>
 14         <project.build.sourceEncoding>UTF-8</project.build.sourceEncoding>
 15     </properties>
 16
 17     <parent>
 18         <groupId>org.springframework.boot</groupId>
 19         <artifactId>spring-boot-starter-parent</artifactId>
 20         <version>1.5.8.RELEASE</version>
 21     </parent>
 22     <dependencies>
 23         <dependency>
 24             <groupId>org.springframework.boot</groupId>
 25             <artifactId>spring-boot-starter-web</artifactId>
 26         </dependency>
 27
 28         <dependency>
 29             <groupId>mysql</groupId>
 30             <artifactId>mysql-connector-java</artifactId>
 31         </dependency>
 32         <dependency>
 33             <groupId>org.springframework.boot</groupId>
 34             <artifactId>spring-boot-starter-jdbc</artifactId>
 35         </dependency>
 36     </dependencies>
 37
 38
 39     <!-- Package as an executable jar -->
 40     <build>
 41         <plugins>
 42             <!-- Maven Assembly Plugin -->
 43             <plugin>
 44                 <groupId>org.apache.maven.plugins</groupId>
 45                 <artifactId>maven-assembly-plugin</artifactId>
 46                 <configuration>
 47                     <!-- get all project dependencies -->
 48                     <descriptorRefs>
 49                         <descriptorRef>jar-with-dependencies</descriptorRef>
 50                     </descriptorRefs>
 51                     <!-- MainClass in mainfest make a executable jar -->
 52                     <archive>
 53                         <manifest>
 54                             <mainClass>jingyangxu.cn.springbootDemo.App</mainClass>
 55                         </manifest>
 56                     </archive>
 57
 58                 </configuration>
 59                 <executions>
 60                     <execution>
 61                         <id>make-assembly</id>
 62                         <!-- bind to the packaging phase -->
 63                         <phase>package</phase>
 64                         <goals>
 65                             <goal>single</goal>
 66                         </goals>
 67                     </execution>
 68                 </executions>
 69             </plugin>
 70
 71         </plugins>
 72     </build>
 73
 74
 75
 76     <!-- Add Spring repositories -->
 77     <!-- (you don't need this if you are using a .RELEASE version) -->
 78     <repositories>
 79         <repository>
 80             <id>spring-snapshots</id>
 81             <url>http://repo.spring.io/snapshot</url>
 82             <snapshots>
 83                 <enabled>true</enabled>
 84             </snapshots>
 85         </repository>
 86         <repository>
 87             <id>spring-milestones</id>
 88             <url>http://repo.spring.io/milestone</url>
 89         </repository>
 90     </repositories>
 91     <pluginRepositories>
 92         <pluginRepository>
 93             <id>spring-snapshots</id>
 94             <url>http://repo.spring.io/snapshot</url>
 95         </pluginRepository>
 96         <pluginRepository>
 97             <id>spring-milestones</id>
 98             <url>http://repo.spring.io/milestone</url>
 99         </pluginRepository>
100     </pluginRepositories>
101
102 </project>
4、编辑JAVA代码新建APP.class
 1 package jingyangxu.cn.springbootDemo;
 2
 3 import org.springframework.boot.SpringApplication;
 4 import org.springframework.boot.autoconfigure.EnableAutoConfiguration;
 5 import org.springframework.boot.context.embedded.ConfigurableEmbeddedServletContainer;
 6 import org.springframework.boot.context.embedded.EmbeddedServletContainerCustomizer;
 7 import org.springframework.web.bind.annotation.RequestMapping;
 8 import org.springframework.web.bind.annotation.RestController;
 9
10 @RestController
11 @EnableAutoConfiguration
12 public class App implements EmbeddedServletContainerCustomizer
13 {
14
15     @RequestMapping("/h")
16     public String home(){
17         return "hello";
18     }
19
20     @RequestMapping("/w")
21     public String world(){
22         return "world";
23     }
24
25
26     public static void main( String[] args )
27     {
28         System.out.println( "Hello World!" );
29         //SpringApplication.run(App.class, args);
30 //        SpringApplication.run(UserController.class, args);
31         SpringApplication.run(DBController.class, args);
32     }
33
34     @Override
35     public void customize(ConfigurableEmbeddedServletContainer container) {
36         container.setPort(8088);
37     }
38 }
运行此代码 服务端口默认8080 访问localhost:8080/h 展示Hello
localhost:8080/w 展示World
------------------------------------------------------------分割线---------------------------------------------------------------------
新建RestController风格的Controller
新建UserController
 1 package jingyangxu.cn.springbootDemo;
 2
 3 import org.springframework.context.annotation.ComponentScan;
 4 import org.springframework.context.annotation.Configuration;
 5 import org.springframework.web.bind.annotation.PathVariable;
 6 import org.springframework.web.bind.annotation.RequestMapping;
 7 import org.springframework.web.bind.annotation.RestController;
 8
 9
10 @ComponentScan
11 @Configuration
12 @RestController
13 @RequestMapping("/user")
14 public class UserController {
15
16     @RequestMapping("/{id}")
17     public User getUser(@PathVariable String id) {
18         User user = new User();
19         user.setId(id);
20         user.setUsername(id + "-" + Math.random());
21
22         return user;
23     }
24
25     private class User {
26
27         private String id;
28         private String username;
29
30         public String getId() {
31             return id;
32         }
33
34         public void setId(String id) {
35             this.id = id;
36         }
37
38         public String getUsername() {
39             return username;
40         }
41
42         public void setUsername(String username) {
43             this.username = username;
44         }
45     }
46 }
修改APP的入口代码

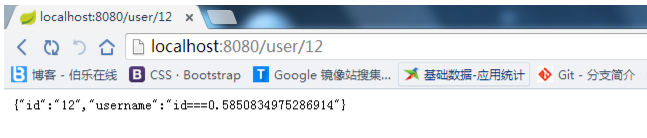
运行App.java 访问 http://localhost:8080/user/12
------------------------------------------------------------分割线---------------------------------------------------------------------
springBoot连接数据库
1.添加依赖
1 <dependency>
2     <groupId>mysql</groupId>
3     <artifactId>mysql-connector-java</artifactId>
4 </dependency>
5 <dependency>
6     <groupId>org.springframework.boot</groupId>
7     <artifactId>spring-boot-starter-jdbc</artifactId>
8 </dependency>
2.编写application.properties配置文件,默认文件名会自动加载
 1 spring.datasource.url=jdbc:mysql://127.0.0.1:3306/test
 2 spring.datasource.username=root
 3 spring.datasource.password=root
 4 spring.datasource.driver-class-name=com.mysql.jdbc.Driver
 5 spring.datasource.max-idle=10
 6 spring.datasource.max-wait=10000
 7 spring.datasource.min-idle=5
 8 spring.datasource.initial-size=5
 9
10 server.port=8088
11 server.session.timeout=10
12 server.tomcat.uri-encoding=UTF-8
3.编写DBController类
 1 package jingyangxu.cn.springbootDemo ;
 2
 3 import java.util.Iterator ;
 4 import java.util.List ;
 5 import java.util.Map ;
 6 import java.util.Map.Entry ;
 7 import java.util.Set ;
 8 import org.springframework.beans.factory.annotation.Autowired ;
 9 import org.springframework.context.annotation.ComponentScan ;
10 import org.springframework.context.annotation.Configuration ;
11 import org.springframework.jdbc.core.JdbcTemplate ;
12 import org.springframework.web.bind.annotation.PathVariable ;
13 import org.springframework.web.bind.annotation.RequestMapping ;
14 import org.springframework.web.bind.annotation.RestController ;
15
16 @ComponentScan
17 @Configuration
18 @RestController
19 @RequestMapping("/db")
20 public class DBController {
21
22     @Autowired
23     private JdbcTemplate    jdbcTemplate ;
24
25     @RequestMapping("/getList")
26     public List<Map<String, Object>> getDbType() {
27         String sqlString = "select * from my" ;
28         List<Map<String, Object>> list = jdbcTemplate.queryForList(sqlString) ;
29         for (Map<String, Object> map : list) {
30             Set<Entry<String, Object>> entrySet = map.entrySet() ;
31             if (entrySet != null) {
32                 Iterator<Entry<String, Object>> iterator = entrySet.iterator() ;
33                 while (iterator.hasNext()) {
34                     Map.Entry<String, Object> entry = (Map.Entry<String, Object>) iterator.next() ;
35                     String key = entry.getKey() ;
36                     Object value = entry.getValue() ;
37                     System.out.println(key+":"+value) ;
38
39                 }
40             }
41         }
42
43         return list;
44     }
45
46     @RequestMapping("/user/{id}")
47     public Map<String, Object> getUser(@PathVariable String id) {
48         List<Map<String,Object>> list = getDbType() ;
49         for (Map<String, Object> map : list) {
50             Set<String> keySet = map.keySet() ;
51             for (String key : keySet) {
52                 if (key.equals("id")) {
53                     return map;
54                 }
55             }
56         }
57         return null;
58     }
59
60 }
4.修改入口

5.启动程序,打开浏览器访问

------------------------------------------------------------分割线---------------------------------------------------------------------
修改默认访问端口
第一种简单的方式,只需要入口类继承EmbeddedServletContainerCustomizer接口,然后重写customize方法。
1   /*
2      * 修改默认访问端口
3      */
4     @Override
5     public void customize(ConfigurableEmbeddedServletContainer container) {
6         container.setPort(8088);
7     }
第二种不继承任何方法,加入方法:
1  @Bean
2     public EmbeddedServletContainerFactory servletFactory(){
3         TomcatEmbeddedServletContainerFactory tomcatFactory =
4                 new TomcatEmbeddedServletContainerFactory();
5         tomcatFactory.setPort(8011);
6         tomcatFactory.setSessionTimeout(10,TimeUnit.SECONDS);
7         return tomcatFactory;
8
9     }