在项目中有用到OAuth2,这里记录下研究成功。详细介绍可参考官方文档:https://tools.ietf.org/html/rfc6749
准备工作:
1、spring-oauth-server 认证服务器和资源服务器(也可以分开)。作为一个jar包提供给客户端使用
2、spring-security-demo 客户端。资源所有者,需要依赖spring-oauth-server进行授权认证
spring-oauth-server
pom依赖:
<dependency>
    <groupId>org.springframework.cloud</groupId>
    <artifactId>spring-cloud-starter-oauth2</artifactId>
</dependency>
<dependency>
    <groupId>org.springframework.boot</groupId>
    <artifactId>spring-boot-starter-data-redis</artifactId>
</dependency>
RedisTokenStore配置:
@Configuration
public class RedisTokenStoreConfig {

    @Autowired
    private RedisConnectionFactory connectionFactory;

    /**
     * 配置Token存储到Redis中
     */
    @Bean
    public TokenStore redisTokenStore() {
        return new RedisTokenStore(connectionFactory);
    }

}
两个配置类SecurityProperty和OAuth2Property:
@Getter
@Setter
@Configuration
@ConfigurationProperties(prefix = "xwj.security")
public class SecurityProperty {

    private OAuth2Property oauth2 = new OAuth2Property();

}
@Getter
@Setter
public class OAuth2Property {

    private OAuth2ClientProperty[] clients = {};

}
认证服务器配置:
/**
 * 配置认证服务器
 */
@Configuration
@EnableAuthorizationServer // 开启认证服务
public class AuthorizationServerConfig extends AuthorizationServerConfigurerAdapter {

    @Autowired
    private AuthenticationManager authenticationManager;
    @Autowired
    private UserDetailsService userDetailsService;
    @Autowired
    private SecurityProperty securityProperty;
    @Autowired
    private TokenStore tokenStore;

    /**
     * 用来配置授权(authorization)以及令牌(token)的访问端点和令牌服务(token services)
     */
    @Override
    public void configure(AuthorizationServerEndpointsConfigurer endpoints) throws Exception {
        endpoints.tokenStore(tokenStore) // 配置存储token的方式(默认InMemoryTokenStore)
                .authenticationManager(authenticationManager) // 密码模式,必须配置AuthenticationManager,不然不生效
                .userDetailsService(userDetailsService); // 密码模式,这里得配置UserDetailsService

        /*
         * pathMapping用来配置端点URL链接,有两个参数,都将以 "/" 字符为开始的字符串
         *
         * defaultPath:这个端点URL的默认链接
         *
         * customPath:你要进行替代的URL链接
         */
        endpoints.pathMapping("/oauth/token", "/oauth/xwj");
    }

    /**
     * 用来配置客户端详情服务(给谁发送令牌)
     */
    @Override
    public void configure(final ClientDetailsServiceConfigurer clients) throws Exception {
        InMemoryClientDetailsServiceBuilder builder = clients.inMemory();
        OAuth2ClientProperty[] oauth2Clients = securityProperty.getOauth2().getClients();
        if (ArrayUtils.isNotEmpty(oauth2Clients)) {
            for (OAuth2ClientProperty config : oauth2Clients) {
                builder // 使用in-memory存储
                        .withClient(config.getClientId()).secret(config.getClientSecret())
                        .accessTokenValiditySeconds(config.getAccessTokenValiditySeconds()) // 发出去的令牌有效时间(秒)
                        .authorizedGrantTypes("authorization_code", "client_credentials", "password", "refresh_token") // 该client允许的授权类型
                        .scopes("all", "read", "write") // 允许的授权范围(如果是all,则请求中可以不要scope参数,否则必须加上scopes中配置的)
                        .autoApprove(true); // 自动审核
            }
        }
    }

}
认证服务器端点配置:
1、token模式默认存储在内存中,服务重启后就没了。这里改为使用redis存储,同时也可用于客户端扩展集群
2、如果要使用密码模式,必须得配置AuthenticationManager(原因可查看源码AuthorizationServerEndpointsConfigurer的getDefaultTokenGranters方法)
3、在使用密码模式时,如果用户实现了UserDetailsService类,则在验证用户名密码时,使用自定义的方法。因为在校验用户名密码时,使用了DaoAuthenticationProvider中的retrieveUser方法(具体可参考AuthenticationManager、ProviderManager)
4、默认获取token的路径是/oauth/token,通过pathMapping方法,可改变默认路径
客户端配置:
1、这里是从配置类中读取clientId、clientSecret、有效期等,便于扩展
2、authorizedGrantTypes,授权认证类型,这里配置的是授权码模式、客户端模式、密码模式、刷新token模式(还有一种简化模式,这里不演示)
3、如果不配置autoApprove,那获取授权码时,需要手动点一下授权
资源服务器配置:
@Configuration
@EnableResourceServer // 开启资源服务
public class ResourceServerConfig extends ResourceServerConfigurerAdapter {

    @Override
    public void configure(HttpSecurity http) throws Exception {
        super.configure(http);
    }

}
使用默认的配置,表示对所有资源都需要授权认证,即授权通过后可以访问所有资源
spring-security-demo
pom依赖:
<dependency>
    <groupId>org.springframework.boot</groupId>
    <artifactId>spring-boot-starter-web</artifactId>
</dependency>
<dependency>
    <groupId>org.springframework.boot</groupId>
    <artifactId>spring-boot-starter-data-jpa</artifactId>
</dependency>
<dependency>
    <groupId>mysql</groupId>
    <artifactId>mysql-connector-java</artifactId>
</dependency>
<!-- druid 数据库连接池 -->
<dependency>
    <groupId>com.alibaba</groupId>
    <artifactId>druid</artifactId>
    <version>1.0.5</version>
</dependency>
<dependency>
    <groupId>com.xwj</groupId>
    <artifactId>spring-oauth-server</artifactId>
    <version>0.0.1-SNAPSHOT</version>
</dependency>
application.yml配置文件:
server:
  port: 80

spring:
  application:
    name: spring-security-demo #应用程序名称
  #durid 数据库连接池
  datasource:
    driver-class-name: com.mysql.jdbc.Driver
    type: com.alibaba.druid.pool.DruidDataSource
    url: jdbc:mysql://127.0.0.1:3306/xwj?autoReconnect=true&failOverReadOnly=false&createDatabaseIfNotExist=true&useSSL=false&useUnicode=true&characterEncoding=utf8
    username: root
    password: 123456
  jpa:
    open-in-view: true
    hibernate:
      ddl-auto: update
      #show-sql: true
    properties:
      hibernate.dialect: org.hibernate.dialect.MySQL57InnoDBDialect
  redis:
    database: 2 #Redis数据库索引(默认为0)
    host: localhost #Redis服务器地址
    port: 6379
    password: ## 密码(默认为空)
    pool:
      max-active: 8 #连接池最大连接数(使用负值表示没有限制)
      max-wait: -1 #连接池最大阻塞等待时间(使用负值表示没有限制)
      max-idle: 8  #连接池中的最大空闲连接

logging:
  level:
    #root: INFO
    #org.hibernate: INFO
    jdbc: off
    jdbc.sqltiming: debug
    com:
      xwj: debug

xwj:
  security:
    oauth2:
      storeType: redis
      jwtSignKey: 1234567890
      clients[0]:
        clientId: test
        clientSecret: testsecret
        accessTokenValiditySeconds: 1800
      clients[1]:
        clientId: myid
        clientSecret: mysecret
        accessTokenValiditySeconds: 3600
新建UserDetailsService的实现类MyUserDetailServiceImpl类:
/**
 * 如果使用密码模式,需要实现UserDetailsService,用于覆盖默认的InMemoryUserDetailsManager方法
 *
 * 可以用来校验用户信息,并且可以添加自定义的用户属性
 */
@Service
public class MyUserDetailServiceImpl implements UserDetailsService {

    @Autowired
    private IUserService userService;

    /**
     * 根据username查询用户实体
     */
    @Override
    public UserDetails loadUserByUsername(String username) throws UsernameNotFoundException {
        // 通过用户名查询数据
        AuthUserInfo userInfo = userService.findByUsername(username);
        if (userInfo == null) {
            throw new BadCredentialsException("User '" + username + "' not found");
        }

        // 用户角色
        List<? extends GrantedAuthority> authorities = AuthorityUtils
                .commaSeparatedStringToAuthorityList("ROLE_" + userInfo.getRole());

        return new SocialUser(username, userInfo.getPassword(), true, true, true, true, authorities);
    }

}
新建一个密码加密的配置类,用来实现PasswordEncoder(默认的加密方式是BCryptPasswordEncoder)
/**
 * 加密方式配置
 */
@Configuration
public class PasswordEncoderConfig {

    @Bean
    public PasswordEncoder passwordEncoder() {
        return new PasswordEncoder() {
            @Override
            public String encode(CharSequence rawPassword) {
                return DigestUtils.md5DigestAsHex(rawPassword.toString().getBytes());
            }

            @Override
            public boolean matches(CharSequence rawPassword, String encodedPassword) {
                return encodedPassword.contentEquals(encode(rawPassword));
            }
        };
    }

}
用户信息实体:
@Entity
@Getter
@Setter
public class AuthUserInfo {

    @Id
    @TableGenerator(name = "global_id_gen", allocationSize = 1)
    @GeneratedValue(strategy = GenerationType.TABLE, generator = "global_id_gen")
    private Long id;

    /** 用户名 */
    private String username;

    /** 密码 */
    private String password;

    /** 角色 */
    private String role;

}
数据访问层,自己实现。造一条用户数据(角色只能为USER,在获取授权码的时候需要拥有该角色的用户进行表单登录):

新建一个IndexController:
@RestController
@RequestMapping("index")
public class IndexController {

    /**
     * 获取资源
     */
    @GetMapping("/getResource")
    public String getResource() {
        return "OK";
    }

    /**
     * 获取当前授权用户
     */
    @GetMapping("/me")
    public Object getCurrrentUser(@AuthenticationPrincipal UserDetails user) {
        return user;
    }

}
1、授权码模式:
1.1、 浏览器请求如下地址,获取授权code(其中response_type=code是固定写法,scope为权限,state为自定义数据):
http://localhost/oauth/authorize?client_id=test&redirect_uri=http://www.baidu.com&response_type=code&scope=read
&state=mystate
1.2、输入用户名密码(xwj/123456):

1.3、上面配置的自动授权,所有会oauth会立马调用回调地址并返回授权code和state(可以发现state传的什么就返回什么):

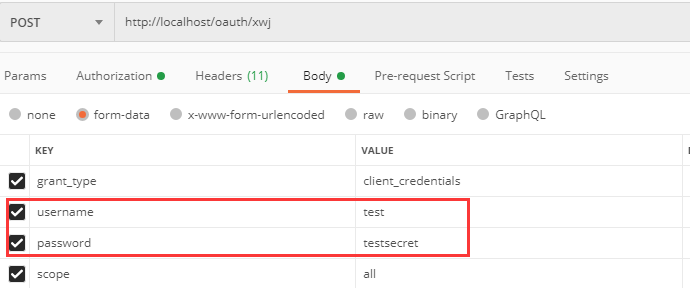
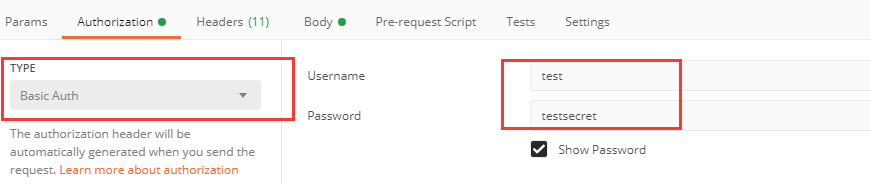
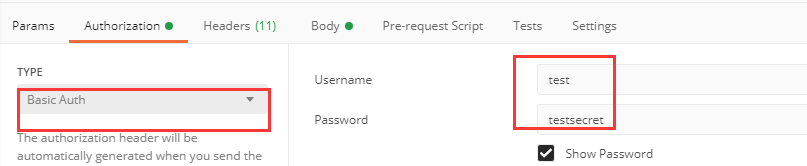
1.4、在获得授权码后,接下来获取访问令牌。使用postman请求 http://localhost/oauth/xwj:
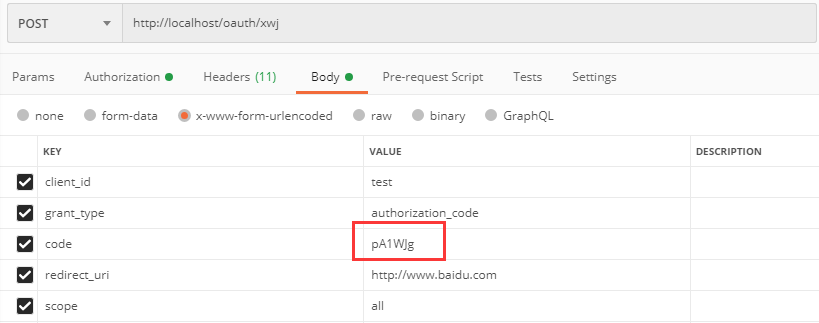
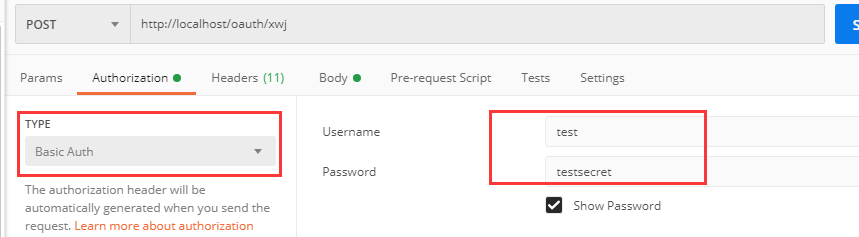
注意,需要在Authorization里设置Username和Password(就是客户端配置的clientId和clientSecret),还有TYPE类型:
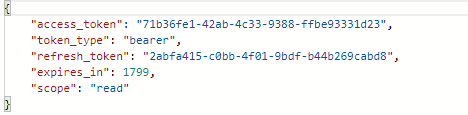
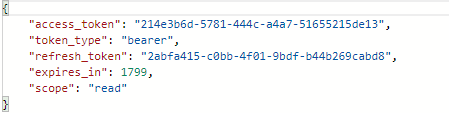
获取到的token如下:
1.5、授权码用一次之后,oauth将会把它从缓存中删掉,所以只能使用。如果重复使用,将返回:

1.6、如果不带上token,请求资源:http://localhost/index/getResource,将会返回无权访问:

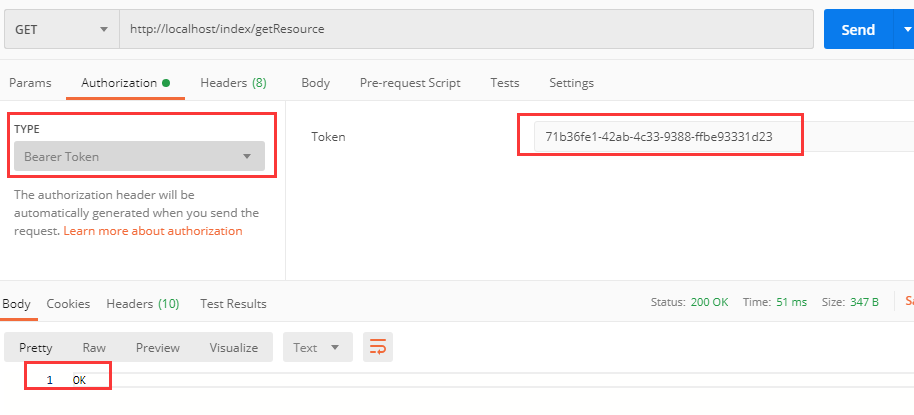
1.7、如果带上token,请求资源:http://localhost/index/getResource,将可以正常获取资源数据:
1.8、如果token错误,将提示无效的token:

2、客户端模式:
2.1、直接获取token,请求地址:http://localhost/oauth/xwj
获取token操作同上。由于客户端模式每次的参数是一样的,则请求多次返回同一个token,只是有效期在变小
3、密码模式:
3.1、直接获取token,请求地址:http://localhost/oauth/xwj
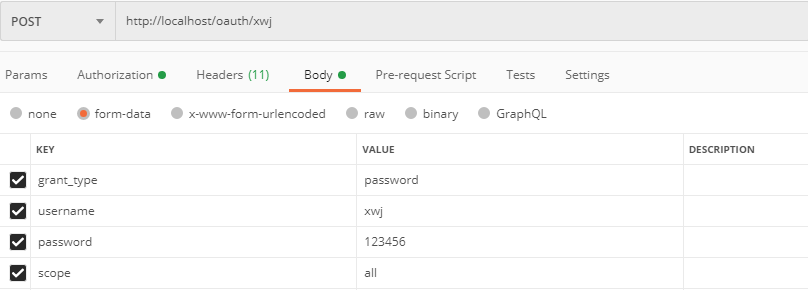

获取token操作同上。由于客户端模式每次的参数是一样的,则请求多次返回同一个token,只是有效期在变小
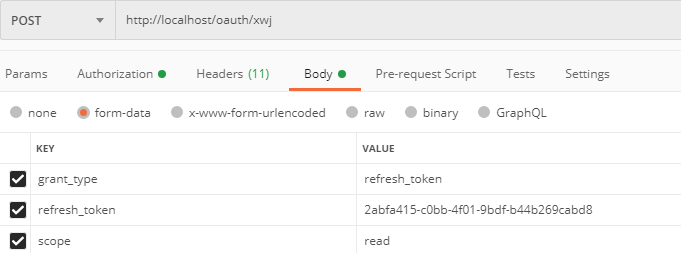
4、刷新token:
4.1、以授权码模式为例,在授权码的token过期后,使用当时的refresh_token获取新的token:
4.2、获取到新的token,就可以正常访问资源了:
使用redis存储token,打开Redis Desktop Manager工具,可以看到数据结构如下:

至此,演示完毕~~~