基于搭建好的Eureka Server+Eureka Client:https://www.cnblogs.com/xuyiqing/p/10861541.html
有了服务,那么现在学习如何调用服务
上文搭建的是商品服务,以下搭建订单服务,订单服务调用商品服务
对Eureka Client进行改造,方便以后得到数据来源
在商品服务的Controller层注入端口号,并进行回显:
package org.dreamtech.product.controller;

import org.dreamtech.product.domain.Product;
import org.dreamtech.product.service.ProductService;
import org.springframework.beans.BeanUtils;
import org.springframework.beans.factory.annotation.Autowired;
import org.springframework.beans.factory.annotation.Value;
import org.springframework.web.bind.annotation.RequestMapping;
import org.springframework.web.bind.annotation.RequestParam;
import org.springframework.web.bind.annotation.RestController;

@RestController
@RequestMapping("/api/product")
public class ProductController {

    @Value("${server.port}")
    private String port;

    private final ProductService productService;

    @Autowired
    public ProductController(ProductService productService) {
        this.productService = productService;
    }

    @RequestMapping("/list")
    public Object list() {
        return productService.getProductList();
    }

    @RequestMapping("/find")
    public Object findById(@RequestParam("id") int id) {
        Product product = productService.findById(id);
        Product result = new Product();
        BeanUtils.copyProperties(product,result);
        result.setName(result.getName()+" data from port="+port);
        return result;
    }

}
启动Eureka Server,8761端口
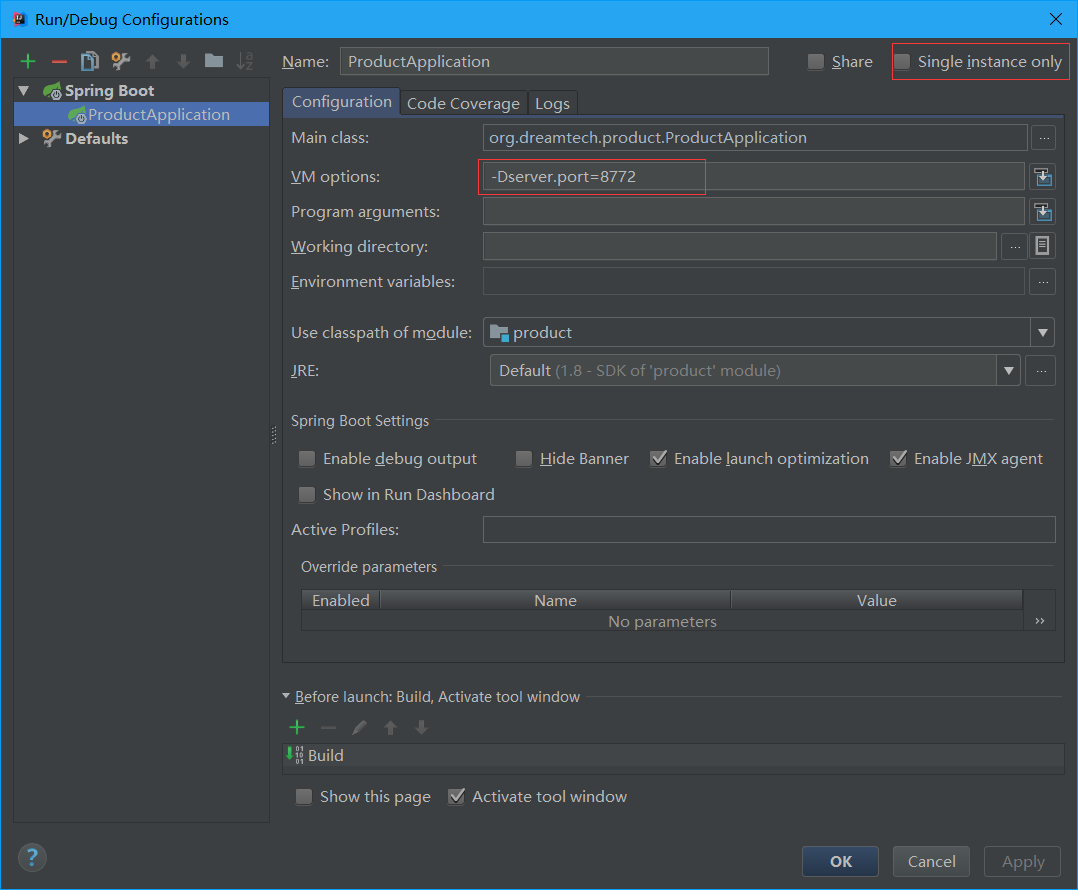
启动三个商品服务,一个项目8771端口,一个8772端口,一个8773端口:
多实例启动方法如下图
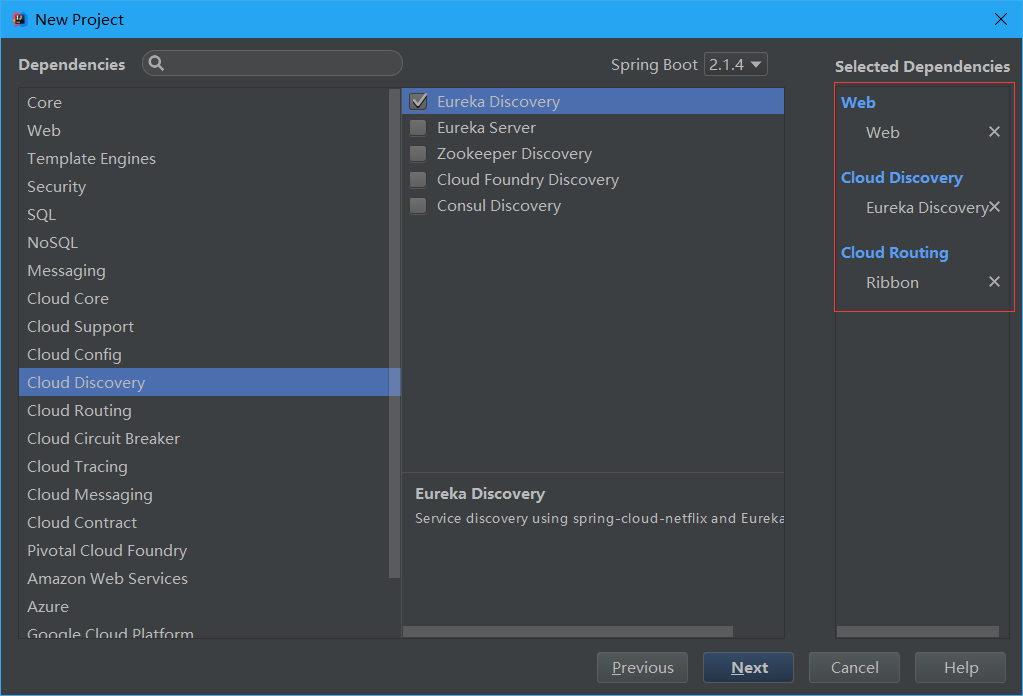
新建一个SpringBoot项目order-service:
Web模块必须的,由于订单服务本身也是服务需要Eureka,最后负载均衡调用Ribbon
订单服务开发(模拟实现):
实体类
package org.dreamtech.orderservice.domain;

import java.io.Serializable;
import java.util.Date;

public class ProductOrder implements Serializable {
    //ID
    private int id;
    //商品名称
    private String productName;
    //订单号
    private String tradeNo;
    //价格
    private int price;
    //创建时间
    private Date createTime;
    //用户ID
    private int userId;
    //用户名
    private String userName;

    public String getUserName() {
        return userName;
    }

    public void setUserName(String userName) {
        this.userName = userName;
    }

    public int getUserId() {
        return userId;
    }

    public void setUserId(int userId) {
        this.userId = userId;
    }

    public int getId() {
        return id;
    }

    public void setId(int id) {
        this.id = id;
    }

    public String getProductName() {
        return productName;
    }

    public void setProductName(String productName) {
        this.productName = productName;
    }

    public String getTradeNo() {
        return tradeNo;
    }

    public void setTradeNo(String tradeNo) {
        this.tradeNo = tradeNo;
    }

    public int getPrice() {
        return price;
    }

    public void setPrice(int price) {
        this.price = price;
    }

    public Date getCreateTime() {
        return createTime;
    }

    public void setCreateTime(Date createTime) {
        this.createTime = createTime;
    }
}
为了方便,和商品服务一样,不调用数据库,只做简单的模拟:
在SpringBoot启动类中加入Bean
package org.dreamtech.orderservice;

import org.springframework.boot.SpringApplication;
import org.springframework.boot.autoconfigure.SpringBootApplication;
import org.springframework.cloud.client.loadbalancer.LoadBalanced;
import org.springframework.context.annotation.Bean;
import org.springframework.web.client.RestTemplate;

@SpringBootApplication
public class OrderServiceApplication {

    public static void main(String[] args) {
        SpringApplication.run(OrderServiceApplication.class, args);
    }

    @Bean
    @LoadBalanced
    public RestTemplate restTemplate(){
        return new RestTemplate();
    }
}
配置文件对端口和服务名称进行配置:
server:
  port: 8781
eureka:
  client:
    service-url:
      defaultZone: http://localhost:8761/eureka/
spring:
  application:
    name: order-service
Controller:
package org.dreamtech.orderservice.controller;

import org.dreamtech.orderservice.service.ProductOrderService;
import org.springframework.beans.factory.annotation.Autowired;
import org.springframework.web.bind.annotation.RequestMapping;
import org.springframework.web.bind.annotation.RequestParam;
import org.springframework.web.bind.annotation.RestController;

@RestController
@RequestMapping("/api/order")
public class OrderController {
    private final ProductOrderService productOrderService;

    @Autowired
    public OrderController(ProductOrderService productOrderService) {
        this.productOrderService = productOrderService;
    }

    @RequestMapping("/save")
    public Object save(@RequestParam("user_id") int userId, @RequestParam("product_id") int productId) {
        return productOrderService.save(userId, productId);
    }
}
Service:
package org.dreamtech.orderservice.service;

import org.dreamtech.orderservice.domain.ProductOrder;

public interface ProductOrderService {
    /**
     * 下单接口
     *
     * @param userId    用户ID
     * @param productId 商品ID
     * @return ProductOrder
     */
    ProductOrder save(int userId, int productId);
}
package org.dreamtech.orderservice.service.impl;

import org.dreamtech.orderservice.domain.ProductOrder;
import org.dreamtech.orderservice.service.ProductOrderService;
import org.springframework.beans.factory.annotation.Autowired;
import org.springframework.http.ResponseEntity;
import org.springframework.stereotype.Service;
import org.springframework.web.client.RestTemplate;

import java.util.Date;
import java.util.Map;
import java.util.UUID;

@Service
public class ProductOrderServiceImpl implements ProductOrderService {

    private final RestTemplate restTemplate;

    @Autowired
    public ProductOrderServiceImpl(RestTemplate restTemplate) {
        this.restTemplate = restTemplate;
    }

    @Override
    @SuppressWarnings("unchecked")
    public ProductOrder save(int userId, int productId) {

        Map<String, Object> productMap = restTemplate.getForObject("http://product-service/api/product/find?id=" + productId, Map.class);

        ProductOrder productOrder = new ProductOrder();
        productOrder.setCreateTime(new Date());
        productOrder.setUserId(userId);
        productOrder.setTradeNo(UUID.randomUUID().toString());

        if (productMap != null) {
            productOrder.setProductName(productMap.get("name").toString());
            productOrder.setPrice(Integer.parseInt(productMap.get("price").toString()));
        }
        return productOrder;
    }
}
注意:getForObject方法的url中product-service是我在商品服务中配置的名称
启动项目,如果正常情况,Eureka应该显示如图:

访问http://localhost:8781/api/order/save?user_id=1&product_id=2多次,我将多次的返回结果记录在下:
{"id":0,"productName":"iPhone2 data from port=8771","tradeNo":"8beb0fe0-83ef-4d23-ae53-9399bac7eacc","price":2222,"createTime":"2019-05-15T03:21:12.432+0000","userId":1,"userName":null}
{"id":0,"productName":"iPhone2 data from port=8773","tradeNo":"09544f1d-462b-413a-b14a-cc9d599bce39","price":2222,"createTime":"2019-05-15T03:21:48.467+0000","userId":1,"userName":null}
{"id":0,"productName":"iPhone2 data from port=8771","tradeNo":"543e83a7-3e58-48bb-8aba-bd7635a10131","price":2222,"createTime":"2019-05-15T03:21:57.244+0000","userId":1,"userName":null}
{"id":0,"productName":"iPhone2 data from port=8772","tradeNo":"b30bbd40-49e8-4001-917a-0ae36b172463","price":2222,"createTime":"2019-05-15T03:22:06.509+0000","userId":1,"userName":null}
可以观察到,我开启了三个商品服务,这里自动在三个服务中进行了负载均衡,8771-8773随机访问
在SpringBoot启动类中加入Bean是一种方式,还有另一种调用方式:
不过还是推荐第一种
package org.dreamtech.orderservice.service.impl;

import org.dreamtech.orderservice.domain.ProductOrder;
import org.dreamtech.orderservice.service.ProductOrderService;
import org.springframework.beans.factory.annotation.Autowired;
import org.springframework.cloud.client.ServiceInstance;
import org.springframework.cloud.client.loadbalancer.LoadBalancerClient;
import org.springframework.stereotype.Service;
import org.springframework.web.client.RestTemplate;

import java.util.Date;
import java.util.Map;
import java.util.UUID;

@Service
public class ProductOrderServiceImpl implements ProductOrderService {
    private final LoadBalancerClient loadBalancer;

    @Autowired
    public ProductOrderServiceImpl(, LoadBalancerClient loadBalancer) {
        this.loadBalancer = loadBalancer;
    }

    @Override
    @SuppressWarnings("unchecked")
    public ProductOrder save(int userId, int productId) {

        ServiceInstance instance = loadBalancer.choose("product-service");
        String url = String.format("http://%s:%s/api/product/find?id="+productId,instance.getHost(),instance.getPort());
        RestTemplate restTemplate = new RestTemplate();
        Map<String, Object> productMap = restTemplate.getForObject(url, Map.class);


        ProductOrder productOrder = new ProductOrder();
        productOrder.setCreateTime(new Date());
        productOrder.setUserId(userId);
        productOrder.setTradeNo(UUID.randomUUID().toString());

        if (productMap != null) {
            productOrder.setProductName(productMap.get("name").toString());
            productOrder.setPrice(Integer.parseInt(productMap.get("price").toString()));
        }
        return productOrder;
    }
}
自定义负载均衡策略:
Ribbon默认是轮询策略
比如我想要使用随机策略,配置如下:
product-service:
  ribbon:
    NFLoadBalancerRuleClassName: com.netflix.loadbalancer.RandomRule
注意:服务名的一致,比如区分"_"和"-"
通常情况下,不需要改变策略,轮询策略为最佳
但是如果有一个好机器,一堆差机器,那么可以调整好机器的权重