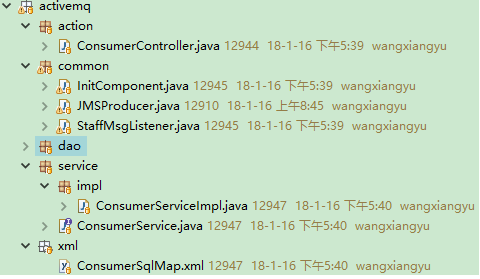
第一步:编写activemq连接工厂,JMS模板等配置文件。
<?xml version="1.0" encoding="UTF-8"?>
<beans xmlns="http://www.springframework.org/schema/beans"
       xmlns:xsi="http://www.w3.org/2001/XMLSchema-instance"
    xsi:schemaLocation="http://www.springframework.org/schema/beans
                      http://www.springframework.org/schema/beans/spring-beans.xsd">

    <!-- 配置ActiveMQ连接工厂 -->
    <bean id="activeMQConnectionFactory" class="org.apache.activemq.ActiveMQConnectionFactory">
        <property name="brokerURL" value="tcp://132.252.3.22:61616" />
        <!-- <property name="brokerURL" value="tcp://localhost:61616" /> -->
        <!-- 异步发送消息 -->
        <property name="useAsyncSend" value="true" />
        <!-- <property name="trustAllPackages" value="true"/> -->
    </bean>

    <!-- 配置Spring Caching 连接工厂 -->
    <bean id="cachingConnectionFactory" class="org.springframework.jms.connection.CachingConnectionFactory">
        <!-- 目标ConnectionFactory对应真实的可以产生JMS Connection的ConnectionFactory -->
        <property name="targetConnectionFactory" ref="activeMQConnectionFactory" />
        <!-- Session缓存数量 -->
        <property name="sessionCacheSize" value="100" />
    </bean>

    <!-- 定义消息队列(Queue) -->
    <!-- bean id="defaultQueue" class="org.apache.activemq.command.ActiveMQQueue">
        <constructor-arg index="0" value="${activemq.queue.default}" /> </bean -->

    <!-- 配置JMS模板(Queue),Spring提供的JMS工具类,它发送、接收消息。 -->
    <bean id="defaultJms" class="org.springframework.jms.core.JmsTemplate">
        <property name="connectionFactory" ref="cachingConnectionFactory" />
        <property name="pubSubDomain" value="true"/>
        <!-- property name="defaultDestination" ref="defaultQueue" / -->
        <property name="defaultDestinationName" value="staffQueue" />
        <property name="receiveTimeout" value="2000" />
        <property name="sessionTransacted" value="true" />
    </bean>

    <!-- 配置监听消息的线程池 -->
    <!-- <task:executor id="jmsTaskExecutor" rejection-policy="CALLER_RUNS"
        pool-size="10-20" keep-alive="300" queue-capacity="0" /> -->
</beans>
第二步:编写消息监听器配置文件。
<?xml version="1.0" encoding="UTF-8"?>
<beans xmlns="http://www.springframework.org/schema/beans"
    xmlns:context="http://www.springframework.org/schema/context"
    xmlns:task="http://www.springframework.org/schema/task"
    xmlns:xsi="http://www.w3.org/2001/XMLSchema-instance"
    xsi:schemaLocation="http://www.springframework.org/schema/beans
                        http://www.springframework.org/schema/beans/spring-beans.xsd
                        http://www.springframework.org/schema/context
                        http://www.springframework.org/schema/context/spring-context.xsd
                        http://www.springframework.org/schema/task
                        http://www.springframework.org/schema/task/spring-task.xsd">

    <!-- 消息监听读取 -->
    <bean id="staffMsgListener" class="com.activemq.listener.StaffMsgListener"></bean>

    <!-- 配置监听消息的线程池 -->
    <task:executor id="staffTaskExecutor" rejection-policy="CALLER_RUNS" pool-size="10-20" keep-alive="300" queue-capacity="0" />

    <bean id="staffMessageConverter" class="org.springframework.jms.support.converter.SimpleMessageConverter"/>

    <!-- 消息监听容器(Queue),配置连接工厂,监听的队列是queue,监听器是上面定义的监听器 -->
    <bean id="staffJmsContainer" class="org.springframework.jms.listener.DefaultMessageListenerContainer">
        <property name="connectionFactory" ref="activeMQConnectionFactory" />
        <property name="destinationName" value="staffQueue" />
        <!-- property name="destination" ref="defaultQueue" / -->
        <property name="messageListener" ref="staffMsgListener" />
        <!-- 启用activemq本地事务管理,默认false -->
        <property name="sessionTransacted" value="false" />
        <!-- 设置消息监听线程数量,格式为"concurrentConsumers-maxConcurrentConsumers" -->
        <property name="concurrency" value="6-6" />
        <!-- 当需要新的消费者,并且监听线程数量没有达到最大时,每次新加入的监听线程数量,默认为1 -->
        <property name="idleConsumerLimit" value="2" />
        <!-- 最大空闲任务数量,但会保证最小线程数量,默认为1 -->
        <property name="idleTaskExecutionLimit" value="1" />
        <!-- 监听异常恢复间隔,默认5000ms,默认恢复策略为FixedBackOff -->
        <property name="recoveryInterval" value="5000" />
        <!-- receive消息等待最长时间,默认1000ms -->
        <property name="receiveTimeout" value="2000" />
        <!-- 采用线程池执行监听任务 -->
        <property name="taskExecutor" ref="staffTaskExecutor" />
        <!-- 每个监听线程任务最大执行消息数,"-1"表示不限制 -->
        <property name="maxMessagesPerTask" value="100" />
        <!-- 消息选择器,可以根据消息中的信息进行筛选,如mesg.setIntProperty("aaaa", 12); -->
        <!-- property name="messageSelector" value="aaaa=12" / -->
    </bean>

</beans>
第三步:将activemq配置文件引入spring配置。
<!-- 引入activeMQ配置文件 -->
<import resource="spring-activemq-base.xml" />
<import resource="spring-staff-listener.xml" />
第四步:编写代码

package com.activemq.service.impl;

import javax.annotation.Resource;
import javax.jms.Connection;
import javax.jms.ConnectionFactory;
import javax.jms.Destination;
import javax.jms.JMSException;
import javax.jms.MessageConsumer;
import javax.jms.Session;

import org.slf4j.Logger;
import org.slf4j.LoggerFactory;
import org.springframework.jms.core.JmsTemplate;
import org.springframework.stereotype.Service;

import com.activemq.common.StaffMsgListener;
import com.activemq.service.ConsumerService;
/**
 * JMS消息中间件
 * 消费者Service
 * @author wangxiangyu
 *
 */
@Service
public class ConsumerServiceImpl implements ConsumerService {
    Logger logger = LoggerFactory.getLogger(ConsumerServiceImpl.class);

    @Resource
    JmsTemplate jmsTemplate;
    //消费者,单例
    private static MessageConsumer messageConsumer = null;

    @Override
    public String receive() {

        String result = "0";//成功

        if(null != messageConsumer) {
            return result;
        }else {
            //创建消息工厂
            ConnectionFactory factory = jmsTemplate.getConnectionFactory();
            Connection connection;
            Session session;
            Destination destination;
            try {
                connection = factory.createConnection();
                connection.start();
                session = connection.createSession(Boolean.FALSE, Session.AUTO_ACKNOWLEDGE);
                destination = session.createTopic(jmsTemplate.getDefaultDestinationName());  // 创建连接的消息队列
                messageConsumer = session.createConsumer(destination);// 创建消息消费者
                messageConsumer.setMessageListener(new StaffMsgListener());
            } catch (JMSException e) {
                result = "1";
                e.printStackTrace();
            }
        }

        return result;
    }

}
package com.activemq.common;

import javax.jms.Connection;
import javax.jms.Destination;
import javax.jms.JMSException;
import javax.jms.MessageProducer;
import javax.jms.Session;
import javax.jms.TextMessage;

import org.apache.activemq.ActiveMQConnection;
import org.apache.activemq.ActiveMQConnectionFactory;
/**
 * JMS消息中间件
 * 消息生产者,用于生成消息测试
 * @author wangxiangyu
 *
 */
public class JMSProducer {

    private static final String USERNAME=ActiveMQConnection.DEFAULT_USER; // 默认的连接用户名
    private static final String PASSWORD=ActiveMQConnection.DEFAULT_PASSWORD; // 默认的连接密码
    private static final String BROKEURL=ActiveMQConnection.DEFAULT_BROKER_URL; // 默认的连接地址
    private static final int SENDNUM=10; // 发送的消息数量

    public static void main(String[] args) {
        ActiveMQConnectionFactory connectionFactory; // 连接工厂
        Connection connection = null; // 连接
        Session session; // 会话 接受或者发送消息的线程
        Destination destination; // 消息的目的地
        MessageProducer messageProducer; // 消息生产者

        // 实例化连接工厂
        connectionFactory=new ActiveMQConnectionFactory(JMSProducer.USERNAME, JMSProducer.PASSWORD, JMSProducer.BROKEURL);

        try {
            connection=connectionFactory.createConnection(); // 通过连接工厂获取连接
            connection.start(); // 启动连接
            session=connection.createSession(Boolean.TRUE, Session.AUTO_ACKNOWLEDGE); // 创建Session
            destination=session.createTopic("ZHXJ_QUEUE"); // 创建消息队列
            messageProducer=session.createProducer(destination); // 创建消息生产者
            sendMessage(session, messageProducer); // 发送消息
            session.commit();
        } catch (Exception e) {
            e.printStackTrace();
        } finally{
            if(connection!=null){
                try {
                    connection.close();
                } catch (JMSException e) {
                    // TODO Auto-generated catch block
                    e.printStackTrace();
                }
            }
        }

    }

    /**
     * 发送消息
     * @param session
     * @param messageProducer
     * @throws Exception
     */
    public static void sendMessage(Session session,MessageProducer messageProducer)throws Exception{
        for(int i=0;i<3;i++){
            TextMessage message=session.createTextMessage("ActiveMQ 发送的消息"+i);
            System.out.println("发送消息:"+"ActiveMQ 发送的消息"+i);
            messageProducer.send(message);
        }


    }
}