关于C#界面美化的一些小技巧
在不使用第三方控件如 IrisSkin 的前提下,依然可以对winform做出让人眼前一亮的美化
首先,我们先来实现主界面的扁平化
此处分为两个步骤,第一步是更改winform自带的MainForm窗体属性,第二步是添加窗体事件。
- 将主窗体FormBorderStyle更改为None,这样就得到了一个无边框的窗体(winform自带边框太丑。。)
- 调节背景色,建议找到自己喜欢的颜色,然后使用取色器(我用的是按键精灵自带的取色板)取得想要的RGB参数,输入到BackColor属性之中
- 在主窗体的Mouse_Down中添加如下事件,实现窗体随意拖动:
[DllImport("user32.dll")]
public static extern bool ReleaseCapture();
[DllImport("user32.dll")]
[DllImport("user32.dll")]
public static extern bool SendMessage(IntPtr hwnd, int wMsg, int wParam, int lParam);
public const int WM_SYSCOMMAND = 0x0112;
public const int SC_MOVE = 0xF010;
public const int HTCAPTION = 0x0002;
/// <summary>
/// 为了是主界面能够移动
/// </summary>
/// <param name="sender"></param>
/// <param name="e"></param>
private void MainForm_MouseDown(object sender, MouseEventArgs e)
{
    ReleaseCapture();
    SendMessage(this.Handle, WM_SYSCOMMAND, SC_MOVE + HTCAPTION, 0);
}
- 添加最小化、退出事件的按钮,背景色BackColor和字体色Forecolor设置为与界面颜色较为搭配的,将按钮的FlatStyle设置为Popup,它会自己随着界面风格调整哦~~最小化和退出的代码如下:
this.WindowState = FormWindowState.Minimized;
this.Close();
到此为止主窗体的美化以及基本功能实现完毕
窗体基本控件实现美化
tabcontrol美化
通过tabcontrol的drawitem事件,来达到改变tabpage字体、字体颜色以及背景色的目的
private void tabControl1_DrawItem(object sender, DrawItemEventArgs e)
        {
            SolidBrush back = new SolidBrush(Color.FromArgb(45, 45, 48));
            SolidBrush white = new SolidBrush(Color.FromArgb(122, 193, 255));
            Rectangle rec = tabControl1.GetTabRect(0);
            e.Graphics.FillRectangle(back, rec);
            Rectangle rec1 = tabControl1.GetTabRect(1);
            e.Graphics.FillRectangle(back, rec1);
            StringFormat sf = new StringFormat();
            sf.Alignment = StringAlignment.Center;
            for (int i = 0; i < tabControl1.TabPages.Count; i++)
            {
                Rectangle rec2 = tabControl1.GetTabRect(i);
                e.Graphics.DrawString(tabControl1.TabPages[i].Text, new Font("微软雅黑", 9), white, rec2, sf);
            }

        }
DataGridview美化
- 通过设置ColumnHeadersDefaultCellStyle,来改变列标题的背景、字体和颜色
- 通过设置DefaultCellStyle,来改变单元格背景、字体和颜色
- 通过设置RowHeadersDefaultCellStyle,来改变行标题的背景、字体和颜色
ProgressBar美化
很多人反映winform的进度条设置BackColor和ForeColor属性,不会产生效果,进度条颜色不会变。因为进度条ProgressBar由于是虚拟模式下运行的,所以调整BackColor和ForeColor都不会产生效果,它仍然会根据windows的主题来更改,为了使其按照我们想要的颜色来显示,我们可以将虚拟模式的命令去掉,在program.cs中,注释掉如下内容:
using System;
using System.Windows.Forms;

namespace 界面美化
{
    static class Program
    {
        [STAThread]
        static void Main()
        {
            //Application.EnableVisualStyles();//此行为允许虚拟模式运行的命令,我们把它注释掉
            Application.SetCompatibleTextRenderingDefault(false);
            Application.Run(new Form1());
        }
    }
}
但是这样的话会导致其他控件形状或者风格发生一些改变,个人不推荐上述方案,更加推荐通过重写ProgressBar的OnePaint方法来改变它的颜色(前景色和背景色)。在此我们有如下代码
using System.Windows.Forms;
using System.Drawing;

namespace 界面美化
{
    class MyProgressBar:ProgressBar //新建一个MyProgressBar类,它继承了ProgressBar的所有属性与方法
    {
        public MyProgressBar()
        {
            base.SetStyle(ControlStyles.UserPaint, true);//使控件可由用户自由重绘
        }
        protected override void OnPaint(PaintEventArgs e)
        {
            SolidBrush brush = null;
            Rectangle bounds = new Rectangle(0, 0, base.Width, base.Height);
            e.Graphics.FillRectangle(new SolidBrush(this.BackColor), 1, 1, bounds.Width - 2, bounds.Height - 2);//此处完成背景重绘,并且按照属性中的BackColor设置背景色
            bounds.Height -= 4;
            bounds.Width = ((int)(bounds.Width * (((double)base.Value) / ((double)base.Maximum)))) - 4;//是的进度条跟着ProgressBar.Value值变化
            brush = new SolidBrush(this.ForeColor);
            e.Graphics.FillRectangle(brush, 2, 2, bounds.Width, bounds.Height);//此处完成前景重绘,依旧按照Progressbar的属性设置前景色
        }
    }
}
完成以上步骤之后,我们如何在界面中插入自己的进度条呢?``我们可以先插入一个winform自带的ProgressBar,调整好位置,ForeColor,BackColor属性,然后进入窗体的Designer程序中做如下修改:
//private System.Windows.Forms.ProgressBar progressBar1;//注释此句
private MyProgressBar progressBar1; //新添此句,添加新的控件MyProgressBar
private void InitializeComponent()
{
    //this.progressBar1 = new System.Windows.Forms.ProgressBar();//注释此句
    this.progressBar1 = new 界面美化.MyProgressBar();//新添此句,此处对MyPorgressBar实例化
    this.SuspendLayout();
    this.progressBar1.Location = new System.Drawing.Point(137, 68);
    this.progressBar1.Name = "progressBar1";
    this.progressBar1.Size = new System.Drawing.Size(100, 23);
    this.progressBar1.TabIndex = 0;
}
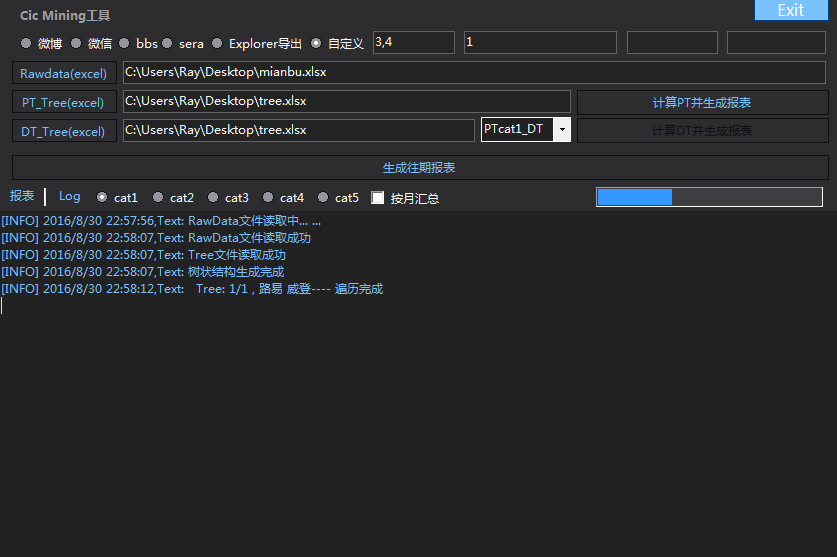
完成之后就可以啦,看看最后的效果:
理解控件重绘或者是重写的含义之后,其他的控件也非常方便拓展与修改,达到美化效果!