一、为什么要做Mysql的主从复制(读写分离)?
通俗来讲,如果对数据库的读和写都在同一个数据库服务器中操作,业务系统性能会降低。
为了提升业务系统性能,优化用户体验,可以通过做主从复制(读写分离)来减轻主数据库的负载。
而且如果主数据库宕机,可快速将业务系统切换到从数据库上,可避免数据丢失。
二、MySQL主从复制 Mysql主从复制(读写分离)和集群的区别
我对MySQL也是刚开始研究,不是很专业。我的理解是:
1、主从复制(读写分离):一般需要两台及以上数据库服务器即可(一台用于写入数据,一台用于同步主的数据并用于数据查询操作)。
局限性:
(1)配置好主从复制之后,同一张表,只能对一个服务器写操作。如果在从上执行了写操作,而之后主也操作了这张表,或导致主从不同步;据说可以配置成主主方式,但我还没有研究到。
(2)主数据库服务器宕机,需要手动将业务系统切换到从数据库服务器。无法做到高可用性(除非再通过部署keepalive做成高可用方案)。
2、集群是由N台数据库服务器组成,数据的写入和查询是随机到任意一台数据库服务器的,其他数据库服务器会自动同步数据库的操作。
任何一台数据库宕机,不会对整个集群造成大的影响。
局限性:我经过测试才知道目前mysql集群版本(MySQL Cluster)只能对NDB存储引擎的数据进行集群同步,如果是INNODB或其他的MySQL存储引擎是不行的。这个也导致了我放弃了在业务系统中应用这种方案。
三、回归正题,接下来开始MySQL5.5.12的主从复制教程:
1、MySQL5.5开始主从复制有两种方式:基于日志(binlog);基于GTID(全局事务标示符)。
需要注意的是:GTID方式不支持临时表!所以如果你的业务系统要用到临时表的话就不要考虑这种方式了,至少目前最新版本MySQL5.5.12的GTID复制还是不支持临时表的。
所以此篇教程主要是告诉大家如何通过日志(binlog)方式做主从复制!
2、MySQL官方提供的MySQL Replication教程:
http://dev.mysql.com/doc/refman/5.6/en/replication.html
这个官方教程强烈建议大家阅读(需要一定的英语阅读能力哦!不行就google翻译后再阅读吧~)。
因此,一般来说都是通过 主从复制(Master-Slave)的方式来同步数据,再通过读写分离(MySQL-Proxy)来提升数据库的并发负载能力 这样的方案来进行部署与实施的。
如下图所示:

三、MySQL主从复制
场景描述:
主数据库服务器:42.51.153.157,MySQL已经安装,并且无应用数据。
从数据库服务器:42.51.155.219,MySQL已经安装,并且无应用数据。
系统:CentOS6.4 32位
Mysql:5.5版本
selinux关闭 防火墙关闭
setenforce 0
service iptables stop
2.就是要确定服务器上的Mysql
yum install mysql mysql-server -y
3.确认时间同步
[root@master ~]# yum install ntp -y
[root@master ~]# vi /etc/ntp.conf    #添加以下2行
server 127.127.1.0
fudge 127.127.1.0 stratum 8
[root@master ~]# /etc/init.d/ntpd restart #重启ntpd服务
2)在节点服务器上进行时间同步
[root@slave1 ~]# /etc/init.d/iptables stop
[root@slave1 ~]# chkconfig iptables off
[root@slave1 ~]# yum install -y ntpdate
[root@slave1 ~]# /usr/sbin/ntpdate 42.51.153.157
四:配置Mysql
1.首先修改Mysql主配置的配置文件(Master)
[root@master ~]# cp /etc/my.cnf /etc/my.cnf.old        ##修改之前备份
[root@master ~]# vi /etc/my.cnf                        ##修改
server-id       = 11                                     //修改

log-bin=master-bin                                         //修改

         log-slave-updates=true                                  //增加

[root@master ~]# /etc/init.d/mysqld restart           ##重启Mysql
[root@master ~]# mysql -u root –ppassword                  //登录数据库,给从服务器授权
mysql> create user 'yanghongfei'@'localhost' identified by '123456';
mysql> grant replication slave on *.* to 'yanghongfei'@'42.51.155.219' identified by '123456';
mysql> flush privileges;
mysql> show master status;                 ##这个日志后面会用的到
+------------------+----------+--------------+------------------+
| File             | Position | Binlog_Do_DB | Binlog_Ignore_DB |
+------------------+----------+--------------+------------------+
| mysql-bin.000005 |      343 |              |                  |
+------------------+----------+--------------+------------------+
1 row in set (0.00 sec)
2.配置从服务器 (Slave)
[root@master ~]# cp /etc/my.cnf /etc/my.cnf.old        ##修改之前备份

[root@salve shell]# vi /etc/my.cnf
server-id       = 33                                                        //修改     此处ID只要比Master大就可以

relay-log=relay-log-bin                                                     //增加

relay-log-index=slave-relay-bin.index                          //增加

修改完成之后重启mysql服务

登录Mysql,配置同步

[root@salve shell]# service mysqld restart

[root@slave1 ~]# mysql -u root –ppassword

mysql> stop slave;                                          ##首先停止

mysql>  change master to master_host='42.51.153.157',master_user='yanghongfei',master_password='123456',master_log_file='mysql-bin.000005',master_log_pos=343;

mysql> start slave;

mysql> show slave status G;
查看是否成功~
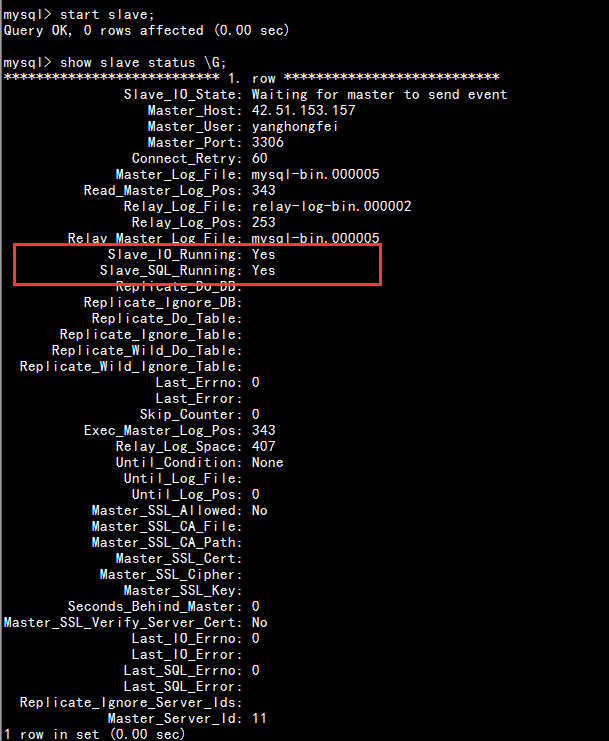
上面2处都为Yes的时候表示已经成功了~~
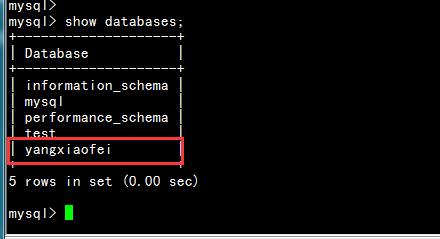
3. 测试主从是否复制成功,主服务器创建数据库看是不是被同步过去了
Master:

Slave:
下面我来装一个Discuz论坛 我们来测试下数据表会不会被同步进去,这里安装网站不再详细说了 我这面用的环境是lnmp 首先下载一个Discuz的包 网上有很多
[root@master ~]# unzip Discuz_7.2_FULL_SC_UTF8.zip

[root@master ~]# mv upload/ /usr/share/nginx/html/

[root@master ~]# cd /usr/share/nginx/html/

[root@master html]# mv upload/ Discuz

[root@master html]# chmod 777 -R ./Discuz/

[root@master ~]# service nginx restart
Master:
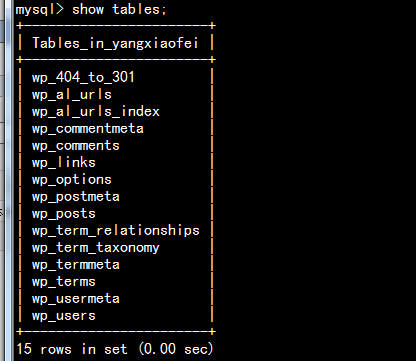
Slave:
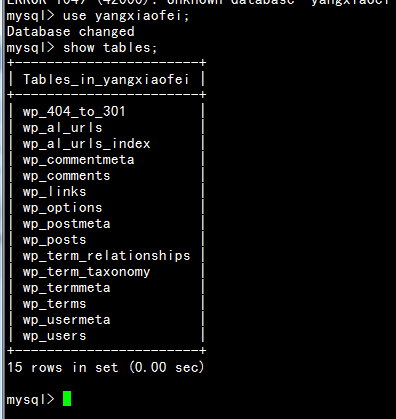
上面可以看出主从复制成功~~
Mysql主从复制常用命令
1.停止主节点复制
mysql> stop master;
2.清除主节点复制文件
mysql> reset master;
3.停止从节点复制
mysql> stop slave;
4.清除从节点复制文件
mysql> reset slave;
5.开启从节点复制
mysql> start slave;
6.查看主数据库的Master复制信息
mysql> show master status;
7.查看主节点的复制状态
mysql> show master status G;
8.查看从节点的复制状态
mysql> show slave status G;
五、MySQL读写分离的实现
搭建MySQL读写分离
环境:主数据库服务器:42.51.153.157
从1数据库服务器:42.51.155.219
从2数据库服务器:42.51.157.217
代理Amoeba服务器:42.51.152.166
software: amoeba-mysql-binary-2.2.0.tar.gz
jdk-6u45-linux-x64.bin
下载地址为:ftp://42.51.152.2/linux环境搭建
1)在Amoeba主机安装Java环境
[root@Amoeba ~]# ./jdk-6u45-linux-x64.bin
[root@Amoeba ~]# mv jdk1.6.0_45/ /usr/local/jdk1.6
[root@amoeba /]# vim /etc/profile                //增加以下配置
export JAVA_HOME=/usr/local/jdk1.6
export CLASSPATH=$CLASSPATH:$JAVA_HOME/lib:$JAVA_HOME/jre/lib
export PATH=$JAVA_HOME/lib:$JAVA_HOME/jre/bin:$PATH:$HOME/bin
export AMOEBA_HOME=/usr/local/amoeba/
export PATH=$PATH:$AMOEBA_HOME/bin
[root@amoeba /]# source /etc/profile
[root@amoeba /]# java -version
java version "1.6.0_14"
Java(TM) SE Runtime Environment (build 1.6.0_14-b08)
Java HotSpot(TM) 64-Bit Server VM (build 14.0-b16, mixed mode)
2)安装并配置Amoeba软件 修改以下带下划线的内容
[root@Amoeba ~]# mkdir /usr/local/amoeba
[root@Amoeba ~]# tar zxvf amoeba-mysql-binary-2.2.0.tar.gz -C /usr/local/amoeba
[root@Amoeba ~]# chmod -R 755 /usr/local/amoeba/
[root@Amoeba ~]# /usr/local/amoeba/bin/amoeba

The stack size specified is too small, Specify at least 160k
Could not create the Java virtual machine.
3)配置Amoeba读写分离,两个Slave读负载均衡
Master、Slave1、Slave2中开放权限给Amoeba访问
Master:
mysql> grant all on *.* to test@'42.51.152.166' identified by '123.com';
Query OK, 0 rows affected (0.00 sec)

mysql> flush privileges;
Query OK, 0 rows affected (0.00 sec)
Slave1:
mysql> grant all on *.* to test@'42.51.152.166' identified by '123.com';
Query OK, 0 rows affected (0.00 sec)

mysql> flush privileges;
Query OK, 0 rows affected (0.00 sec)
Slave2:
mysql> grant all on *.* to test@'42.51.152.166' identified by '123.com';
Query OK, 0 rows affected (0.00 sec)

mysql> flush privileges;
Query OK, 0 rows affected (0.00 sec)
编辑amoeba.xml配置文件
<!DOCTYPE amoeba:configuration SYSTEM "amoeba.dtd">
<amoeba:configuration xmlns:amoeba="http://amoeba.meidusa.com/">

        <proxy>

                <!-- service class must implements com.meidusa.amoeba.service.Service -->
                        <!-- port -->
                        <property name="port">8066</property>

                        <!-- bind ipAddress -->
                        <!--
                        <property name="ipAddress">127.0.0.1</property>
                        <property name="connectionFactory">
                                        <property name="sendBufferSize">128</property>
                                        <property name="receiveBufferSize">64</property>
                                </bean>
                        </property>


                                        <property name="user">amoeba</property>

                                        <property name="password">123456</property>

                                        <property name="filter">
                                                </bean>
                                        </property>
                                </bean>
                        </property>

                </service>

                <!-- server class must implements com.meidusa.amoeba.service.Service -->
                        <!-- port -->
                        <!--  default value: random number
                        <property name="port">9066</property>
                        -->
                        <!-- bind ipAddress -->
                        <property name="ipAddress">127.0.0.1</property>
                        <property name="daemon">true</property>
                        <property name="manager">${clientConnectioneManager}</property>
                        <property name="connectionFactory">
                        </property>

                </service>

                <runtime class="com.meidusa.amoeba.mysql.context.MysqlRuntimeContext">
                        <!-- proxy server net IO Read thread size -->
                        <property name="readThreadPoolSize">20</property>
                        <!-- mysql server data packet process thread size -->
                        <property name="serverSideThreadPoolSize">30</property>

                        <!-- per connection cache prepared statement size  -->
                        <property name="statementCacheSize">500</property>

        </proxy>

        <!--
                Each ConnectionManager will start as thread
                manager responsible for the Connection IO read , Death Detection
        -->
        <connectionManagerList>
                        <!--
                          default value is avaliable Processors
                        <property name="processors">5</property>
                         -->
                </connectionManager>

                        <!--
                          default value is avaliable Processors
                        <property name="processors">5</property>
                         -->
                </connectionManager>
        </connectionManagerList>

                <!-- default using file loader -->
        <dbServerLoader class="com.meidusa.amoeba.context.DBServerConfigFileLoader">
                <property name="configFile">${amoeba.home}/conf/dbServers.xml</property>
        </dbServerLoader>

        <queryRouter class="com.meidusa.amoeba.mysql.parser.MysqlQueryRouter">
                <property name="ruleLoader">
                        <bean class="com.meidusa.amoeba.route.TableRuleFileLoader">
                                <property name="ruleFile">${amoeba.home}/conf/rule.xml</property>
                                <property name="functionFile">${amoeba.home}/conf/ruleFunctionMap.xml</property>
                        </bean>
                </property>
                <property name="sqlFunctionFile">${amoeba.home}/conf/functionMap.xml</property>
                <property name="LRUMapSize">1500</property>
                <property name="defaultPool">master</property>

                <property name="writePool">master</property>
                <property name="readPool">slaves</property>
                <property name="needParse">true</property>
        </queryRouter>
</amoeba:configuration>
编辑dbServers.xml配置文件 同样是以下带下划线的内容
<?xml version="1.0" encoding="gbk"?>

<!DOCTYPE amoeba:dbServers SYSTEM "dbserver.dtd">
<amoeba:dbServers xmlns:amoeba="http://amoeba.meidusa.com/">

                <!--
                        Each dbServer needs to be configured into a Pool,
                         such as 'multiPool' dbServer
                -->

        <dbServer name="abstractServer" abstractive="true">
                <factoryConfig class="com.meidusa.amoeba.mysql.net.MysqlServerConnectionFactory">
                        <property name="manager">${defaultManager}</property>
                        <property name="sendBufferSize">64</property>
                        <property name="receiveBufferSize">128</property>

                        <!-- mysql port -->
                        <property name="port">3306</property>

                        <!-- mysql schema -->
                        <property name="schema">test</property>

                        <!-- mysql user -->
                        <property name="user">test</property>

                        <property name="password">123.com</property>
                </factoryConfig>

                <poolConfig class="com.meidusa.amoeba.net.poolable.PoolableObjectPool">
                        <property name="maxActive">500</property>
                        <property name="maxIdle">500</property>
                        <property name="minIdle">10</property>
                        <property name="minEvictableIdleTimeMillis">600000</property>
                        <property name="timeBetweenEvictionRunsMillis">600000</property>
                        <property name="testOnBorrow">true</property>
                        <property name="testOnReturn">true</property>
                        <property name="testWhileIdle">true</property>
                </poolConfig>
        </dbServer>

        <dbServer name="master"  parent="abstractServer">
                <factoryConfig>
                        <!-- mysql ip -->
                        <property name="ipAddress">42.51.153.157</property>
                </factoryConfig>
        </dbServer>

        <dbServer name="slave1"  parent="abstractServer">
                <factoryConfig>
                        <!-- mysql ip -->
                        <property name="ipAddress">42.51.155.219</property>
                </factoryConfig>
        </dbServer>

        <dbServer name="slave2"  parent="abstractServer">
                <factoryConfig>
                        <!-- mysql ip -->
                        <property name="ipAddress">42.51.157.217</property>
                </factoryConfig>
        </dbServer>

        <dbServer name="slaves" virtual="true">
                <poolConfig class="com.meidusa.amoeba.server.MultipleServerPool">
                        <!-- Load balancing strategy: 1=ROUNDROBIN , 2=WEIGHTBASED , 3=HA-->
                        <property name="loadbalance">1</property>

                        <!-- Separated by commas,such as: server1,server2,server1 -->
                        <property name="poolNames">slave1,slave2</property>
                </poolConfig>
        </dbServer>

</amoeba:dbServers>
配置无误后 启动Amoeba软件 默认的TCP端口号:8066. 只有看到Amoeba软件监听到了其他的Mysql主机才算是成功了~
[root@Amoeba conf]# netstat -antp | grep 'java'
tcp        0      0 ::ffff:127.0.0.1:60672      :::*                        LISTEN      5121/java
tcp        0      0 :::8066                     :::*                        LISTEN      5121/java
tcp        0      0 ::ffff:42.51.152.166:55874  ::ffff:42.51.153.157:3306   ESTABLISHED 5121/java
tcp        0      0 ::ffff:42.51.152.166:36135  ::ffff:42.51.157.217:3306   ESTABLISHED 5121/java
tcp        0      0 ::ffff:42.51.152.166:40687  ::ffff:42.51.155.219:3306   ESTABLISHED 5121/java
4).客户端测试 通过代理来访问Mysql
[root@squid_node1 ~]# mysql -u amoeba -p123456 -h 42.51.152.166 -P8066
Welcome to the MySQL monitor.  Commands end with ; or g.
Your MySQL connection id is 414297791
Server version: 5.1.45-mysql-amoeba-proxy-2.2.0 MySQL Community Server (GPL) by Atomicorp

Copyright (c) 2000, 2013, Oracle and/or its affiliates. All rights reserved.

Oracle is a registered trademark of Oracle Corporation and/or its
affiliates. Other names may be trademarks of their respective
owners.

Type 'help;' or 'h' for help. Type 'c' to clear the current input statement.

mysql>
mysql> show databases;
+--------------------+
| Database           |
+--------------------+
| information_schema |
| mysql              |
| performance_schema |
| test               |
| yanghongfei        |
+--------------------+
5 rows in set (0.02 sec)

mysql>
在Master创建一个表,同步到其他的2个从服务器上,然后关闭从服务器的Slave功能,再插入其他的区别语句。
Master:
mysql> show databases;
+--------------------+
| Database           |
+--------------------+
| information_schema |
| mysql              |
| performance_schema |
| test               |
| yanghongfei        |
+--------------------+
5 rows in set (0.00 sec)

mysql>
mysql> use yanghongfei;
Database changed
mysql> create table yang (id int (10), name varchar(10),address varchar(20));
Query OK, 0 rows affected (0.26 sec)
mysql> desc yang;
+---------+-------------+------+-----+---------+-------+
| Field   | Type        | Null | Key | Default | Extra |
+---------+-------------+------+-----+---------+-------+
| id      | int(10)     | YES  |     | NULL    |       |
| name    | varchar(10) | YES  |     | NULL    |       |
| address | varchar(20) | YES  |     | NULL    |       |
+---------+-------------+------+-----+---------+-------+
3 rows in set (0.01 sec)
Slave1; 可以看出来同步了
mysql> use yanghongfei;
Database changed
mysql>
mysql> show tables;
+-----------------------+
| Tables_in_yanghongfei |
+-----------------------+
| yang                  |
+-----------------------+
1 row in set (0.00 sec)

mysql>
mysql> desc yang;
+---------+-------------+------+-----+---------+-------+
| Field   | Type        | Null | Key | Default | Extra |
+---------+-------------+------+-----+---------+-------+
| id      | int(10)     | YES  |     | NULL    |       |
| name    | varchar(10) | YES  |     | NULL    |       |
| address | varchar(20) | YES  |     | NULL    |       |
+---------+-------------+------+-----+---------+-------+
3 rows in set (0.01 sec)
Slave2: 同上
mysql> show databases;
+--------------------+
| Database           |
+--------------------+
| information_schema |
| mysql              |
| performance_schema |
| test               |
| yanghongfei        |
+--------------------+
5 rows in set (0.06 sec)

mysql> use yanghongfei;
Database changed
mysql> show tables;
+-----------------------+
| Tables_in_yanghongfei |
+-----------------------+
| yang                  |
+-----------------------+
1 row in set (0.03 sec)

mysql> desc yang;
+---------+-------------+------+-----+---------+-------+
| Field   | Type        | Null | Key | Default | Extra |
+---------+-------------+------+-----+---------+-------+
| id      | int(10)     | YES  |     | NULL    |       |
| name    | varchar(10) | YES  |     | NULL    |       |
| address | varchar(20) | YES  |     | NULL    |       |
+---------+-------------+------+-----+---------+-------+
3 rows in set (0.04 sec)
关闭从1和从2 的Slave功能
mysql> stop slave;
Query OK, 0 rows affected (0.00 sec)
关闭之后在主服务器上插入区别语句 Master操作:
mysql> insert into yang values('1','yang','this_is_master');
Query OK, 1 row affected (0.01 sec)
刚才上面操作是我们关闭了Slave功能 所有从服务器只是同步了表,没有同步到插入的区别语句,我们在2个从数据库上分别创建区别语句;
Slave1:
mysql> insert into yang values('2','yang','this_is_slave1');
Query OK, 1 row affected (0.00 sec)

mysql> select * from yang;
+------+------+----------------+
| id   | name | address        |
+------+------+----------------+
|    2 | yang | this_is_slave1 |
+------+------+----------------+
1 row in set (0.00 sec)
Slave2:
mysql> insert into yang values ('3','yang','this_is_slave2');
Query OK, 1 row affected (0.05 sec)

mysql> select * from yang;
+------+------+----------------+
| id   | name | address        |
+------+------+----------------+
|    3 | yang | this_is_slave2 |
+------+------+----------------+
1 row in set (0.02 sec)

mysql>
最后:在刚才连接上的客户端上操作
第一次查询操作为:
mysql> use yanghongfei;
Reading table information for completion of table and column names
You can turn off this feature to get a quicker startup with -A

Database changed
mysql> show tables;
+-----------------------+
| Tables_in_yanghongfei |
+-----------------------+
| yang                  |
+-----------------------+
1 row in set (0.00 sec)

mysql> desc yang;
+---------+-------------+------+-----+---------+-------+
| Field   | Type        | Null | Key | Default | Extra |
+---------+-------------+------+-----+---------+-------+
| id      | int(10)     | YES  |     | NULL    |       |
| name    | varchar(10) | YES  |     | NULL    |       |
| address | varchar(20) | YES  |     | NULL    |       |
+---------+-------------+------+-----+---------+-------+
3 rows in set (0.01 sec)

mysql> select * from yang;
+------+------+----------------+
| id   | name | address        |
+------+------+----------------+
|    2 | yang | this_is_slave1 |
+------+------+----------------+
1 row in set (0.01 sec)
第二次查询操作为:
mysql> select * from yang;
+------+------+----------------+
| id   | name | address        |
+------+------+----------------+
|    3 | yang | this_is_slave2 |
+------+------+----------------+
1 row in set (0.01 sec)
第三次查询操作为:
mysql> select * from yang;
+------+------+----------------+
| id   | name | address        |
+------+------+----------------+
|    2 | yang | this_is_slave1 |
+------+------+----------------+
1 row in set (0.00 sec)
从上面可以看出查询操作是 都是在Slave1和Slave2执行的 还可以看出来我们的2台Slave起到了负载均衡
接下来我们在Client上再写一条insert语句
Client 写操作 下面可以看出我们插入了一条写操作 查询的话还是查不到的.证明是只能在Master才能查询到~
mysql> insert into yang values ('4','yang','This_is_wirte_test');
Query OK, 1 row affected (0.02 sec)

mysql>
mysql>
mysql> select * from yang;
+------+------+----------------+
| id   | name | address        |
+------+------+----------------+
|    3 | yang | this_is_slave2 |
+------+------+----------------+
1 row in set (0.01 sec)

mysql> select * from yang;
+------+------+----------------+
| id   | name | address        |
+------+------+----------------+
|    2 | yang | this_is_slave1 |
+------+------+----------------+
1 row in set (0.01 sec)

mysql> select * from yang;
+------+------+----------------+
| id   | name | address        |
+------+------+----------------+
|    3 | yang | this_is_slave2 |
+------+------+----------------+
1 row in set (0.00 sec)

mysql> select * from yang;
+------+------+----------------+
| id   | name | address        |
+------+------+----------------+
|    2 | yang | this_is_slave1 |
+------+------+----------------+
1 row in set (0.00 sec)
Master查询刚才Client的Write Test
mysql>
mysql> select * from yang;
+------+------+--------------------+
| id   | name | address            |
+------+------+--------------------+
|    1 | yang | this_is_master     |
|    4 | yang | This_is_wirte_test |
+------+------+--------------------+
2 rows in set (0.00 sec)

mysql>
Mysql读写分离常用命令
1.切换数据库
mysql> use yanghongfei;
2.查看数据表
mysql> show tables;
3.查看表结构
mysql> desc yang;
4.查看表内容
mysql> select * from yang;
5.插入一条表语句
mysql> insert into yang values ('4','yang','This_is_wirte_test');
6.删除一条表语句
mysql> delete from yang where id=4;
实现结果: 可以看出Mysql的读写分离,目前所有的写操作都在Master数据库服务器上,所有的写操作都在Slave1和Slave2 数据库服务器上。从而实现了MySql读写分离,负载均衡。
备注:i/o线程的端口号是没办法锁定的,若是要开启iptables的话、就在Cilent执行insert到Master上,然后在Slave 用tcpdum抓Master的数据包,记录下来tcp端口号,添加iptables ACCEPT即可。
重启后端口号会跟这变化,这时候需要根据tcpdump抓到的包分析来修改iptables的策略~ Amoeba的iptables上只开启Java的8066端口号就OK..