urllib库的使用
Python2中有urllib和urllib2两个内置库实现请求的发送;Python3中则没有urllib2,统一为了内置的urllib库;
API:https://docs.python.org/3/library/urllib.html
#该库提供了相关函数和类,基于身份认证、摘要身份验证、重定向、cookie的操作,实现完成(HTTP/1.1协议)的URL访问;
该库主要包含以下四个模块:
request,用于模拟浏览器发送请求;
error,异常处理模块;
parse,主要提供了对URL处理的方法,例如:拆分、转码、解析合并等;
robotparser,用于识别网站的robots.txt文件,判断哪些网站可以爬取、哪些不可以,一般不使用;
1、request模块:
(1)方法:urlopen
def urlopen(url, data=None, timeout=socket._GLOBAL_DEFAULT_TIMEOUT,
*, cafile=None, capath=None, cadefault=False, context=None):
urlopen用于打开一个url,返回结果为HTTPResponse类型对象;
参数:
data可选参数,该字段可以是字节流编码格式,即bytes类型,则需要通过bytes()方法转化; 如果该参数不为空,表示该请求方式不再是GET请求方式,则是PPOST方式提交请求;
timeout用于设置超时时间,单位秒,如果请求后超过该时间依然没有响应,则抛出异常;如果该参数未设置,那么会使用默认时间;他的支持仅是HTTP、HTTPS、FTP请求;
其他参数:
context,则必须是ssl.SSLContext类型,用于指定SSL设置;cafile和capath分别指定CA证书和它的路径,在HTTPS连接是会使用;
cadefault参数忽略;
例如:通过访问http://httpbin.org测试http请求(该站点可以测试http请求)
 1 #urllib(发送请求)
 2 #注意:python3以后将urlib2和urllib整合为了urllib,其中urllib的request不能直接用,需要urllib.request引入
 3 import urllib
 4 import urllib.parse
 5 import urllib.request
 6
 7 data=bytes(urllib.parse.urlencode({'word':'hello'}),encoding='utf-8')
 8 response=urllib.request.urlopen('http://httpbin.org/post',data=data,timeout=1)#该地址可提供HTTP请求测试
 9 print(response.read().decode('utf-8'))
10 print(type(response))#返回一个http.client.HTTPResponse对象
11 print(response.status)#状态码
12 print(response.getheaders())#相应头头信息
13 print(response.getheader('Server'))#获取头信息中的Server服务名
以上urlopen方法设置超时时间为1秒,如果超时则抛出urllib.error.URLError: <urlopen error timed out>异常;
(2)类:Request
class urllib.request.Request(url, data=None, headers={}, origin_req_host=None, unverifiable=False, method=None)
urlopen方法可以实现最基本的请求发起,但是简单的几个参数无法满足一个完整的请求;如果加入Headers等信息,则需要使用Request类来构建;
使用该类,依然使用urlopen方法来发起请求,但是urlopen方法不再是一个字符串url,而是Request类型的字段;
如下:
1 #Request来构建请求
2
3 import urllib
4 import urllib.parse
5 import urllib.request
6 request=urllib.request.Request('http://python.org')
7 response=urllib.request.urlopen(request)
8 print(response.read().decode('utf-8'))
参数:
url必选,其他可选参数
data,如果传入该参数,必须是bytes(字节流)类型,如果他是字典,则可以通过urllib.parse 中urlencode()进行编码
headers参数是一个字典,他是请求头,在构建请求时可通过headers参数直接构建或者使用add_header()方法单独添加;
添加请求头信息最常用方法是通过修改User-Agent伪装浏览器,默认User-Agent是Python-urllib;
例如如果我们模拟发送请求时是使用的火狐浏览器,则可以设置
User-Agent
Mozilla/5.0 (Windows NT 6.1; W…) Gecko/20100101 Firefox/64.0
例如:
 1 #Request来构建请求
 2
 3 import urllib
 4 import urllib.parse
 5 import urllib.request
 6
 7 headers={"User-Agent":'Mozilla/5.0 (Windows NT 6.1; Win64; x64; rv:64.0) Gecko/20100101 Firefox/64.0',
 8                     #注意:"Mozilla/5.0 (Windows NT 6.1; W…) Gecko/20100101 Firefox/64.0",这里我复制了火狐debug下url的请求信息,
 9                     # W... 没有显示全,因此粘贴过来少内容,报错:UnicodeEncodeError: 'latin-1' codec can't encode character 'u2026' in position。。。
10           "Host":'httpbin.org'
11          }
12 data=bytes(urllib.parse.urlencode({'word':'Help'}),encoding='utf-8')
13 request=urllib.request.Request('http://httpbin.org/post',headers=headers,data=data )
14 #也可以通过add_header添加请求头信息
15 request.add_header("Content-Type","application/x-www-form-urlencoded")
16
17 response=urllib.request.urlopen(request)
18 print(response.read().decode('utf-8'))
19
20
21
(3)类:BaseHandler
用于一些更高级操作,例如Cookies、代理操作等;
子类: HTTPDefaultErrorHandler 处理HTTP相应错误,抛出HTTPError异常
HTTPREdirectHandler 处理重定向
HTTPCookieProcessor处理Cookie
ProxyHandler设置代理,默认代理为空
HTTPPasswordMgr 用于管理密码,他维护了用户名和密码的表
HTTPBasicAuthHandler用于管理可认证,如果一个连接打开时需要认证,则他可以解决认证问题;
OpenerDirector,简称Opener,之前的urlopen实际就是urllib提供的一个简单的Opener;
下面则通过Handler来构建Opener:
例如:安装tomcat后访问tomcat首页面,http://localhost:8080/manager/html此时需要验证,

此时可以进行下面代码来验证,通过显示源码:
#Handler来构建Opener(做个登录验证)

import urllib
import urllib.parse
import urllib.request
from urllib.request import HTTPBasicAuthHandler,HTTPPasswordMgrWithDefaultRealm,build_opener
from urllib.error import  URLError
username="admin"
pwd="admin"
url="http://localhost:8080/manager/html"
p=HTTPPasswordMgrWithDefaultRealm()
p.add_password(None,url,username,pwd)
authHandler=HTTPBasicAuthHandler(p)
opener=build_opener(authHandler)
result=opener.open(url)
html=result.read().decode('utf-8')
print(html)
如果设置代理,则如下(未验证下面代码):
proxyhandler=ProxyHandler({
'http':'http://127.0.0.1:999',
'https':'https://127.0.0.1:888'
})
opener=build_opener(proxyhandler)
try:
response=opener.open('https://www.baidu.com')
print(response.read().decode('utf-8'))
except URLError as e:
print(e.reason)
(4)获取请求后的Cookies
可以通过声明一个CookieJar对象,利用HTTPCookieProcessor构建一个Handler,然后通过build_opener()方法创建opener,执行open方法即可;
保存Cookies文件,则可以通过MozillaCookieJar或者LWPCookieJar 对象实现;
例如:
 1 #获取网站的Cookies
 2
 3 import urllib
 4 import urllib.parse
 5 import urllib.request
 6 from urllib.request import HTTPBasicAuthHandler,HTTPPasswordMgrWithDefaultRealm,build_opener
 7 from urllib.error import  URLError
 8 import http.cookiejar
 9 cookie=http.cookiejar.CookieJar()
10 handler=urllib.request.HTTPCookieProcessor(cookie)
11 opener=urllib.request.build_opener(handler)
12 response=opener.open("http://www.baidu.com")
13 for item in cookie:
14      print(item.name+":"+item.value)
15
16 #输出文本格式,则使用MozillaCookieJar
17 filename='cookie.txt'
18 cookie1=http.cookiejar.MozillaCookieJar(filename)
19 handler1=urllib.request.HTTPCookieProcessor(cookie1)
20 opener1=urllib.request.build_opener(handler1)
21 response1=opener1.open("http://www.baidu.com")
22 cookie1.save(ignore_discard=True,ignore_expires=True)
23
24 #LWPCookieJar也可以保存Cookies,但是根式与上面不同;会保存为libwww-perl(LWP)格式的Cookies文件
25 filename2='cookie2.txt'
26 cookie2=http.cookiejar.LWPCookieJar(filename2)
27 handler2=urllib.request.HTTPCookieProcessor(cookie2)
28 opener2=urllib.request.build_opener(handler2)
29 response2=opener2.open("http://www.baidu.com")
30 cookie2.save(ignore_discard=True,ignore_expires=True)
31
如何利用取保存了cookies的文件数据?
如下:
 1 #获取网站的Cookies
 2
 3 import urllib
 4 import urllib.parse
 5 import urllib.request
 6 from urllib.request import HTTPBasicAuthHandler,HTTPPasswordMgrWithDefaultRealm,build_opener
 7 from urllib.error import  URLError
 8 import http.cookiejar
 9 cookie=http.cookiejar.CookieJar()
10 handler=urllib.request.HTTPCookieProcessor(cookie)
11 opener=urllib.request.build_opener(handler)
12 response=opener.open("http://www.baidu.com")
13 for item in cookie:
14      print(item.name+":"+item.value)
15
16 #输出文本格式,则使用MozillaCookieJar
17 filename='cookie.txt'
18 cookie1=http.cookiejar.MozillaCookieJar(filename)
19 handler1=urllib.request.HTTPCookieProcessor(cookie1)
20 opener1=urllib.request.build_opener(handler1)
21 response1=opener1.open("http://www.baidu.com")
22 cookie1.save(ignore_discard=True,ignore_expires=True)
23
24 #LWPCookieJar也可以保存Cookies,但是根式与上面不同;会保存为libwww-perl(LWP)格式的Cookies文件
25 filename2='cookie2.txt'
26 cookie2=http.cookiejar.LWPCookieJar(filename2)
27 handler2=urllib.request.HTTPCookieProcessor(cookie2)
28 opener2=urllib.request.build_opener(handler2)
29 response2=opener2.open("http://www.baidu.com")
30 cookie2.save(ignore_discard=True,ignore_expires=True)
31
32 #加载cookie.txt,访问百度来搜索数据
33 cookie = http.cookiejar. LWPCookieJar()
34 cookie.load('cookie2.txt',ignore_discard=True, ignore_expires=True)
35 handler = urllib.request.HTTPCookieProcessor(cookie)
36 opener = urllib .request.build_opener(handler)
37 response= opener.open('http://www.baidu.com/baidu?word=Python')
38 print (response. read(). decode ('utf-8'))
2、关于异常处理
urllib的error模块定义了又request模块产生的异常。
URLError类:
URLError类是来自于urllib库的error模块,继承自OSError类,是error异常类的基类,由request模块产生的异常都可以捕获处理到;
它具有一个属性reason,返回错误的消息;
例如:访问了一个网站不存在的页面;
 1 #关于异常URLError
 2
 3 import urllib
 4 import urllib.parse
 5 import urllib.request
 6 from urllib.request import HTTPBasicAuthHandler,HTTPPasswordMgrWithDefaultRealm,build_opener
 7 from urllib.error import  URLError
 8 import http.cookiejar
 9
10
11 try:
12        response=urllib.request.urlopen("https://i.cnblogs.com/a.html")
13 except URLError as e:
14        print(e.reason)
结果为Not Found;
HTTPError类:
他是URLError的子类,专门用于处理Http请求错误,例如认证请求失败
code:返回HTTP状态码,例如:404,500等状态码
reason,返回错误信息
headers:返回请求头
例如:
1 try:
2      response=urllib.request.urlopen("https://i.cnblogs.com/a.html")
3 except  HTTPError as e:
4      print(e.reason,e.code,e.headers)
两者父子关系,我们也可以先捕子类型错误,再补货父类类型错误;
例如:
1 try:
2      response=urllib.request.urlopen("https://i.cnblogs.com/a.html")
3 except  HTTPError as e:
4      print(e.reason,e.code,e.headers,sep='
')
5 except URLError as e:
6      print(e.reason)
7 else:
8      print("无异常")
有时候异常信息是一个对象,例如:
1 try:
2      response = urllib.request.urlopen("https://www.baidu.com",timeout=0.01)
3 except  HTTPError as e:
4      print(type(e.reason))
5 except URLError as e: #请求超时,此时被URLError异常捕获
6      print(type(e.reason))#<class 'socket.timeout'>是一个异常对象
7 else:
8      print("无异常")
再次修改上面
的程序,通过isinstance来判断是那种对象,来给具体异常信息描述;
#前面import略
import socket
try:
     response = urllib.request.urlopen("https://www.baidu.com",timeout=0.01)
except  HTTPError as e:
     print(type(e.reason))
except URLError as e: #请求超时,此时被URLError异常捕获
     print(type(e.reason))#<class 'socket.timeout'>是一个异常对象
     if isinstance(e.reason,socket.timeout):
          print("Time Out")
else:
     print("无异常")
3.链接解析:
urllib中的parse模块提供了chuliURL的标准接口,例如,url的各部分抽取,合并以及连接转换等;支持一下协议的URL处理:
file、ftp、gopher、hdl、http/https、imap、mailto、mms、news、nntp、prospero、rsync、rtsp、rtspu、sftp、sip、snews、svn、svn+ssh、
telnet和wais;
常用方法如下:
①urlparse()提供了url的识别和分段;返回元组对象;
例如:(allow_fragments=False 可以忽略fragment))
 1 #关于异常URLparse
 2
 3 import urllib
 4 from urllib.parse import  urlparse
 5 result=urlparse("http://www.baidu.com/index.html;user?id=5#comment")
 6 print(type(result),result)
 7 #<class 'urllib.parse.ParseResult'> ParseResult(scheme='http', netloc='www.baidu.com', path='/index.html', params='user', query='id=5', fragment='comment')
 8 # ://前是scheme,代表协议; 第一个/前面是netloc,即域名;后面是path,即访问路径;分号后,是params,代表参数;?号后表示查询条件;#号后是锚点用户直接定位到当前页某个位置
 9 #即根据scheme://netloc/path;params?query#fragment 格式进行的拆分;
10
11 #例如:url没有scheme,可以通过参数设置;前提是url没有写scheme,否则scheme参数设置失效

12 result=urlparse("www.baidu.com/index.html;user?id=5#comment",scheme="http")
13 print(type(result),result)
②unurlparse()及将一个列表中的元素,组成为一个完整url
前提是该方法参数必须是6个参数,否则报错;
例如:data=['http','www.baidu.com','/index.html', 'user', 'id=5', 'comment']
unurlparse(data) 该结果则为http://www.baidu.com/index.html;user?id=5#comment
③urlsplit()将一个一个url拆分;unsplit()与之相反;
例如:
1 r=urlsplit("http://www.baidu.com/index.html;user?id=5#comment")#不包含params,注意
2 print( (r))
3 print( r[0],r[1],r[2],r[3],r[4])
④urljoin() 连接多个url,将他们合并;
例如:
rom urllib.parse import urljoin
print(urljoin(' http: I lwww. baidu. com', 'FAQ. html ’))
print(urljoin('http://www.baidu.com ', ’ https://cuiqingcai . com/FAQ . html ’))
结果为:
http://www.baidu.com/FAQ.html
https://cuiqingcai.com/FAQ.html
⑤urlencode()
例如:
from urllib .parse import urlencode
params = {
’ name' 'JONES' ,
age : 30
}
url='http://www.baidu.com?'+urlencode(params)
print(url)
结果为:
http://www.baidu.com?name=JONES&age=30
⑥parse_qs()
urlencode相当于序列化操作,而parse_qs()则相当于反序列化操作;
例如:
from urllib.parse import parse qs
query= 'name=germey&age=22'
print(parse_qs(query))
结果:
{’ name': [’ germey ’],’ age ' : [ ’ 22 ' ]}
⑦、quote()
该方法讲内容转为URL编码的格式。
例如:
keyword=’张三’
url =’ https://www.baidu.com/s?wd =’+ quote(keyword)
print(url)
结果为:
https://www.baidu.com/s?wd=%E5%A3%81%E7%BA%B8
⑧、unquote() 与上面quote()方法操作相反效果;
4、robotparser
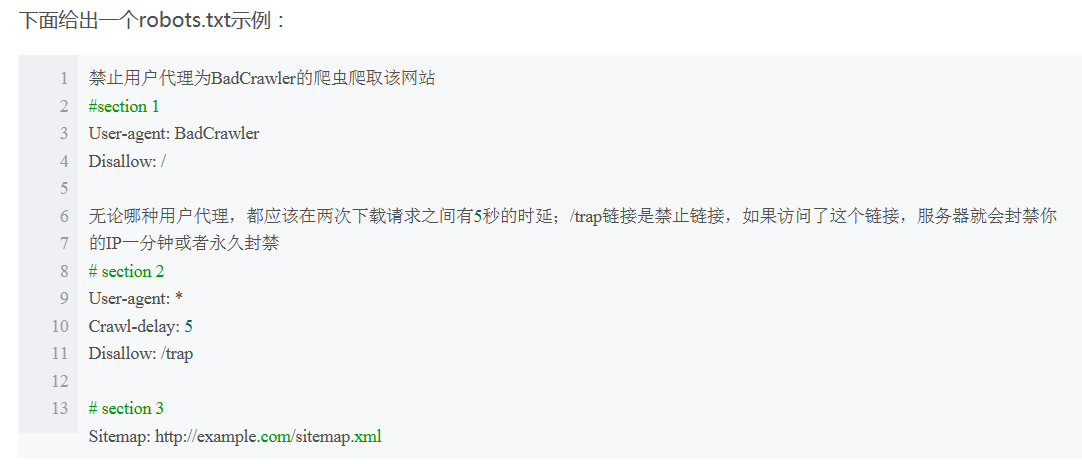
即Python中用于解析robots.txt文件的模块, Robots是一种协议,被叫做爬虫协议、机器人协议,他全名叫做网络爬虫排除标准(Robots Exclusion Protocol)
用于告诉爬虫和搜索引擎哪些页面可以抓取,那些不可以;一般网站项目根目录中会有一个robots.txt文件,来设置那些不允许被抓取;
例如:该文件中如果
User-agent: *
Disallow: I
Allow: /public/
则表示对所有爬虫只允许抓取public目录;
爬虫一般会有名字,例如百度(搜索引擎会有蜘蛛来爬取网页)的蜘蛛名字为:BaiduSpider,其他网站不说了这里;
例如:访问xx网站
 1 import urllib.robotparser
 2
 3 rp = urllib.robotparser.RobotFileParser()
 4 rp.set_url('http://example.com/robots.txt')
 5 rp.read()
 6 url = 'http://example.com'
 7 user_agent = 'BadCrawler'
 8 f=rp.can_fetch(user_agent, url)#是否允许指定的用户代理访问网页
 9 print(f)
10 user_agent = 'GoodCrawler'
11 n=rp.can_fetch(user_agent, url)
12 print(n)
