本人虽然自学最开始是ui自动化,但是后面实际项目中并没有用到;
年底想换工作,所以还是捡起来,计划本周内完成复习,并把记录下来(原文章删了,当前日期为2019.11.18)。
一、环境准备
1、安装selenium:pip install selenium
2、下载驱动,找到浏览器对应的driver并下载
Chrome版本对应关系:https://blog.csdn.net/yoyocat915/article/details/80580066
Chrome驱动下载:http://npm.taobao.org/mirrors/chromedriver
解压将驱动放到python安装目录下,因为该目录我设置了环境变量
二、实用技能
1、隐式等待10秒:dr.implicitly_wait(10)
2、注意动态属性不能定位,最好用相对位置来定位
3、登录验证码的情况,用万能码
4、iframe (frame需要一级一级逐级进入)
1>切换到frame switch_to.frame
2>切换回主文档 switch_to.default_content()
3>返回上一级文档 driver.switch_to.parent_frame()
5、窗口切换
from selenium import webdriver

dr=webdriver.Chrome()
dr.get('https://www.baidu.com/')
dr.implicitly_wait(10)
Q=dr.find_element_by_css_selector("[title='点击一下,了解更多']").click()

#所有页面
# all_handle=dr.window_handles
current_handle=dr.current_window_handle#当前页面
dr.switch_to.window(current_handle)

A=dr.find_element_by_id('kw').send_keys('测试')
6、元素可见、存在、点击、被选中判断(涉及到显示等待)
driver.find_element_by_id('kw').is_displayed() #查看元素是否可见
参考:https://blog.csdn.net/weixin_40894921/article/details/88367716
7、截屏
#可以通过时间来区分命名,不然每运行一次会覆盖
#下面2种截图方式都可以
screenshot1=dr.get_screenshot_as_file(".\文件\screenshot.png")
screenshot2=dr.save_screenshot(".\文件\screenshot2.png")
8、JS操作
相关点:有些元素不可见,可以通过执行js操作变为可见
参考:https://blog.csdn.net/yinlin330/article/details/82625454
9、弹窗、文件上传
#上传文件
send_keys('文件路径')

alert=dr.switch_to_alert()#获取alert对话框
print(alert.text)#获取弹窗内容

#警告对话框,只能选择接受弹窗
alert.accept()

#确定、取消的弹窗
alert.accept()#确定
alert.dismiss()#取消

#文字输入的弹窗
alert=dr.switch_to_alert()
alert.send_keys('1')
alert.accept()
三、元素定位
1、普通方式
1> id定位 driver.find_element_by_id("")
2> name定位 driver.find_element_by_name("")
3> class定位 driver.find_element_by_class_name("")
4> tag定位 driver.find_element_by_tag_name("")
5> link定位 driver.find_element_by_link_text("")
6> partial link定位 driver.find_element_by_partial_link_text("")
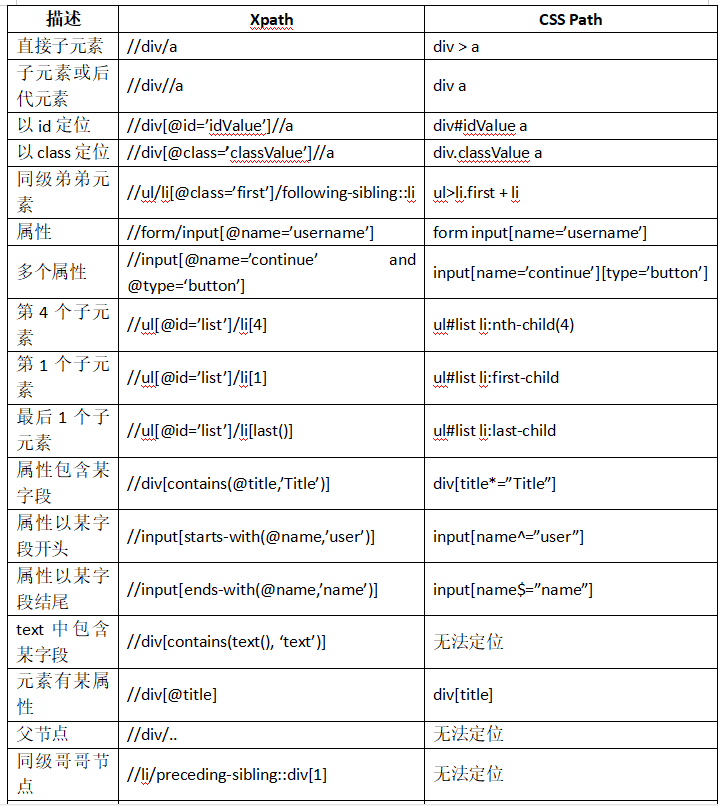
2、xpath方式(分绝对路径和相对路径,但相对路径比较适用,另外浏览器copy xpath可以作为一个参考)
3、css方式
from selenium import webdriver
from selenium.webdriver.common.action_chains import ActionChains
import time

dr=webdriver.Chrome()
dr.get('https://email.163.com/')
dr.implicitly_wait(10)

iframe=dr.find_element_by_xpath("//div[@class='urs-163-area']/iframe")
dr.switch_to.frame(iframe)

user=dr.find_element_by_xpath("//input[contains(@data-loginname,'loginEmail')]")
user.send_keys('帐号')

pwd=dr.find_element_by_xpath("//input[@placeholder='输入密码']")
pwd.send_keys('密码')

login=dr.find_element_by_css_selector("#dologin")
login.click()
#鼠标悬停并单击
action=ActionChains(dr)
q=dr.find_element_by_xpath("//*[@id='_mail_component_32_32']/span[@title='收件箱']")
action.move_to_element(q).click().perform()

#悬停
# mouseshow=dr.find_element_by_link_text("仪表盘")
# ActionChains(dr).move_to_element(mouseshow).perform()
# time.sleep(5)
#双击
# mousedc=dr.find_element_by_id("field")
# ActionChains(dr).double_click(mousedc).perform()
# time.sleep(5)
#右击
# ActionChains(dr).context_click(mousedc).perform()
以上是163邮箱登录,涉及到了隐式等待、iframe、xpath定位、css定位、鼠标悬停等内容