数据库开发-pymysql详解
作者:尹正杰
版权声明:原创作品,谢绝转载!否则将追究法律责任。
一.Python支持的MySQL驱动
1>.什么是驱动
  与MySQL通信就是典型的CS模式。Server就是服务器端,使用客户端先建立连接,数据库编程时,这个客户端变成了程序。

  MySQL基于TCP协议之上开发,传输的数据必须遵循MySQL的协议。

  封装好MySQL协议的包,习惯上称为驱动程序。
2>.MySQLdb
最有名的库。对MySQL的Client封装实现,支持Python 2,不更新了,不支持Python3
3>.mysqlclient
在MySQLdb的基础上,增加了对Python 3的支持
4>.MySQL官方Connector
  博主推荐阅读:
    https://dev.mysql.com/downloads/connector/
5>.pymysql
  语法兼容MySQLdb,使用纯Python写的MySQL客户端库,支持Python 3

  CPython 2.7 、3.4+

  MySQL 5.5+、MariaDB 5.5+
二.pymysql的使用
1>.安装pymysql驱动
  pip install pymysql      #安装支持mysql的驱动

  pip install simplejson    #安装解析json格式的包
2>.连接数据库


{
  "host": "172.30.1.101",
  "user": "jason",
  "password": "yinzhengjie",
  "database": "test",
  "port": 3306
}


以上参数相关说明:
  host:
    主机

  user:
    用户名

  password:
    密码

  database:
    数据库

  port:
    端口
 1 #!/usr/bin/env python
 2 #_*_conding:utf-8_*_
 3 #@author :yinzhengjie
 4 #blog:http://www.cnblogs.com/yinzhengjie
 5
 6 import pymysql
 7 import simplejson
 8
 9 conf = simplejson.load(open("conn.json"))
10 print(conf)
11
12 conn = None
13
14 try:
15     conn = pymysql.connect(**conf)
16     print(type(conn),conn)
17     """
18         Connection.ping(self, reconnect=True)方法,测试数据库服务器是否活着。
19         reconnect=True:
20             表示断开与服务器连接会进行重连。
21         reconnect=False:
22             ping不通或连接关闭抛出异常。
23     """
24     conn.ping(False)
25 finally:
26     if conn:
27         conn.close()
{'host': '172.30.1.101', 'user': 'jason', 'password': 'yinzhengjie', 'database': 'test', 'port': 3306}
<class 'pymysql.connections.Connection'> <pymysql.connections.Connection object at 0x1030037f0>
3>.插入数据
[root@node101.yinzhengjie.org.cn ~]# mysql
Welcome to the MariaDB monitor.  Commands end with ; or g.
Your MariaDB connection id is 19
Server version: 5.5.64-MariaDB MariaDB Server

Copyright (c) 2000, 2018, Oracle, MariaDB Corporation Ab and others.

Type 'help;' or 'h' for help. Type 'c' to clear the current input statement.

MariaDB [(none)]> CREATE DATABASE IF NOT EXISTS school;
Query OK, 1 row affected (0.00 sec)

MariaDB [(none)]> USE school
Database changed
MariaDB [school]>
MariaDB [school]> CREATE TABLE student(id INT(11) NOT NULL AUTO_INCREMENT,name VARCHAR(30) NOT NULL ,age INT(11) DEFAULT NULL ,PRIMARY KEY(id))ENGINE=InnoDB DEFAULT CHARSET=utf8mb4;
Query OK, 0 rows affected (0.02 sec)

MariaDB [school]>
MariaDB [school]> SHOW TABLES;
+------------------+
| Tables_in_school |
+------------------+
| student          |
+------------------+
1 row in set (0.00 sec)

MariaDB [school]>
MariaDB [school]> DESC student;
+-------+-------------+------+-----+---------+----------------+
| Field | Type        | Null | Key | Default | Extra          |
+-------+-------------+------+-----+---------+----------------+
| id    | int(11)     | NO   | PRI | NULL    | auto_increment |
| name  | varchar(30) | NO   |     | NULL    |                |
| age   | int(11)     | YES  |     | NULL    |                |
+-------+-------------+------+-----+---------+----------------+
3 rows in set (0.01 sec)

MariaDB [school]>
MariaDB [school]> SHOW DATABASES;
+--------------------+
| Database |
+--------------------+
| information_schema |
| mysql |
| performance_schema |
| school |
| test |
+--------------------+
5 rows in set (0.00 sec)

MariaDB [school]>
 1 #!/usr/bin/env python
 2 #_*_conding:utf-8_*_
 3 #@author :yinzhengjie
 4 #blog:http://www.cnblogs.com/yinzhengjie
 5
 6 import pymysql
 7 import simplejson
 8
 9 with open("conn.json") as f:
10     conf = simplejson.load(f)
11
12 print(conf)
13
14 conn = None
15 cursor = None
16
17 try:
18     conn = pymysql.connect(**conf)
19     print(type(conn),conn)
20     """
21         操作数据库,必须使用游标,需要先获取一个游标对象。
22         Connection.cursor(cursor=None) 方法返回一个新的游标对象。 连接没有关闭前,游标对象可以反复使用。
23         cursor参数,可以指定一个Cursor类。如果为None,则使用默认Cursor类。
24     """
25     cursor = conn.cursor()
26
27     for i in range(1,11):
28         sql = "INSERT INTO student (name,age) values ('jason{}',{});".format(i,20+i)
29         #Cursor类的实例,使用execute()方法,执行SQL语句,成功返回影响的行数。
30         row = cursor.execute(sql)
31         print("第{}次执行影响了{}行".format(i,row))
32
33     conn.commit()       #由于在connect类中已经将"autocommit"设置为False,因此为嘛需要手动提交事物。
34 except Exception as e:
35     print(e)
36     conn.rollback()     #如果出现异常我们可以将异常记录到本地文件我这里为了方便演示就直接打印在当前终端,千万别忘记显式将事物回滚。
37 finally:
38     if cursor:
39         cursor.close()
40     if conn:
41         conn.close()
{'host': '172.30.1.101', 'user': 'jason', 'password': 'yinzhengjie', 'database': 'school', 'port': 3306}
<class 'pymysql.connections.Connection'> <pymysql.connections.Connection object at 0x10300b860>
第1次执行影响了1行
第2次执行影响了1行
第3次执行影响了1行
第4次执行影响了1行
第5次执行影响了1行
第6次执行影响了1行
第7次执行影响了1行
第8次执行影响了1行
第9次执行影响了1行
第10次执行影响了1行
4>.查询数据
 1 #!/usr/bin/env python
 2 #_*_conding:utf-8_*_
 3 #@author :yinzhengjie
 4 #blog:http://www.cnblogs.com/yinzhengjie
 5
 6 import pymysql
 7 import simplejson
 8
 9 with open("conn.json") as f:
10     conf = simplejson.load(f)
11
12 print(conf)
13
14 conn = None
15 cursor = None
16
17 try:
18     conn = pymysql.connect(**conf)
19     cursor = conn.cursor()
20     sql = "SELECT * FROM student;"
21     rows = cursor.execute(sql)
22
23     """
24     Cursor类的获取查询结果集的方法有fetchone()、fetchmany(size=None)、fetchall()。
25         fetchone()
26             获取结果集的下一行
27         fetchmany(size=None)
28             size指定返回的行数的行,None则返回空元组
29         fetchall()
30             返回剩余所有行,如果走到末尾,就返回空元组,否则返回一个元组,其元素是每一行的记录封装的一个元组
31         cursor.rownumber
32             返回当前行号。可以修改,支持负数
33         cursor.rowcount
34             返回的总行数
35
36     注意:fetch操作的是结果集,结果集是保存在客户端的,也就是说fetch的时候,查询已经结束了。
37     """
38     print(cursor.fetchone())
39     print(cursor.fetchone())
40     print(cursor.rownumber,cursor.rowcount)
41     print("{0} 1 我是分割线 {0}".format("*" * 15))
42     print(cursor.fetchmany(2))
43     print(cursor.rownumber, cursor.rowcount)
44     print("{0} 2 我是分割线 {0}".format("*" * 15))
45     print(cursor.fetchmany(2))
46     print(cursor.rownumber, cursor.rowcount)
47     print("{0} 3 我是分割线 {0}".format("*" * 15))
48     print(cursor.fetchall())
49     print(cursor.rownumber, cursor.rowcount)
50
51     for x in cursor.fetchall():
52         print(x,"------")
53     cursor.rownumber = 0        #正负都支持
54
55     for x in cursor.fetchall():
56         print(x,"======")
57 finally:
58     if cursor:
59         cursor.close()
60     if conn:
61         conn.close()
{'host': '172.30.1.101', 'user': 'jason', 'password': 'yinzhengjie', 'database': 'school', 'port': 3306}
(1, 'jason1', 21)
(2, 'jason2', 22)
2 10
*************** 1 我是分割线 ***************
((3, 'jason3', 23), (4, 'jason4', 24))
4 10
*************** 2 我是分割线 ***************
((5, 'jason5', 25), (6, 'jason6', 26))
6 10
*************** 3 我是分割线 ***************
((7, 'jason7', 27), (8, 'jason8', 28), (9, 'jason9', 29), (10, 'jason10', 30))
10 10
(1, 'jason1', 21) ======
(2, 'jason2', 22) ======
(3, 'jason3', 23) ======
(4, 'jason4', 24) ======
(5, 'jason5', 25) ======
(6, 'jason6', 26) ======
(7, 'jason7', 27) ======
(8, 'jason8', 28) ======
(9, 'jason9', 29) ======
(10, 'jason10', 30) ======
5>.带有列名代查询(需要指定cursor参数)
 1 #!/usr/bin/env python
 2 #_*_conding:utf-8_*_
 3 #@author :yinzhengjie
 4 #blog:http://www.cnblogs.com/yinzhengjie
 5
 6 import pymysql
 7 import simplejson
 8
 9 with open("conn.json") as f:
10     conf = simplejson.load(f)
11
12 print(conf)
13
14 conn = None
15 cursor = None
16
17 try:
18     conn = pymysql.connect(**conf)
19     #可以指定一个Cursor类用来显示列名,Cursor类有一个Mixin的子类DictCursor,
20     cursor = conn.cursor(pymysql.cursors.DictCursor)
21     sql = "SELECT * FROM student;"
22     rows = cursor.execute(sql)
23
24     """
25         返回一行,是一个字典。
26         返回多行,放在列表中,元素是字典,代表一行。
27     """
28     for x in cursor.fetchall():
29         print(x)
30     cursor.rownumber = 0        #正负都支持
31
32 finally:
33     if cursor:
34         cursor.close()
35     if conn:
36         conn.close()
{'host': '172.30.1.101', 'user': 'jason', 'password': 'yinzhengjie', 'database': 'school', 'port': 3306}
{'id': 1, 'name': 'jason1', 'age': 21}
{'id': 2, 'name': 'jason2', 'age': 22}
{'id': 3, 'name': 'jason3', 'age': 23}
{'id': 4, 'name': 'jason4', 'age': 24}
{'id': 5, 'name': 'jason5', 'age': 25}
{'id': 6, 'name': 'jason6', 'age': 26}
{'id': 7, 'name': 'jason7', 'age': 27}
{'id': 8, 'name': 'jason8', 'age': 28}
{'id': 9, 'name': 'jason9', 'age': 29}
{'id': 10, 'name': 'jason10', 'age': 30}
三.SQL注入攻击
1>.查询student表中id为8的行数据
 1 #!/usr/bin/env python
 2 #_*_conding:utf-8_*_
 3 #@author :yinzhengjie
 4 #blog:http://www.cnblogs.com/yinzhengjie
 5
 6 import pymysql
 7 import simplejson
 8
 9 with open("conn.json") as f:
10     conf = simplejson.load(f)
11
12 print(conf)
13
14 conn = None
15 cursor = None
16
17 try:
18     conn = pymysql.connect(**conf)
19     #可以指定一个Cursor类用来显示列名,Cursor类有一个Mixin的子类DictCursor,
20     cursor = conn.cursor(pymysql.cursors.DictCursor)
21
22     userid = 8
23     sql = "SELECT * FROM student WHERE id = {};".format(userid)
24     rows = cursor.execute(sql)
25
26     for x in cursor.fetchall():
27         print(x)
28
29
30 finally:
31     if cursor:
32         cursor.close()
33     if conn:
34         conn.close()
{'host': '172.30.1.101', 'user': 'jason', 'password': 'yinzhengjie', 'database': 'school', 'port': 3306}
{'id': 8, 'name': 'jason8', 'age': 28}
2>.模拟客户端SQL注入攻击
 1 #!/usr/bin/env python
 2 #_*_conding:utf-8_*_
 3 #@author :yinzhengjie
 4 #blog:http://www.cnblogs.com/yinzhengjie
 5
 6 import pymysql
 7 import simplejson
 8
 9 with open("conn.json") as f:
10     conf = simplejson.load(f)
11
12 print(conf)
13
14 conn = None
15 cursor = None
16
17 try:
18     conn = pymysql.connect(**conf)
19     #可以指定一个Cursor类用来显示列名,Cursor类有一个Mixin的子类DictCursor,
20     cursor = conn.cursor(pymysql.cursors.DictCursor)
21
22     """
23     SQL注入攻击:
24         猜测后台数据库的查询语句使用拼接字符串等方式,从而经过设计为服务端传参,令其拼接出特殊字符串的SQL语句,返回攻击者想要的结果。
25         永远不要相信客户端传来的数据是规范且安全的!!!
26     """
27     userid = "8 or 3 > 2"       #本来想查询id为8的行数据,现在用来模拟SQL注入。
28     sql = "SELECT * FROM student WHERE id = {};".format(userid)
29     rows = cursor.execute(sql)
30
31     #运行的结果竟然是返回了全部数据。
32     for x in cursor.fetchall():
33         print(x)
34
35
36 finally:
37     if cursor:
38         cursor.close()
39     if conn:
40         conn.close()
{'host': '172.30.1.101', 'user': 'jason', 'password': 'yinzhengjie', 'database': 'school', 'port': 3306}
{'id': 1, 'name': 'jason1', 'age': 21}
{'id': 2, 'name': 'jason2', 'age': 22}
{'id': 3, 'name': 'jason3', 'age': 23}
{'id': 4, 'name': 'jason4', 'age': 24}
{'id': 5, 'name': 'jason5', 'age': 25}
{'id': 6, 'name': 'jason6', 'age': 26}
{'id': 7, 'name': 'jason7', 'age': 27}
{'id': 8, 'name': 'jason8', 'age': 28}
{'id': 9, 'name': 'jason9', 'age': 29}
{'id': 10, 'name': 'jason10', 'age': 30}
3>.如何解决SQL注入攻击?(参数化查询,可以有效防止注入攻击,并提高查询的效率。)
 1 #!/usr/bin/env python
 2 #_*_conding:utf-8_*_
 3 #@author :yinzhengjie
 4 #blog:http://www.cnblogs.com/yinzhengjie
 5
 6 import pymysql
 7 import simplejson
 8
 9 with open("conn.json") as f:
10     conf = simplejson.load(f)
11
12 print(conf)
13
14 conn = None
15 cursor = None
16
17 try:
18     conn = pymysql.connect(**conf)
19     #可以指定一个Cursor类用来显示列名,Cursor类有一个Mixin的子类DictCursor,
20     cursor = conn.cursor(pymysql.cursors.DictCursor)
21
22     userid = "8 or 3 > 2"
23     sql = "SELECT * FROM student WHERE id = %s;"
24
25     """
26     Cursor.execute(query, args=None) args,
27         必须是元组、列表或字典。如果查询字符串使用%(name)s,就必须使用字典。
28     """
29     rows = cursor.execute(sql,userid)
30     print(cursor.fetchall())
31
32     print("{0} 我是分割线 {0}".format("*" * 15))
33
34     sql = "SELECT * FROM student WHERE name LIKE %(name)s and age > %(age)s;"   #仅测试用,生产环境不推荐使用like语句。
35
36     cursor.execute(sql,{"name":"jason%","age":27})
37     print(cursor.fetchall())
38
39 finally:
40     if cursor:
41         cursor.close()
42     if conn:
43         conn.close()
{'host': '172.30.1.101', 'user': 'jason', 'password': 'yinzhengjie', 'database': 'school', 'port': 3306}
/yinzhengjie/python/devops/venv/lib/python3.7/site-packages/pymysql/cursors.py:329: Warning: (1292, "Truncated incorrect DOUBLE value: '8 or 3 > 2'")
  self._do_get_result()
[{'id': 8, 'name': 'jason8', 'age': 28}]
*************** 我是分割线 ***************
[{'id': 8, 'name': 'jason8', 'age': 28}, {'id': 9, 'name': 'jason9', 'age': 29}, {'id': 10, 'name': 'jason10', 'age': 30}]
4>.参数化查询为什么提高效率?
  原因就是——SQL语句缓存。

  数据库服务器一般会对SQL语句编译和缓存,编译只对SQL语句部分,所以参数中就算有SQL指令也不 会被当做指令执行。

  编译过程,需要词法分析、语法分析、生成AST、优化、生成执行计划等过程,比较耗费资源。

  服务端会先查找是否对同一条查询语句进行了缓存,如果缓存未失效,则不需要再次编译,从而降低了编译的成本,降低了内存消耗。

  可以认为SQL语句字符串就是一个key,如果使用拼接方案,每次发过去的SQL语句都不一样,都需要编译并缓存。

  开发时,应该使用参数化查询。主要目的不是为了语句缓存,而是为了有效消除注入攻击。

  注意:这里说的是查询字符串的缓存,不是查询结果的缓存。
四.上下文支持
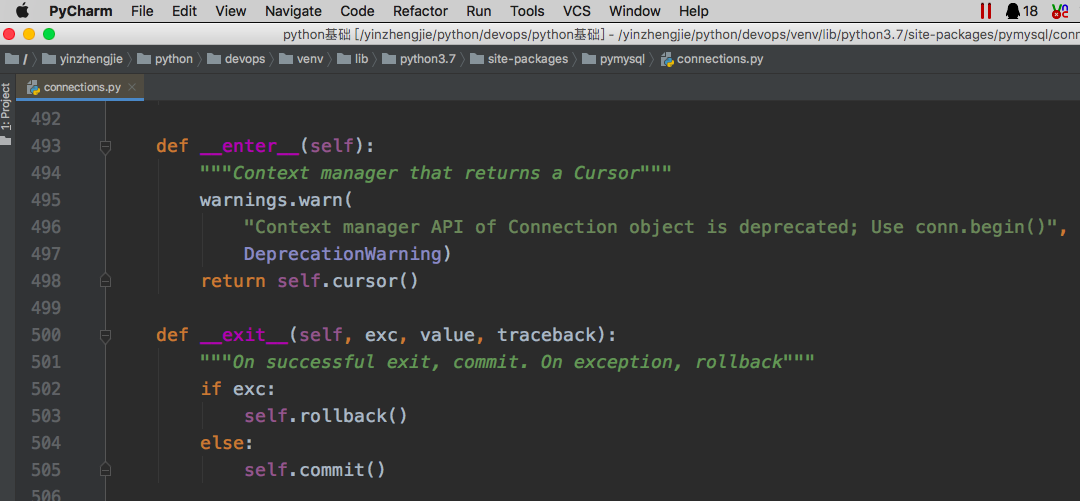
1>.查看连接类关于上下文管理的魔术方法源码
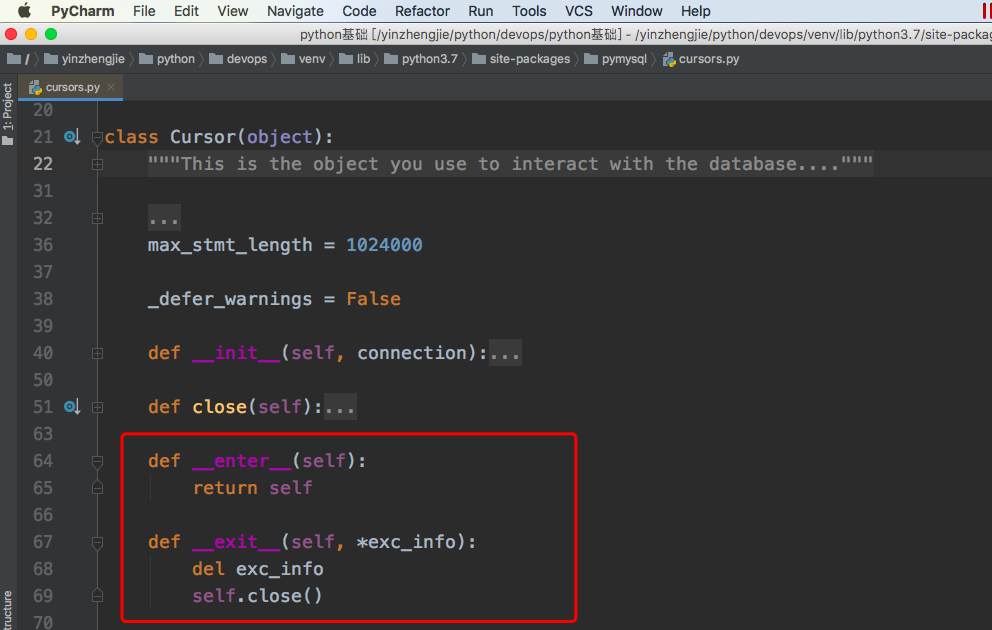
2>.查看游标类关于上下文管理的魔术方法源码
3>.案例展示
 1 #!/usr/bin/env python
 2 #_*_conding:utf-8_*_
 3 #@author :yinzhengjie
 4 #blog:http://www.cnblogs.com/yinzhengjie
 5
 6 import pymysql
 7 import simplejson
 8
 9 with open("conn.json") as f:
10     conf = simplejson.load(f)
11
12 print(conf)
13
14 conn = None
15 cursor = None
16
17 try:
18     conn = pymysql.connect(**conf)
19
20     with conn as cursor:        #连接类进入上下文的时候会返回一个游标对象,退出时如果没有异常会提交更改。
21         with cursor:            #游标类也使用上下文,在退出时关闭游标对象。
22             sql = "SELECT * FROM student WHERE id = %s;"
23             userid = 8
24             rows = cursor.execute(sql,userid)
25             print(cursor.fetchall())
26
27         """
28             通过上面的实验,我们应该知道,连接应该不需要反反复复创建销毁,应该是多个cursor共享一个conn。
29         """
30
31 finally:
32     #注意连接未关闭
33     if conn:
34         conn.close()
五.mysqlclient
1>.安装驱动
pip install mysqlclient
2>.案例展示
 1 #!/usr/bin/env python
 2 #_*_conding:utf-8_*_
 3 #@author :yinzhengjie
 4 #blog:http://www.cnblogs.com/yinzhengjie
 5
 6
 7 import MySQLdb
 8 import simplejson
 9
10 with open("conn.json") as f:
11     conf = simplejson.load(f)
12
13 print(conf)
14
15 conn = None
16
17 try:
18     conn = MySQLdb.connect(**conf)
19     print(type(conn), conn)
20
21     cursor = conn.cursor()
22
23     with cursor:
24         sql = "SELECT * FROM student;"
25         x = cursor.execute(sql)
26         print(x)
27         print(cursor.fetchall())
28
29 finally:
30     conn.close()