spring核心组件总结
spring介绍
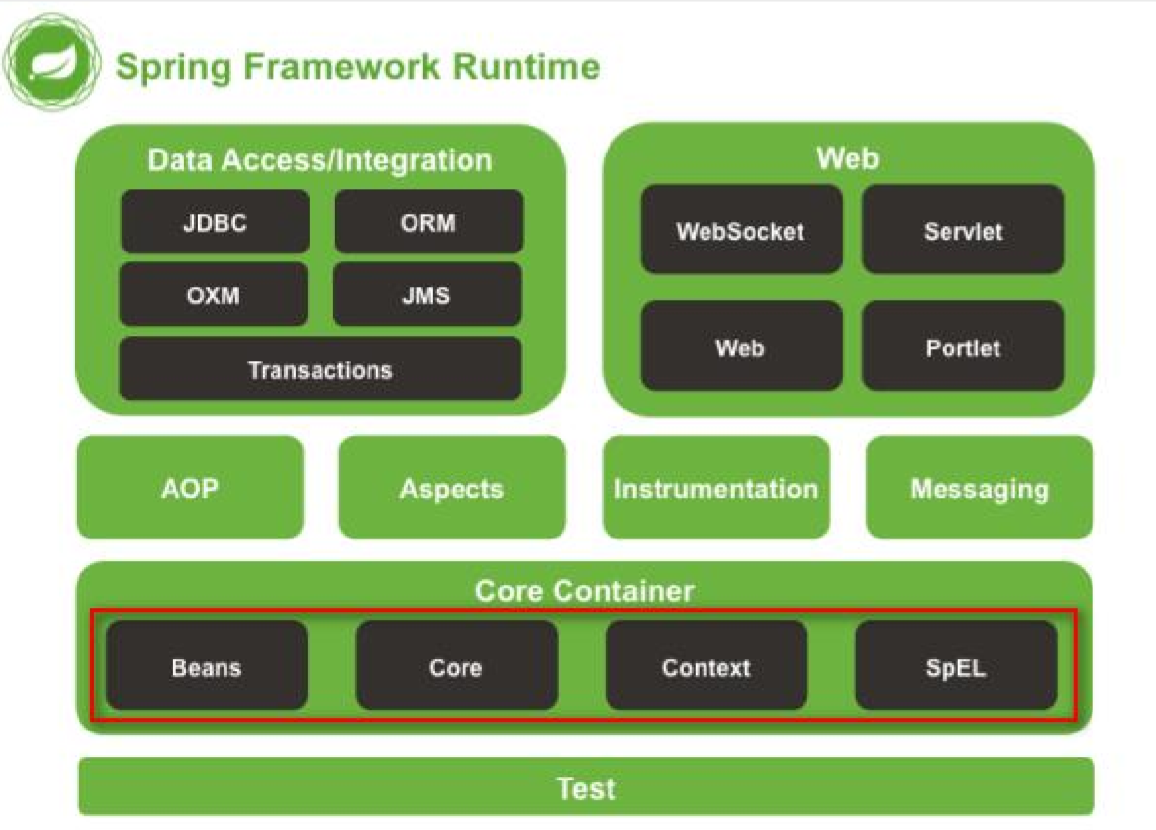
spring概念
IOC: Inverse Of Control 控制反转
将我们创建对象的方式反转了,以前创建对象是由我们开发人员自己维护,包括依赖注入关系也是自己注入。
使用了spring之后,对象的创建以及依赖关系,由spring完成创建以及注入。
控制反转就是反转了对象的创建方式。从我们自己创建反转给了spring
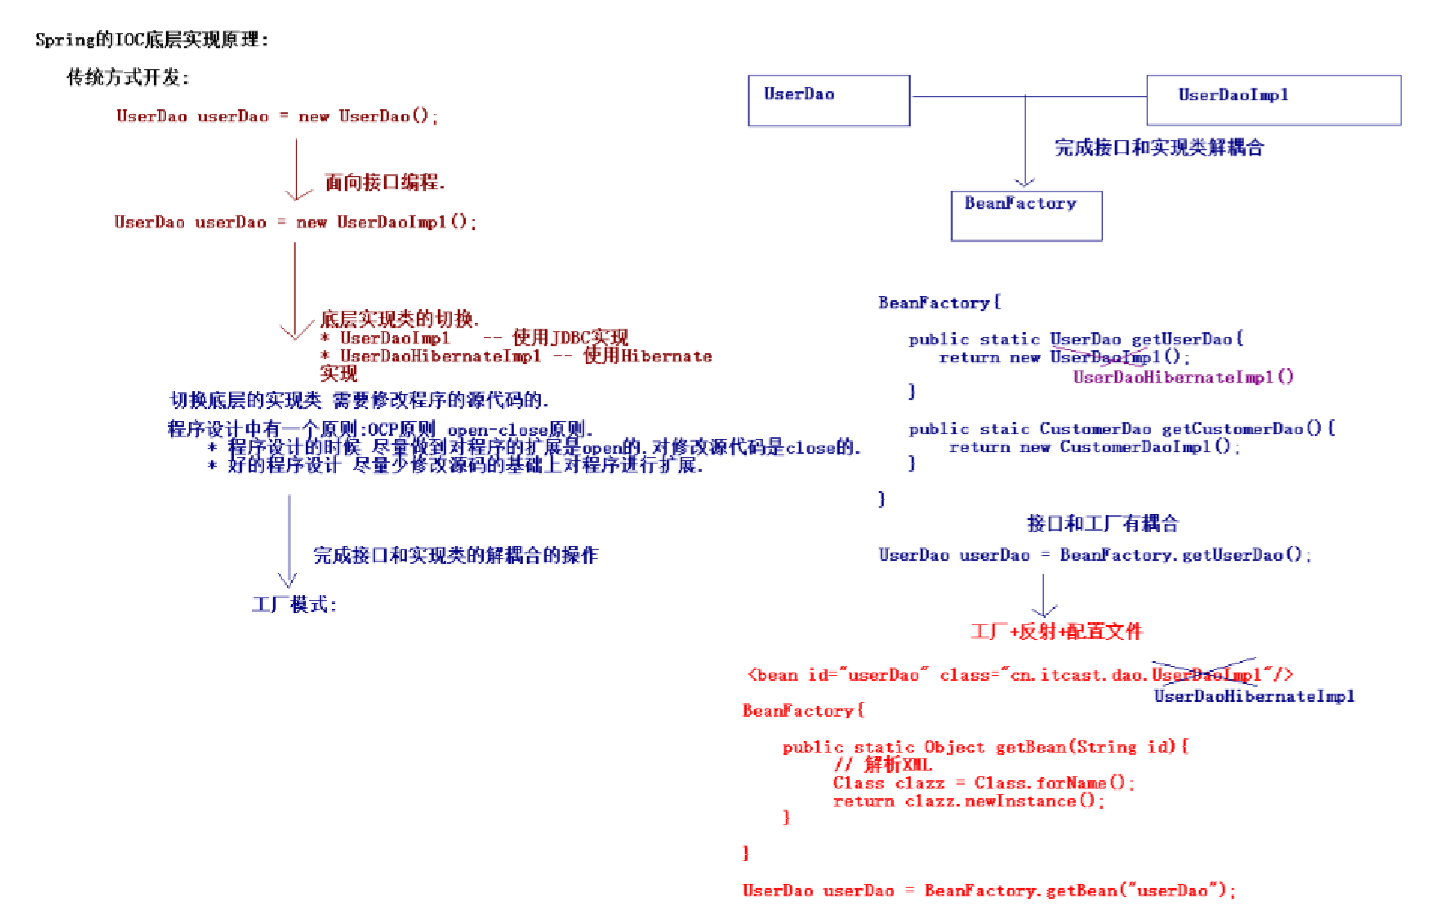
DI: Dependency Injection 依赖注入
实现ioc思想需要 DI提供支持
注入方式:1)set方式注入 2) 构造方法注入 3) 字段注入(不推荐)
注入类型:1) 值类型注入 2)引用类型注入
AOP 面向切面的编程 (横向重复,纵向抽取)
举例:拦截器(身份校验)、过滤器(编码处理)、动态代理(事务)
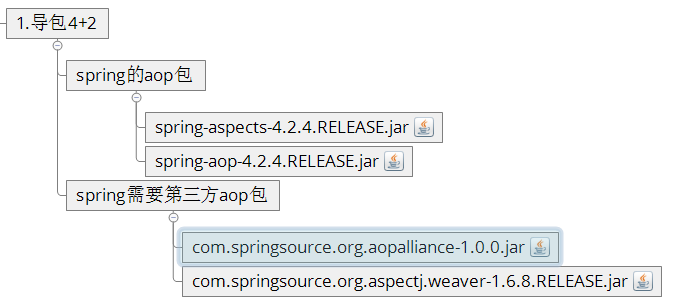
spring aop实现原理
动态代理(优先):被代理对象必须要实现接口,才能产生代理对象.如果没有接口将不能使用动态代理技术
cglib代理(没有接口):第三方代理技术,cglib代理.可以对任何类生成代理.代理的原理是对目标对象进行继承代理. 如果目标对象被final修饰.那么该类无法被cglib代理.
spring名词解释

aop依赖所需包
aop代码演示(xml配置)
//通知类
public class MyAdvice {
	//前置通知
	//	|-目标方法运行之前调用
	//后置通知(如果出现异常不会调用)
	//	|-在目标方法运行之后调用
	//环绕通知
	//	|-在目标方法之前和之后都调用
	//异常拦截通知
	//	|-如果出现异常,就会调用
	//后置通知(无论是否出现 异常都会调用)
	//	|-在目标方法运行之后调用
	//----------------------------------------------------------------
	//前置通知
	public void before(){
		System.out.println("这是前置通知");
	}
	//后置通知
	public void afterReturning(){
		System.out.println("这是后置通知(出现异常不执行)!!");
	}
	//环绕通知
	public Object around(ProceedingJoinPoint pjp) throws Throwable {
		System.out.println("这是环绕通知之前的部分!");
		Object proceed = pjp.proceed();//璋冪敤鐩�爣鏂规硶
		System.out.println("这是环绕通知之后的部分");
		return proceed;
	}
	//异常通知
	public void afterException(){
		System.out.println("这是异常通知,出现异常执行!");
	}
	//后置通知
	public void after(){
		System.out.println("这是后置通知(出现异常也会调用)!!");
	}
}
	<!-- 1.配置目标对象 -->
	<bean name="userService" class="com.yoci.service.UserServiceImpl"></bean>

	<!-- 2.配置通知对象 -->
	<bean name="myAdvice" class="com.yoci.springaop.MyAdvice"></bean>

	<!-- 3.配置将通知织入目标对象 -->
	<aop:config>
		<!-- 配置切入点
			public void cn.itcast.service.UserServiceImpl.save()
			void cn.itcast.service.UserServiceImpl.save()
			* cn.itcast.service.UserServiceImpl.save()
			* cn.itcast.service.UserServiceImpl.*()
			* cn.itcast.service.*ServiceImpl.*(..)
			* cn.itcast.service..*ServiceImpl.*(..)
		-->
		<aop:pointcut expression="execution(* com.yoci.service.*ServiceImpl.*(..))" id="pc"/>
		<aop:aspect ref="myAdvice">
			<!-- 指定名为before方法作为前置通知 -->
			<aop:before method="before" pointcut-ref="pc"/>
			<!-- 后置 -->
			<aop:after-returning method="afterReturning" pointcut-ref="pc" />
			<!-- 环绕通知 -->
			<aop:around method="around" pointcut-ref="pc"/>
			<!-- 异常拦截通知 -->
			<aop:after-throwing method="afterException" pointcut-ref="pc"/>
			<!-- 后置 -->
			<aop:after method="after" pointcut-ref="pc"/>
		</aop:aspect>
	</aop:config>
aop代码演示(注解配置)
//通知类
@Aspect
public class MyAdvice {

	@Pointcut("execution(* com.yoci.service.*ServiceImpl.*(..))")
	public void pointcut(){}

	@Before("MyAdvice.pointcut()")
	public void before(){
		System.out.println("这是前置通知");
	}
	@AfterReturning("execution(* com.yoci.service.*ServiceImpl.*(..))")
	public void afterReturning(){
		System.out.println("这是后置通知(出现异常不执行)!!");
	}

	@Around("execution(* com.yoci.service.*ServiceImpl.*(..))")
	public Object around(ProceedingJoinPoint pjp) throws Throwable {
		System.out.println("这是环绕通知之前的部分!");
		Object proceed = pjp.proceed();//调用目标方法
		System.out.println("这是环绕通知之后的部分");
		return proceed;
	}

	@AfterThrowing("execution(* com.yoci.service.*ServiceImpl.*(..))")
	public void afterException(){
		System.out.println("这是异常通知,出现异常执行!");
	}

	@After("execution(* com.yoci.service.*ServiceImpl.*(..))")
	public void after(){
		System.out.println("这是后置通知(出现异常也会调用)!!");
	}
}
	<!-- 1.配置目标对象 -->
	<bean name="userService" class="com.yoci.service.UserServiceImpl"></bean>

	<!-- 2.配置通知对象 -->
	<bean name="myAdvice" class="com.yoci.annotationaop.MyAdvice"></bean>

	<!-- 3.开启使用注解完成织入 -->
	<aop:aspectj-autoproxy></aop:aspectj-autoproxy>
spring 中的工厂(容器)
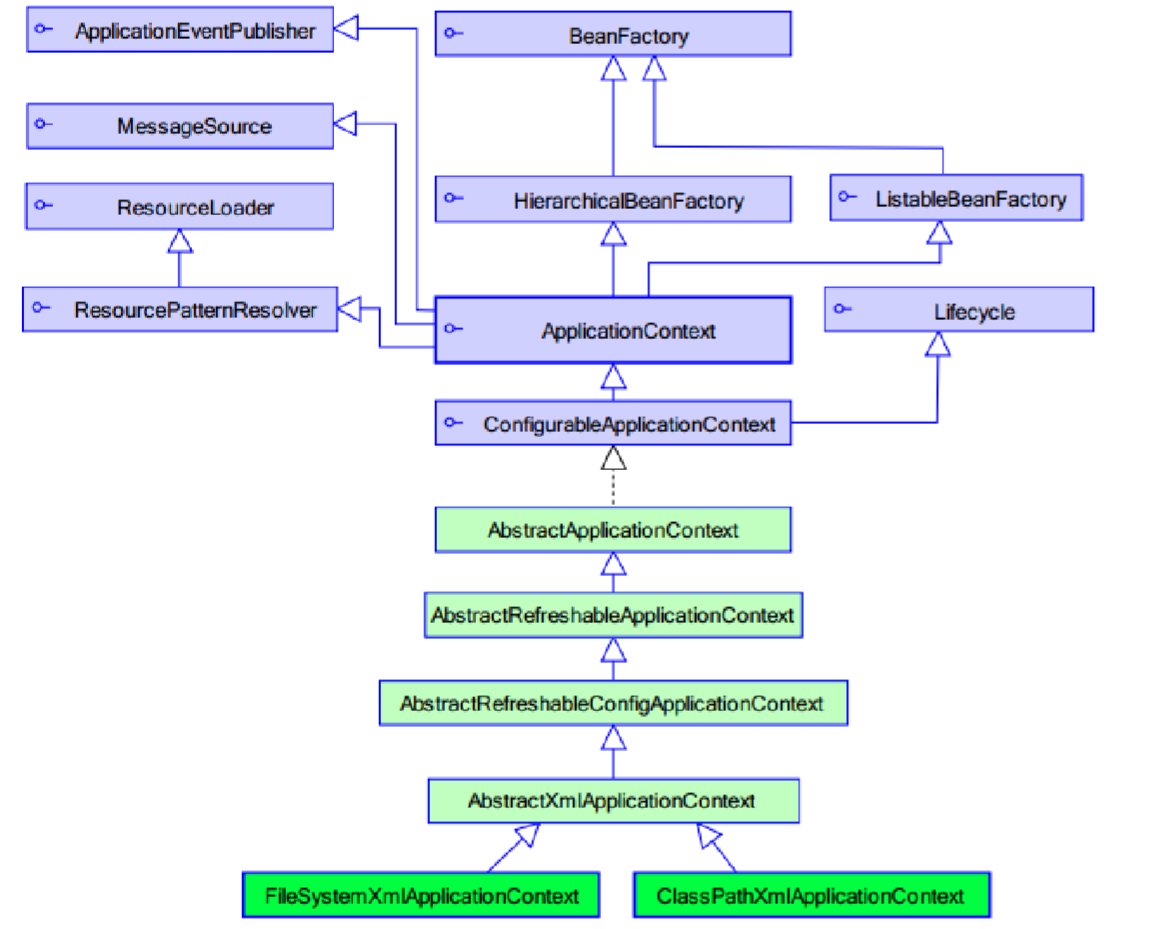
ApplicationContext接口由两个实现类:
1) ClassPathXmlApplicationContext: 加载类路径下的spring的配置
2)FilesSystemXmlApplicationContext:加载本地磁盘下的spring的配置
BeanFactrory(过时)
BeanFactory和ApplicationContext的区别:
1)BeanFactory:是在getBean的时候才会生成类的实例
2)ApplicationContext:是在加载applicationContext.xml(容器启动)时就会创建
spring配置详解
Bean元素
	<!-- 将User对象交给spring容器管理 -->
	<!-- Bean元素:使用该元素描述需要spring容器管理的对象
			class属性:被管理对象的完整类名.
			name属性:给被管理的对象起个名字.获得对象时根据该名称获得对象.
					可以重复.可以使用特殊字符.
			id属性: 与name属性一模一样.
					名称不可重复.不能使用特殊字符.
			结论: 尽量使用name属性.
	  -->
	<bean  name="user" class="cn.itcast.bean.User" ></bean>

	<!-- 导入其他spring配置文件 -->
	<!-- 分模块配置 -->
	<import resource="cn/itcast/b_create/applicationContext.xml"/>
Bean元素进阶
scope属性(作用域)
1)singleton(默认值):单例对象.被标识为单例的对象在spring容器中只会存在一个实例
2)prototype:多例原型.被标识为多例的对象,每次再获得才会创建.每次创建都是新的对象.整合struts2时,ActionBean必须配置为多例的.
3)request:web环境下.对象与request生命周期一致.
4)session:web环境下,对象与session生命周期一致.
5)global-session:global-session和Portlet应用相关。当你的应用部署在Portlet容器中工作时,它包含很多portlet。如果你想要声明让所有的portlet共用全局的存储变量的话,那么这全局变量需要存储在global-session中。
生命周期属性
1)init-method:配置一个方法作为生命周期初始化方法.spring会在对象创建之后立即调用.
2)destory-method:配置一个方法作为生命周期的销毁方法.spring容器在关闭并销毁所有容器中的对象之前调用.
<bean  name="user" class="cn.itcast.bean.User"
		 init-method="init" destroy-method="destory" ></bean>
public class User {
	private String name;
	private Integer age;
	private Car car;

	public Car getCar() {return car;}
	public void setCar(Car car) {this.car = car;}
	public String getName() {return name;}
	public void setName(String name) {this.name = name;}
	public Integer getAge() {return age;}
	public void setAge(Integer age) {this.age = age;}

	public void init(){
		System.out.println("我是初始化方法!");
	}
	public void destory(){
		System.out.println("我是销毁方法!");
	}
	@Override
	public String toString() {
		return "User [name=" + name + ", age=" + age + ", car=" + car + "]";
	}

}
spring创建对象的方式
1)空参构造方式
2)静态工厂(了解)
3)实例工厂(了解)
	<!-- 创建方式1:空参构造创建  -->
	<bean  name="user" class="cn.itcast.bean.User"
		 init-method="init" destroy-method="destory" ></bean>

	<!-- 创建方式2:静态工厂创建
		  调用UserFactory的createUser方法创建名为user2的对象.放入容器
	 -->
	<bean  name="user2"
		class="cn.itcast.b_create.UserFactory"
		factory-method="createUser" ></bean>

	<!-- 创建方式3:实例工厂创建
		 调用UserFactory对象的createUser2方法创建名为user3的对象.放入容器
	 -->
	<bean  name="user3"
		factory-bean="userFactory"
		factory-method="createUser2" ></bean>

	<bean  name="userFactory"
		class="cn.itcast.b_create.UserFactory"   ></bean>
public class UserFactory {

	public static User createUser(){

		System.out.println("静态工厂创建User");

		return new User();

	}

	public  User createUser2(){

		System.out.println("实例工厂创建User");

		return new User();

	}

}
spring属性注入
	<!-- set方式注入: -->
	<bean name="user" class="com.yoci.entity.User" >
		<!-- 值类型注入 -->
		<property name="name" value="zhangsan"></property>
		<property name="age" value="22"></property>
		<!-- 引用类型注入 -->
		<property name="car" ref="car"></property>
	</bean>

	<!-- 将car对象配置到容器当中 -->
	<bean name="car" class="com.yoci.entity.Car">
		<property name="name" value="兰博基尼"></property>
		<property name="color" value="黄色"></property>
	</bean>


	<!-- 构造函数注入 -->
	<bean name="user1" class="com.yoci.entity.User">
		<!-- name属性: 构造函数的参数名 -->
		<!-- index属性: 构造函数的参数索引 -->
		<!-- type属性: 构造函数的参数类型-->
		<constructor-arg name="name" index="0"  value="李四" ></constructor-arg>
		<constructor-arg name="car" index="1" ref="car" ></constructor-arg>
	</bean>

	<!-- p名称空间注入 -->
	<!--
		1.导入P名称空间  xmlns:p="http://www.springframework.org/schema/p"
		2.使用p:属性完成注入
		-值类型: p:属性名="值"
		-对象类型: p:属性名-ref="bean名称" -->
	<bean name="user2" class="com.yoci.entity.User" p:name="wangwu" p:age="26" p:car-ref="car"></bean>

	<!-- spEL注入 -->
	<bean name="user3" class="com.yoci.entity.User">
		<property name="name" value="#{user1.name}"></property>
		<property name="age" value="#{user2.age}"></property>
		<property name="car" ref="car"></property>
	</bean>
	<!-- 复杂类型注入 -->
	<bean name="collection" class="com.yoci.entity.Collection">
		<!-- 如果数组中只准备注入一个值(对象),直接使用value|ref即可
			<property name="arr" value="tom" ></property>
		-->
		<!-- array注入,多个元素注入 -->
		<property name="arr">
			<array>
				<value>tom</value>
				<value>jack</value>
				<ref bean="user2"></ref>
			</array>
		</property>

		<!--
			如果List中只准备注入一个值(对象),直接使用value|ref即可
			<property name="list" value="jack" ></property>
		-->
		<property name="list">
			<list>
				<value>zhangsan</value>
				<value>李四</value>
				<ref bean="user"/>
			</list>
		</property>

		<!-- map类型注入 -->
		<property name="map">
			<map>
				<entry key="url" value="www.yoci.com"></entry>
				<entry key="user3" value-ref="user"></entry>
			</map>
		</property>

		<!-- prperties 类型注入 -->
		<property name="prop">
			<props>
				<prop key="driverClass">com.jdbc.mysql.Driver</prop>
				<prop key="userName">root</prop>
				<prop key="password">1234</prop>
			</props>
		</property>
spring事务
什么是事务:
事务逻辑上的一组操作,组成这组操作的各个逻辑单元,要么一起成功,要么一起失败。
事务特性
原子性 :强调事务的不可分割.
一致性 :事务的执行的前后数据的完整性保持一致.
隔离性 :一个事务执行的过程中,不应该受到其他事务的干扰
持久性 :事务一旦结束,数据就持久到数据库
如果不考虑隔离性引发安全性问题:
脏读 :一个事务读到了另一个事务的未提交的数据
不可重复读 :一个事务读到了另一个事务已经提交的 update 的数据导致多次查询结果不一致.
虚幻读 :一个事务读到了另一个事务已经提交的 insert 的数据导致多次查询结果不一致.
解决读问题:设置事务隔离级别
未提交读 :脏读,不可重复读,虚读都有可能发生
已提交读 :避免脏读。但是不可重复读和虚读有可能发生
可重复读 :避免脏读和不可重复读.但是虚幻读有可能发生.
串行化的 :避免以上所有读问题.
Mysql 默认:可重复读 Oracle 默认:读已提交
事务的操作对象
在spring中玩事务管理.最为核心的对象就TransactionManager对象
事务的属性介绍
事务隔离级别:
1 读未提交 2 读已提交 4 可重复读 8 串行化
是否只读:
true/false
事务的传播行为:

spring代码(xml配置)
<!-- 事务管理器 -->
	<bean id="transactionManager"	class="org.springframework.jdbc.datasource.DataSourceTransactionManager">
		<!-- 数据源 -->
		<property name="dataSource" ref="dataSource" />
	</bean>

	<!-- 通知 -->
	<tx:advice id="txAdvice" transaction-manager="transactionManager">
		<tx:attributes>

          <!-- 以方法为单位,指定方法应用什么事务属性
			isolation:隔离级别
			propagation:传播行为
			read-only:是否只读
		 -->
          <!-- 传播行为 -->
		<tx:method name="save*" isolation="REPEATABLE_READ" propagation="REQUIRED" read-only="false" />
		<tx:method name="persist*" isolation="REPEATABLE_READ" propagation="REQUIRED" read-only="false" />
		<tx:method name="update*" isolation="REPEATABLE_READ" propagation="REQUIRED" read-only="false" />
		<tx:method name="modify*" isolation="REPEATABLE_READ" propagation="REQUIRED" read-only="false" />
		<tx:method name="delete*" isolation="REPEATABLE_READ" propagation="REQUIRED" read-only="false" />
		<tx:method name="remove*" isolation="REPEATABLE_READ" propagation="REQUIRED" read-only="false" />
		<tx:method name="get*" isolation="REPEATABLE_READ" propagation="REQUIRED" read-only="true" />
		<tx:method name="find*" isolation="REPEATABLE_READ" propagation="REQUIRED" read-only="true" />
		<tx:method name="transfer" isolation="REPEATABLE_READ" propagation="REQUIRED" read-only="false" />
		</tx:attributes>
	</tx:advice>

	<!-- 切面 -->
	<aop:config>
		<aop:advisor advice-ref="txAdvice"
			pointcut="execution(* cn.itcast.crm.service.*.*(..))" />
	</aop:config>
spring代码(注解配置)
<!-- 事务管理器 -->
	<bean id="transactionManager"	class="org.springframework.jdbc.datasource.DataSourceTransactionManager">
		<!-- 数据源 -->
		<property name="dataSource" ref="dataSource" />
	</bean>

<!-- 开启使用注解管理aop事务 -->
<tx:annotation-driven/>
@Transactional(isolation=Isolation.REPEATABLE_READ,propagation=Propagation.REQUIRED,readOnly=true)
public class AccountServiceImpl implements AccountService {

	private AccountDao ad ;
	private TransactionTemplate tt;
		@Transactional(isolation=Isolation.REPEATABLE_READ,propagation=Propagation.REQUIRED,readOnly=false)
	public void transfer(final Integer from,final Integer to,final Double money) {
				//减钱
				ad.decreaseMoney(from, money);
				int i = 1/0;
				//加钱
				ad.increaseMoney(to, money);
	}

}
spring注解
开启spring注解
<?xml version="1.0" encoding="UTF-8"?>
<beans xmlns:xsi="http://www.w3.org/2001/XMLSchema-instance" xmlns="http://www.springframework.org/schema/beans" xmlns:context="http://www.springframework.org/schema/context" xsi:schemaLocation="http://www.springframework.org/schema/beans http://www.springframework.org/schema/beans/spring-beans-4.2.xsd http://www.springframework.org/schema/context http://www.springframework.org/schema/context/spring-context-4.2.xsd ">

<!--
	引入:
	xmlns:context="http://www.springframework.org/schema/context"
	http://www.springframework.org/schema/context
    http://www.springframework.org/schema/context/spring-context-4.2.xsd
-->
<!-- 指定扫描cn.itcast.bean报下的所有类中的注解.
	 注意:扫描包时.会扫描指定报下的所有子孙包
 -->
<context:component-scan base-package="cn.itcast.bean"></context:component-scan>

</beans>
注解使用介绍
@Component("user") = <bean name="user" class="cn.itcast.bean.User"  />
  // service层
  @Service("user")
  // web层
  @Controller("user")
  // dao层
  @Repository("user")

//指定对象的作用范围
@Scope(scopeName="singleton/prototype")

//属性注入,推荐使用set方法注入方式, 第一种破坏封装性
@Value("18")
private Integer age;
@Value("tom")
public void setName(String name) {
  this.name = name;
}

//自动装配
@Autowired //问题:如果匹配多个类型一致的对象.将无法选择具体注入哪一个对象.
@Qualifier("car2")//使用@Qualifier 配合 @Autowired注解告诉spring容器自动装配哪个名称的对象
//手动装配,指定注入哪个名称的对象
@Resource(name="car")
private Car car;

//在对象被创建后调用.init-method
@PostConstruct
public void init(){
  System.out.println("我是初始化方法!");
}

//在销毁之前调用.destory-method
@PreDestroy
public void destory(){
  System.out.println("我是销毁方法!");
}
spring整合junit测试
导入aop+test包
//帮我们创建容器
@RunWith(SpringJUnit4ClassRunner.class)
//指定创建容器时使用哪个配置文件
@ContextConfiguration("classpath:applicationContext.xml")
//指定多个配置文件时
@ContextConfiguration(locations = { "classpath*:/spring1.xml", "classpath*:/spring2.xml" })
public class Demo {
	//将名为user的对象注入到u变量中
	@Resource(name="user")
	private User u;

	@Test
	public void fun1(){

		System.out.println(u);

	}

}