本文说明了如何定制化JHipster-Registry,增加消息总线功能。
实现的效果就是修改配置中心的文件后,通过消息队列主动推送给微服务而无需重启微服务,实现配置内容热加载。
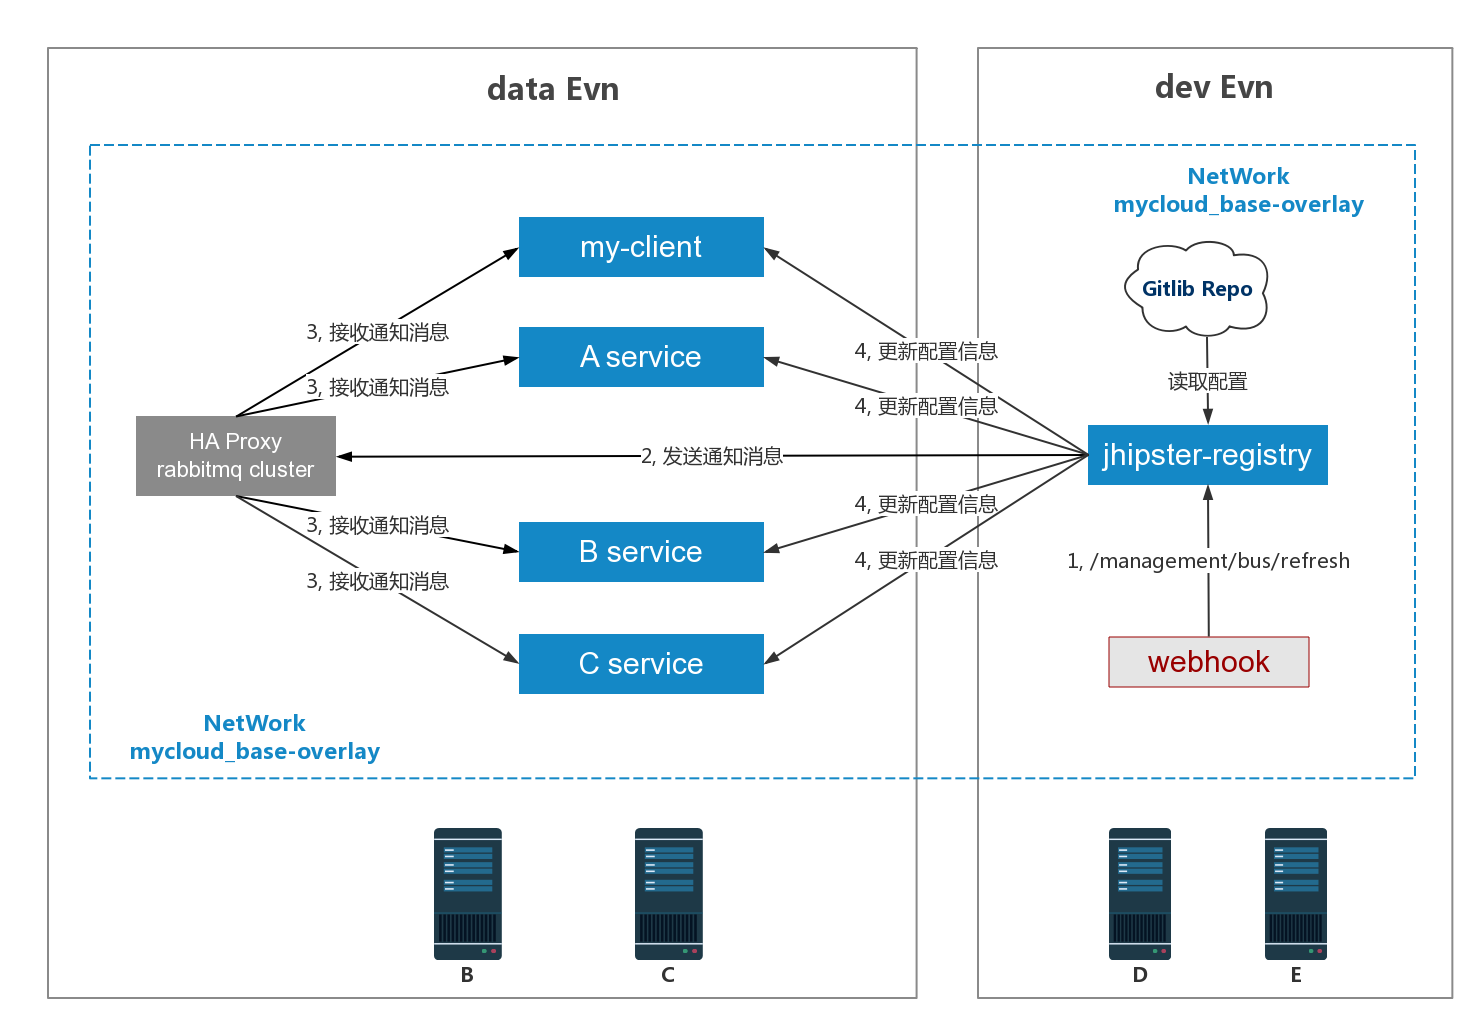
1 整体规划
1.1 拓扑架构
1.2 基础设置
| 编号 | IP | 主机名 |
|---|---|---|
| B | 192.168.1.102 | node02 |
| C | 192.168.1.103 | node03 |
| D | 192.168.1.104 | node04 |
| E | 192.168.1.105 | node05 |
1.3 相关组件
| 组件名 | 说明 | 版本 |
|---|---|---|
| Jhipster Registry | 基于eureka和spring cloud config的基础服务。 | v4.0.0 |
| Spring Cloud Bus | 消息总线组件,通过maven依赖引入。 | 1.3.1 |
| RabbitMQ | 消息中间件,已部署在预研环境中。 | 3 |
| myClient | 一个客户端服务,用于测试消息总线效果。 | 1.0 |
| GitLab配置库 | JHipster-Registry引用的配置中心。所有服务的配置文件所在地。 |
2 JHipster Registry定制
2.1 下载源码
Github上下载jhipster-jhipster源码。
https://github.com/jhipster/jhipster-registry/releases
2.2 提交到GitLab
保存到本地Gitlab源码库
2.3 配置文件定制
pom.xml
<dependency>
     <groupId>org.springframework.cloud</groupId>
     <artifactId>spring-cloud-starter-bus-amqp</artifactId>
</dependency>
<dependency>
      <groupId>org.springframework.boot</groupId>
     <artifactId>spring-boot-starter-actuator</artifactId>
</dependency>
application.yml
management:
    security:
        enabled: false
    context-path: /management       # 消息总线的url,这个前缀要加在 /bus/refresh 前面
application-prod.conf
spring:
   rabbitmq:
        host: rmqha_proxy
        port: 56729
        username: guest
        password: guest
        publisher-confirms: true     # 生产者消息确认
        addresses: rmqha_proxy       # 客户端访问server地址, 作为发送者,配置和host一致
2.4 项目构建
在安装了jdk,maven, yarn,nodejs的centos7服务器上执行命令
yarn && yarn install	#前端资源配置生成
mvn -Pprod clean package dockerfile:build	#项目构建并打包成docker镜像,版本号为3.0
2.5 服务启动
docker service create --name base-registry --replicas 1 --network mycloud_base-overlay --constraint node.labels.mycloud.node.type==worker --constraint node.labels.mycloud.node.env==dev --env SPRING_PROFILES_ACTIVE=prod,git --env JHIPSTER_SECURITY_AUTHENTICATION_JWT_SECRET=gdd904a2dffb3eaf28a318b49e0ab986cc51012k --publish 8761:8761 dtr.devops.mycloud.com/common/jhipster-registry:3.0
可通过如下url访问
http://<IP>:8761
3 客户端服务定制
3.1 创建项目
通过jhipster生成一个微服务,名为my-client。
3.2 提交到GitLab
保存到gitLab库git@gitlab.yourcompany.com:root-cloud/mycloud-monitor.git
3.3 配置文件定制
pom.xml
<dependency>
    <groupId>org.springframework.boot</groupId>
    <artifactId>spring-boot-starter-web</artifactId>
</dependency>
<dependency>
    <groupId>org.springframework.cloud</groupId>
    <artifactId>spring-cloud-starter-eureka</artifactId>
</dependency>
<dependency>
    <groupId>org.springframework.cloud</groupId>
    <artifactId>spring-cloud-starter-bus-amqp</artifactId>
</dependency>
<dependency>
    <groupId>org.springframework.boot</groupId>
    <artifactId>spring-boot-starter-actuator</artifactId>
</dependency>
application-prod.yml
eureka:
    instance:
        prefer-ip-address: true
    client:
        service-url:         # 指向eureka服务器
            defaultZone: http://admin:${jhipster.registry.password}@base-registry:8761/eureka/

spring:
   rabbitmq:
        host: rmqha_proxy
        port: 56729
        username: guest
        password: guest
        publisher-confirms: true         # 生产者消息确认
        addresses: rmqha_proxy       # 客户端访问server地址, 作为发送者,配置和host一致
bootstrap-prod.yml
spring:
    cloud:
        config:
            fail-fast: true
            retry:
                initial-interval: 1000
                max-interval: 2000
                max-attempts: 100
            uri: http://admin:${jhipster.registry.password}@base-registry:8761/config       # 指向配置服务器
            # name of the config server's property source (file.yml) that we want to use
            name: mq-client
            profile: rd # 注意这里是rd分支,springcloud-config.git上的rd分支
            label: master # toggle to switch to a different version of the configuration as stored in git
jhipster:
    registry:
        password: admin
MyClientApp.java
@(JHipster)RefreshScope     # 加上这个注解
public class MyClientApp {
    ......
}
3.4 添加测试代码
application-prod.yml
application:
    domain: http://yourcompany.com/2017        # 增加一个配置项
ApplicationProperties
@ConfigurationProperties(prefix = "application", ignoreUnknownFields = false)
public class ApplicationProperties {
    private String domain = "http://default";
    public String getDomain() {
        return domain;
    }
    public void setDomain(String domain) {
        this.domain = domain;
    }
}
TestResource.java
@RestController
@RequestMapping("/management")
public class TestResource {
private final ApplicationProperties appProperties;

   @GetMapping("/mq/property")
    @Timed
    public ResponseEntity<String> getproperty() {
        return ResponseUtil.wrapOrNotFound(Optional.ofNullable(appProperties.getDomain()));
    }
}
3.5 项目构建
在安装了jdk,maven, yarn,nodejs的centos7服务器上执行命令
$ mvn -Pprod clean package dockerfile:build #项目构建并打包成docker image
3.6 服务启动
docker service create --name mq-client-mysql --replicas 1 --network name=mycloud_base-overlay,alias=mq-client-mysql --constraint node.labels.mycloud.node.type==worker --constraint node.labels.mycloud.node.env==data --env MYSQL_ROOT_PASSWORD=my-secret-pw --publish 32781:3306 dtr.devops.mycloud.com/common/mysql:5
docker service create --name my-client-app --replicas 1 --network mycloud_base-overlay --constraint node.labels.mycloud.node.type==worker --constraint node.labels.mycloud.node.env==dev --env SPRING_PROFILES_ACTIVE=prod,swagger --publish 18081:8081 dtr.devops.mycloud.com/yourcompany/my-client:1.0
可通过如下url访问
http://<IP>:18081
4 测试效果
4.1 第1次查询配置项
http://<IP>:18081/management/mq/property
http://yourcompany.com/2017 # 返回值
4.2 修改配置项
application:
    domain: http://yourcompany.com/2018        # 把2017改成了2018
4.3 第2次查询配置项
http://<IP>:18081/management/mq/property
http://yourcompany.com/2017 # 返回值没有改变
4.4 通知消息总线
$ curl -X POST http://<IP>:8761/management/bus/refresh
4.5 第3次查询配置项
http://<IP>:<port>/management/mq/property
http://yourcompany.com/2018 # 返回值已经更新为2018