模板层
你可能已经注意到我们在例子视图中返回文本的方式有点特别。 也就是说,HTML被直接硬编码在 Python代码之中。
def current_datetime(request):
    now = datetime.datetime.now()
    html = "<html><body>It is now %s.</body></html>" % now
    return HttpResponse(html)
尽管这种技术便于解释视图是如何工作的,但直接将HTML硬编码到你的视图里却并不是一个好主意。 让我们来看一下为什么:
- 对页面设计进行的任何改变都必须对 Python 代码进行相应的修改。 站点设计的修改往往比底层 Python 代码的修改要频繁得多,因此如果可以在不进行 Python 代码修改的情况下变更设计,那将会方便得多。
- Python 代码编写和 HTML 设计是两项不同的工作,大多数专业的网站开发环境都将他们分配给不同的人员(甚至不同部门)来完成。 设计者和HTML/CSS的编码人员不应该被要求去编辑Python的代码来完成他们的工作。
- 程序员编写 Python代码和设计人员制作模板两项工作同时进行的效率是最高的,远胜于让一个人等待另一个人完成对某个既包含 Python又包含 HTML 的文件的编辑工作。
基于这些原因,将页面的设计和Python的代码分离开会更干净简洁更容易维护。 我们可以使用 Django的 模板系统 (Template System)来实现这种模式,这就是本章要具体讨论的问题。
python的模板:HTML代码+模板语法
def current_time(req):
    # ================================原始的视图函数
    # import datetime
    # now=datetime.datetime.now()
    # html="<html><body>现在时刻:<h1>%s.</h1></body></html>" %now

    # ================================django模板修改的视图函数
    # from django.template import Template,Context
    # now=datetime.datetime.now()
    # t=Template('<html><body>现在时刻是:<h1>{{current_date}}</h1></body></html>')
    # #t=get_template('current_datetime.html')
    # c=Context({'current_date':str(now)})
    # html=t.render(c)
    #
    # return HttpResponse(html)

    #另一种写法(推荐)
    import datetime
    now=datetime.datetime.now()
    return render(req, 'current_datetime.html', {'current_date':str(now)[:19]})
模板语法之变量
在 Django 模板中遍历复杂数据结构的关键是句点字符, 语法:
{{ var_name }}
views.py:
def index(request):
    import datetime
    s="hello"
    l=[111,222,333]    # 列表
    dic={"name":"yuan","age":18}  # 字典
    date = datetime.date(1993, 5, 2)   # 日期对象

    class Person(object):
        def __init__(self,name):
            self.name=name

    person_yuan=Person("yuan")  # 自定义类对象
    person_egon=Person("egon")
    person_alex=Person("alex")

    person_list=[person_yuan,person_egon,person_alex]

     return render(request,"index.html",{"l":l,"dic":dic,"date":date,"person_list":person_list})
template:
<h4>{{s}}</h4>
<h4>列表:{{ l.0 }}</h4>
<h4>列表:{{ l.2 }}</h4>
<h4>字典:{{ dic.name }}</h4>
<h4>日期:{{ date.year }}</h4>
<h4>类对象列表:{{ person_list.0.name }}</h4>
注意:句点符也可以用来引用对象的方法(无参数方法)
<h4>字典:{{ dic.name.upper }}</h4>
模板之过滤器
语法:
{{obj|filter__name:param}}
default
如果一个变量是false或者为空,使用给定的默认值。否则,使用变量的值。例如:
{{ value|default:"nothing" }}
length
返回值的长度。它对字符串和列表都起作用。例如:
{{ value|length }}
如果 value 是 ['a', 'b', 'c', 'd'],那么输出是 4。
date
如果 value=datetime.datetime.now()
{{ value|date:"Y-m-d" }}
slice
如果 value="hello world"
{{ value|slice:"2:-1" }}
truncatechars
如果字符串字符多于指定的字符数量,那么会被截断。截断的字符串将以可翻译的省略号序列(“...”)结尾。
参数:要截断的字符数
例如:
{{ value|truncatechars:9 }}
safe
Django的模板中会对HTML标签和JS等语法标签进行自动转义,原因显而易见,这样是为了安全。但是有的时候我们可能不希望这些HTML元素被转义,比如我们做一个内容管理系统,后台添加的文章中是经过修饰的,这些修饰可能是通过一个类似于FCKeditor编辑加注了HTML修饰符的文本,如果自动转义的话显示的就是保护HTML标签的源文件。为了在Django中关闭HTML的自动转义有两种方式,如果是一个单独的变量我们可以通过过滤器“|safe”的方式告诉Django这段代码是安全的不必转义。比如:
value="<a href="">点击</a>"
{{ value|safe}}
代码示例:
views.py
import datetime
def info(request):
    data2 = datetime.datetime.now()
    null_list = []
    list = [11,22,33]
    GB = 15664757
    text = '这里是使用继承的一些提示'
    link = '<a href="http://www.123.com">这个一个 p 标签</a>'
    class Type:
        def __init__(self,name,age):
            self.name = name
            self.age = age
    t1 = Type('ysg','12')
    t2 = Type('pei','13')
    t = [t1,t2]

    return render(request,'模板层传参.html',locals())
template:
    <h2>过滤器</h2>
    <p>{{ data2|date:'Y-m-d' }}</p>
    <p>{{ null_list|default:"数据为空" }}</p>
    <p>{{ list|default:"数据为空吗?"  }}</p>
    <p>{{ GB|filesizeformat }}</p>
    <p>{{ text|truncatechars:5 }}</p>
    <p>{{ list.0|add:100 }}</p>
    <p>{{ t.0.name|upper }}</p>
    <p>{{ link|safe }}</p>
    <p>{{ list.0|add:100 }}</p>
模板之标签
标签看起来像是这样的: {% tag %}。标签比变量更加复杂:一些在输出中创建文本,一些通过循环或逻辑来控制流程,一些加载其后的变量将使用到的额外信息到模版中。一些标签需要开始和结束标签 (例如{% tag %} ...标签 内容 ... {% endtag %})。
for标签
遍历每一个元素:
可以利用{% for obj in list reversed %}反向完成循环。
遍历一个字典:
    <h3>for 标签</h3>
    {% for foo in list %}
        <p> {{ foo }} </p>
    {% endfor %}

    {% for foo in dic %}
        <p>{{ foo }}</p>    {# 循环出的是 key #}
    {% endfor %}

    {% for foo in t %}
        <p>{{ foo }}</p>
        <p>{{ foo.age }},{{ foo.name }}</p>
    {% endfor %}

    {% for foo in list %}
    <p>{{ forloop.counter}},{{ foo }}</p>     {# 循环序列号 #}
    {% endfor %}
注:循环序号可以通过{{forloop}}显示
forloop.counter            The current iteration of the loop (1-indexed)
forloop.counter0           The current iteration of the loop (0-indexed)
forloop.revcounter         The number of iterations from the end of the loop (1-indexed)
forloop.revcounter0        The number of iterations from the end of the loop (0-indexed)
forloop.first              True if this is the first time through the loop
forloop.last               True if this is the last time through the loop
for ... empty
for 标签带有一个可选的{% empty %} 从句,以便在给出的组是空的或者没有被找到时,可以有所操作。
   <h3>for ...empty</h3>
    {% for foo in null_list %}
        <p>{{ foo }}</p>
        {% empty %}
        <p>列表为空</p>
    {% endfor %}
if 标签{% if %}会对一个变量求值,如果它的值是“True”(存在、不为空、且不是boolean类型的false值),对应的内容块会输出。
   <h3>if 标签</h3>
    {% if str %}
        <p>
            <a href="#">欢迎 {{ str }}</a>
            <a href="#">注销</a>
        </p>
    {% else %}
        <p>
            <a href="#">登录</a>
            <a href="#">注册</a>
        </p>
    {% endif %}
with 标签
使用一个简单地名字缓存一个复杂的变量,当你需要使用一个“昂贵的”方法(比如访问数据库)很多次的时候是非常有用的
    <h3>with 标签</h3>
    {% with t.1.name as n %}
        <p>{{ n }}</p>
    {% endwith %}
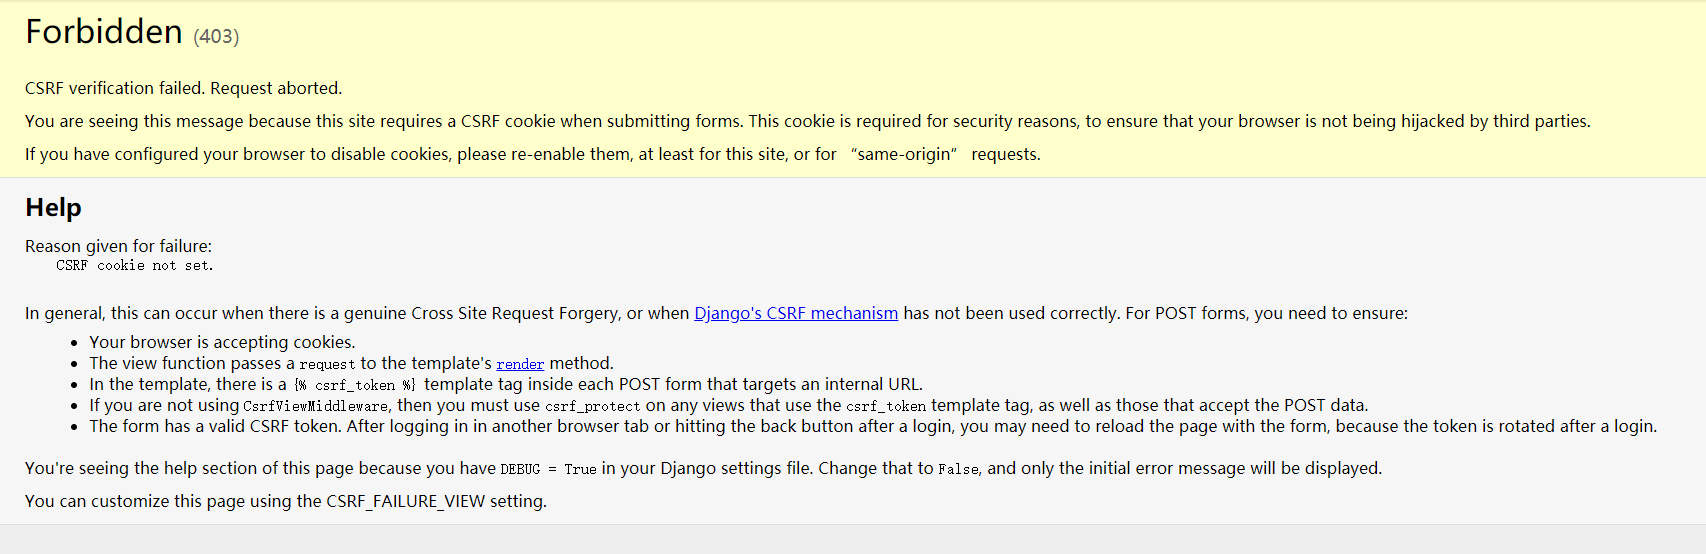
csrf_token 标签
这个标签用于跨站请求伪造保护,避免出现以下报错
在提交的 <form>...</form> 中加入 {% csrf_token %} 标签
<!DOCTYPE html>
<html lang="en">
<head>
    <meta charset="UTF-8">
    <title>login</title>
</head>
<body>
<form action="" method="post">
    {% csrf_token %}
    <input type="text" name="text">
    <input type="submit">
</form>
</body>
</html>
自定义标签和过滤器
1、在 settings 中的INSTALLED_APPS配置当前 app,不然 django 无法找到自定义的 simple_tag
2、在 app 中创建 templatetags 模块(模块名只能是 templatetags )
3、创建任意 .py 文件,如:my_tags.py
from django import template
from django.utils.safestring import mark_safe
register = template.Library() # 必须是 register 这个名称

# 自定义过滤器
@register.filter
def muit_filfer(x,y):
    return x * y


# 自定义标签
@register.simple_tag
def muit_tag(x,y):
    return x * y

# 自定义标签
@register.tag
def my_inp(id,arg):
    res = '<input type="text" id=%s class=%s>'%(id,arg)
    return mark_safe(res)
4、在使用自定义simple_tag和filter的html文件中导入之前创建的 my_tags.py
{% load my_tags %}
5、使用 simple_tag 和 filter(如何调用)
    <h3>自定义标签&过滤器</h3>
    <h4>过滤器</h4>
    {% load my_filter_tag %}  # 自定义标签与过滤器所在的 py 文件名
    <p>{{ list.1|muit_filfer:10 }}</p>

    <h4>标签</h4>
    <p>{% muit_tag 3 10 %}</p>
    <p>{% my_inp 'top' 'user' %}</p>
注意:filter 可以用在 if 等语句后,simple_tag不可以
{% if num|filter_multi:30 > 100 %}
    {{ num|filter_multi:30 }}
{% endif %}
模板继承 (extend)
Django模版引擎中最强大也是最复杂的部分就是模版继承了。模版继承可以让您创建一个基本的“骨架”模版,它包含您站点中的全部元素,并且可以定义能够被子模版覆盖的 blocks 。
通过从下面这个例子开始,可以容易的理解模版继承:
<!DOCTYPE html>
<html lang="zh-CN">
<head>
    <meta charset="utf-8">
    <title>
        {% block title %}

        {% endblock title%}
    </title>
    <style type="text/css">
        #top{
            height: 150px;
            width:100%;
            background-color: #afd9ee;
        }
        #left{
            float: left;
            height: 500px;
            width: 300px;
            background-color: #c9e2b3;
        }
        #right{
            height: 500px;
            width: 100%;
            background-color: #e4b9c0;
        }
    </style>
</head>
<body>
<div id="top">

</div>
<div id="left">
    {% block left_title %}
    left_title
    {% endblock %}
</div>
<div id="right">
    {% block info %}
    {{ name }}
    {% endblock info%}
</div>
</body>
</html>
这个模版,我们把它叫作 base.html, 它定义了一个可以用于两列排版页面的简单HTML骨架。“子模版”的工作是用它们的内容填充空的 blocks。
在这个例子中, block 标签定义了三个可以被子模版内容填充的 block。 block 告诉模版引擎: 子模版可能会覆盖掉模版中的这些位置。
子模版可能看起来是这样的:
{% extends 'base.html' %}
{% block title %}
    index_title
{% endblock %}

{% block info %}
{{ block.super }}
    pei
    name
{% endblock info%}
extends 标签是这里的关键。它告诉模版引擎,这个模版“继承”了另一个模版。当模版系统处理这个模版时,首先,它将定位父模版——在此例中,就是“base.html”。
那时,模版引擎将注意到 base.html 中的三个 block 标签,并用子模版中的内容来替换这些block。根据 blog_entries 的值,输出可能看起来是这样的:
<!DOCTYPE html>
<html lang="zh-CN">
<head>
    <meta charset="utf-8">
    <title>

    index_title

    </title>
    <style type="text/css">
        #top{
            height: 150px;
            width:100%;
            background-color: #afd9ee;
        }
        #left{
            float: left;
            height: 500px;
            width: 300px;
            background-color: #c9e2b3;
        }
        #right{
            height: 500px;
            width: 100%;
            background-color: #e4b9c0;
        }
    </style>
</head>
<body>
<div id="top">

</div>
<div id="left">

    left_title

</div>
<div id="right">


    ysg

    pei
    name

</div>
</body>
</html>
请注意,子模版并没有定义 sidebar block,所以系统使用了父模版中的值。父模版的 {% block %} 标签中的内容总是被用作备选内容(fallback)。
这种方式使代码得到最大程度的复用,并且使得添加内容到共享的内容区域更加简单,例如,部分范围内的导航。
这里是使用继承的一些提示:
- 如果你在模版中使用
{% extends %}标签,它必须是模版中的第一个标签。其他的任何情况下,模版继承都将无法工作。 - 在base模版中设置越多的
{% block %}标签越好。请记住,子模版不必定义全部父模版中的blocks,所以,你可以在大多数blocks中填充合理的默认内容,然后,只定义你需要的那一个。多一点钩子总比少一点好。 - 如果你发现你自己在大量的模版中复制内容,那可能意味着你应该把内容移动到父模版中的一个
{% block %}中。 - If you need to get the content of the block from the parent template, the variable will do the trick. This is useful if you want to add to the contents of a parent block instead of completely overriding it. Data inserted using will not be automatically escaped (see the next section), since it was already escaped, if necessary, in the parent template.
- 为了更好的可读性,你也可以给你的
{% endblock %}标签一个 名字 。例如:
{% block content %}
...
{% endblock content %}
在大型模版中,这个方法帮你清楚的看到哪一个 {% block %} 标签被关闭了。不能在一个模版中定义多个相同名字的 block 标签。