1、数据库
数据库(Database)是按照数据结构来组织、存储和管理数据的仓库。它产生于距今六十多年前,随着信息技术和市场的发展,特别是二十世纪九十年代以后,数据管理不再仅仅是存储和管理数据,而转变成用户所需要的各种数据管理方式。数据库有很多种类型,从简单的存储有各种数据的表格到能够进行海量数据存储的大型数据库系统。
关系型数据库系统(Relational Database Management System,RDBMS)是建立在关系模型基础上的数据库,借助于集合代数等数学概念和方法来处理数据库中的数据。现实世界中的各种实体以及实体之间的各种联系均用关系模型来表示。
关系型数据库有以下特点:
- 数据以表格的形式出现
- 每行为各种记录名称
- 每列为记录名称所对应的数据域
- 许多的行和列组成一张表单
- 若干的表单组成一个数据库
RDBMS术语:
- 数据库:一些关联表的集合
- 数据表:数据的矩阵。在一个数据库中的表看起来像是一个简单的电子表格
- 列:一列(数据元素)包含了相同的数据
- 行:一行(元组或记录)是一组相关的数据
- 冗余:存储两倍数据,冗余可以使系统速度更快。(表的规范化程度越高,表与表之间的关系就越多,查询时可能经常需要在多个表之间进行连接查询,而进行连接操作会降低查询速度。如果需要经常进行连接查询,将会消耗很多时间,所以可以在一个表中增加一个冗余字段,使得在查询时不用每次都进行连接操作)
- 主键:一个数据表中只能包含一个主键,可以使用主键来查询数据
- 外键:用于关联两个表
- 复合键:又称组合键,将多个列作为一个索引键,一般用于复合索引
- 索引:使用索引可以快速访问数据库表中的特定信息。索引是对数据库表中一列或多列的值进行排序的一种结构
- 实体完整性:实体完整性要求每一个表中的主键字段都不能为空或者重复的值
- 参照完整性:参照的完整性要求关系中不允许引用不存在的实体。与实体完整性是关系模型必须满足的完整性约束条件,目的是保证数据的一致性
2、MySQL
MySQL是当前最流行的关系型数据库,在Web应用方面MySQL是最好的关系型数据库。MySQL由瑞典MySQL AB公司开发,目前属于Oracle公司。
- MySQL是开源的,所以你不需要支付额外的费用
- MySQL支持大型数据库,可以处理拥有上千万条记录的大型数据库
- MySQL使用标准的SQL数据语言形式
- MySQL可以运行于多个系统上,并且支持多种语言。这些编程语言包括C、C++、Python、Java、Perl、PHP、Eiffel、Ruby和Tcl等
- MySQL对PHP有很好的支持,PHP是目前最流行的Web开发语言
- MySQL支持大型数据库,支持5000万条记录的数据仓库,32位系统表文件最大可支持4GB,64位系统支持最大的表文件为8TB
- MySQL可以定制,采用了GPL协议,可以修改源码来开发自己的MySQL系统
猛戳这里访问MySQL官网
3、MySQL的安装和使用
安装MySQL
Windows可在官网下载安装包安装,Linux上可通过yum或apt等安装包管理工具安装。
在ubuntu 16.04下安装MySQL,通过命令sudo apt-get install mysql-server。通过该命令安装MySQL时会在安装过程中提示设置root用户的密码。
本文中使用MySQL的环境均为ubuntu server 16.04.3。
验证MySQL安装
在成功安装MySQL后,一些基础表会初始化,在服务器启动后,可以通过mysqladmin工具来获取服务器状态。
fangyu@python:~$ mysqladmin --version
mysqladmin  Ver 8.42 Distrib 5.7.20, for Linux on x86_64
如果以上命令执行后未输出任何信息,则说明MySQL安装不成功。
启动及关闭MySQL
#通过以下命令检查MySQL服务器是否启动
ps -ef|grep mysqld
如果MySQL已经启动,以上命令将输出MySQL进程列表。
#通过以下命令启动MySQL服务器
 /etc/init.d/mysql start
#通过以下命令可以关闭正在运行的MySQL服务器
mysqladmin -u root -p shutdown
登录MySQL
#通过以下命令可以登录MySQL服务器
mysql -u root -p
Enter password:
#输入密码即可
在ubuntu 16.04上通过apt安装MySQL时,在安装过程中会提示设置root用户的密码,所以这里需要使用密码登录。
登录成功后会出现MySQL提示符,如下
mysql>
说明以成功连接上MySQL服务器,可以在该命令提示符下执行SQL命令。MySQL的SQL语句以;作为结束标识。
MySQL用户设置
使用root登录之后可以设置新用户并为新用户配置权限。
创建新用户
create user '用户名'@'host' identified by '密码';

#命令详解:
#host - 指定该用户在哪个主机上可以登录,如果是本地用户可以使用localhost;如果想让该用户可以从任意主机登录,可以使用通配符%;从指定主机登录可直接使用IP地址
为新用户配置权限
grant 权限 on 数据库.表名 to '用户名'@'host';

#命令详解:
#权限 - 用户的操作权限,如select、insert、update等,如果要授权所有权限,可以使用all
#数据库.表名 - 授权用户操作指定的数据库和表,如果要授权用户对所有数据库及表的操作,可以使用*.*

#注意:使用上面的命令所授权的用户无法给其他用户授权,想让该用户可以授权,可以通过以下命令
grant 权限 on 数据库.表名 to '用户名'@'host' with grant option;
#通过以下命令查看用户的授权信息
show grants for '用户名'@'host';
更改用户密码
set password for '用户名'@'host'=password('密码');

#为当前用户更改密码
set password=password('密码');

#password() - 使用MySQL提供的password函数对密码进行加密
撤销用户权限
revoke 权限 on 数据库.表名 from '用户名'@'host';

#注意:撤销权限时必须于添加权限的内容一致
删除用户
drop user '用户名'@'host';
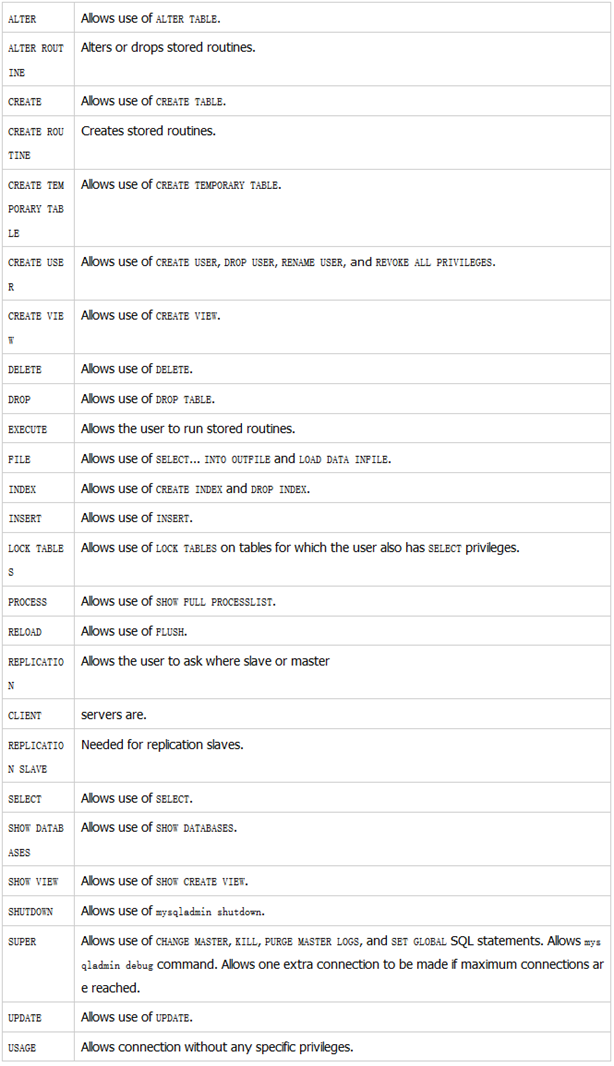
MySQL中的操作权限
MySQL管理命令
show databases:列出MySQL的数据库列表
use 数据库:选择要操作的数据库,使用该命令后所有的MySQL命令都只针对该数据库
show tables:显示指定数据库的所有表,使用该命令前需要使用use命令来选择要操作的数据库
show columns from 表名:显示数据表的属性,属性类型,主键信息,是否为NULL,默认值等其他信息,也可使用desc 表名
show index from 表名:显示数据表的详细索引信息,包括PRIMARY KEY(主键)
create database 数据库名 charset 'utf8':创建一个数据库,并使其支持中文
drop database 数据库名:删除数据库
4、MySQL数据类型
MySQL中定义数据字段的类型对于数据库的优化是非常重要的。
MySQL支持多种数据类型,大致可以分为三类:数值、日期/时间和字符串(字符)类型。
数值类型
MySQL支持所有标准SQL数值数据类型。
这些类型包括严格数值数据类型(INTEGER、SMALLINT、DECIMAL和NUMERIC),以及近似数值数据类型(FLOAT、REAL和DOUBLE PRECISION)。
关键字INT是INTEGER的同义词,关键字DEC是DECIMAL的同义词。
BIT数据类型保存位字段值,并且支持MyISAM、MEMORY、InnoDB和BDB表。
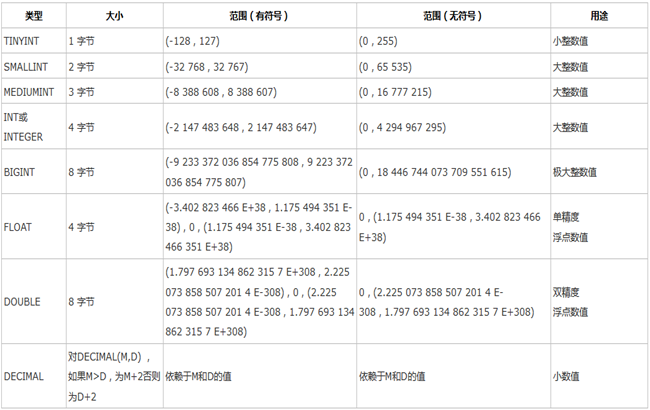
作为SQL标准的扩展,MySQL也支持整数类型TINYINT、MEDIUMINT和BIGINT。下面的表显示了需要的每个整数类型的存储和范围。
时间和日期类型
表示时间值的日期和时间类型为DATETIME、DATE、TIMESTAMP、TIME和YEAR。
每个时间类型有一个有效值范围和一个"零"值,当指定不合法的MySQL不能表示的值时使用"零"值。
TIMESTAMP类型有专有的自动更新特性。
字符串类型
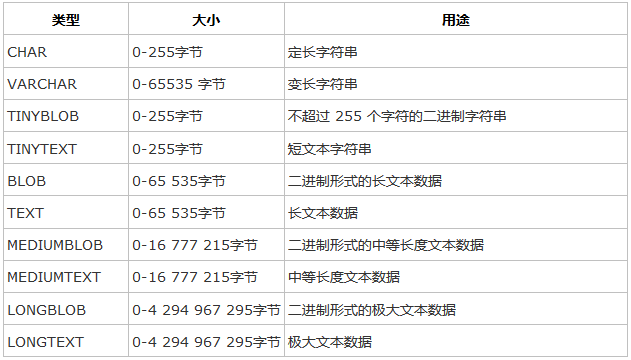
字符串类型指CHAR、VARCHAR、BINARY、VARBINARY、BLOB、TEXT、ENUM和SET。
CHAR和VARCHAR类型类似,但它们保存和检索的方式不同。它们的最大长度和是否尾部空格被保留等方面也不同。在存储或检索过程中不进行大小写转换。
BINARY和VARBINARY类类似于CHAR和VARCHAR,不同的是它们包含二进制字符串而不是非二进制字符串。也就是说,它们包含字节字符串而不是字符字符串。这说明它们没有字符集,并且排序和比较基于列值字节的数值值。
BLOB是一个二进制大对象,可以容纳可变数量的数据。有4种BLOB类型:TINYBLOB、BLOB、MEDIUMBLOB和LONGBLOB。它们只是可容纳值的最大长度不同。
有4种TEXT类型:TINYTEXT、TEXT、MEDIUMTEXT和LONGTEXT。这些对应4种BLOB类型,有相同的最大长度和存储需求。
5、MySQL常用命令
创建数据表
create table 表名(字段名,字段数据类型);
实例:在testdb中创建一个student表,有id,name,register_date三个字段,其中id为主键
mysql> create table student(
    -> id int not null auto_increment,
    -> name char(32) not null,
    -> register_date date not null,
    -> primary key(id)
    -> );

#命令详解:
#not null - 字段不为null,设置该属性后在输入该字段的数据为null时将会报错
#auto_increment - 自增,一般用于主键,数值会自动加1
#primary key - 定义主键,可以使用多个字段来定义主键,字段间以逗号分隔
插入数据
insert into 表名(字段1,字段2,...,字段n) values (值1,值2,...,值n);
查询数据
select 字段 from 表名 [where 条件] [offset m] [limit n];

#命令详解:
#查询语句中可以使用一个或多个表,表之间使用逗号分隔,并使用where语句来设定查询条件
#select命令可以读取一条或多条记录
#可以使用*来代替其他字段,select语句会返回表的所有字段数据
#可以使用where语句来包含任何条件
#可以通过offset指定select语句开始查询的数据偏移量,默认情况下偏移量为0,需配合limit使用
#可以使用limit属性来设定返回的记录树
where子句
以下操作符可以用于where子句中
假定A为10,B为20
like子句
select 字段 from 表名 where 条件 like 匹配条件;

#实例
select * from student where name like 'g%';

select * from student where name like binary 'G%';    #只匹配大写
排序
select 字段 from 表名 order by 字段 [asc or desc];

#命令详解:
#使用asc或desc关键字来设置查询结果按升序或者降序排序,默认情况下按升序排序
group by分组
select 字段,函数(自定义名称) from 表名 [where 条件] group by 字段;

#实例
mysql> select * from student;
+----+--------+---------------+
| id | name   | register_date |
+----+--------+---------------+
|  1 | gougou | 2017-12-22    |
|  2 | maomao | 2017-12-25    |
|  3 | guigui | 2017-12-25    |
|  4 | niuniu | 2017-12-29    |
|  5 | tutu   | 2017-12-30    |
+----+--------+---------------+
5 rows in set (0.00 sec)

#统计每个名字出现的次数并分组
mysql> select name,count('计数') from student group by name;
+--------+-----------------+
| name   | count('计数')   |
+--------+-----------------+
| gougou |               1 |
| guigui |               1 |
| maomao |               1 |
| niuniu |               1 |
| tutu   |               1 |
+--------+-----------------+

#使用with rollup
mysql> select name,count('c') as '计数' from student group by name with rollup;
+--------+--------+
| name   | 计数   |
+--------+--------+
| gougou |      1 |
| guigui |      1 |
| maomao |      1 |
| niuniu |      1 |
| tutu   |      1 |
| NULL   |      5 |
+--------+--------+

#可以使用 coalesce 来设置一个可以取代 NUll 的名称
mysql> select coalesce(name,'总计数'),count('计数') from student group by name with rollup;
+----------------------------+-----------------+
| coalesce(name,'总计数')    | count('计数')   |
+----------------------------+-----------------+
| gougou                     |               1 |
| guigui                     |               1 |
| maomao                     |               1 |
| niuniu                     |               1 |
| tutu                       |               1 |
| 总计数                         |               5 |
+----------------------------+-----------------+
修改数据
update 表名 set 字段1=值1,字段2=值2 [where 条件];
删除数据
delete from 表名 [where 条件];
修改表名及字段
#添加字段
alter table 表名 add 字段;
#实例:alter table student add phone int not null;

#删除字段
alter table 表名 drop 字段;
#实例:alter table student drop phone;


#修改字段类型及名称

#使用modify子句
alter table 表名 modify 字段 修改后的数据类型;
#实例: alter table student modify name char(48) not null;

#使用change子句
alter table 表名 change 字段名 修改后的字段名 修改后的数据类型;
#实例1:alter table student change name name char(32) not null;    #不修改字段名
#实例2:alter table student change name stu_name char(48) not null;    #修改字段名

#修改字段时添加是否null值及是否设置默认值
alter table 表名 modify 字段 数据类型 not null default 默认值;


#修改表名
alter table 表名 rename to 修改后的表名;
外键关联
外键是一个特殊的索引,用于关联两个表,用于维护数据的完整性。
#实例
mysql> create table student(
    -> id int not null auto_increment,
    -> name char(32) not null,
    -> class_id int not null,
    -> primary key(id),
    -> foreign key(class_id) references class(id)    #设置外键
    -> );
外键约束
mysql> insert into student (name,class_id) values('wangwang',3);
ERROR 1452 (23000): Cannot add or update a child row: a foreign key constraint fails (`testdb`.`student`, CONSTRAINT `student_ibfk_1` FOREIGN KEY (`class_id`) REFERENCES `class` (`id`))

#插入数据时,当插入的class_id为class表中不存在的id时,报错
mysql> delete from class where id=1;
ERROR 1451 (23000): Cannot delete or update a parent row: a foreign key constraint fails (`testdb`.`student`, CONSTRAINT `student_ibfk_1` FOREIGN KEY (`class_id`) REFERENCES `class` (`id`))

#一个表的字段被其他表关联后,无法删除
MySQL null值处理
使用selecet 命令及where子句进行查询时,当提供的查询条件字段为null时,该命令可能无法正常工作。为处理这种情况,MySQL提供了三大运算符:
is null:当列的值是null时,此运算符返回true
is not null:当列的值不为null时,此运算符返回true
<=>:比较操作符(不同于=运算符),当比较的两个值为null时返回true
关于 NULL 的条件比较运算是比较特殊的。你不能使用 = NULL 或 != NULL 在列中查找 NULL 值 。
在MySQL中,NULL值与任何其它值的比较(即使是NULL)永远返回false,即 NULL = NULL 返回false 。
MySQL中处理NULL使用IS NULL和IS NOT NULL运算符。
连接查询
MySQL的join可以在两个或多个表中查询数据。在select、update和delete语句中使用join来联合多表查询。
join按照功能大致分为以下三类:
inner join(内连接,或等值连接):获取两个表中字段匹配关系的记录。
left join(左连接):获取左表所有记录,即使右表没有对应的匹配记录。
right join(右连接):与left join相反,用于获取右表所有记录,即使左表没有对应匹配的记录。
实例:
有以下两张表
#class表
+----+----------+
| id | class    |
+----+----------+
|  1 | animal-1 |
|  2 | animal-2 |
|  3 | animal-3 |
+----+----------+

#student表
+----+--------+----------+
| id | name   | class_id |
+----+--------+----------+
|  2 | gougou |        1 |
|  3 | maomao |        2 |
|  4 | tutu   |        1 |
+----+--------+----------+
inner join(内连接)
mysql> select * from class inner join student on class.id=student.class_id;
+----+----------+----+--------+----------+
| id | class    | id | name   | class_id |
+----+----------+----+--------+----------+
|  1 | animal-1 |  2 | gougou |        1 |
|  2 | animal-2 |  3 | maomao |        2 |
|  1 | animal-1 |  4 | tutu   |        1 |
+----+----------+----+--------+----------+

#另一种写法
mysql> select class.*,student.* from class,student where class.id=student.class_id;
+----+----------+----+--------+----------+
| id | class    | id | name   | class_id |
+----+----------+----+--------+----------+
|  1 | animal-1 |  2 | gougou |        1 |
|  2 | animal-2 |  3 | maomao |        2 |
|  1 | animal-1 |  4 | tutu   |        1 |
+----+----------+----+--------+----------+


#配合where子句
mysql> select * from class inner join student on class.id=student.class_id where class_id=1;
+----+----------+----+--------+----------+
| id | class    | id | name   | class_id |
+----+----------+----+--------+----------+
|  1 | animal-1 |  2 | gougou |        1 |
|  1 | animal-1 |  4 | tutu   |        1 |
+----+----------+----+--------+----------+

mysql> select class.*,student.* from class,student where class.id=student.class_id and class_id=1;
+----+----------+----+--------+----------+
| id | class    | id | name   | class_id |
+----+----------+----+--------+----------+
|  1 | animal-1 |  2 | gougou |        1 |
|  1 | animal-1 |  4 | tutu   |        1 |
+----+----------+----+--------+----------+
left join(左连接)
mysql> select * from class left join student on class.id=student.class_id;
+----+----------+------+--------+----------+
| id | class    | id   | name   | class_id |
+----+----------+------+--------+----------+
|  1 | animal-1 |    2 | gougou |        1 |
|  2 | animal-2 |    3 | maomao |        2 |
|  1 | animal-1 |    4 | tutu   |        1 |
|  3 | animal-3 | NULL | NULL   |     NULL |
+----+----------+------+--------+----------+
right join(右连接)
mysql> select * from class right join student on class.id=student.class_id;
+------+----------+----+--------+----------+
| id   | class    | id | name   | class_id |
+------+----------+----+--------+----------+
|    1 | animal-1 |  2 | gougou |        1 |
|    1 | animal-1 |  4 | tutu   |        1 |
|    2 | animal-2 |  3 | maomao |        2 |
+------+----------+----+--------+----------+
full join,MySQL不支持full join,可以使用另一种方法实现
mysql> select * from class left join student on class.id=student.class_id union
    -> select * from class right join student on class.id=student.class_id;
+------+----------+------+--------+----------+
| id   | class    | id   | name   | class_id |
+------+----------+------+--------+----------+
|    1 | animal-1 |    2 | gougou |        1 |
|    2 | animal-2 |    3 | maomao |        2 |
|    1 | animal-1 |    4 | tutu   |        1 |
|    3 | animal-3 | NULL | NULL   |     NULL |
+------+----------+------+--------+----------+
事务
MySQL 事务主要用于处理操作量大,复杂度高的数据。比如说,在人员管理系统中,你删除一个人员,你即需要删除人员的基本资料,也要删除和该人员相关的信息,如信箱,文章等等,这样,这些数据库操作语句就构成一个事务!
- 在MySQL中只有使用了Innodb数据库引擎的数据库或表才支持事务
- 事务处理可以用来维护数据库的完整性,保证成批的SQL语句要么全部执行,要么全部不执行
- 事务用来管理insert,update,delete语句
一般来说,事务是必须满足4个条件(ACID): Atomicity(原子性)、Consistency(稳定性)、Isolation(隔离性)、Durability(可靠性)
- 事务的原子性:一组事务,要么成功;要么撤回。
- 稳定性 : 有非法数据(外键约束之类),事务撤回。
- 隔离性:事务独立运行。一个事务处理后的结果,影响了其他事务,那么其他事务会撤回。事务的100%隔离,需要牺牲速度。
- 可靠性:软、硬件崩溃后,InnoDB数据表驱动会利用日志文件重构修改。可靠性和高速度不可兼得, innodb_flush_log_at_trx_commit选项决定什么时候把事务保存到日志里。
使用begin开始一个事务;使用rollback进行回滚,这样数据将不会写入数据库;使用commit进行提交,写入数据库
索引
MySQL索引的建立对于MySQL的高效运行是很重要的,索引可以大大提高MySQL的检索速度。
索引分单列索引和组合索引。单列索引,即一个索引只包含单个列,一个表可以有多个单列索引,但这不是组合索引。组合索引,即一个索引包含多个列。
创建索引时,你需要确保该索引是应用在 SQL 查询语句的条件(一般作为 WHERE 子句的条件)。
实际上,索引也是一张表,该表保存了主键与索引字段,并指向实体表的记录。
索引的缺点:虽然索引大大提高了查询速度,同时却会降低更新表的速度,如对表进行INSERT、UPDATE和DELETE。因为更新表时,MySQL不仅要保存数据,还要保存一下索引文件。建立索引会占用磁盘空间的索引文件。
创建普通索引
普通索引是最基本的索引,没有任何限制。有以下几种方法创建:
CREATE INDEX indexName ON mytable(username(length));
#如果是CHAR,VARCHAR类型,length可以小于字段实际长度;如果是BLOB和TEXT类型,必须指定 length。

ALTER mytable ADD INDEX [indexName] ON (username(length));

#创建表时直接创建
CREATE TABLE mytable(
ID INT NOT NULL,
username VARCHAR(16) NOT NULL,
INDEX [indexName] (username(length))
);
#删除索引
DROP INDEX [indexName] ON mytable;
创建唯一索引
与普通索引不同,索引列的值必须唯一,但允许有空值。如果是组合索引,则列值的组合必须唯一。有以下几种方法创建:
CREATE UNIQUE INDEX indexName ON mytable(username(length));

ALTER mytable ADD UNIQUE [indexName] ON (username(length));

#创建表的时候直接指定
CREATE TABLE mytable(
ID INT NOT NULL,
username VARCHAR(16) NOT NULL,
UNIQUE [indexName] (username(length))
);
使用alter命令添加和删除索引
ALTER TABLE tbl_name ADD PRIMARY KEY (column_list): 该语句添加一个主键,这意味着索引值必须是唯一的,且不能为NULL。
ALTER TABLE tbl_name ADD UNIQUE index_name (column_list): 这条语句创建索引的值必须是唯一的(除了NULL外,NULL可能会出现多次)。
ALTER TABLE tbl_name ADD INDEX index_name (column_list): 添加普通索引,索引值可出现多次。
ALTER TABLE tbl_name ADD FULLTEXT index_name (column_list):该语句指定了索引为 FULLTEXT ,用于全文索引。
ALTER TABLE tbl_name DROP INDEX (index_name); 删除索引
使用alter命令添加和删除主键
主键只能作用于一个列上,添加主键索引时,你需要确保该主键默认不为空(NOT NULL)。实例如下:
mysql> ALTER TABLE testalter_tbl MODIFY i INT NOT NULL;
mysql> ALTER TABLE testalter_tbl ADD PRIMARY KEY (i);

你也可以使用 ALTER 命令删除主键:
mysql> ALTER TABLE testalter_tbl DROP PRIMARY KEY;
删除指定时只需指定PRIMARY KEY,但在删除索引时,你必须知道索引名。
显示索引信息
mysql> SHOW INDEX FROM table_name\G
6、Python使用pymysql操作MySQL
pymysql为第三方模块,可以使用pip install pymysql安装。使用该模块可以在Python中连接MySQL并执行原生SLQ命令。
pymysql使用实例
MySQL中存在testdb数据库,数据库中有表student,表的具体信息如下
+----+--------+----------+
| id | name   | class_id |
+----+--------+----------+
|  2 | gougou |        1 |
|  3 | maomao |        2 |
|  4 | tutu   |        1 |
|  6 | guigui |        2 |
+----+--------+----------+
查询数据
import pymysql

# 创建连接
conn = pymysql.connect(host="IP", port=3306, user="用户名", password="密码", db="testdb")

# 创建游标,类似登录MySQL后命令提示符的光标
cursor = conn.cursor()

# 执行SQL,并返回受影响行数
effect_line = cursor.execute("select * from student")
# 读取第一行数据
res1 = cursor.fetchone()
# 读取前n行数据
res2 = cursor.fetchmany(2)
# 读取全部数据
res3 = cursor.fetchall()

# 类似MySQL事务,提交后才执行
conn.commit()

# 关闭游标和连接
cursor.close()
conn.close()

print("%s条记录受影响" % effect_line)
print(res1)
print(res2)
print(res3)

#结果
4条记录受影响
(2, 'gougou', 1)
((3, 'maomao', 2), (4, 'tutu', 1))    # 注意:前面已读取一行,这里就从第二行开始
((6, 'guigui', 2),)    # 注意:前面的数据已读取,这里只读取了最后一行
注:在fetch数据时按照顺序进行,可以使用cursor.scroll(num,mode)来移动游标位置,如:
- cursor.scroll(1,mode='relative') # 相对当前位置移动
- cursor.scroll(2,mode='absolute') # 相对绝对位置移动
添加和修改数据
import pymysql

conn = pymysql.connect(host="IP", port=3306, user="用户名", password="密码", db="testdb")
cursor = conn.cursor()

effect_line1 = cursor.execute("update student set name='wangwang' where id=%s", (2,))

# 一次执行多条
effect_line2 = cursor.executemany("insert into student (name,class_id) values (%s, %s)", [("niuniu", 1), ("yangyang", 2)])

conn.commit()

cursor.close()
conn.close()

print("%s条记录受影响" % effect_line1)
print("%s条记录受影响" % effect_line2)

#结果
1条记录受影响
2条记录受影响

#执行后的student表
+----+----------+----------+
| id | name     | class_id |
+----+----------+----------+
|  2 | wangwang |        1 |
|  3 | maomao   |        2 |
|  4 | tutu     |        1 |
|  6 | guigui   |        2 |
|  7 | niuniu   |        1 |
|  8 | yangyang |        2 |
+----+----------+----------+
获取自增的新ID
# Life is short,you need Python!

import pymysql

conn = pymysql.connect(host="IP", port=3306, user="用户名", password="密码", db="testdb")
cursor = conn.cursor()

cursor.execute("insert into student (name, class_id) values ('yaya', 2)")

conn.commit()

cursor.close()
conn.close()

# 获取自增的新ID
new_id = cursor.lastrowid
print(new_id)

#结果
9
以字典形式返回数据
import pymysql

conn = pymysql.connect(host="IP", port=3306, user="用户名", password="密码", db="testdb")

# 游标设置为字典类型
cursor = conn.cursor(cursor=pymysql.cursors.DictCursor)

cursor.execute("select * from student")

res = cursor.fetchone()

conn.commit()

cursor.close()
conn.close()

print(res)

#结果
{'id': 2, 'name': 'wangwang', 'class_id': 1}
7、ORM — sqlalchemy使用
什么是ORM
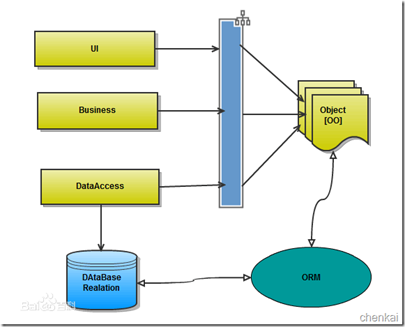
ORM英文全称为object relational mapping,对象映射关系程序,对于面向对象的编程语言来说一切皆对象,但数据库却是关系型的,为了保证一致的使用习惯,通过ORM将编程语言的对象模型和数据库的关系模型建立映射关系,这样在使用编程语言对数据库进行操作的时候可以直接使用编程语言的对象模型,而不用直接使用SQL语言。
ORM的优点:
- 隐藏了数据访问细节,“封闭”了通用数据库交互,使得我们与通用数据库交互变得简单易行,并且完全不用考虑SQL语言。快速开发由此而来。
- ORM使我们构造固化数据结构变得简单易行。
ORM的缺点:
无可避免的,自动化意味着映射和关联管理,代价是牺牲性能(在早期这是所有不喜欢ORM人的共同点)。现在的各种ORM框架都在尝试使用各种方法来减轻这块,效果还是很显著的。
SQLAlchemy安装
在Python中,最有名的ORM框架是SQLAlchemy。它是一个第三方模块,可以使用pip install sqlalchemy安装。
SQLAlchemy基本使用
创建一个表
from sqlalchemy import create_engine
from sqlalchemy import Column, Integer, CHAR
from sqlalchemy.ext.declarative import declarative_base

# 连接数据库
engine = create_engine("mysql+pymysql://用户名:密码@IP/testdb", encoding="utf-8", echo=True)

Base = declarative_base()    # 生成ORM基类


class Student(Base):
    __tablename__ = "student"    # 表名
    id = Column(Integer, primary_key=True)
    name = Column(CHAR(32), nullable=False)  # 创建变长字符串使用String,nullable=False为该字段不能为空

Base.metadata.create_all(engine)    # 创建表结构
另一种方法创建一个表
from sqlalchemy import Table, MetaData, Column, Integer, CHAR
from sqlalchemy.orm import mapper

metadata = MetaData()

student = Table("student", metadata,
                Column("id", Integer, primary_key=True),
                Column("name", CHAR(32), nullable=False))


class Student(object):
    def __init__(self, name):
        self.name = name

mapper(Student, student)
事实上,第一种创建方法就是第二种方法的再封装。
SQLAlchemy支持中文
engine = create_engine("mysql+pymysql://用户名:密码@IP/testdb?charset=utf8", encoding="utf-8")
插入记录到表
from sqlalchemy.orm import sessionmaker

SessionClass = sessionmaker(bind=engine)    # 创建与数据库的会话,这里返回的是一个class
Session = SessionClass()    # 生成session的实例

obj1 = Student(name="gougou")    # 需要插入的记录
obj2 = Student(name="maomao")

Session.add(obj1)    # 将记录插入数据库,注意,这里还没有真正写到数据库中
Session.add(obj2)

Session.commit()    # 统一提交给数据库
此时在MySQL中查询student表,结果如下:
+----+--------+
| id | name   |
+----+--------+
|  1 | gougou |
|  2 | maomao |
+----+--------+
SQLAlchemy查询、修改、删除记录
data = Session.query(Student).filter_by(name="gougou").first()    # 查询第一条记录
print(data)
#结果
<__main__.Student object at 0x00000196737E7C50>
#返回的数据映射成一个对象,直接打印即为该对象的内存地址

#可以像调用对象的属性一样调用字段
data = Session.query(Student).filter_by(name="gougou").first()    # 查询第一条记录
print("查询出的记录ID:%s,记录内容:%s" % (data.id, data.name))
#结果
查询出的记录ID:1,记录内容:gougou
为了是查询结果变得更加可读,可使用下面的方法:
from sqlalchemy import create_engine
from sqlalchemy.orm import sessionmaker
from sqlalchemy import Column, Integer, CHAR
from sqlalchemy.ext.declarative import declarative_base

engine = create_engine("mysql+pymysql://用户名:密码@IP/testdb", encoding="utf-8")
Base = declarative_base()


class Student(Base):
    __tablename__ = "student"
    id = Column(Integer, primary_key=True)
    name = Column(CHAR(32), nullable=False)

    def __repr__(self):
        return "ID:%s,name:%s" % (self.id, self.name)

SessionClass = sessionmaker(bind=engine)
Session = SessionClass()

data = Session.query(Student).filter_by(name="gougou").first()    # 查询第一条记录
print(data)

#结果
ID:1,name:gougou
查询所有记录
data = Session.query(Student.id, Student.name).all()
print(data)

#结果
[(1, 'guigui'), (2, 'maomao'), (3, 'niuniu'), (4, 'gougou'), (5, 'tutu')]
多条件查询
data = Session.query(Student).filter(Student.id > 1).filter(Student.id < 5).all()
print(data)

#结果
[ID:2 NAME:maomao, ID:3 NAME:niuniu, ID:4 NAME:gougou]
常用查询语法
等于
data = Session.query(Student).filter(Student.name == "niuniu").all()
print(data)

#结果
[ID:5 NAME:niuniu]
不等于
data = Session.query(Student).filter(Student.name != "niuniu").all()
print(data)

#结果
[ID:1 NAME:gougou, ID:2 NAME:maomao, ID:3 NAME:guigui, ID:4 NAME:tutu]
like
data = Session.query(Student).filter(Student.name.like("%i%")).all()
print(data)

#结果
[ID:3 NAME:guigui, ID:5 NAME:niuniu]
in、not in
#in
data = Session.query(Student).filter(Student.name.in_(["a", "niuniu"])).all()
print(data)
#结果
[ID:5 NAME:niuniu]


#not in
data = Session.query(Student).filter(~Student.name.in_(["gougou", "maomao", "niuniu"])).all()
print(data)
#结果
[ID:3 NAME:guigui, ID:4 NAME:tutu]
null,not null
#null
data = Session.query(Student).filter(Student.name.is_(None)).all()
print(data)
#结果
[]


#not null
data = Session.query(Student).filter(Student.name.isnot(None)).all()
print(data)
#结果
[ID:1 NAME:gougou, ID:2 NAME:maomao, ID:3 NAME:guigui, ID:4 NAME:tutu, ID:5 NAME:niuniu]
and
from sqlalchemy import and_

data = Session.query(Student).filter(and_(Student.id == 1, Student.name == "gougou")).all()
print(data)


#另一种写法
data = Session.query(Student).filter(Student.id == 1).filter(Student.name == "gougou").all()
print(data)
or
data = Session.query(Student).filter(or_(Student.name == "niuniu", Student.name == "gougou")).all()
print(data)
filter与filter_by的区别
data = Session.query(Student).filter_by(name="gougou").all()

data = Session.query(Student).filter(Student.name == "gougou").all()
修改
data = Session.query(Student).filter_by(name="gougou").first()    # 查询出该条记录
data.name = "guigui"    # 修改该记录的字段的值
Session.commit()
删除
data = Session.query(Student).filter_by(id=5).first()
Session.delete(data)
Session.commit()
回滚
Session.rollback()
统计
data = Session.query(Student).filter(Student.name.like("%i%")).count()
print(data)
分组
from sqlalchemy import func

data = Session.query(func.count(Student.name), Student.name).group_by(Student.name).all()
print(data)

#结果
[(1, 'gougou'), (1, 'guigui'), (1, 'maomao'), (1, 'niuniu')]
SQLAlchemy外键关联
创建classes和student两个表,其中student表的class_id字段关联class表中的id字段。
from sqlalchemy import create_engine
from sqlalchemy.orm import sessionmaker, relationship
from sqlalchemy.ext.declarative import declarative_base
from sqlalchemy import Column, Integer, CHAR, ForeignKey

engine = create_engine("mysql+pymysql://用户名:密码@IP/testdb", encoding="utf-8")
Base = declarative_base()


class Classes(Base):
    __tablename__ = "classes"
    id = Column(Integer, primary_key=True)
    name = Column(CHAR(32), nullable=False)

    def __repr__(self):
        return "Class:%s" % self.name


class Student(Base):
    __tablename__ = "student"
    id = Column(Integer, primary_key=True)
    name = Column(CHAR(32), nullable=False)
    class_id = Column(Integer, ForeignKey("classes.id"), nullable=False)

    # 在class表中通过backref字段反向查询出所有在student表中的关联项
    student = relationship("Classes", backref="students")

    def __repr__(self):
        return "ID:%s NAME:%s" % (self.id, self.name)

Base.metadata.create_all(engine)

SessionClass = sessionmaker(bind=engine)
Session = SessionClass()

classes = ["animal1", "animal2"]
for i in classes:
    Session.add(Classes(name=i))

students = {"gougou": 1, "maomao": 1, "guigui": 1, "niuniu": 2, "tutu": 2}
for j in students:
    Session.add(Student(name=j, class_id=students[j]))

Session.commit()
通过class查询相应的student记录
data = Session.query(Classes).all()
for i in data:
    print(i, i.students)
data = Session.query(Classes).filter_by(id=1).all()
for i in data:
    print(i.students)
通过student查询class记录
data = Session.query(Student).all()
for i in data:
    print(i, i.student.name)
多外键关联
创建classes和student表,其中student表中的class_id字段与class_name字段关联classes表中的id字段
class Classes(Base):
    __tablename__ = "classes"
    id = Column(Integer, primary_key=True)
    name = Column(CHAR(32), nullable=False)


class Student(Base):
    __tablename__ = "student"
    id = Column(Integer, primary_key=True)
    name = Column(CHAR(32), nullable=False)
    class_id = Column(Integer, ForeignKey("classes.id"), nullable=False)
    class_name = Column(Integer, ForeignKey("classes.id"), nullable=False)

    students = relationship("Classes", foreign_keys=[class_id])
    team = relationship("Classes", foreign_keys=[class_name])
SQLAlchemy多对多关系
实例
设计一个能描述图书与作者关系的表结构,需求如下:
- 一本书可以有好几个作者
- 一个作者可以写好几本书
此时可以通过中间表来完成书与作者之间的多对多关联
创建book,author,book_to_author三张表
from sqlalchemy import create_engine
from sqlalchemy.orm import relationship, sessionmaker
from sqlalchemy.ext.declarative import declarative_base
from sqlalchemy import Table, Column, Integer, CHAR, ForeignKey

engine = create_engine("mysql+pymysql://用户名:密码@IP/testdb?charset=utf8", encoding="utf-8")
Base = declarative_base()

book_to_author = Table("book_to_author", Base.metadata,
                       Column("book_id", Integer, ForeignKey("book.id")),
                       Column("author_id", Integer, ForeignKey("author.id")))


class Book(Base):
    __tablename__ = "book"
    id = Column(Integer, primary_key=True)
    name = Column(CHAR(64), nullable=False)

    authors = relationship("Author", secondary=book_to_author, backref="books")

    def __repr__(self):
        return "Book Name:%s" % self.name


class Author(Base):
    __tablename__ = "author"
    id = Column(Integer, primary_key=True)
    name = Column(CHAR(32), nullable=False)

    def __repr__(self):
        return "Author Name:%s" % self.name

Base.metadata.create_all(engine)

SessionClass = sessionmaker(bind=engine)
Session = SessionClass()

book1 = Book(name="Python核心编程")
book2 = Book(name="Linux内核")

a1 = Author(name="aaa")
a2 = Author(name="bbb")
a3 = Author(name="ccc")
a4 = Author(name="ddd")
a5 = Author(name="eee")

book1.authors = [a1, a2, a3]
book2.authors = [a4, a5]

Session.add_all([book1, book2, a1, a2, a3, a4, a5])
Session.commit()
MySQL中创建以下三张表。
#author
+----+------+
| id | name |
+----+------+
|  1 | aaa  |
|  2 | bbb  |
|  3 | ccc  |
|  4 | ddd  |
|  5 | eee  |
+----+------+

#book
+----+--------------------+
| id | name               |
+----+--------------------+
|  1 | Python核心编程     |
|  2 | Linux内核          |
+----+--------------------+

#book_to_author
+---------+-----------+
| book_id | author_id |
+---------+-----------+
|       1 |         1 |
|       1 |         2 |
|       1 |         3 |
|       2 |         4 |
|       2 |         5 |
+---------+-----------+
#book_to_author为ORM自动创建自动维护
查询
print("通过书名查作者".center(50, "*"))
authors = Session.query(Book).filter(Book.name == "Python核心编程").all()
for i in authors:
    print(i, i.authors, "\n")

print("通过作者查书名".center(50, "*"))
books = Session.query(Author).filter(Author.name == "aaa").all()
for j in books:
    print(j, j.books)

#结果
*********************通过书名查作者**********************
Book Name:Python核心编程 [Author Name:aaa, Author Name:bbb, Author Name:ccc]

*********************通过作者查书名**********************
Author Name:aaa [Book Name:Python核心编程]
删除
author = Session.query(Author).filter(Author.name == "aaa").all()
Session.delete(author[0])
Session.commit()
#此时ORM自动从book_to_author中删除对应的关联关系


