MHA-Atlas-MySQL高可用(下)
链接:https://pan.baidu.com/s/17Av92KQnJ81Gc0EmxSO7gA
提取码:a8mq
复制这段内容后打开百度网盘手机App,操作更方便哦
6. 配置VIP漂移
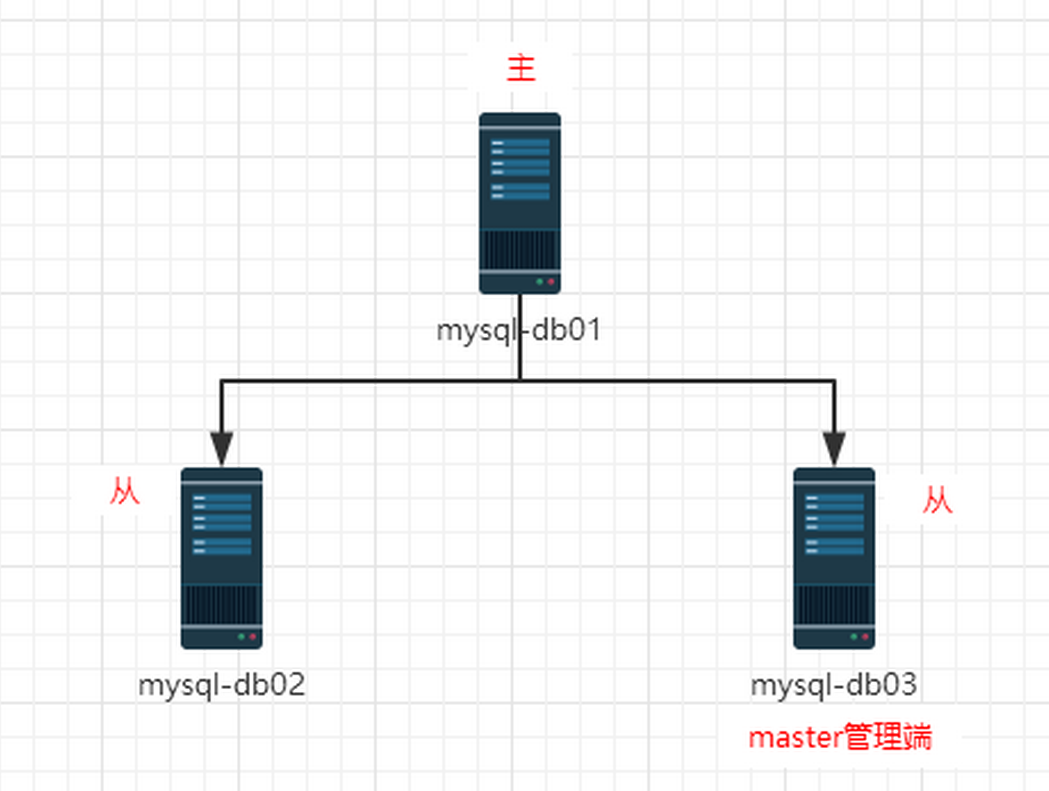
| 主机名 | IP地址 | 网卡模式 | 漂移VIP | 描述 |
|---|---|---|---|---|
| Mysql-Master | 192.168.200.123 | NAT8 | VIP:192.168.200.111 | 系统:CentOS6.5(6.x都可以)安装:mysql5.6 |
| Mysql-Slave01 | 192.168.200.124 | NAT8 | VIP:192.168.200.111 | 系统:CentOS6.5(6.x都可以)安装:mysql5.6 |
| Mysql-Slave02 | 192.168.200.125 | NAT8 | VIP:192.168.200.111 | 系统:CentOS6.5(6.x都可以)安装:mysql5.6 |
6.1 IP漂移的两种方式
- 通过keepalived的方式,管理虚拟IP的漂移
- 通过MHA自带脚本方式,管理虚拟IP的漂移
6.2 MHA脚本管理方式
6.2.1 获取管理脚本master_ip_failover
提示:yum安装的manager是没有这个脚本的。
我们需要从manager的源码包里复制一个。
[root@Mysql-Slave02 yuanmabao]# pwd
/root/yuanmabao
[root@Mysql-Slave02 yuanmabao]# ll mha4mysql-manager-0.56.tar.gz
-rw-r--r--. 1 root root 113914 Oct  5 20:57 mha4mysql-manager-0.56.tar.gz
[root@Mysql-Slave02 yuanmabao]# tar xf mha4mysql-manager-0.56.tar.gz

[root@Mysql-Slave02 yuanmabao]# cd mha4mysql-manager-0.56/samples/scripts/
[root@Mysql-Slave02 scripts]# ll
total 32
-rwxr-xr-x. 1 4984 users  3648 Apr  1  2014 master_ip_failover    #这就是管理虚拟IP的脚本
-rwxr-xr-x. 1 4984 users  9870 Apr  1  2014 master_ip_online_change
-rwxr-xr-x. 1 4984 users 11867 Apr  1  2014 power_manager
-rwxr-xr-x. 1 4984 users  1360 Apr  1  2014 send_report

[root@Mysql-Slave02 scripts]# cp master_ip_failover /usr/local/bin/
#复制到/usr/local/bin目录下
[root@Mysql-Slave02 scripts]# which master_ip_failover
/usr/local/bin/master_ip_failover
6.2.2 修改mha配置文件
[root@Mysql-Slave02 ~]# cat /etc/mha/mha1.cnf
[server default]
manager_log=/var/log/mha/mha1/manager
manager_workdir=/var/log/mha/mha1
master_binlog_dir=/usr/local/mysql/data
master_ip_failover_script=/usr/local/bin/master_ip_failover    #添加脚本位置
user=mha
password=971108
ping_interval=2
repl_user=rep
repl_password=971108
ssh_user=root

#candidate_master=1      #留着备用的注释项
#check_repl_delay=0      #留着备用的注释项

[server1]
hostname=192.168.200.123
port=3306

[server2]
hostname=192.168.200.124
port=3306

[server3]
hostname=192.168.200.125
port=3306
6.2.3 修改源程序自带VIP漂移脚本
#在下边的脚本里添加如下4行代码:
[root@Mysql-Slave02 ~]# sed -n '34,37p' /usr/local/bin/master_ip_failover
my $vip = '192.168.200.111/24';      #定义VIP
my $key = '0';                       #定义网卡后缀数值,如果eth0就是0,eth1就是1
my $ssh_start_vip = "/sbin/ifconfig eth0:$key $vip";  #绑定VIP的命令
my $ssh_stop_vip = "/sbin/ifconfig eth0:$key down";   #关闭VIP的命令
特别提示:由于自带的模板脚本特别的坑,需要修改的地方太多,因此,咱们可以直接拷贝脚本文件放到/usr/local/bin目录下,并赋予x权限。
6.2.4 修改后的master_ip_failover脚本的内容如下:
[root@Mysql-Slave02 ~]# cat  /usr/local/bin/master_ip_failover
#!/usr/bin/env perl

use strict;
use warnings FATAL => 'all';

use Getopt::Long;

my (
  $command,        $ssh_user,         $orig_master_host,
  $orig_master_ip, $orig_master_port, $new_master_host,
  $new_master_ip,  $new_master_port
);

my $vip = '192.168.200.111/24';
my $key = '0';
my $ssh_start_vip = "/sbin/ifconfig eth0:$key $vip";
my $ssh_stop_vip = "/sbin/ifconfig eth0:$key down";

GetOptions(
  'command=s'             => $command,
  'ssh_user=s'            => $ssh_user,
  'orig_master_host=s'    => $orig_master_host,
  'orig_master_ip=s'      => $orig_master_ip,
  'orig_master_port=i'    => $orig_master_port,
  'new_master_host=s'     => $new_master_host,
  'new_master_ip=s'       => $new_master_ip,
  'new_master_port=i'     => $new_master_port,
);

exit &main();

sub main {
    if ( $command eq "stop" || $command eq "stopssh" ) {
            my $exit_code = 1;
    	eval {
     		print "Disabling the VIP on old master:$orig_master_host
";
      		&stop_vip();
      		$exit_code = 0;
    	};
    	if ($@) {
            warn "Got Error: $@
";
      		exit $exit_code;
        }
        exit $exit_code;
  	}
  	elsif ( $command eq "start" ) {
            my $exit_code = 10;
    	eval {
      		print "Enabling the VIP - $vip on the new master - $new_master_host
";
      		&start_vip();
      		$exit_code = 0;
    	};
    	if ($@) {
            warn $@;
      		exit $exit_code;
        }
        exit $exit_code;
  	}
  	elsif ( $command eq "status" ) {
            print "Checking the Status of the script..OK
";
            `ssh $ssh_user@$orig_master_host " $ssh_start_vip "`;
            exit 0;
    }
    else {
            &usage();
            exit 1;
    }
    }
sub start_vip() {
    `ssh $ssh_user@$new_master_host " $ssh_start_vip "`;
}
sub stop_vip() {
    `ssh $ssh_user@$orig_master_host " $ssh_stop_vip "`;
}
sub usage {
  print
"Usage: master_ip_failover --command=start|stop|stopssh|status --orig_master_host=host --orig_master_ip=ip --orig_master_port=port --new_master_host=host --new_master_ip=ip --new_master_port=port
";
}
6.2.5 重启动mha管理端
[root@Mysql-Slave02 ~]# ps -ef | grep mha | grep -v grep   #查看mha进程
root      14138  13211  0 19:22 pts/3    00:00:00 perl /usr/bin/masterha_manager --conf=/etc/mha/mha1.cnf --remove_dead_master_conf --ignore_last_failover
[root@Mysql-Slave02 ~]# pkill perl         #杀掉perl进程
[1]+  Exit 1                  nohup masterha_manager --conf=/etc/mha/mha1.cnf --remove_dead_master_conf --ignore_last_failover < /dev/null > /var/log/mha/mha1/manager.log 2>&1
[root@Mysql-Slave02 ~]# ps -ef | grep mha | grep -v grep   #查看mha进程

[root@Mysql-Slave02 ~]# nohup masterha_manager --conf=/etc/mha/mha1.cnf --remove_dead_master_conf --ignore_last_failover < /dev/null > /var/log/mha/mha1/manager.log 2>&1 &       #启动mha进程
[1] 1574
[root@Mysql-Slave02 ~]# ps -ef | grep mha | grep -v grep
root       1574   1520 17 02:08 pts/0    00:00:00 perl /usr/bin/masterha_manager --conf=/etc/mha/mha1.cnf --remove_dead_master_conf --ignore_last_failover
提示:如果启动mha进程失败,需要进行mha的连接检测
- masterha_check_ssh --conf=/etc/mha/mha1.cnf ssh #连接检测
- masterha_check_repl --conf=/etc/mha/mha1.cnf #主从复制检测
6.3 VIP漂移脚本验证测试。
架构初始状态: