PyQt Demo:
https://www.cnblogs.com/zach0812/p/13121523.html
我们知道QFormLayout 是两列的(Label 和 Feild ) ,那么如果是想要 三列,想要四列如何搞呢?
就要用到这里的网格布局了,
QGridLayout的描述:
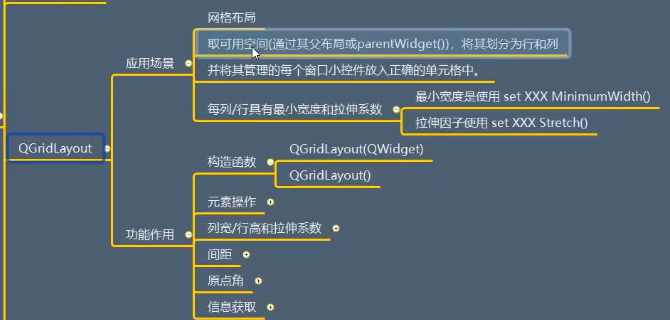
它是继承与QLayout 的,
QGridLayout的功能作用:
构造函数:


from PyQt5.Qt import * #刚开始学习可以这样一下导入
import sys

class Window(QWidget):
    def __init__(self):
        super().__init__()
        self.setWindowTitle("QGridLayout的学习")
        self.resize(400,400)
        self.set_ui()


    def set_ui(self):
        gridLayout = QGridLayout()

        label1= QLabel("标签1")
        label1.setStyleSheet("background-color:red;")
        label2= QLabel("标签2")
        label2.setStyleSheet("background-color:green;")
        label3= QLabel("标签3")
        label3.setStyleSheet("background-color:yellow;")


        self.setLayout(gridLayout)

if __name__ == '__main__':
    app =QApplication(sys.argv)

    window = Window()
    window.show()

    sys.exit(app.exec_())
元素操作:

合并单元格,要指明,从哪个开始,跨越几行,跨越几列。
from PyQt5.Qt import * #刚开始学习可以这样一下导入
import sys

class Window(QWidget):
    def __init__(self):
        super().__init__()
        self.setWindowTitle("QGridLayout的学习")
        self.resize(400,400)
        self.set_ui()


    def set_ui(self):
        gridLayout = QGridLayout()

        label1= QLabel("标签1")
        label1.setStyleSheet("background-color:red;")
        label2= QLabel("标签2")
        label2.setStyleSheet("background-color:green;")
        label3= QLabel("标签3")
        label3.setStyleSheet("background-color:yellow;")

        #添加控件
        gridLayout.addWidget(label1,0,0)
        gridLayout.addWidget(label2,0,1)
        # gridLayout.addWidget(label3,1,0)
        #合并单元格的时候要告诉它 跨越多少行 和跨越多少列
        gridLayout.addWidget(label3,1,0,1,2)   #从1 0开始 它占的是1行 2 列
        # gridLayout.addWidget(label3,1,0,3,3)   #从1 0开始 它占的是3行 3 列

        #添加布局
        # gridLayout.addLayout()   #它的智能提示不是太好

        #获取
        print(gridLayout.getItemPosition(2))
        print(gridLayout.itemAtPosition(1,1).widget().text())


        self.setLayout(gridLayout)

if __name__ == '__main__':
    app =QApplication(sys.argv)

    window = Window()
    window.show()

    sys.exit(app.exec_())
列宽/行高 和拉伸系数:

这里指的是最小的列宽和最小的行高:
from PyQt5.Qt import * #刚开始学习可以这样一下导入
import sys

class Window(QWidget):
    def __init__(self):
        super().__init__()
        self.setWindowTitle("QGridLayout的学习")
        self.resize(400,400)
        self.set_ui()


    def set_ui(self):
        gridLayout = QGridLayout()

        label1= QLabel("标签1")
        label1.setStyleSheet("background-color:red;")
        label2= QLabel("标签2")
        label2.setStyleSheet("background-color:green;")
        label3= QLabel("标签3")
        label3.setStyleSheet("background-color:yellow;")

        #添加控件
        gridLayout.addWidget(label1,0,0)
        gridLayout.addWidget(label2,0,1)
        gridLayout.addWidget(label3,1,0,1,2)

        #设置最小的列宽/行高
        # gridLayout.setColumnMinimumWidth(0,100 )  #第0列 最小 100
        # gridLayout.setRowMinimumHeight(0,100 )  #第0行  最小 100

        #拉伸系数
        gridLayout.setColumnStretch(0,1)  #第0列 的伸缩系数为1
        gridLayout.setColumnStretch(1,1)  #第1列 的伸缩系数为1

        gridLayout.setRowStretch(0,1)  #第0行 的伸缩系数为1
        gridLayout.setRowStretch(1,2)  #第1行 的伸缩系数为1


        self.setLayout(gridLayout)

if __name__ == '__main__':
    app =QApplication(sys.argv)

    window = Window()
    window.show()

    sys.exit(app.exec_())
间距:

一个是垂直方向的间距,一个是水平方向的间距。
from PyQt5.Qt import * #刚开始学习可以这样一下导入
import sys

class Window(QWidget):
    def __init__(self):
        super().__init__()
        self.setWindowTitle("QGridLayout的学习")
        self.resize(400,400)
        self.set_ui()


    def set_ui(self):
        gridLayout = QGridLayout()

        label1= QLabel("标签1")
        label1.setStyleSheet("background-color:red;")
        label2= QLabel("标签2")
        label2.setStyleSheet("background-color:green;")
        label3= QLabel("标签3")
        label3.setStyleSheet("background-color:yellow;")

        #添加控件
        gridLayout.addWidget(label1,0,0)
        gridLayout.addWidget(label2,0,1)
        gridLayout.addWidget(label3,1,0,1,2)

        self.setLayout(gridLayout)

        #间距
        # print(gridLayout.spacing())
        # print(gridLayout.horizontalSpacing())
        # print(gridLayout.verticalSpacing())

        gridLayout.setVerticalSpacing(0)
        gridLayout.setHorizontalSpacing(0)
        # 等同于上两个  gridLayout.setSpacing(0)

if __name__ == '__main__':
    app =QApplication(sys.argv)

    window = Window()
    window.show()

    sys.exit(app.exec_())
原点角:

信息获取:
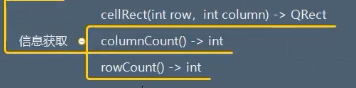
from PyQt5.Qt import * #刚开始学习可以这样一下导入
import sys

class Window(QWidget):
    def __init__(self):
        super().__init__()
        self.setWindowTitle("QGridLayout的学习")
        self.resize(400,400)
        self.set_ui()


    def set_ui(self):
        gridLayout = QGridLayout()

        label1= QLabel("标签1")
        label1.setStyleSheet("background-color:red;")
        label2= QLabel("标签2")
        label2.setStyleSheet("background-color:green;")
        label3= QLabel("标签3")
        label3.setStyleSheet("background-color:yellow;")

        #添加控件
        gridLayout.addWidget(label1,0,0)
        gridLayout.addWidget(label2,0,1)
        gridLayout.addWidget(label3,1,0,1,2)

        #信息获取
        print(gridLayout.rowCount())
        print(gridLayout.columnCount())
        QRect()
        print(gridLayout.cellRect(1,1))  #如果没有,可以将其放到 window.show() 后


if __name__ == '__main__':
    app =QApplication(sys.argv)

    window = Window()
    window.show()

    print(window.gridLayout.cellRect(1,1))


    sys.exit(app.exec_())
总结:
下面是QStackedLayout:https://www.cnblogs.com/zach0812/p/11402608.html