自定义view
一:组合现有的view
比较简单,暂时不举例子,以后补充
二:扩展已有的控件
继承已有的控件,保留继承的父控件的特性,引入新特性
举栗子说明:为九宫格增加分割线
系统默认Gridview没有分割线,因此若想为Gridview引入分割线,则需要自己扩展系统属性,需要重写Gridview。
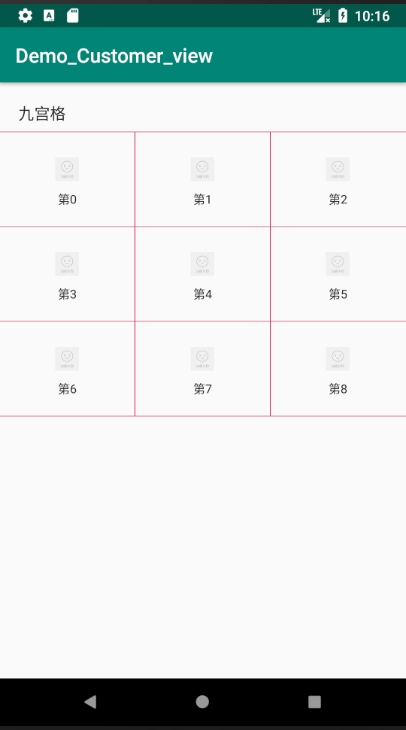
看一下上面的图片,思路很简单,就是继承GridView增加属性,这里我们先了解一个方法dispatchDraw()
ondraw() 和dispatchdraw()的区别
绘制View本身的内容,通过调用View.onDraw(canvas)函数实现
绘制自己的孩子通过dispatchDraw(canvas)实现
View组件的绘制会调用draw(Canvas canvas)方法,draw过程中主要是先画Drawable背景,对 drawable调用setBounds()然后是draw(Canvas c)方法.有点注意的是背景drawable的实际大小会影响view组件的大小,drawable的实际大小通过getIntrinsicWidth()和getIntrinsicHeight()获取,当背景比较大时view组件大小等于背景drawable的大小
画完背景后,draw过程会调用onDraw(Canvas canvas)方法,然后就是dispatchDraw(Canvas canvas)方法, dispatchDraw()主要是分发给子组件进行绘制,我们通常定制组件的时候重写的是onDraw()方法。值得注意的是ViewGroup容器组件的绘制,当它没有背景时直接调用的是dispatchDraw()方法, 而绕过了draw()方法,当它有背景的时候就调用draw()方法,而draw()方法里包含了dispatchDraw()方法的调用。因此要在ViewGroup上绘制东西的时候往往重写的是dispatchDraw()方法而不是onDraw()方法,或者自定制一个Drawable,重写它的draw(Canvas c)和 getIntrinsicWidth(),
getIntrinsicHeight()方法,然后设为背景。
下面给出GridView源码:
import android.content.Context;
import android.graphics.Canvas;
import android.graphics.Paint;
import android.util.AttributeSet;
import android.view.View;
import android.widget.GridView;

import com.bingo.customer.R;


/**
 * ================================
 *
 * @author: zcb
 * @email: zhang-cb@foxmail.com
 * @time: 2018/5/31 17:48
 * @version: 1.0
 * @description: 自定义了GridView 增加了边线
 * =================================
 */
public class LineGridView extends GridView {


    public LineGridView(Context context) {
        super(context);
    }

    public LineGridView(Context context, AttributeSet attrs) {
        super(context, attrs);
    }

    public LineGridView(Context context, AttributeSet attrs, int defStyle) {
        super(context, attrs, defStyle);
    }

    @Override
    protected void dispatchDraw(Canvas canvas) {
        super.dispatchDraw(canvas);
        View localView1 = getChildAt(0);
        if (localView1 == null) {
            return;
        }
        int column = getWidth() / localView1.getWidth();
        int childCount = getChildCount();
        Paint localPaint;
        localPaint = new Paint();
        localPaint.setStyle(Paint.Style.STROKE);
        localPaint.setColor(getContext().getResources().getColor(R.color.colorAccent));
        localPaint.setStrokeWidth(2);
        for (int i = 0; i < childCount; i++) {
            View cellView = getChildAt(i);
            if ((i + 1) % column == 0) {
                //最右边的列 只画底线
                if (i < column) {
                    //第一行最右边的列 画一条上边横线
                    canvas.drawLine(cellView.getLeft(), cellView.getTop(), cellView.getRight(), cellView.getTop(), localPaint);
                }

                canvas.drawLine(cellView.getLeft(), cellView.getBottom(), cellView.getRight(), cellView.getBottom(), localPaint);
            } else if ((i + 1) > (childCount - (childCount % column))) {
                //
                canvas.drawLine(cellView.getRight(), cellView.getTop(), cellView.getRight(), cellView.getBottom(), localPaint);
            } else {
                if (i < column) {
                    //第一行 不含有最右边一列 画一条上边横线
                    canvas.drawLine(cellView.getLeft(), cellView.getTop(), cellView.getRight(), cellView.getTop(), localPaint);
                }
                canvas.drawLine(cellView.getRight(), cellView.getTop(), cellView.getRight(), cellView.getBottom(), localPaint);
                canvas.drawLine(cellView.getLeft(), cellView.getBottom(), cellView.getRight(), cellView.getBottom(), localPaint);
            }
        }
        if (childCount % column != 0) {
            for (int j = 0; j < (column - childCount % column); j++) {
                View lastView = getChildAt(childCount - 1);
                canvas.drawLine(lastView.getRight() + lastView.getWidth() * j,
                        lastView.getTop(),
                        lastView.getRight() + lastView.getWidth() * j,
                        lastView.getBottom(),
                        localPaint);
            }
        }
    }
}
三:重写View实现全新的控件
基础知识:
1,Canvas 画板
2,Paint 画笔
3,Color 颜色
其中Color.parseColor(String str); 方法可以解析Alpha颜色和普通的颜色。
4,Bitmap 位图
首先,我们需要明白这是一种完全的自定义控件的形式,只有当我们遇到原生控件无法满足的时候才会想要这种办法。
自定义控件分为以下几个步骤:
Ⅰ、在OnMeasure()方法中,测量自定义控件的大小,使自定义控件能够自适应布局各种各样的需求。
Ⅱ、在OnDraw()方法中,利用哼哈二将(Canvas与Paint)来绘制要显示的内容。
Ⅲ、在OnLayout()方法中来确定控件显示位置。
Ⅳ、在OnTouchEvent()方法处理控件的触摸事件。
对应的思维导图如下:

下面将举个我遇到的栗子view:
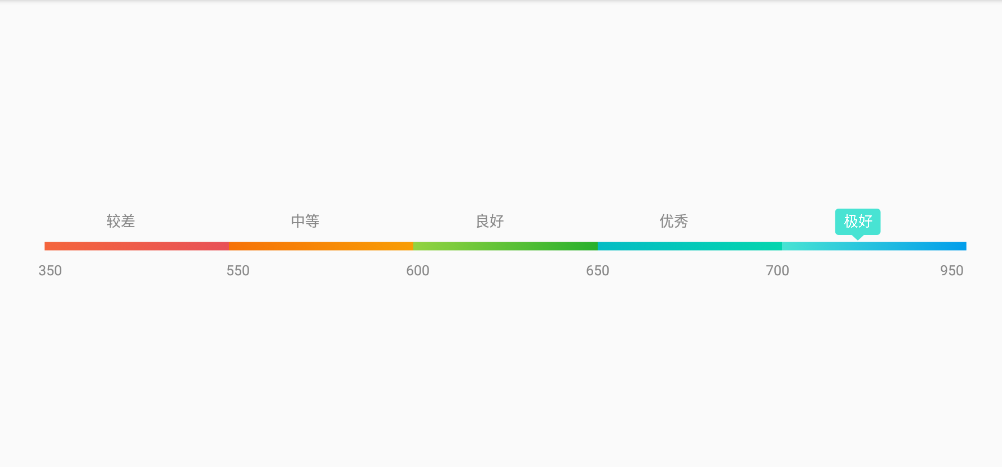
看下上面这个View的图,用于显示芝麻分认证以后显示芝麻分等级的view。这是个简单的例子,简单分析一下,一共有三行,
第一行显示等级汉字(较差、中等、良好、优秀、极好),其中极好这个等级是有背景,并且背景颜色是根据当前分数决定的。
第二行是5个等级不同颜色的view。
第三行是显示不同的分数开始和结束的数字。
分析结束,我们自定义view要把这个分成三行分开来,一行一行画。
第一步是onMeasure()方法,测量view将使用的宽高。
    @Override
    protected void onMeasure(int widthMeasureSpec, int heightMeasureSpec) {
        super.onMeasure(widthMeasureSpec, heightMeasureSpec);
        int height = getPaddingTop() + getPaddingBottom() + lineWidth + padding_img + 20 + textHeight + padding_text;
        Log.i(Tag, "height:" + height);
        Log.i(Tag, "getPaddingBottom():" + getPaddingBottom() + ",getPaddingTop():" + getPaddingTop() + "padding_img:" + padding_img + "lineWidth" + lineWidth);
        setMeasuredDimension(getMeasuredWidth(), height);
    }
第二步是onDraw()方法:
    @Override
    protected void onDraw(Canvas canvas) {
        super.onDraw(canvas);
        //画第一行 5个等级的文字
        Rect rect = getTextWH(currentDialvalue + "", textSize);
        //修正边界
        Log.i(Tag, "textgetPaddingTop:" + getPaddingTop());
        int text_ph = getPaddingTop() + rect.height() - 7;

        if (currentDialvalue >= 350 && currentDialvalue < 550) {
            recPaint.setColor(ContextCompat.getColor(context, R.color.jiaocha_start));
            draw5Characters(canvas, 1,  text_ph);
        } else if (currentDialvalue >= 550 && currentDialvalue < 600) {
            recPaint.setColor(ContextCompat.getColor(context, R.color.zhongdeng_start));
            draw5Characters(canvas, 2,  text_ph);
        } else if (currentDialvalue >= 600 && currentDialvalue < 650) {
            recPaint.setColor(ContextCompat.getColor(context, R.color.lianghao_start));
            draw5Characters(canvas, 3, text_ph);
        } else if (currentDialvalue >= 650 && currentDialvalue < 700) {
            recPaint.setColor(ContextCompat.getColor(context, R.color.youxiu_start));
            draw5Characters(canvas, 4,  text_ph);
        } else if (currentDialvalue >= 700 && currentDialvalue < 950) {
            recPaint.setColor(ContextCompat.getColor(context, R.color.jihao_start));
            draw5Characters(canvas, 5, text_ph);
        }

        //画第二行不同颜色矩形
        int bgline_ph = lineWidth / 2 + 1 + getPaddingTop() + textHeight + padding_text;
        draw5Line(canvas, bgline_ph);
        //画第三行等级数字
        drawLevelNum(canvas);
    }
这其中有个细节必须要注意:画每一个汉字的时候,必须先确定这个字当前需不需要背景,如果需要背景则要画上背景,如果不需要背景则只需要画汉字即可,画汉字代码如下:
 /**
     * 画第一行5个等级词语{较差,中等,良好,优秀,极好}
     * @param canvas 画布
     * @param index 第一个需要背景
     * @param text_ph 高
     */
    public void draw5Characters(Canvas canvas, int index, int text_ph) {

        final float stepWidth = (getMeasuredWidth() - getPaddingRight() - cap) / 5;
        final float offsetWidth = getPaddingLeft() + stepWidth / 3;

        for (int i = 1; i <= 5; i++) {
            if (i == index) {
                // 背景矩形
                float left = stepWidth * (i - 1) + offsetWidth - 15;
                float top = getPaddingTop() - 20;
                float right = left + getTextWH("测试", textSize).width() + 30;
                float bottom = text_ph + 15;
                RectF oval3 = new RectF(left, top, right, bottom);
                canvas.drawRoundRect(oval3, 6, 6, recPaint);

                /**
                 * 三角形
                 *  *******
                 *   *****
                 *    ***
                 *     *
                 */
                Path path = new Path();
                path.moveTo(left, getPaddingTop());// 三角形的起顶点
                path.lineTo(right, getPaddingTop());//三角形右边的顶点
                path.lineTo((left + right) / 2, bottom + 10);  //三角形下面的顶点
                path.close(); // 使这些点构成封闭的多边形
                canvas.drawPath(path, recPaint);

                paint_text_value.setColor(Color.WHITE);
                canvas.drawText(paintString[i - 1], stepWidth * (i - 1) + offsetWidth, text_ph, paint_text_value);

            } else {
                canvas.drawText(paintString[i - 1], stepWidth * (i - 1) + offsetWidth, text_ph, hanziPaint);
            }
        }
    }
第二行不同颜色的矩形图笔比较简单,但是需要注意的细节是,背景颜色是渐变的,不是一层不变的颜色,具体代码如下:
其中画渐变颜色的方法也很简单,使用系统自带的类LinearGradient,画渐变背景颜色代码如下:
linearGradient = new LinearGradient(startXPoint, 0, stopXPoint, 0, new int[]{lineColors.get(i - 1).startColor, lineColors.get(i - 1).stopColor}, null, LinearGradient.TileMode.CLAMP);
            paint_bg.setShader(linearGradient);
下面就是画第二行矩形的全部代码:
    /**
     * 画第二行5条等级颜色渐变线
     */
    public void draw5Line(Canvas canvas, int bgline_ph) {
        float startXPoint;
        float stopXPoint;
        float tempXPoint;

        for (int i = 1; i <= 5; i++) {
            startXPoint = (getMeasuredWidth() - getPaddingRight() - cap) / 5 * (i - 1) + getPaddingLeft();
            stopXPoint = (getMeasuredWidth() - getPaddingRight() - cap) / 5 * i + getPaddingLeft();
            if (i % 2 == 0) {  //第偶数次循环,交换起始点
                tempXPoint = startXPoint;
                startXPoint = stopXPoint;
                stopXPoint = tempXPoint;
            }

            linearGradient = new LinearGradient(startXPoint, 0, stopXPoint, 0, new int[]{lineColors.get(i - 1).startColor, lineColors.get(i - 1).stopColor}, null, LinearGradient.TileMode.CLAMP);
            paint_bg.setShader(linearGradient);
            canvas.drawLine(startXPoint, bgline_ph, stopXPoint, bgline_ph, paint_bg);
        }
    }
到了画第三行数字的时候了,也是比较简单的,难点在于位置的定位,刚开始的时候我怎么都找不到位置,多次修改尝试之后才最终确定,不多说了,直接上代码吧:
    /**
     * 画第三行的等级数字{350,550,600,650,70,950}
     *
     * @param canvas
     */
    public void drawLevelNum(Canvas canvas) {
        Paint mPaint = new Paint();
        mPaint.setStrokeWidth(3);
        mPaint.setTextSize(25);
        mPaint.setAntiAlias(true);
        mPaint.setColor(Color.GRAY);
        mPaint.setTextAlign(Paint.Align.CENTER);

        int img_postion_h = lineWidth + padding_img + getPaddingTop() + textHeight + padding_text;
        Log.i(Tag, "img_postion_h:" + img_postion_h);
        float pre = allLength / 5;
        float offsetw = 20 / 3 * -1;
        for (int i = 0; i < level_num.length; i++) {
            if (i == level_num.length - 1) {
                canvas.drawText(level_num[i] + "", allLength + getPaddingLeft() + cap, img_postion_h + 25, mPaint);
            } else {
                if (i == 0) {
                    canvas.drawText(level_num[i] + "", i * pre + getPaddingLeft() + cap, img_postion_h + 25, mPaint);
                } else {
                    canvas.drawText(level_num[i] + "", i * pre + offsetw + getPaddingLeft() + cap + 20, img_postion_h + 25, mPaint);
                }
            }
        }
    }
至此,三行都画完了之后吗,这个view也就成型了,总的来说不难,但是刚开始的时候会找不到入口点,还是需要多练习,本人才疏学浅,下面给出全部代码和源码:
import android.animation.ValueAnimator;
import android.content.Context;
import android.graphics.Canvas;
import android.graphics.Color;
import android.graphics.LinearGradient;
import android.graphics.Paint;
import android.graphics.Path;
import android.graphics.Rect;
import android.graphics.RectF;
import android.support.v4.content.ContextCompat;
import android.util.AttributeSet;
import android.util.Log;
import android.view.View;
import com.bingo.customer.R;

import java.util.ArrayList;

/**
 * ================================
 * 作   者:   zcb
 * 邮   箱:   zhang-cb@foxmail.com
 * 创建时间:   2017/6/5 14:18
 * 版   本:   1.0
 * 描   述:   自定义芝麻分数等级view
 * 首先需要设置数据setdata,data中值的范围需要从小到大排序
 * 然后设置等级的值setCurrentDialvalue,即可
 * =================================
 */

public class UserLevelView extends View {
    private Context context;
    private String Tag = "UserLevelView";
    private Paint paint_bg = new Paint();
    private Paint paint_text_value = new Paint();
    private Paint paint_text_total = new Paint();
    private Paint hanziPaint = new Paint();
    private Paint recPaint = new Paint();

    private LinearGradient linearGradient;
    private ArrayList<UserLevelDial> datas;
    private int currentDialvalue = -1;
    //整个控件的长度
    private int allLength;
    //有背景文字的等级汉字的长度
    private int cDialLenth;

    //笔触宽度
    private int cap = 10;
    //进度条宽度
    private int lineWidth = 15;

    private int[] level_num = {350, 550, 600, 650, 700, 950};
    private int currentImg = -1;
    //图片等级与线条的间距
    private int padding_img = 20;
    //线条与上面文字的间距
    private int padding_text = 20;
    private int textHeight = 0;
    private int textSize;
    private int maxValue = 1500;
    private String[] paintString = {getResources().getString(R.string.text_sesame_level_jiaocha),
            getResources().getString(R.string.text_sesame_level_zhongdeng),
            getResources().getString(R.string.text_sesame_level_lianghao),
            getResources().getString(R.string.text_sesame_level_youxiu),
            getResources().getString(R.string.text_sesame_level_jihao)};

    private ArrayList<LineColor> lineColors = new ArrayList<>();

    public UserLevelView(Context context) {
        this(context, null);
        this.context = context;
    }

    public UserLevelView(Context context, AttributeSet attrs) {
        this(context, attrs, 0);
        this.context = context;
    }

    public UserLevelView(Context context, AttributeSet attrs, int defStyleAttr) {
        super(context, attrs, defStyleAttr);
        this.context = context;
        init();
    }

    public void init() {
        this.textSize = DensityUtil.dip2px(getContext(), 10f);
        this.textHeight = getTextWH("9", textSize).height();
        initPaint();
        initLineColor();
    }


    public void initPaint() {

        //第二条背景线的画笔
        paint_bg.setColor(ContextCompat.getColor(context, R.color.gray));
        paint_bg.setStyle(Paint.Style.FILL);
//        paint_bg.setStrokeCap(Paint.Cap.ROUND);
        paint_bg.setStrokeJoin(Paint.Join.ROUND);
        paint_bg.setStrokeWidth(lineWidth);
        paint_bg.setAntiAlias(true);

        //选中值后的有颜色背景的汉字画笔
        paint_text_value.setTextSize(textSize);
        paint_text_value.setColor(ContextCompat.getColor(context, R.color.userlevels2));
        paint_text_total.setTextSize(textSize);
        paint_text_total.setColor(Color.BLACK);

        //汉字画笔
        hanziPaint.setStrokeWidth(3);
        hanziPaint.setTextSize(textSize);
        hanziPaint.setColor(Color.GRAY);
        hanziPaint.setTextAlign(Paint.Align.LEFT);
        hanziPaint.setAntiAlias(true);

        //渐变色矩形画笔
        recPaint.setStyle(Paint.Style.FILL);//充满
        recPaint.setColor(Color.LTGRAY);
        recPaint.setAntiAlias(true);// 设置画笔的锯齿效果
    }

    private void initLineColor() {
        lineColors.add(new LineColor(ContextCompat.getColor(context, R.color.jiaocha_start), ContextCompat.getColor(context, R.color.jiaocha_end)));
        lineColors.add(new LineColor(ContextCompat.getColor(context, R.color.zhongdeng_start), ContextCompat.getColor(context, R.color.zhongdeng_end)));
        lineColors.add(new LineColor(ContextCompat.getColor(context, R.color.lianghao_start), ContextCompat.getColor(context, R.color.lianghao_end)));
        lineColors.add(new LineColor(ContextCompat.getColor(context, R.color.youxiu_start), ContextCompat.getColor(context, R.color.youxiu_end)));
        lineColors.add(new LineColor(ContextCompat.getColor(context, R.color.jihao_start), ContextCompat.getColor(context, R.color.jihao_end)));
    }

    @Override
    protected void onMeasure(int widthMeasureSpec, int heightMeasureSpec) {
        super.onMeasure(widthMeasureSpec, heightMeasureSpec);
        int height = getPaddingTop() + getPaddingBottom() + lineWidth + padding_img + 20 + textHeight + padding_text;
        Log.i(Tag, "height:" + height);
        Log.i(Tag, "getPaddingBottom():" + getPaddingBottom() + ",getPaddingTop():" + getPaddingTop() + "padding_img:" + padding_img + "lineWidth" + lineWidth);
        setMeasuredDimension(getMeasuredWidth(), height);
    }

    @Override
    protected void onDraw(Canvas canvas) {
        super.onDraw(canvas);
        //画第一行 5个等级的文字
        Rect rect = getTextWH(currentDialvalue + "", textSize);
        //修正边界
        Log.i(Tag, "textgetPaddingTop:" + getPaddingTop());
        int text_ph = getPaddingTop() + rect.height() - 7;

        if (currentDialvalue >= 350 && currentDialvalue < 550) {
            recPaint.setColor(ContextCompat.getColor(context, R.color.jiaocha_start));
            draw5Characters(canvas, 1,  text_ph);
        } else if (currentDialvalue >= 550 && currentDialvalue < 600) {
            recPaint.setColor(ContextCompat.getColor(context, R.color.zhongdeng_start));
            draw5Characters(canvas, 2,  text_ph);
        } else if (currentDialvalue >= 600 && currentDialvalue < 650) {
            recPaint.setColor(ContextCompat.getColor(context, R.color.lianghao_start));
            draw5Characters(canvas, 3, text_ph);
        } else if (currentDialvalue >= 650 && currentDialvalue < 700) {
            recPaint.setColor(ContextCompat.getColor(context, R.color.youxiu_start));
            draw5Characters(canvas, 4,  text_ph);
        } else if (currentDialvalue >= 700 && currentDialvalue < 950) {
            recPaint.setColor(ContextCompat.getColor(context, R.color.jihao_start));
            draw5Characters(canvas, 5, text_ph);
        }

        //画第二行不同颜色矩形
        int bgline_ph = lineWidth / 2 + 1 + getPaddingTop() + textHeight + padding_text;
        draw5Line(canvas, bgline_ph);
        //画第三行等级数字
        drawLevelNum(canvas);
    }

    /**
     * 画第一行5个等级词语{较差,中等,良好,优秀,极好}
     * @param canvas 画布
     * @param index 第一个需要背景
     * @param text_ph 高
     */
    public void draw5Characters(Canvas canvas, int index, int text_ph) {

        final float stepWidth = (getMeasuredWidth() - getPaddingRight() - cap) / 5;
        final float offsetWidth = getPaddingLeft() + stepWidth / 3;

        for (int i = 1; i <= 5; i++) {
            if (i == index) {
                // 背景矩形
                float left = stepWidth * (i - 1) + offsetWidth - 15;
                float top = getPaddingTop() - 20;
                float right = left + getTextWH("测试", textSize).width() + 30;
                float bottom = text_ph + 15;
                RectF oval3 = new RectF(left, top, right, bottom);
                canvas.drawRoundRect(oval3, 6, 6, recPaint);

                /**
                 * 三角形
                 *  *******
                 *   *****
                 *    ***
                 *     *
                 */
                Path path = new Path();
                path.moveTo(left, getPaddingTop());// 三角形的起顶点
                path.lineTo(right, getPaddingTop());//三角形右边的顶点
                path.lineTo((left + right) / 2, bottom + 10);  //三角形下面的顶点
                path.close(); // 使这些点构成封闭的多边形
                canvas.drawPath(path, recPaint);

                paint_text_value.setColor(Color.WHITE);
                canvas.drawText(paintString[i - 1], stepWidth * (i - 1) + offsetWidth, text_ph, paint_text_value);

            } else {
                canvas.drawText(paintString[i - 1], stepWidth * (i - 1) + offsetWidth, text_ph, hanziPaint);
            }
        }
    }

    /**
     * 画第二行5条等级颜色渐变线
     */
    public void draw5Line(Canvas canvas, int bgline_ph) {
        float startXPoint;
        float stopXPoint;
        float tempXPoint;

        for (int i = 1; i <= 5; i++) {
            startXPoint = (getMeasuredWidth() - getPaddingRight() - cap) / 5 * (i - 1) + getPaddingLeft();
            stopXPoint = (getMeasuredWidth() - getPaddingRight() - cap) / 5 * i + getPaddingLeft();
            if (i % 2 == 0) {  //第偶数次循环,交换起始点
                tempXPoint = startXPoint;
                startXPoint = stopXPoint;
                stopXPoint = tempXPoint;
            }

            linearGradient = new LinearGradient(startXPoint, 0, stopXPoint, 0, new int[]{lineColors.get(i - 1).startColor, lineColors.get(i - 1).stopColor}, null, LinearGradient.TileMode.CLAMP);
            paint_bg.setShader(linearGradient);
            canvas.drawLine(startXPoint, bgline_ph, stopXPoint, bgline_ph, paint_bg);
        }
    }

    /**
     * 画第三行的等级数字{350,550,600,650,70,950}
     *
     * @param canvas
     */
    public void drawLevelNum(Canvas canvas) {
        Paint mPaint = new Paint();
        mPaint.setStrokeWidth(3);
        mPaint.setTextSize(25);
        mPaint.setAntiAlias(true);
        mPaint.setColor(Color.GRAY);
        mPaint.setTextAlign(Paint.Align.CENTER);

        int img_postion_h = lineWidth + padding_img + getPaddingTop() + textHeight + padding_text;
        Log.i(Tag, "img_postion_h:" + img_postion_h);
        float pre = allLength / 5;
        float offsetw = 20 / 3 * -1;
        for (int i = 0; i < level_num.length; i++) {
            if (i == level_num.length - 1) {
                canvas.drawText(level_num[i] + "", allLength + getPaddingLeft() + cap, img_postion_h + 25, mPaint);
            } else {
                if (i == 0) {
                    canvas.drawText(level_num[i] + "", i * pre + getPaddingLeft() + cap, img_postion_h + 25, mPaint);
                } else {
                    canvas.drawText(level_num[i] + "", i * pre + offsetw + getPaddingLeft() + cap + 20, img_postion_h + 25, mPaint);
                }
            }
        }
    }


    /**
     * 设置有多少个刻度,每个刻度的返回{0,50},{50,x},{x,x2}....
     * 必须按照大小排好序再传递进来
     */
    public void setData(ArrayList<UserLevelDial> datas) {
        this.datas = datas;
        if (null != datas && datas.size() > 0) {
            maxValue = datas.get(datas.size() - 1).dial_e;
        }
    }

    //数值变化的动画
    ValueAnimator valueAnimator;

    /**
     * 设置当前刻度
     */
    public void setCurrentDialvalue(int dial) {
        if (null != valueAnimator && valueAnimator.isRunning()) {
            valueAnimator.cancel();
        }
        valueAnimator = ValueAnimator.ofInt(0, dial);
        valueAnimator.setDuration(5);
        valueAnimator.addUpdateListener(new ValueAnimator.AnimatorUpdateListener() {
            @Override
            public void onAnimationUpdate(ValueAnimator valueAnimator) {
                currentDialvalue = (int) valueAnimator.getAnimatedValue();
                getCurrentDialLength();
                invalidate();
            }
        });
        valueAnimator.start();
    }

    //根据当前值,按照比例,计算它该有的长度,每个刻度的长度一样,但是每个刻度的差值不一样,
    //这里就根据比例来计算
    public int getCurrentDialLength() {
        getDialAllLength();
        if (allLength > 0 && datas.size() > 0 && currentDialvalue > 0) {
            int pre = allLength / (datas.size());
            for (int i = 0; i < datas.size(); i++) {
                UserLevelDial dial = datas.get(i);
                if (currentDialvalue <= dial.dial_e && currentDialvalue >= dial.dial_s) {
                    this.currentImg = i;
                    cDialLenth = pre * i + (int) (pre * ((currentDialvalue - dial.dial_s) / ((float) dial.dial_e - dial.dial_s)));
                    Log.i(Tag, "i:" + i);
                    break;
                }
            }
        }
        if (currentDialvalue > datas.get(datas.size() - 1).dial_e) {
            this.currentImg = datas.size();
            cDialLenth = allLength;
        }
        Log.i(Tag, "cDialLenth:" + cDialLenth);
        //重新设置等级图片
        return cDialLenth;
    }

    @Override
    protected void onSizeChanged(int w, int h, int oldw, int oldh) {
        super.onSizeChanged(w, h, oldw, oldh);
        getDialAllLength();
    }

    //得到整个长度,出去padding
    public void getDialAllLength() {
        allLength = getMeasuredWidth() - getPaddingLeft() - getPaddingRight() - cap * 2;
    }

    /**
     * @param text
     * @param textSize
     * @return
     */
    public Rect getTextWH(String text, int textSize) {
        Paint pFont = new Paint();
        Rect rect = new Rect();
        pFont.setTextSize(textSize);
        pFont.getTextBounds(text, 0, text.length(), rect);
        return rect;
    }

    @Override
    protected void onDetachedFromWindow() {
        super.onDetachedFromWindow();
        Log.i(Tag, "onDetachedFromWindow");
    }


    public class LineColor {

        public LineColor(int startColor, int stopColor) {
            this.startColor = startColor;
            this.stopColor = stopColor;
        }

        public int startColor;
        public int stopColor;
    }
}