准备三台服务器进行测试:
nfs_server:192.168.12.110
web_server:192.168.12.111
rsync_server:192.168.12.112
网络规划图:
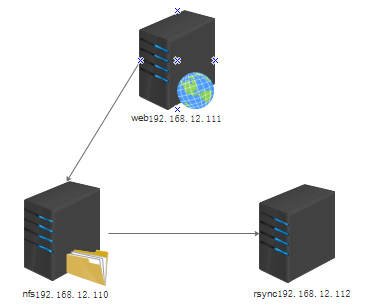
将web服务器的网页根目录/var/www挂载到nfs服务器,同时nfs服务器将文件实时备份到rsync服务器
1.在web服务器上面安装相应的web服务,例如httpd服务,产生相应的/var/www/html文件,此次备份的重点是/var/www下的文件
yum
				install httpd*
2.在nfs服务器上安装nfs服务
nfs服务需要和rpcbind进行通信,所以必须先安装rpcbind和启动rpcbind服务
yum
				install rpcbind
yum
				install nfs
配置nfs的配置文件/etc/exports
echo
				"/www/ 192.168.12.0/24(rw,sync,all_squash)" /etc/exports
/etc/init.d/rpcbind start
/etc/init.d/nfs start
其中rpcbind必须先启动,nfs才可以向rpcbind进行注册
启动完成后检测一下
ps -ef | grep rpcbind
ps -ef | grep nfs
rpcinfo
3.将webserver的/var/www进行挂载
showmount -e 192.168.12.110
mount -t nfs 192.168.12.110:/www/ /var/www/
将nfs的/www挂载到web服务器根目录
df -h
查看是否挂载成功
4.在nfs服务器上面安装inotify-tools软件
安装inotify-tools
yum
				install inotify-tools inotify-tools-devels
5.编写inotify监控/www/文件的脚本
echo
				"qinger" /etc/rsync.password
#!/bin/bash
/usr/bin/inotifywait -format '%w%f' -e create,close_write,delete /www/
| while read file
do
rsync -avzP /www/ root@192.168.12.112::backup -password-file=/etc/rsync.password
done
6.在rsync服务器上安装rsync服务见
http://www.cnblogs.com/zhangsubai/p/5194490.html