前面介绍了Spring Boot 中的整合Redis缓存已经如何实现数据缓存功能。不清楚的朋友可以看看之前的文章:https://www.cnblogs.com/zhangweizhong/category/1657780.html。
今天主要讲解Springboot整合定时任务。在SpringMvc中也会用到很多的定时任务,主要是通过Quartz实现。但是在Spring MVC中使用这些插件相对还是比较麻烦的:要增加一些依赖包,然后加入各种配置等等。Spring Boot相对就简单很多了,现在就来说说Spring Boot 是怎么实现定时任务的。
一、使用注解@EnableScheduling
在application启动类忠,加上@EnableScheduling 注解,Spring Boot 会会自动扫描任务类,开启定时任务。
package com.weiz;


import org.springframework.boot.SpringApplication;
import org.springframework.boot.autoconfigure.SpringBootApplication;
import org.springframework.context.annotation.ComponentScan;
import org.springframework.scheduling.annotation.EnableAsync;
import org.springframework.scheduling.annotation.EnableScheduling;
import tk.mybatis.spring.annotation.MapperScan;


@SpringBootApplication
//扫描 mybatis mapper 包路径
@MapperScan(basePackages = "com.weiz.mapper")
//扫描 所有需要的包, 包含一些自用的工具类包 所在的路径
@ComponentScan(basePackages = {"com.weiz","org.n3r.idworker"})
//开启定时任务
@EnableScheduling
//开启异步调用方法
@EnableAsync
public class SpringBootStarterApplication {

    public static void main(String[] args) {
        SpringApplication.run(SpringBootStarterApplication.class, args);
    }

}
说明:
1、@EnableScheduling 为开启定时任务。
2、@ComponentScan 定义扫描包的路径。
二、创建任务类,定义@Component 组件
创建com.weiz.tasks包,在tasks包里增加TestTask任务类,加上@Component 注解,那么TestTask就会作为组件被容器扫描到。扫描到之后,Spring Boot容器就会根据任务类里面定义的时间,定时执行了。
package com.weiz.tasks;

import java.text.SimpleDateFormat;
import java.util.Date;

import org.springframework.scheduling.annotation.Scheduled;
import org.springframework.stereotype.Component;

@Component
public class TestTask {

    private static final SimpleDateFormat dateFormat = new SimpleDateFormat("HH:mm:ss");

    // 定义每过3秒执行任务
    @Scheduled(fixedRate = 3000)
    // @Scheduled(cron = "4-40 * * * * ?")
    public void reportCurrentTime() {
        System.out.println("现在时间:" + dateFormat.format(new Date()));
    }
}
说明:@Scheduled 是定时任务执行的时间,可以每个一段时间执行,也可以使用cron 表达式定义执行时间。
三、Cron表达式
Spring Boot 定时任务支持每个一段时间执行或是使用cron 表达式定义执行时间。关于cron表达式,我之前的文章介绍过,大家可以看我以前的文章:《Quartz.NET总结(二)CronTrigger和Cron表达式》
四、测试
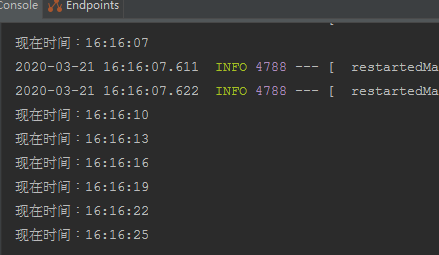
启动程序之后,就可以看到系统每隔3s,会打印系统时间。
最后
以上,就把Spring Boot整合定时任务简单介绍完了,是不是特别简单,下一篇我会介绍Spring boot 的异步任务。
这个系列课程的完整源码,也会提供给大家。大家关注我的微信公众号(架构师精进),回复:springboot源码。获取这个系列课程的完整源码。