此案例用来处理纹理的拉伸,并对拉伸后图片进行保存。
拉伸效果:

一、拉伸案例 - 主流程
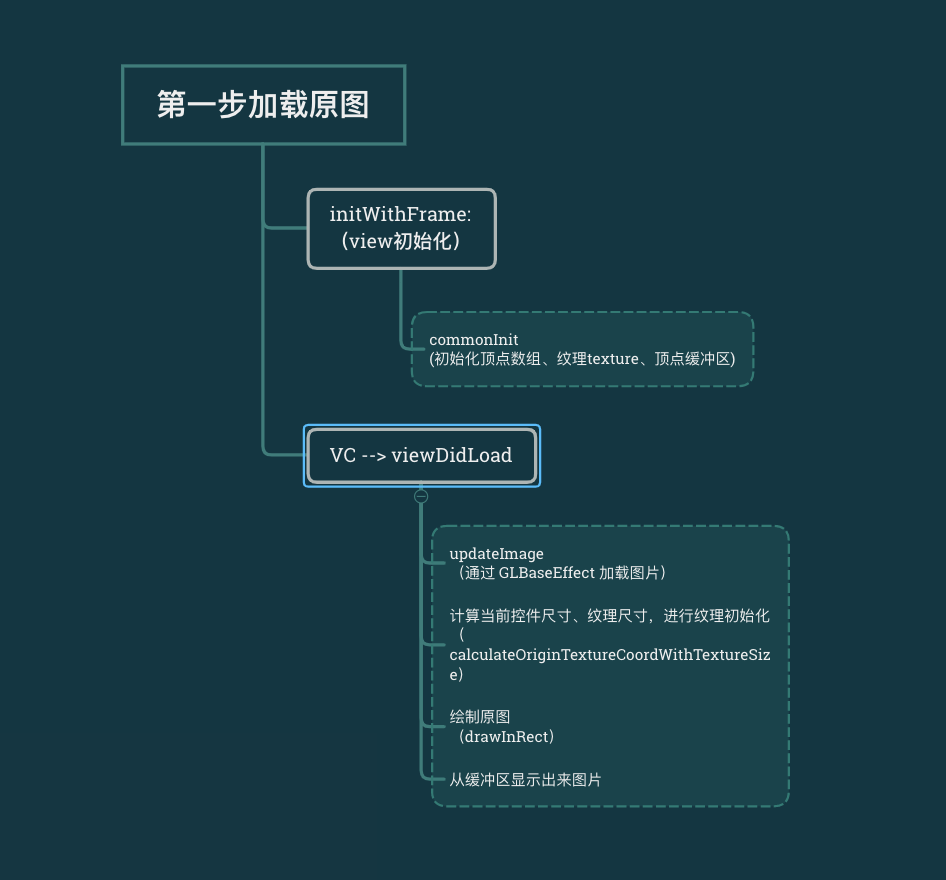
1、加载原图
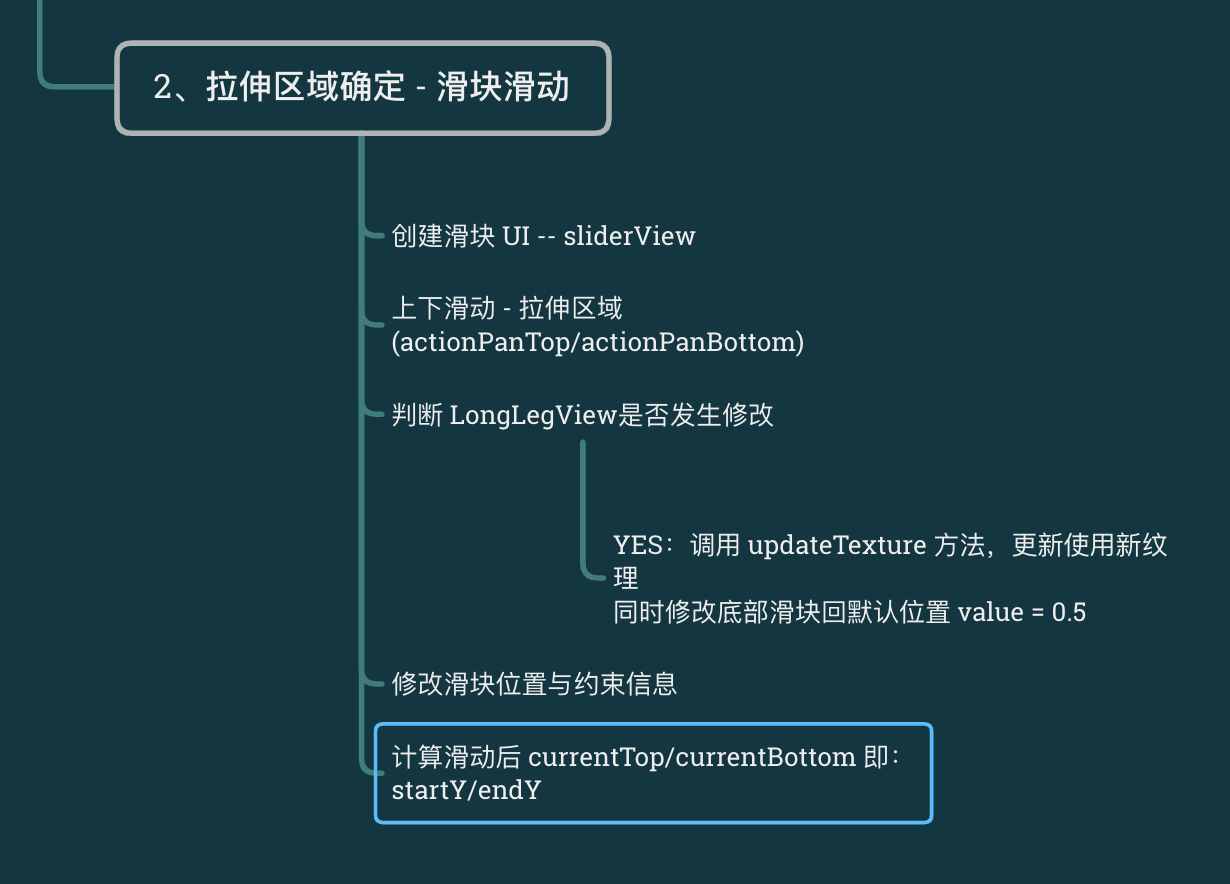
2、拉伸区域的滑块处理 -- sliderView
3、图片拉伸绘制

4、保存图片到本地相册

二、拉伸,顶点/纹理坐标处理过程
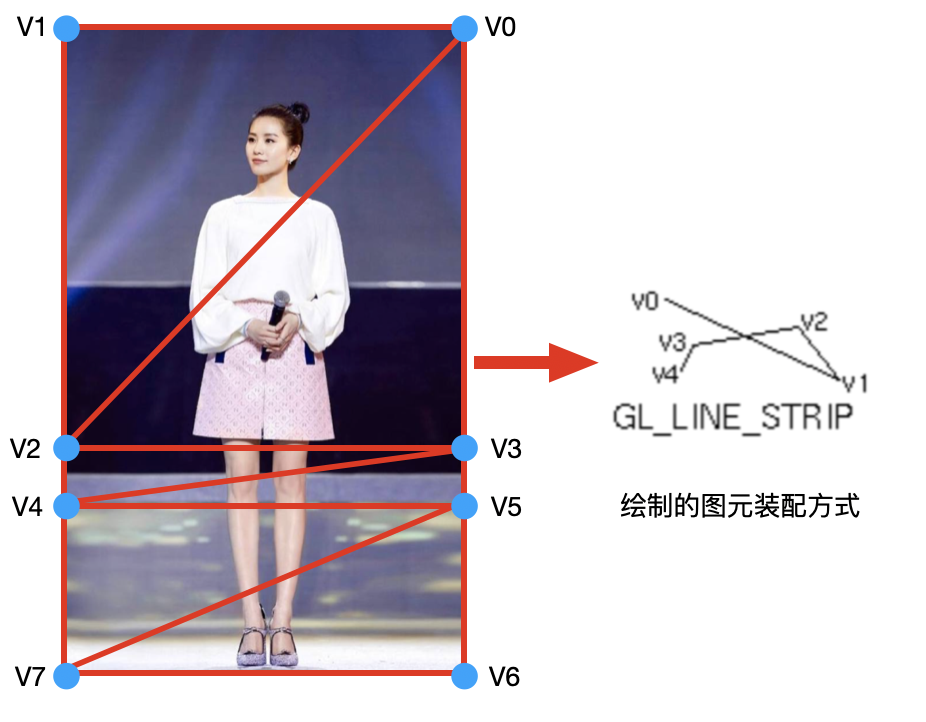
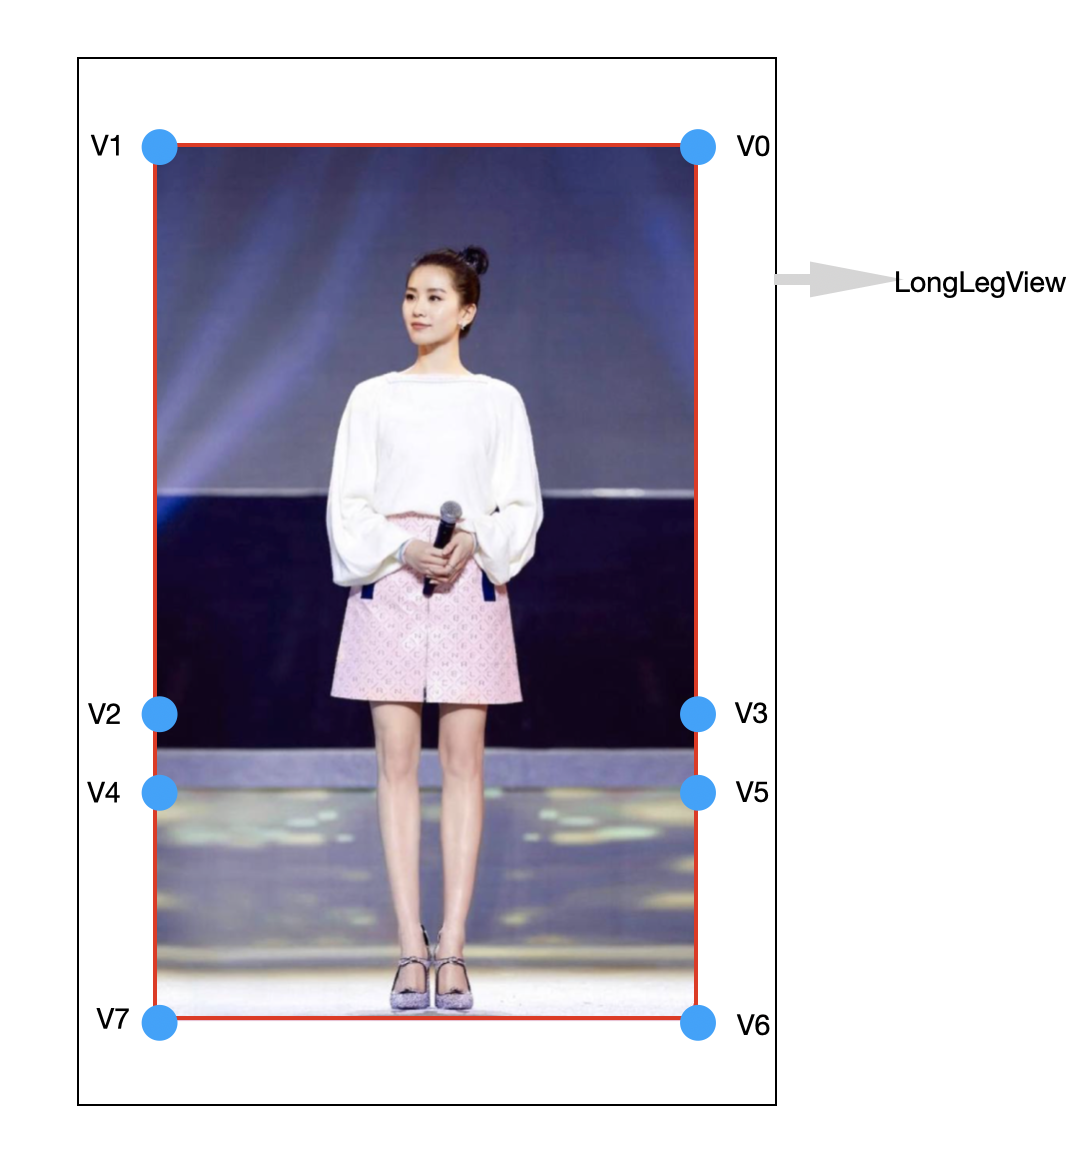
1、手动指定拉伸区域、选取合适的图元装配方式
8个顶点,通过方式 GL_LINE_STRIP 连接绘制。--> V2 ~ V5,拉伸区域 --> 拉伸区域高度 = V5.y - V3.y
2、设置纹理宽高比 得到拉伸量
根据图片实际size计算出纹理高,宽一直不变。
设置初识纹理高度占控件 LongLegView 高度 的 0.8
radio = 当前纹理图片的高宽比 * 控件的宽高比 = img.height/img.width * (view.width/view.height);
纹理高度 textureHeight = textureWidth * radio;
拉伸量 delta = (newHeight - (endY - startY)) * textureHeight; --> newHeight: 拉伸后的纹理高度; startY和endY: 当前的拉伸区域上下的纹理值
3、根据传入的开始结束纹理坐标,计算拉伸后的顶点坐标 [-1 ~ 1]
textureWidth = 0.8455;
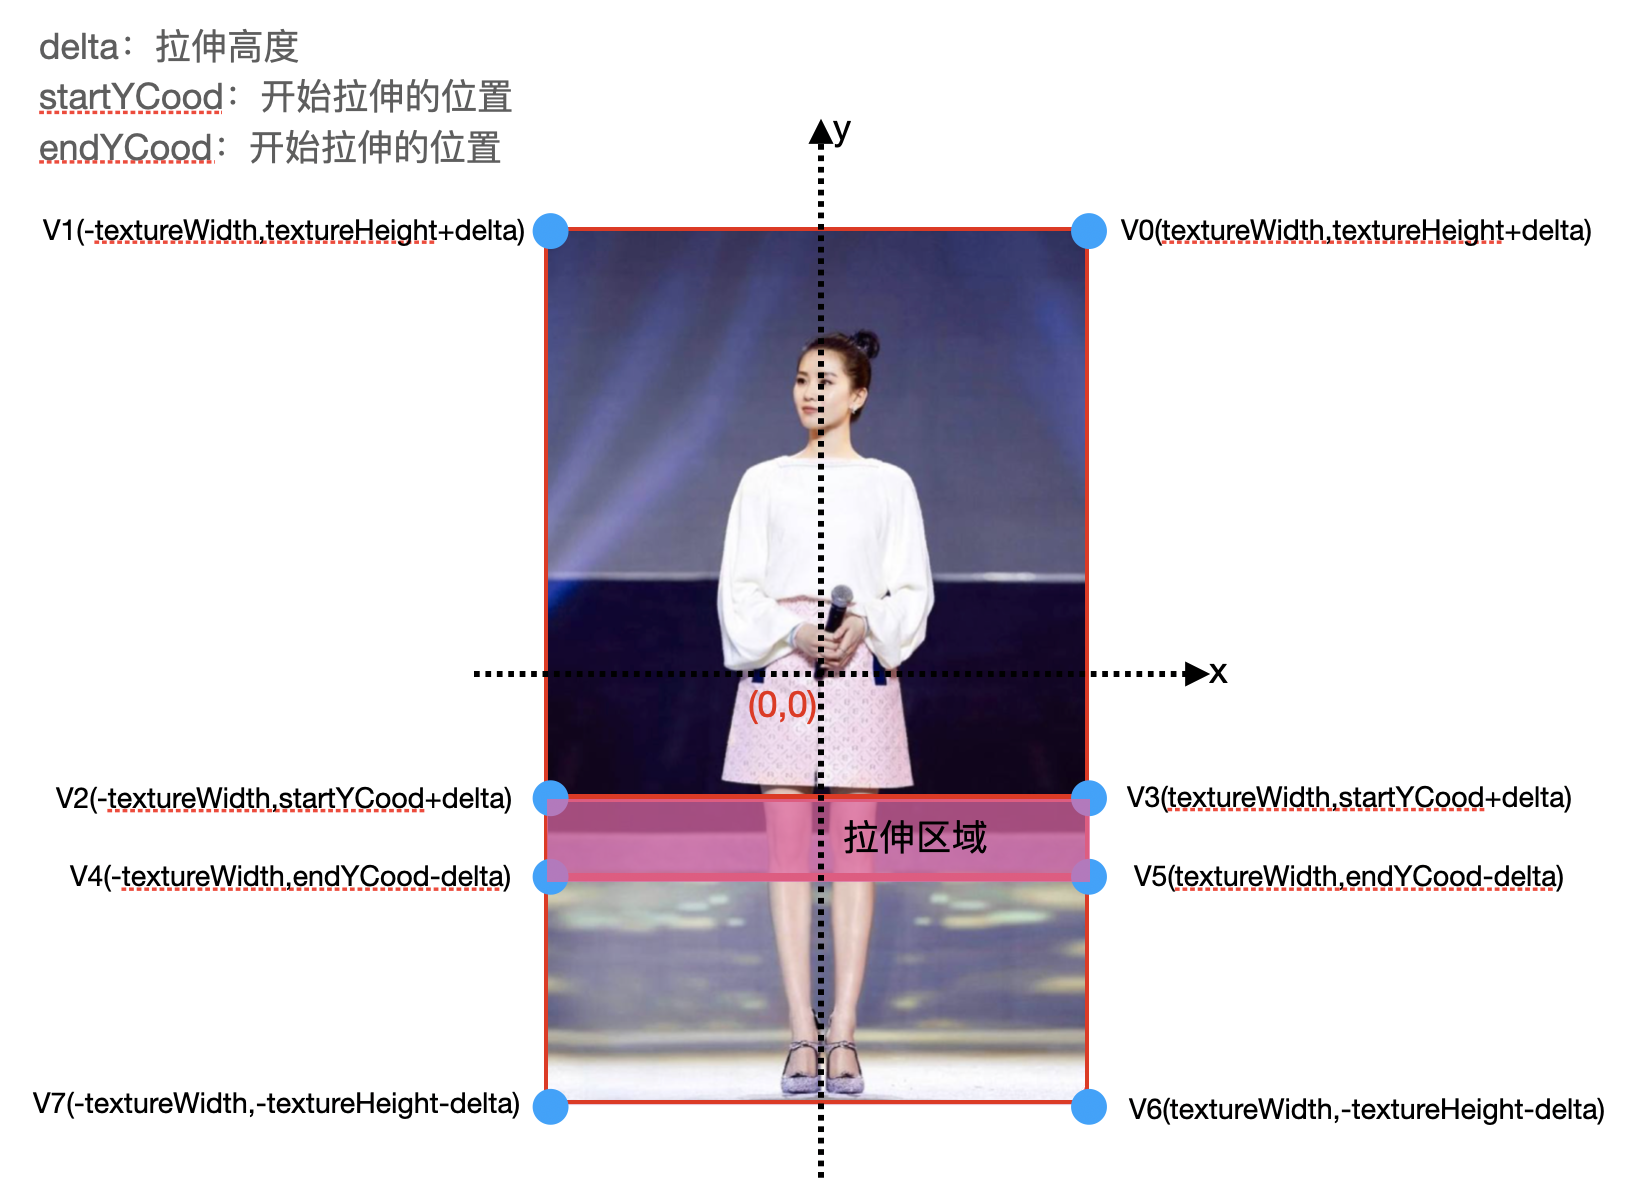
4、换算拉伸后对应的纹理坐标 [0 ~ 1]

5、记录拉伸后的当前值,绘制
GLKitView 的 display 方法执行,触发delegate:glkView:drawInRect
1、准备绘制
2、清空缓冲区
3、顶点数据、纹理数据的绑定传递 bind()、glVertexAttribPointer()
4、开始绘制 draw
三、主要代码
1、拉伸后纹理、顶点坐标的计算
// 获取图片的中间拉伸区域高度: (currentBottom - currentTop)*sliderValue + 0.5;
    CGFloat newHeight = (self.currentBottom - self.currentTop) * ((sender.value) + 0.5);
 1 /**
 2  根据当前控件的尺寸和纹理的尺寸,计算初始纹理、顶点坐标
 3
 4  @param size 原始纹理尺寸
 5  @param startY 中间区域的开始纵坐标位置 0~1
 6  @param endY 中间区域的结束纵坐标位置 0~1
 7  @param newHeight 新的中间区域的高度
 8  */
 9 - (void)calculateOriginTextureCoordWithTextureSize:(CGSize)size
10                                             startY:(CGFloat)startY
11                                               endY:(CGFloat)endY
12                                          newHeight:(CGFloat)newHeight {
13     NSLog(@"%f,%f",size.height,size.width);
14
15     // 1. 计算拉伸后的宽高比;
16     CGFloat ratio = (size.height / size.width) *
17     (self.bounds.size.width / self.bounds.size.height);
18     CGFloat rr = self.bounds.size.width / self.bounds.size.height;
19     // 2. 宽度=纹理本身宽度;
20     CGFloat textureWidth = self.currentTextureWidth;
21     // 3. 高度=纹理高度*radio(宽高比)
22     CGFloat textureHeight = textureWidth * ratio;
23
24     NSLog(@"%f,%f,%f,%f",newHeight,endY,startY,textureHeight);
25     // 4. 拉伸量 (newHeight - (endY-startY)) * 纹理高度;
26     CGFloat delta = (newHeight - (endY -  startY)) * textureHeight;
27
28     // 5. 判断纹理高度+拉伸量是否超出最大值1
29     if (textureHeight + delta >= 1) {
30         delta = 1 - textureHeight;
31         newHeight = delta / textureHeight + (endY -  startY);
32     }
33
34     // 6. 纹理4个角的顶点
35     // 左上角
36     GLKVector3 pointLT = {-textureWidth, textureHeight + delta, 0};
37     // 右上角
38     GLKVector3 pointRT = {textureWidth, textureHeight + delta, 0};
39     // 左下角
40     GLKVector3 pointLB = {-textureWidth, -textureHeight - delta, 0};
41     // 右下角
42     GLKVector3 pointRB = {textureWidth, -textureHeight - delta, 0};
43
44     // 中间矩形区域的顶点
45     CGFloat tempStartYCoord = textureHeight - 2 * textureHeight * startY;
46     CGFloat tempEndYCoord = textureHeight - 2 * textureHeight * endY;
47
48     CGFloat startYCoord = MIN(tempStartYCoord, textureHeight);
49     CGFloat endYCoord = MAX(tempEndYCoord, -textureHeight);
50
51     // 中间部分左上角
52     GLKVector3 centerPointLT = {-textureWidth, startYCoord + delta, 0};
53     // 中间部分右上角
54     GLKVector3 centerPointRT = {textureWidth, startYCoord + delta, 0};
55     // 中间部分左下角
56     GLKVector3 centerPointLB = {-textureWidth, endYCoord - delta, 0};
57     // 中间部分右下角
58     GLKVector3 centerPointRB = {textureWidth, endYCoord - delta, 0};
59
60     // --纹理的上面两个顶点
61     // 顶点V0的顶点坐标以及纹理坐标;
62     self.vertices[0].positionCoord = pointRT;
63     self.vertices[0].textureCoord = GLKVector2Make(1, 1);
64
65     // 顶点V1的顶点坐标以及纹理坐标;
66     self.vertices[1].positionCoord = pointLT;
67     self.vertices[1].textureCoord = GLKVector2Make(0, 1);
68
69     // -- 中间区域的4个顶点
70     //顶点V2的顶点坐标以及纹理坐标;
71     self.vertices[2].positionCoord = centerPointRT;
72     self.vertices[2].textureCoord = GLKVector2Make(1, 1 - startY);
73
74     // 顶点V3的顶点坐标以及纹理坐标;
75     self.vertices[3].positionCoord = centerPointLT;
76     self.vertices[3].textureCoord = GLKVector2Make(0, 1 - startY);
77
78     // 顶点V4的顶点坐标以及纹理坐标;
79     self.vertices[4].positionCoord = centerPointRB;
80     self.vertices[4].textureCoord = GLKVector2Make(1, 1 - endY);
81
82     // 顶点V5的顶点坐标以及纹理坐标;
83     self.vertices[5].positionCoord = centerPointLB;
84     self.vertices[5].textureCoord = GLKVector2Make(0, 1 - endY);
85
86     // 纹理的下面两个顶点
87     // 顶点V6的顶点坐标以及纹理坐标;
88     self.vertices[6].positionCoord = pointRB;
89     self.vertices[6].textureCoord = GLKVector2Make(1, 0);
90
91     // 顶点V7的顶点坐标以及纹理坐标;
92     self.vertices[7].positionCoord = pointLB;
93     self.vertices[7].textureCoord = GLKVector2Make(0, 0);
94
95     // 保存临时值
96     self.currentTextureStartY = startY;
97     self.currentTextureEndY = endY;
98     self.currentNewHeight = newHeight;
99 }
2、图片保存至相册
 1 // 从帧缓存区中获取纹理图片文件,获取当前的渲染结果
 2 - (UIImage *)createResult {
 3
 4     // 1. 根据屏幕上显示结果, 重新获取顶点/纹理坐标
 5     [self resetTextureWithOriginWidth:self.currentImageSize.width
 6                          originHeight:self.currentImageSize.height
 7                                  topY:self.currentTextureStartY
 8                               bottomY:self.currentTextureEndY
 9                             newHeight:self.currentNewHeight];
10
11     // 2.绑定帧缓存区;
12     glBindFramebuffer(GL_FRAMEBUFFER, self.tmpFrameBuffer);
13     // 3.获取新的图片Size
14     CGSize imageSize = [self newImageSize];
15     // 4.从帧缓存中获取拉伸后的图片;
16     UIImage *image = [self imageFromTextureWithWidth:imageSize.width height:imageSize.height];
17     // 5. 将帧缓存绑定0,清空;
18     glBindFramebuffer(GL_FRAMEBUFFER, 0);
19
20     // 6. 返回拉伸后的图片
21     return image;
22 }
  1 /**
  2  根据当前屏幕上的显示,重新创建纹理
  3
  4  @param originWidth 纹理的原始实际宽度
  5  @param originHeight 纹理的原始实际高度
  6  @param topY 0 ~ 1,拉伸区域的顶边的纵坐标
  7  @param bottomY 0 ~ 1,拉伸区域的底边的纵坐标
  8  @param newHeight 0 ~ 1,拉伸区域的新高度
  9  */
 10 - (void)resetTextureWithOriginWidth:(CGFloat)originWidth
 11                        originHeight:(CGFloat)originHeight
 12                                topY:(CGFloat)topY
 13                             bottomY:(CGFloat)bottomY
 14                           newHeight:(CGFloat)newHeight {
 15
 16     // 1.新的纹理尺寸(新纹理图片的宽高)
 17     GLsizei newTextureWidth = originWidth;
 18     GLsizei newTextureHeight = originHeight * (newHeight - (bottomY - topY)) + originHeight;
 19
 20     // 2.高度变化百分比
 21     CGFloat heightScale = newTextureHeight / originHeight;
 22
 23     // 3.在新的纹理坐标下,重新计算 topY、bottomY
 24     CGFloat newTopY = topY / heightScale;
 25     CGFloat newBottomY = (topY + newHeight) / heightScale;
 26
 27     // 4.创建顶点数组与纹理数组(逻辑与calculateOriginTextureCoordWithTextureSize 中关于纹理坐标以及顶点坐标逻辑是一样的)
 28     SenceVertex *tmpVertices = malloc(sizeof(SenceVertex) * kVerticesCount);
 29     tmpVertices[0] = (SenceVertex){{-1, 1, 0}, {0, 1}};
 30     tmpVertices[1] = (SenceVertex){{1, 1, 0}, {1, 1}};
 31     tmpVertices[2] = (SenceVertex){{-1, -2 * newTopY + 1, 0}, {0, 1 - topY}};
 32     tmpVertices[3] = (SenceVertex){{1, -2 * newTopY + 1, 0}, {1, 1 - topY}};
 33     tmpVertices[4] = (SenceVertex){{-1, -2 * newBottomY + 1, 0}, {0, 1 - bottomY}};
 34     tmpVertices[5] = (SenceVertex){{1, -2 * newBottomY + 1, 0}, {1, 1 - bottomY}};
 35     tmpVertices[6] = (SenceVertex){{-1, -1, 0}, {0, 0}};
 36     tmpVertices[7] = (SenceVertex){{1, -1, 0}, {1, 0}};
 37
 38
 39     /// 下面开始渲染到纹理的流程
 40
 41     // 1. 生成帧缓存区;
 42     GLuint frameBuffer;
 43     GLuint texture;
 44     // glGenFramebuffers 生成帧缓存区对象名称;
 45     glGenFramebuffers(1, &frameBuffer);
 46     // glBindFramebuffer 绑定一个帧缓存区对象;
 47     glBindFramebuffer(GL_FRAMEBUFFER, frameBuffer);
 48
 49     // 2. 生成纹理ID,绑定纹理;
 50     // glGenTextures 生成纹理ID
 51     glGenTextures(1, &texture);
 52     // glBindTexture 将一个纹理绑定到纹理目标上;
 53     glBindTexture(GL_TEXTURE_2D, texture);
 54     // glTexImage2D 指定一个二维纹理图像;
 55     glTexImage2D(GL_TEXTURE_2D, 0, GL_RGBA, newTextureWidth, newTextureHeight, 0, GL_RGBA, GL_UNSIGNED_BYTE, NULL);
 56
 57     // 3. 设置纹理相关参数
 58     glTexParameteri(GL_TEXTURE_2D, GL_TEXTURE_WRAP_S, GL_CLAMP_TO_EDGE);
 59     glTexParameteri(GL_TEXTURE_2D, GL_TEXTURE_WRAP_T, GL_CLAMP_TO_EDGE);
 60     glTexParameteri(GL_TEXTURE_2D, GL_TEXTURE_MAG_FILTER, GL_LINEAR);
 61     glTexParameteri(GL_TEXTURE_2D, GL_TEXTURE_MIN_FILTER, GL_LINEAR);
 62
 63     // 4. 将纹理图像加载到帧缓存区对象上;
 64     /*
 65      glFramebufferTexture2D (GLenum target, GLenum attachment, GLenum textarget, GLuint texture, GLint level)
 66      target: 指定帧缓冲目标,符合常量必须是GL_FRAMEBUFFER;
 67      attachment: 指定附着纹理对象的附着点GL_COLOR_ATTACHMENT0
 68      textarget: 指定纹理目标, 符合常量:GL_TEXTURE_2D
 69      teture: 指定要附加图像的纹理对象;
 70      level: 指定要附加的纹理图像的mipmap级别,该级别必须为0。
 71      */
 72     glFramebufferTexture2D(GL_FRAMEBUFFER, GL_COLOR_ATTACHMENT0, GL_TEXTURE_2D, texture, 0);
 73
 74     // 5. 设置视口尺寸
 75     glViewport(0, 0, newTextureWidth, newTextureHeight);
 76
 77     // 6. 获取着色器程序
 78     GLuint program = [LongLegHelper programWithShaderName:@"spring"];
 79     glUseProgram(program);
 80
 81     // 7. 获取参数ID
 82     GLuint positionSlot = glGetAttribLocation(program, "Position");
 83     GLuint textureSlot = glGetUniformLocation(program, "Texture");
 84     GLuint textureCoordsSlot = glGetAttribLocation(program, "TextureCoords");
 85
 86     // 8. 传值
 87     glActiveTexture(GL_TEXTURE0);
 88     glBindTexture(GL_TEXTURE_2D, self.baseEffect.texture2d0.name);
 89     glUniform1i(textureSlot, 0);
 90
 91     // 9.初始化缓存区
 92     LongLegVertexAttribArrayBuffer *vbo = [[LongLegVertexAttribArrayBuffer alloc] initWithAttribStride:sizeof(SenceVertex) numberOfVertices:kVerticesCount data:tmpVertices usage:GL_STATIC_DRAW];
 93
 94     // 10.准备绘制,将纹理/顶点坐标传递进去;
 95     [vbo prepareToDrawWithAttrib:positionSlot numberOfCoordinates:3 attribOffset:offsetof(SenceVertex, positionCoord) shouldEnable:YES];
 96     [vbo prepareToDrawWithAttrib:textureCoordsSlot numberOfCoordinates:2 attribOffset:offsetof(SenceVertex, textureCoord) shouldEnable:YES];
 97
 98     // 11. 绘制
 99     [vbo drawArrayWithMode:GL_TRIANGLE_STRIP startVertexIndex:0 numberOfVertices:kVerticesCount];
100
101     // 12.解绑缓存
102     glBindFramebuffer(GL_FRAMEBUFFER, 0);
103     // 13.释放顶点数组
104     free(tmpVertices);
105
106     // 14.保存临时的纹理对象/帧缓存区对象;
107     self.tmpTexture = texture;
108     self.tmpFrameBuffer = frameBuffer;
109 }
 1 // 返回某个纹理对应的 UIImage,调用前先绑定对应的帧缓存
 2 - (UIImage *)imageFromTextureWithWidth:(int)width height:(int)height {
 3
 4     // 1.绑定帧缓存区;
 5     glBindFramebuffer(GL_FRAMEBUFFER, self.tmpFrameBuffer);
 6
 7     // 2.将帧缓存区内的图片纹理绘制到图片上;
 8     int size = width * height * 4;
 9     GLubyte *buffer = malloc(size);
10
11     /*
12
13      glReadPixels (GLint x, GLint y, GLsizei width, GLsizei height, GLenum format, GLenum type, GLvoid* pixels);
14      @功能: 读取像素(理解为将已经绘制好的像素,从显存中读取到内存中;)
15      @参数解读:
16      参数x,y,width,height: xy坐标以及读取的宽高;
17      参数format: 颜色格式; GL_RGBA;
18      参数type: 读取到的内容保存到内存所用的格式;GL_UNSIGNED_BYTE 会把数据保存为GLubyte类型;
19      参数pixels: 指针,像素数据读取后, 将会保存到该指针指向的地址内存中;
20
21      注意: pixels指针,必须保证该地址有足够的可以使用的空间, 以容纳读取的像素数据; 例如一副256 * 256的图像,如果读取RGBA 数据, 且每个数据保存在GLUbyte. 总大小就是 256 * 256 * 4 = 262144字节, 即256M;
22      int size = width * height * 4;
23      GLubyte *buffer = malloc(size);
24      */
25     glReadPixels(0, 0, width, height, GL_RGBA, GL_UNSIGNED_BYTE, buffer);
26
27     // 使用data和size 数组来访问buffer数据;
28     /*
29      CGDataProviderRef CGDataProviderCreateWithData(void *info, const void *data, size_t size, CGDataProviderReleaseDataCallback releaseData);
30      @功能: 新的数据类型, 方便访问二进制数据;
31      @参数:
32      参数info: 指向任何类型数据的指针, 或者为Null;
33      参数data: 数据存储的地址,buffer
34      参数size: buffer的数据大小;
35      参数releaseData: 释放的回调,默认为空;
36
37      */
38     CGDataProviderRef provider = CGDataProviderCreateWithData(NULL, buffer, size, NULL);
39     // 每个组件的位数;
40     int bitsPerComponent = 8;
41     // 像素占用的比特数4 * 8 = 32;
42     int bitsPerPixel = 32;
43     // 每一行的字节数
44     int bytesPerRow = 4 * width;
45     // 颜色空间格式;
46     CGColorSpaceRef colorSpaceRef = CGColorSpaceCreateDeviceRGB();
47     // 位图图形的组件信息 - 默认的
48     CGBitmapInfo bitmapInfo = kCGBitmapByteOrderDefault;
49     // 颜色映射
50     CGColorRenderingIntent renderingIntent = kCGRenderingIntentDefault;
51
52     // 3.将帧缓存区里像素点绘制到一张图片上;
53     /*
54      CGImageCreate(size_t width, size_t height,size_t bitsPerComponent, size_t bitsPerPixel, size_t bytesPerRow,CGColorSpaceRef space, CGBitmapInfo bitmapInfo, CGDataProviderRef provider,const CGFloat decode[], bool shouldInterpolate,CGColorRenderingIntent intent);
55      @功能:根据你提供的数据创建一张位图;
56      注意:size_t 定义的是一个可移植的单位,在64位机器上为8字节,在32位机器上是4字节;
57      参数 图片的宽度像素;
58      参数height: 图片的高度像素;
59      参数bitsPerComponent: 每个颜色组件所占用的位数, 比如R占用8位;
60      参数bitsPerPixel: 每个颜色的比特数, 如果是RGBA则是32位, 4 * 8 = 32位;
61      参数bytesPerRow :每一行占用的字节数;
62      参数space:颜色空间模式,CGColorSpaceCreateDeviceRGB
63      参数bitmapInfo:kCGBitmapByteOrderDefault 位图像素布局;
64      参数provider: 图片数据源提供者, 在CGDataProviderCreateWithData ,将buffer 转为 provider 对象;
65      参数decode: 解码渲染数组, 默认NULL
66      参数shouldInterpolate: 是否抗锯齿;
67      参数intent: 图片相关参数;kCGRenderingIntentDefault
68
69      */
70     CGImageRef imageRef = CGImageCreate(width, height, bitsPerComponent, bitsPerPixel, bytesPerRow, colorSpaceRef, bitmapInfo, provider, NULL, NO, renderingIntent);
71
72     // 4. 此时的 imageRef 是上下颠倒的,调用 CG 的方法重新绘制一遍,翻转过来
73     // 创建一个图片context
74     UIGraphicsBeginImageContext(CGSizeMake(width, height));
75     CGContextRef context = UIGraphicsGetCurrentContext();
76     // 将图片绘制上去
77     CGContextDrawImage(context, CGRectMake(0, 0, width, height), imageRef);
78     // 从context中获取图片
79     UIImage *image = UIGraphicsGetImageFromCurrentImageContext();
80     // 结束图片context处理
81     UIGraphicsEndImageContext();
82
83     // 释放buffer
84     free(buffer);
85     // 返回图片
86     return image;
87 }