今天呢,我小拉面主要想给大家讲一讲Flutter中的Slivers大家族的使用场景和方法。开发过列表布局的同学们应该对Slivers系列的控件不陌生,或多或少都用过这个库中的控件,来解决复杂的滑动嵌套布局。
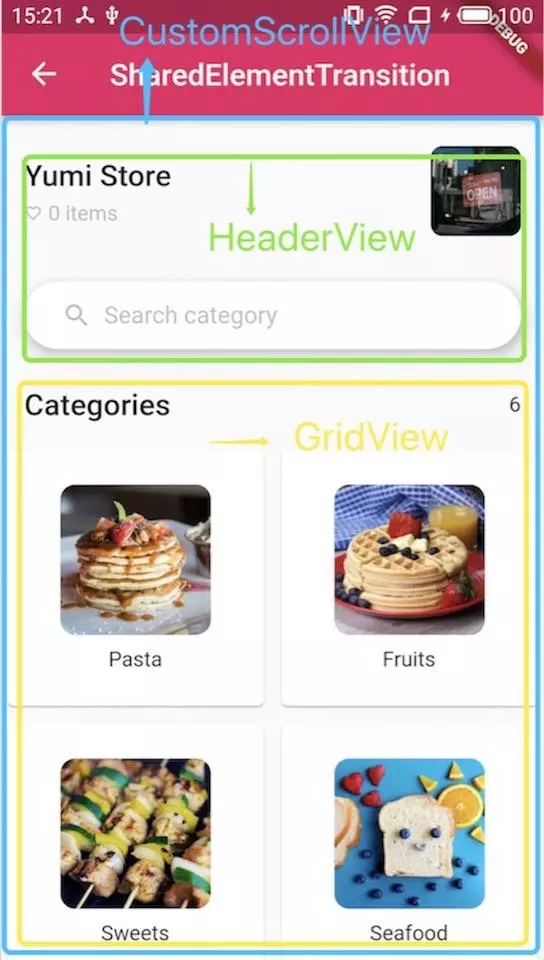
比如之前讲Hero的时候提到的下面这个界面,使用普通的GridView的话是没法实现的,我们选择使用CustomScrollView,然后在slivers属性中添加子控件,在这个例子里,我们可以用SliverToBoxAdapter来做HeaderView,GridView来做主体布局,整体为一个CustomScrollView,完全不会出现任何滑动冲突的问题。
Flutter中的Slivers大家族基本都是配合CustomScrollView来实现的,除了上面提到的滑动布局嵌套,你还可以使用Slivers来实现页面头部展开/收起、
AppBar随手势变换等等功能。官方的Sliver库里面的控件很多,可以去Flutter API网站搜一下,这篇文章我只讲一些常用的控件。
OK, Let's start !!
SliverAppBar
如果你是一名Android开发者,一定使用过CollapsingToolbarLayout这个布局来实现AppBar展开/收起的功能,在Flutter里面则对应SliverAppBar控件。给SliverAppBar设置flexibleSpace和expandedHeight属性,就可以轻松完成AppBar展开/收起的功能:
CustomScrollView(
        slivers: <Widget>[
          SliverAppBar(
            actions: <Widget>[
              _buildAction(),
            ],
            title: Text('SliverAppBar'),
            backgroundColor: Theme.of(context).accentColor,
            expandedHeight: 200.0,
            flexibleSpace: FlexibleSpaceBar(
              background: Image.asset('images/food01.jpeg', fit: BoxFit.cover),
            ),
            // floating: floating,
            // snap: snap,
            // pinned: pinned,
          ),
          SliverFixedExtentList(
            itemExtent: 120.0,
            delegate: SliverChildListDelegate(
              products.map((product) {
                return _buildItem(product);
              }).toList(),
            ),
          ),
        ],
      );
sliver_app_bar_01.gif

如果设置floating属性为true,那么AppBar会在你做出下拉手势时就立即展开(即使ListView并没有到达顶部),该展开状态不显示flexibleSpace:
sliver_app_bar_02.gif

如果同时设置floating和snap属性为true,那么AppBar会在你做出下拉手势时就立即全部展开(即使ListView并没有到达顶部),该展开状态显示flexibleSpace:
sliver_app_bar_03.gif

如果不想AppBar消失,则设置pinned属性为true即可:
SliverList
SliverList的使用非常简单,只需设置delegate属性即可,我们一般使用SliverChildBuilderDelegate,注意记得设置childCount,否则Flutter没法知道怎么绘制:
CustomScrollView(
        slivers: <Widget>[
          SliverList(
            delegate: SliverChildBuilderDelegate(
                  (BuildContext context, int index) {
                return _buildItem(context, products[index]);
              },
              childCount: 3,
            ),
          )
        ],
      );

sliver_list.png
你也可以通过下面的方式来设置childCount,如果不设置childCount,Flutter一旦发现delegate的某个index返回了null,就会认为childCount就是这个index。
delegate: SliverChildBuilderDelegate(
                  (BuildContext context, int index) {
                    if(index>products.length){
                      return null;
                    }
                return _buildItem(context, products[index]);
              },
你也可以使用SliverChildListDelegate来构建delegate:
delegate: SliverChildListDelegate([
              _buildItem(),
              _buildItem(),
              _buildItem(),
            ]),
SliverChildListDelegate和SliverChildBuilderDelegate的区别:
SliverChildListDelegate一般用来构item建数量明确的列表,会提前build好所有的子item,所以在效率上会有问题,适合item数量不多的情况(不超过一屏)。
SliverChildBuilderDelegate构建的列表理论上是可以无限长的,因为使用来lazily construct优化。
(两者的区别有些类似于ListView和ListView.builder()的区别。)
SliverGrid
SliverGrid有三个构造函数:SliverGrid.count()、SliverGrid.extent和SliverGrid()。
SliverGrid.count()指定了一行展示多少个item,下面的例子表示一行展示4个:
SliverGrid.count(children: scrollItems, crossAxisCount: 4)
SliverGrid.extent可以指定item的最大宽度,然后让Flutter自己决定一行展示多少个item:
SliverGrid.extent(children: scrollItems, maxCrossAxisExtent: 90.0)
SliverGrid()则是需要指定一个gridDelegate,它提供给了程序员一个自定义Delegate的入口,你可以自己决定每一个item怎么排列:
SliverGrid(
  gridDelegate: SliverGridDelegateWithFixedCrossAxisCount(
    crossAxisCount: products.length,
  ),
  delegate: SliverChildBuilderDelegate(
    (BuildContext context, int index) {
      return _buildItem(products[index]);;
    }
);

SliverPersistentHeader
SliverPersistentHeader顾名思义,就是给一个可滑动的视图添加一个头(实际上,在CustomScrollView的slivers列表中,header可以出现在视图的任意位置,不一定要是在顶部)。这个Header会随着滑动而展开/收起,使用pinned和floating属性来控制收起时Header是否展示(pinned和floating属性不可以同时为true),pinned和floating属性的具体意义和SliverAppBar中相同,这里就不再次解释了。
sliver_persistent_header.gif
SliverPersistentHeader(
      pinned: pinned,
      floating: floating,
      delegate: _SliverAppBarDelegate(
        minHeight: 60.0,
        maxHeight: 180.0,
        child: Container(),
      ),
    );
构建一个SliverPersistentHeader需要传入一个delegate,这个delegate是SliverPersistentHeaderDelegate类型的,而SliverPersistentHeaderDelegate是一个abstract类,我们不能直接new一个SliverPersistentHeaderDelegate出来,因此,我们需要自定义一个delegate来实现SliverPersistentHeaderDelegate类:
class _SliverAppBarDelegate extends SliverPersistentHeaderDelegate {
  _SliverAppBarDelegate({
    @required this.minHeight,
    @required this.maxHeight,
    @required this.child,
  });

  final double minHeight;
  final double maxHeight;
  final Widget child;

  @override
  double get minExtent => minHeight;

  @override
  double get maxExtent => math.max(maxHeight, minHeight);

  @override
  Widget build(
      BuildContext context, double shrinkOffset, bool overlapsContent) {
    return new SizedBox.expand(child: child);
  }

  @override
  bool shouldRebuild(_SliverAppBarDelegate oldDelegate) {
    return maxHeight != oldDelegate.maxHeight ||
        minHeight != oldDelegate.minHeight ||
        child != oldDelegate.child;
  }
}
写一个自定义SliverPersistentHeaderDelegate很简单,只需重写build()、get maxExtent、get minExtent和shouldRebuild()这四个方法,上面就是一个最简单的SliverPersistentHeaderDelegate的实现。其中,maxExtent表示header完全展开时的高度,minExtent表示header在收起时的最小高度。因此,对于我们上面的那个自定义Delegate,如果将minHeight和maxHeight的值设置为相同时,header就不会收缩了,这样的Header跟我们平常理解的Header更像。
之前也提到了,实际使用时,header不一定要放在slivers列表的最前面,可以随意混搭,当然,一般来说不会有这种视觉需求的:
CustomScrollView(
        slivers: <Widget>[
          _buildHeader(0),
          SliverGrid.count(
            crossAxisCount: 3,
            children: _products.map((product) {
              return _buildItemGrid(product);
            }).toList(),
          ),
          _buildHeader(1),
          SliverFixedExtentList(
            itemExtent: 100.0,
            delegate: SliverChildListDelegate(
              products.map((product) {
                return _buildItemList(product);
              }).toList(),
            ),
          ),
          _buildHeader(2),
          SliverGrid(
            gridDelegate: new SliverGridDelegateWithMaxCrossAxisExtent(
              maxCrossAxisExtent: 200.0,
              mainAxisSpacing: 10.0,
              crossAxisSpacing: 10.0,
              childAspectRatio: 3.0,
            ),
            delegate: new SliverChildBuilderDelegate(
              (BuildContext context, int index) {
                return _buildItemGrid2(_products2[index]);
              },
              childCount: _products2.length,
            ),
          ),
        ],
      );
SliverToBoxAdapter
SliverPersistentHeader一般来说都是会展开/收起的(除非minExtent和maxExtent值相同),那么如果想要在滚动视图中添加一个普通的控件,那么就可以使用SliverToBoxAdapter来将各种视图组合在一起,放在CustomListView中。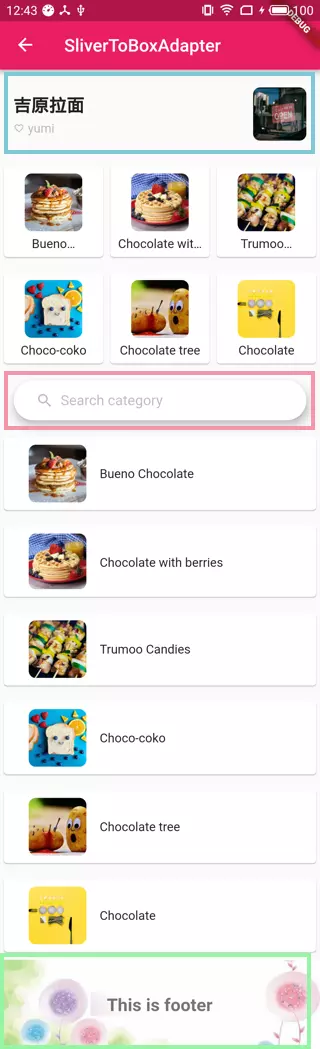
sliver_adapter.png
上图中框起来的部分全部都是SliverToBoxAdapter,结合SliverToBoxAdapter,滚动视图可以任意组合:
CustomScrollView(
        physics: ScrollPhysics(),
        slivers: <Widget>[
          SliverToBoxAdapter(
            child: _buildHeader(),
          ),
          SliverGrid.count(
            crossAxisCount: 3,
            children: products.map((product) {
              return _buildItemGrid(product);
            }).toList(),
          ),
          SliverToBoxAdapter(
            child: _buildSearch(),
          ),
          SliverFixedExtentList(
            itemExtent: 100.0,
            delegate: SliverChildListDelegate(
              products.map((product) {
                return _buildItemList(product);
              }).toList(),
            ),
          ),
          SliverToBoxAdapter(
            child: _buildFooter(),
          ),
        ],
      );