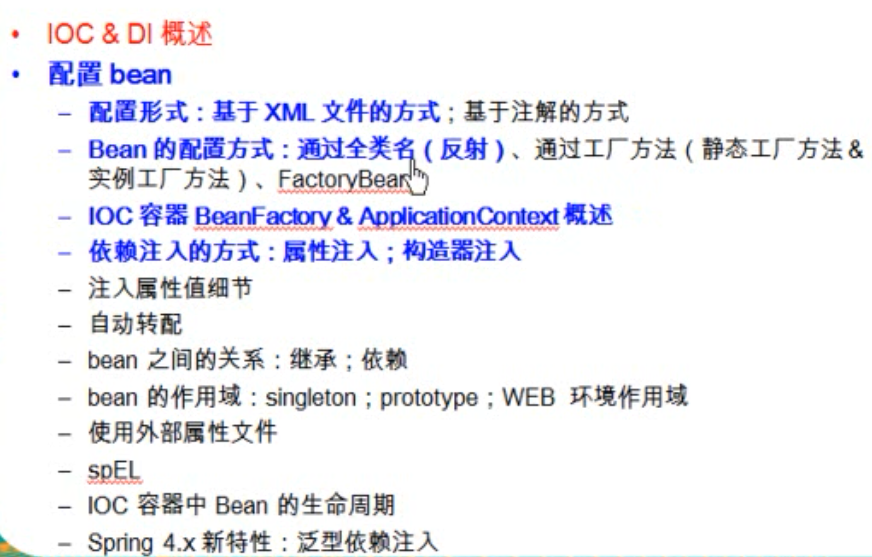
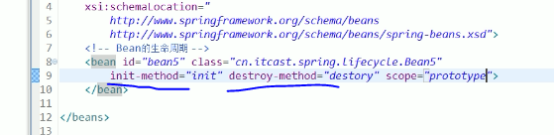
Bean的xml配置
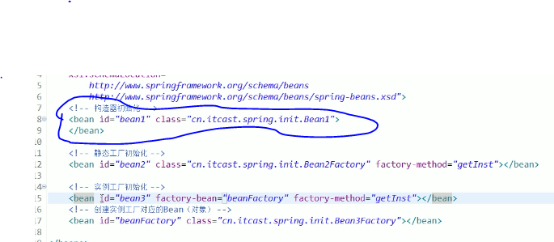
1.bean的初始化方式
三种方式: 默认构造器,静态工厂初始化(了解)和实例工厂初始化(了解)
2.springbean的作用域
Bean默认作用域是单实例的
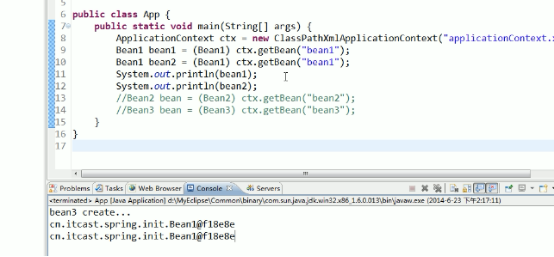
可以设置非单实例

作用域介绍:
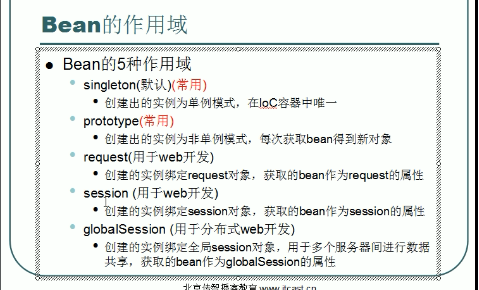
比如:将作用域设置request时,原理是在request对象创建好后调用,request.setAttribute(“bean4”,ctx.getBean(“bean4”))。

Bean的生命周期
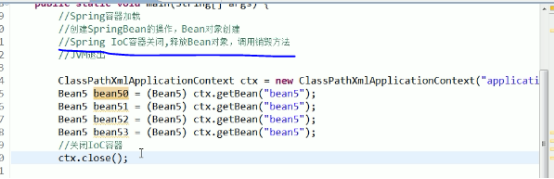
注意: spring的bean容器关闭后才会调用销毁方法。
2.Bean的属性注入
两种方式: 构造器注入和属性注入
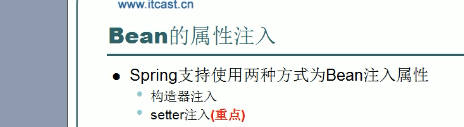
1) 构造器注入
配置文件

Java类

- bean的初始化使用有参数构造器时,需要同时给属性赋值,这时就叫做bean的属性注入,bean的初始化方式还是构造方法
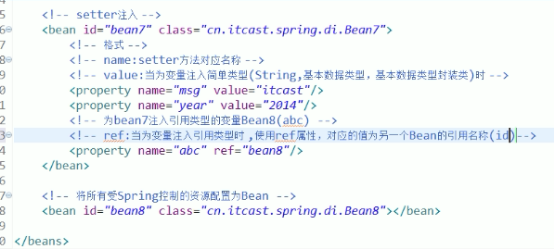
2)setter注入
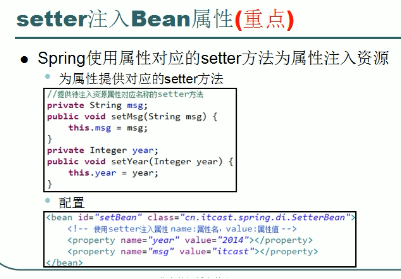
配置实例
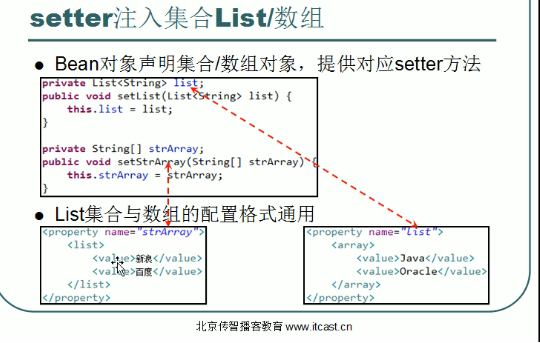
复杂属性注入
- list注入
2.map属性注入
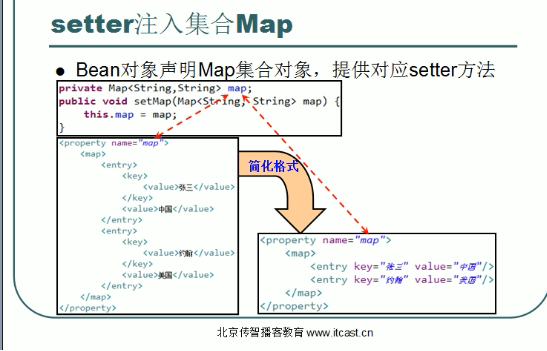
Property注入

3)团队开发

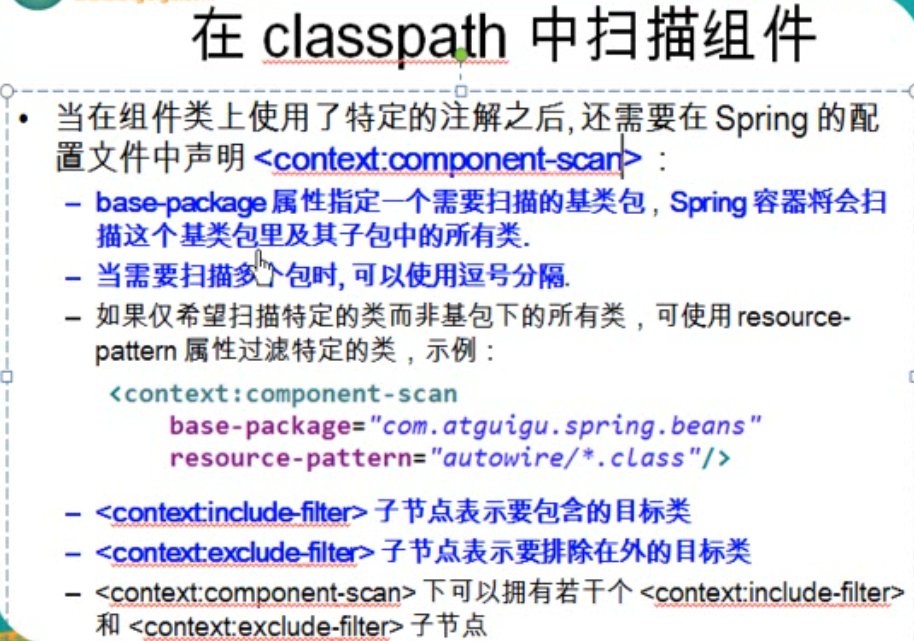
Bean的注解配置
@Autowired和qualifier(“”)注解可以使用Resource替代.

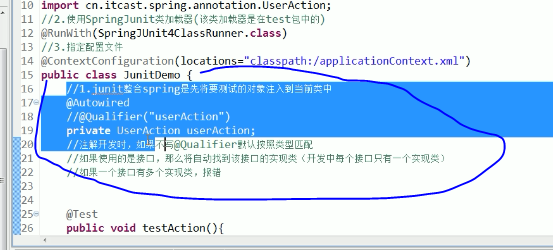
Spring整合junit
Classpath: 指定项目的根路径
@RunWith: 使用springJunit类加载器
@ContextConfiguration: 指定配置文件
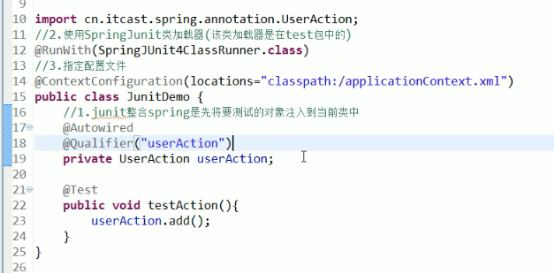
注意: @Autowired根据类型自动注入,如果类型是接口,那么会默认找到实现类.如果有多个实现类则会抱错
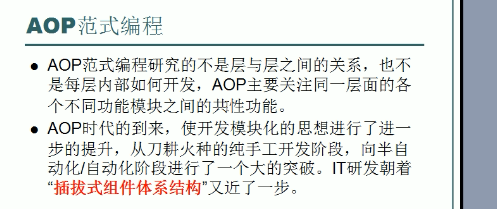
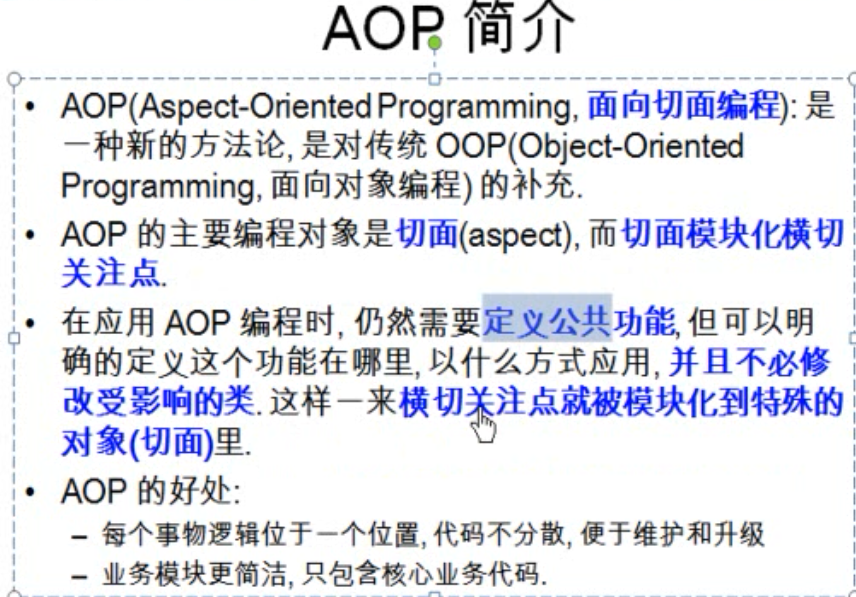
AOP

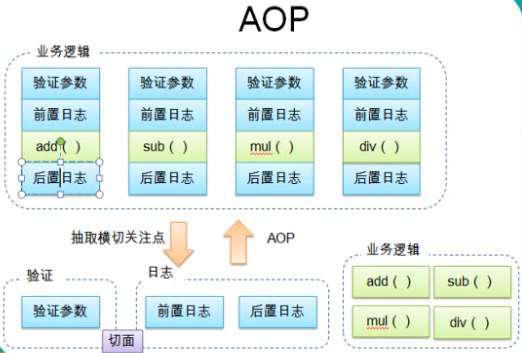
aop代码实例
1)applicationContext-aop.xml文件


<?xml version="1.0" encoding="UTF-8"?>
<beans xmlns="http://www.springframework.org/schema/beans"
    xmlns:xsi="http://www.w3.org/2001/XMLSchema-instance"
    xmlns:aop="http://www.springframework.org/schema/aop"
    xmlns:context="http://www.springframework.org/schema/context"
    xsi:schemaLocation="http://www.springframework.org/schema/beans http://www.springframework.org/schema/beans/spring-beans.xsd
        http://www.springframework.org/schema/aop http://www.springframework.org/schema/aop/spring-aop-4.0.xsd
        http://www.springframework.org/schema/context http://www.springframework.org/schema/context/spring-context-4.0.xsd">

    <!-- 自动扫描的包 -->
    <context:component-scan base-package="com.atguigu.spring.aop"></context:component-scan>

    <!-- 使 AspectJ 的注解起作用 -->
    <aop:aspectj-autoproxy></aop:aspectj-autoproxy>

</beans>
2)LoggingAspect.java类
package com.atguigu.spring.aop;

import java.util.Arrays;

import org.aspectj.lang.JoinPoint;
import org.aspectj.lang.annotation.After;
import org.aspectj.lang.annotation.Aspect;
import org.aspectj.lang.annotation.Before;
import org.springframework.stereotype.Component;

/**
 * AOP 的 helloWorld
 * 1. 加入 jar 包
 * com.springsource.net.sf.cglib-2.2.0.jar
 * com.springsource.org.aopalliance-1.0.0.jar
 * com.springsource.org.aspectj.weaver-1.6.8.RELEASE.jar
 * spring-aspects-4.0.0.RELEASE.jar
 *
 * 2. 在 Spring 的配置文件中加入 aop 的命名空间。
 *
 * 3. 基于注解的方式来使用 AOP
 * 3.1 在配置文件中配置自动扫描的包: <context:component-scan base-package="com.atguigu.spring.aop"></context:component-scan>
 * 3.2 加入使 AspjectJ 注解起作用的配置: <aop:aspectj-autoproxy></aop:aspectj-autoproxy>
 * 为匹配的类自动生成动态代理对象.
 *
 * 4. 编写切面类:
 * 4.1 一个一般的 Java 类
 * 4.2 在其中添加要额外实现的功能.
 *
 * 5. 配置切面
 * 5.1 切面必须是 IOC 中的 bean: 实际添加了 @Component 注解
 * 5.2 声明是一个切面: 添加 @Aspect
 * 5.3 声明通知: 即额外加入功能对应的方法.
 * 5.3.1 前置通知: @Before("execution(public int com.atguigu.spring.aop.ArithmeticCalculator.*(int, int))")
 * @Before 表示在目标方法执行之前执行 @Before 标记的方法的方法体.
 * @Before 里面的是切入点表达式:
 *
 * 6. 在通知中访问连接细节: 可以在通知方法中添加 JoinPoint 类型的参数, 从中可以访问到方法的签名和方法的参数.
 *
 * 7. @After 表示后置通知: 在方法执行之后执行的代码.
 */

//通过添加 @Aspect 注解声明一个 bean 是一个切面!
@Aspect
@Component
public class LoggingAspect {
    //切面方法针对那些方法使用切面,@Before前置通知
    @Before("execution(public int com.atguigu.spring.aop.ArithmeticCalculator.*(int, int))")
    public void beforeMethod(JoinPoint joinPoint){
        String methodName = joinPoint.getSignature().getName();
        Object [] args = joinPoint.getArgs();

        System.out.println("The method " + methodName + " begins with " + Arrays.asList(args));
    }

    @After("execution(* com.atguigu.spring.aop.*.*(..))")
    public void afterMethod(JoinPoint joinPoint){
        String methodName = joinPoint.getSignature().getName();
        System.out.println("The method " + methodName + " ends");
    }

}
3)main.java执行类
package com.atguigu.spring.aop;

import org.springframework.context.ApplicationContext;
import org.springframework.context.support.ClassPathXmlApplicationContext;

public class Main {

    public static void main(String[] args) {
//        ArithmeticCalculator arithmeticCalculator = new ArithmeticCalculatorImpl();
//
//        arithmeticCalculator =
//                new ArithmeticCalculatorLoggingProxy(arithmeticCalculator).getLoggingProxy();
//
//        int result = arithmeticCalculator.add(11, 12);
//        System.out.println("result:" + result);
//
//        result = arithmeticCalculator.div(21, 3);
//        System.out.println("result:" + result);

        ApplicationContext ctx = new ClassPathXmlApplicationContext("applicationContext-aop.xml");
        ArithmeticCalculator arithmeticCalculator = (ArithmeticCalculator) ctx.getBean("arithmeticCalculator");

        System.out.println(arithmeticCalculator.getClass().getName());

        int result = arithmeticCalculator.add(11, 12);
        System.out.println("result:" + result);

        result = arithmeticCalculator.div(21, 3);
        System.out.println("result:" + result);
    }

}
效果如下图:

前置通知:
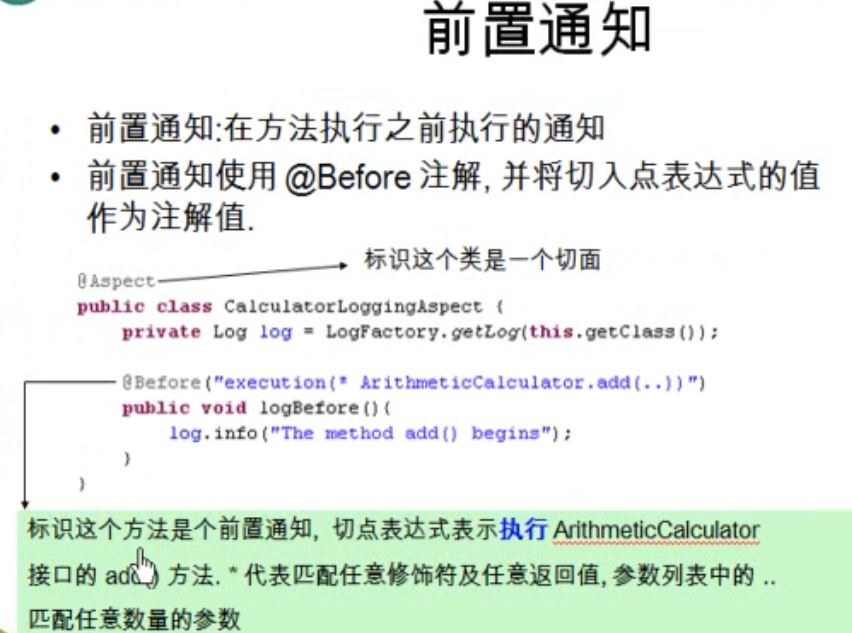
方法签名:

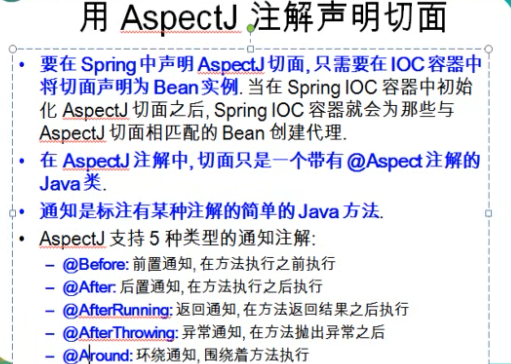
注解声明切面实例:
1.applicationContext.xml文件
<?xml version="1.0" encoding="UTF-8"?>
<beans xmlns="http://www.springframework.org/schema/beans"
    xmlns:xsi="http://www.w3.org/2001/XMLSchema-instance"
    xmlns:context="http://www.springframework.org/schema/context"
    xmlns:aop="http://www.springframework.org/schema/aop"
    xsi:schemaLocation="http://www.springframework.org/schema/aop http://www.springframework.org/schema/aop/spring-aop-4.0.xsd
        http://www.springframework.org/schema/beans http://www.springframework.org/schema/beans/spring-beans.xsd
        http://www.springframework.org/schema/context http://www.springframework.org/schema/context/spring-context-4.0.xsd">

    <!-- 配置自动扫描的包 -->
    <context:component-scan base-package="com.atguigu.spring.aop"></context:component-scan>

    <!-- 配置自动为匹配 aspectJ 注解的 Java 类生成代理对象 -->
    <aop:aspectj-autoproxy></aop:aspectj-autoproxy>

</beans>
2.定义类日志切面
package com.atguigu.spring.aop;

import java.util.Arrays;

import org.aspectj.lang.JoinPoint;
import org.aspectj.lang.annotation.After;
import org.aspectj.lang.annotation.AfterReturning;
import org.aspectj.lang.annotation.AfterThrowing;
import org.aspectj.lang.annotation.Aspect;
import org.aspectj.lang.annotation.Before;
import org.aspectj.lang.annotation.Pointcut;
import org.springframework.core.annotation.Order;
import org.springframework.stereotype.Component;

/**
 * 可以使用 @Order 注解指定切面的优先级, 值越小优先级越高
 */
@Order(2)
@Aspect
@Component
public class LoggingAspect {

    /**
     * 定义一个方法, 用于声明切入点表达式. 一般地, 该方法中再不需要添入其他的代码.
     * 使用 @Pointcut 来声明切入点表达式.
     * 后面的其他通知直接使用方法名来引用当前的切入点表达式.
     */
    @Pointcut("execution(public int com.atguigu.spring.aop.ArithmeticCalculator.*(..))")
    public void declareJointPointExpression(){}

    /**
     * 在 com.atguigu.spring.aop.ArithmeticCalculator 接口的每一个实现类的每一个方法开始之前执行一段代码
     */
    @Before("declareJointPointExpression()")
    public void beforeMethod(JoinPoint joinPoint){
        String methodName = joinPoint.getSignature().getName();
        Object [] args = joinPoint.getArgs();

        System.out.println("The method " + methodName + " begins with " + Arrays.asList(args));
    }

    /**
     * 在方法执行之后执行的代码. 无论该方法是否出现异常
     */
    @After("declareJointPointExpression()")
    public void afterMethod(JoinPoint joinPoint){
        String methodName = joinPoint.getSignature().getName();
        System.out.println("The method " + methodName + " ends");
    }

    /**
     * 在方法法正常结束受执行的代码
     * 返回通知是可以访问到方法的返回值的!
     */
    @AfterReturning(value="declareJointPointExpression()",
            returning="result")
    public void afterReturning(JoinPoint joinPoint, Object result){
        String methodName = joinPoint.getSignature().getName();
        System.out.println("The method " + methodName + " ends with " + result);
    }

    /**
     * 在目标方法出现异常时会执行的代码.
     * 可以访问到异常对象; 且可以指定在出现特定异常时在执行通知代码
     */
    @AfterThrowing(value="declareJointPointExpression()",
            throwing="e")
    public void afterThrowing(JoinPoint joinPoint, Exception e){
        String methodName = joinPoint.getSignature().getName();
        System.out.println("The method " + methodName + " occurs excetion:" + e);
    }

    /**
     * 环绕通知需要携带 ProceedingJoinPoint 类型的参数.
     * 环绕通知类似于动态代理的全过程: ProceedingJoinPoint 类型的参数可以决定是否执行目标方法.
     * 且环绕通知必须有返回值, 返回值即为目标方法的返回值
     */
    /*
    @Around("execution(public int com.atguigu.spring.aop.ArithmeticCalculator.*(..))")
    public Object aroundMethod(ProceedingJoinPoint pjd){

        Object result = null;
        String methodName = pjd.getSignature().getName();

        try {
            //前置通知
            System.out.println("The method " + methodName + " begins with " + Arrays.asList(pjd.getArgs()));
            //执行目标方法
            result = pjd.proceed();
            //返回通知
            System.out.println("The method " + methodName + " ends with " + result);
        } catch (Throwable e) {
            //异常通知
            System.out.println("The method " + methodName + " occurs exception:" + e);
            throw new RuntimeException(e);
        }
        //后置通知
        System.out.println("The method " + methodName + " ends");

        return result;
    }
    */
}
3.定义校验切面
package com.atguigu.spring.aop;

import java.util.Arrays;

import org.aspectj.lang.JoinPoint;
import org.aspectj.lang.annotation.Aspect;
import org.aspectj.lang.annotation.Before;
import org.springframework.core.annotation.Order;
import org.springframework.stereotype.Component;

@Order(1)
@Aspect
@Component
public class VlidationAspect {

    @Before("com.atguigu.spring.aop.LoggingAspect.declareJointPointExpression()")
    public void validateArgs(JoinPoint joinPoint){
        System.out.println("-->validate:" + Arrays.asList(joinPoint.getArgs()));
    }

}
4.arithmeticCalculator类
package com.atguigu.spring.aop;

import org.springframework.stereotype.Component;

@Component("arithmeticCalculator")
public class ArithmeticCalculatorImpl implements ArithmeticCalculator {

    @Override
    public int add(int i, int j) {
        int result = i + j;
        return result;
    }

    @Override
    public int sub(int i, int j) {
        int result = i - j;
        return result;
    }

    @Override
    public int mul(int i, int j) {
        int result = i * j;
        return result;
    }

    @Override
    public int div(int i, int j) {
        int result = i / j;
        return result;
    }

}
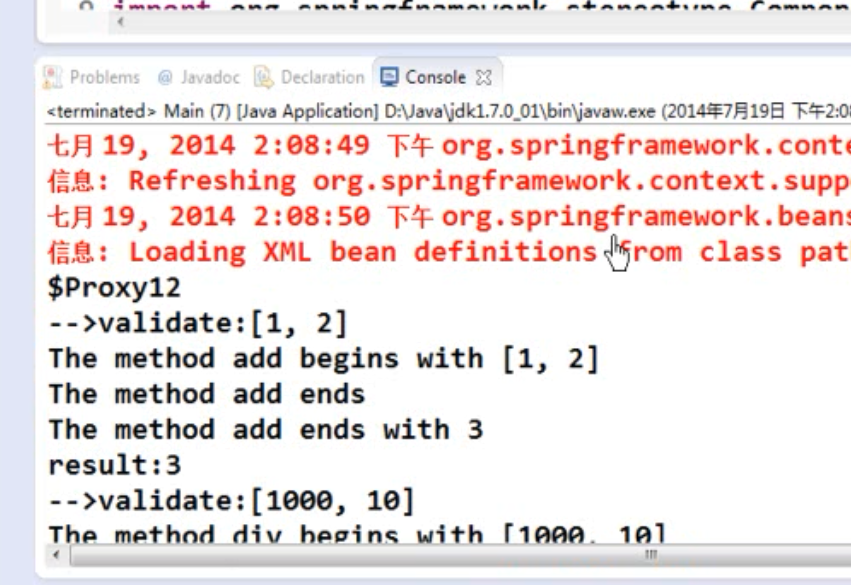
5.Main.java类
package com.atguigu.spring.aop;

import org.springframework.context.ApplicationContext;
import org.springframework.context.support.ClassPathXmlApplicationContext;

public class Main {

    public static void main(String[] args) {

        ApplicationContext ctx = new ClassPathXmlApplicationContext("applicationContext.xml");
        ArithmeticCalculator arithmeticCalculator = (ArithmeticCalculator) ctx.getBean("arithmeticCalculator");

        System.out.println(arithmeticCalculator.getClass().getName());

        int result = arithmeticCalculator.add(1, 2);
        System.out.println("result:" + result);

        result = arithmeticCalculator.div(1000, 10);
        System.out.println("result:" + result);
    }

}
方法执行截图:
spring声明式事务
xml文件:
<?xml version="1.0" encoding="UTF-8"?>
<beans xmlns="http://www.springframework.org/schema/beans"
    xmlns:xsi="http://www.w3.org/2001/XMLSchema-instance"
    xmlns:context="http://www.springframework.org/schema/context"
    xmlns:tx="http://www.springframework.org/schema/tx"
    xsi:schemaLocation="http://www.springframework.org/schema/beans http://www.springframework.org/schema/beans/spring-beans.xsd
        http://www.springframework.org/schema/tx http://www.springframework.org/schema/tx/spring-tx-4.0.xsd
        http://www.springframework.org/schema/context http://www.springframework.org/schema/context/spring-context-4.0.xsd">

    <context:component-scan base-package="com.atguigu.spring"></context:component-scan>

    <!-- 导入资源文件 -->
    <context:property-placeholder location="classpath:db.properties"/>

    <!-- 配置 C3P0 数据源 -->
    <bean id="dataSource"
        class="com.mchange.v2.c3p0.ComboPooledDataSource">
        <property name="user" value="${jdbc.user}"></property>
        <property name="password" value="${jdbc.password}"></property>
        <property name="jdbcUrl" value="${jdbc.jdbcUrl}"></property>
        <property name="driverClass" value="${jdbc.driverClass}"></property>

        <property name="initialPoolSize" value="${jdbc.initPoolSize}"></property>
        <property name="maxPoolSize" value="${jdbc.maxPoolSize}"></property>
    </bean>

    <!-- 配置 Spirng 的 JdbcTemplate -->
    <bean id="jdbcTemplate"
        class="org.springframework.jdbc.core.JdbcTemplate">
        <property name="dataSource" ref="dataSource"></property>
    </bean>

    <!-- 配置 NamedParameterJdbcTemplate, 该对象可以使用具名参数, 其没有无参数的构造器, 所以必须为其构造器指定参数 -->
    <bean id="namedParameterJdbcTemplate"
        class="org.springframework.jdbc.core.namedparam.NamedParameterJdbcTemplate">
        <constructor-arg ref="dataSource"></constructor-arg>
    </bean>

    <!-- 配置事务管理器 -->
    <bean id="transactionManager"
        class="org.springframework.jdbc.datasource.DataSourceTransactionManager">
        <property name="dataSource" ref="dataSource"></property>
    </bean>

    <!-- 启用事务注解 -->
    <tx:annotation-driven transaction-manager="transactionManager"/>

</beans>
代码如下:
package com.atguigu.spring.tx;

import org.springframework.beans.factory.annotation.Autowired;
import org.springframework.stereotype.Service;
import org.springframework.transaction.annotation.Isolation;
import org.springframework.transaction.annotation.Propagation;
import org.springframework.transaction.annotation.Transactional;

@Service("bookShopService")
public class BookShopServiceImpl implements BookShopService {

    @Autowired
    private BookShopDao bookShopDao;

    //添加事务注解
    //1.使用 propagation 指定事务的传播行为, 即当前的事务方法被另外一个事务方法调用时
    //如何使用事务, 默认取值为 REQUIRED, 即使用调用方法的事务
    //REQUIRES_NEW: 事务自己的事务, 调用的事务方法的事务被挂起.
    //2.使用 isolation 指定事务的隔离级别, 最常用的取值为 READ_COMMITTED
    //3.默认情况下 Spring 的声明式事务对所有的运行时异常进行回滚. 也可以通过对应的
    //属性进行设置. 通常情况下去默认值即可.
    //4.使用 readOnly 指定事务是否为只读. 表示这个事务只读取数据但不更新数据,
    //这样可以帮助数据库引擎优化事务. 若真的事一个只读取数据库值的方法, 应设置 readOnly=true
    //5.使用 timeout 指定强制回滚之前事务可以占用的时间.
//    @Transactional(propagation=Propagation.REQUIRES_NEW,
//            isolation=Isolation.READ_COMMITTED,
//            noRollbackFor={UserAccountException.class})
    @Transactional(propagation=Propagation.REQUIRES_NEW,
            isolation=Isolation.READ_COMMITTED,
            readOnly=false,
            timeout=3)
    @Override
    public void purchase(String username, String isbn) {

        try {
            Thread.sleep(5000);
        } catch (InterruptedException e) {}

        //1. 获取书的单价
        int price = bookShopDao.findBookPriceByIsbn(isbn);

        //2. 更新数的库存
        bookShopDao.updateBookStock(isbn);

        //3. 更新用户余额
        bookShopDao.updateUserAccount(username, price);
    }

}
事务传播行为
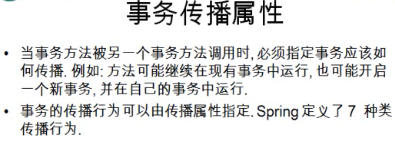

在web中应该怎么使用spring
1.思路整理
1. Spring 如何在 WEB 应用中使用 ?

1). 需要额外加入的 jar 包:

spring-web-4.0.0.RELEASE.jar
spring-webmvc-4.0.0.RELEASE.jar

2). Spring 的配置文件, 没有什么不同

3). 如何创建 IOC 容器 ?

①. 非 WEB 应用在 main 方法中直接创建
②. 应该在 WEB 应用被服务器加载时就创建 IOC 容器:

在 ServletContextListener#contextInitialized(ServletContextEvent sce) 方法中创建 IOC 容器.

③. 在 WEB 应用的其他组件中如何来访问 IOC 容器呢 ?

在 ServletContextListener#contextInitialized(ServletContextEvent sce) 方法中创建 IOC 容器后, 可以把其放在
ServletContext(即 application 域)的一个属性中.

④. 实际上, Spring 配置文件的名字和位置应该也是可配置的! 将其配置到当前 WEB 应用的初始化参数中较为合适.

2. Spring 如何整合 Struts2 ?
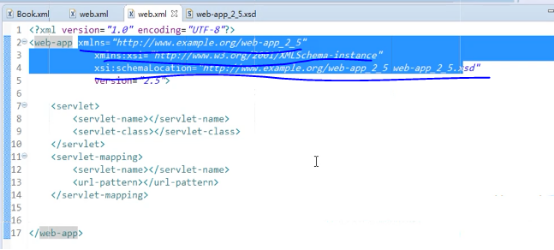
2.web.xml配置
<?xml version="1.0" encoding="UTF-8"?>
<web-app xmlns:xsi="http://www.w3.org/2001/XMLSchema-instance" xmlns="http://java.sun.com/xml/ns/javaee" xsi:schemaLocation="http://java.sun.com/xml/ns/javaee http://java.sun.com/xml/ns/javaee/web-app_2_5.xsd" id="WebApp_ID" version="2.5">
<!--配置servletContext的初始化参数-->
  <context-param>
    <param-name>configLocation</param-name>
    <param-value>applicationContext.xml</param-value>
  </context-param>

  <!--配置servletContext监听器,用于初始化ioc容器-->
  <listener>
    <listener-class>com.atguigu.spring.struts2.listeners.SpringServletContextListener</listener-class>
  </listener>
  <!--配置servletContext-->
  <servlet>
    <description></description>
    <display-name>TestServlet</display-name>
    <servlet-name>TestServlet</servlet-name>
    <servlet-class>com.atguigu.spring.struts2.servlets.TestServlet</servlet-class>
  </servlet>
  <servlet-mapping>
    <servlet-name>TestServlet</servlet-name>
    <url-pattern>/TestServlet</url-pattern>
  </servlet-mapping>
</web-app>
3.SpringServletContextListener
package com.atguigu.spring.struts2.listeners;

import javax.servlet.ServletContext;
import javax.servlet.ServletContextEvent;
import javax.servlet.ServletContextListener;

import org.springframework.context.ApplicationContext;
import org.springframework.context.support.ClassPathXmlApplicationContext;

/**
 * Application Lifecycle Listener implementation class SpringServletContextListener
 *
 */
public class SpringServletContextListener implements ServletContextListener {

    /**
     * Default constructor.
     */
    public SpringServletContextListener() {
        // TODO Auto-generated constructor stub
    }

    /**
     * @see ServletContextListener#contextInitialized(ServletContextEvent)
     */
    public void contextInitialized(ServletContextEvent arg0) {
        //1. 获取 Spring 配置文件的名称.
        ServletContext servletContext = arg0.getServletContext();
        String config = servletContext.getInitParameter("configLocation");

        //1. 创建 IOC 容器
        ApplicationContext ctx = new ClassPathXmlApplicationContext(config);

        //2. 把 IOC 容器放在 ServletContext 的一个属性中.
        servletContext.setAttribute("ApplicationContext", ctx);
    }

    /**
     * @see ServletContextListener#contextDestroyed(ServletContextEvent)
     */
    public void contextDestroyed(ServletContextEvent arg0) {
        // TODO Auto-generated method stub
    }

}
4.applicationContext.xml
<?xml version="1.0" encoding="UTF-8"?>
<beans xmlns="http://www.springframework.org/schema/beans"
    xmlns:xsi="http://www.w3.org/2001/XMLSchema-instance"
    xsi:schemaLocation="http://www.springframework.org/schema/beans http://www.springframework.org/schema/beans/spring-beans.xsd">

    <bean id="person"
        class="com.atguigu.spring.struts2.beans.Person">
        <property name="username" value="atguigu"></property>
    </bean>

</beans>
5.testservelt.java ---测试类
package com.atguigu.spring.struts2.servlets;

import java.io.IOException;

import javax.servlet.ServletContext;
import javax.servlet.ServletException;
import javax.servlet.http.HttpServlet;
import javax.servlet.http.HttpServletRequest;
import javax.servlet.http.HttpServletResponse;

import org.springframework.context.ApplicationContext;

import com.atguigu.spring.struts2.beans.Person;

/**
 * Servlet implementation class TestServlet
 */
public class TestServlet extends HttpServlet {
    private static final long serialVersionUID = 1L;

    /**
     * @see HttpServlet#doGet(HttpServletRequest request, HttpServletResponse response)
     */
    protected void doGet(HttpServletRequest request, HttpServletResponse response) throws ServletException, IOException {
        //1. 从 application 域对象中得到 IOC 容器的引用
        ServletContext servletContext = getServletContext();
        ApplicationContext ctx = (ApplicationContext) servletContext.getAttribute("ApplicationContext");

        //2. 从 IOC 容器中得到需要的 bean
        Person person = ctx.getBean(Person.class);
        person.hello();
    }

}
在web中使用spring
4). 在 WEB 环境下使用 Spring

①. 需要额外加入的 jar 包:

spring-web-4.0.0.RELEASE.jar
spring-webmvc-4.0.0.RELEASE.jar

②. Spring 的配置文件, 和非 WEB 环境没有什么不同

③. 需要在 web.xml 文件中加入如下配置:

<!-- 配置 Spring 配置文件的名称和位置 -->
<context-param>
    <param-name>contextConfigLocation</param-name>
    <param-value>classpath:applicationContext.xml</param-value>
</context-param>

<!-- 启动 IOC 容器的 ServletContextListener -->
<listener>
    <listener-class>org.springframework.web.context.ContextLoaderListener</listener-class>
</listener>
web.xml文件
<?xml version="1.0" encoding="UTF-8"?>
<web-app xmlns:xsi="http://www.w3.org/2001/XMLSchema-instance" xmlns="http://java.sun.com/xml/ns/javaee" xsi:schemaLocation="http://java.sun.com/xml/ns/javaee http://java.sun.com/xml/ns/javaee/web-app_2_5.xsd" id="WebApp_ID" version="2.5">

    <!-- 配置 Spring 配置文件的名称和位置 -->
    <context-param>
        <param-name>contextConfigLocation</param-name>
        <param-value>classpath:applicationContext.xml</param-value>
    </context-param>

    <!-- 启动 IOC 容器的 ServletContextListener -->
    <listener>
        <listener-class>org.springframework.web.context.ContextLoaderListener</listener-class>
    </listener>

    <!-- 配置 Struts2 的 Filter -->
    <filter>
        <filter-name>struts2</filter-name>
        <filter-class>org.apache.struts2.dispatcher.ng.filter.StrutsPrepareAndExecuteFilter</filter-class>
    </filter>

    <filter-mapping>
        <filter-name>struts2</filter-name>
        <url-pattern>/*</url-pattern>
    </filter-mapping>

</web-app>
Xml文件操作
Schema约束
w3c中http://www.w3.org/2001/XMLSchema-instance,这个是w3预定义的命名空间。客户可以根据这个名称空间创建自己的约束文档。就像w3定义了一个标准接口一样,实现这个接口可以具备自定义约束文档的能力,比如:<complexType>这个标签就是w3预定义的标签,用于客户实现自己的约束文档。用户做完自己的约束文档后就可以在实例文档中使用这个约束文档,创建对应的配置文件。
即定义自己的约束文档然后使用的过程是:
自定义约束文档: 引入w3预定义命名空间,使用其内的标签定义自己的约束标签。
实例文档: 引入预定义命名空间,引入自定义明明空间和位置。使用自定义标签进行配置,从而完成配置文件作用。

使用实例:
如下:
1)xmls引入自定义命名空间 2)xmlns:xsi:引入预定义命名空间 3)xsi:schemalocation:引入自定义空间位置
Xml解析

