配置
配置文件、加载顺序、配置原理
代码地址
ssh git@gitee.com:Ding_DangMao/learn-spring-bot.git
1. 配置文件
-
Spring boot使用一个全局的配置文件,配置文件名是固定的
application.properties
application.yml -
配置文件放在 src/main/resources目录或者类路径/config下
-
配置文件的作用: 修改 spring boot自动配置的默认值,spring boot在底层都给我们自动配置好
-
yaml (yaml ain't markup language)
yaml a markup language: 是一个标记语言
yaml isn't markup language: 不是一个标记语言
-
标记语言:
以前的配置文件;大多使用的是 xxx.xml文件;
yaml :以数据为中心,比 json,xml等更适合做配置文件;
yaml :配置例子
server
  port: 8081
<server> <port>8081</port> </server>
2. YAML 语法
2.1 基本语法
- k:(空格)v 表示一对键值对(空格必须有)
以空格的缩进来控制层级关系;只要是左对齐的一列数据,都是同一个层级的
属性和值也是大小写敏感;server prot: 8081 path: /hello
2.2 值的写法
-
字面量:普通的值(数字,字符串,布尔,日期)
k: v 字面直接来写
-
字符串默认不用加上单引号,或者双引号
-
"":双引号,不会转义字符串里面的特殊字符;特殊字符会作为本身像表示的意思
name: "zhangsan lisi" 输出:zhangsan 换行 lisi
-
'':单引号,会转义特殊字符,特殊字符最终只是一个普通的字符串数据
name: "zhangsan lisi" 输出:zhangsan lisi
-
-
文档
多个文档用 --- 隔开 -
对象,map(属性和值)(键值对)
k: v 在写一行写对象的属性和值得关系,注意缩进
- 对象还是 k: v的方式
friends: lastName: zhangsan age: 20 - 行内写法:
friends: {lastName: zhangsan,age: 18}
- 对象还是 k: v的方式
-
数组(list,set)
- 用- 值表示数组中的一个元素
pets: - cat - dog - pig - 行内写法:
pets: [cat,dog,pig]
- 用- 值表示数组中的一个元素
3 配置文件值注入
- 配置文件
person: lastName: zhangsan age: 18 boss: false birth: 2017/12/17 map: {k1: v1,k2: 12} list: - lisi - zhaoliu dog: name: 小狗 age: 2 - Java组件
/** * 将配文件中配置的每一个属性的值,映射到这个组件中 * @ConfigurationProperties:告诉 Spring Boot将本类中的所有属性和配置文件中相关的配置进项绑定 * ====> prefix = "person" 配置文件中那个下面的所有属性进行--映射 * 只有这个组件是容器中的组件,才能使用容器中提供 @ConfigurationProperties的功能 */ @Component @ConfigurationProperties(prefix = "person") public class Person { private String lastName; private Integer age; private Boolean boss; private Date birth; private Map<String, Object> map; private List<Object> list; private Dog dog; } - 我们可以导入配置文件处理器,以后编写配置就有提示了
<!--导入配置文件处理器,配置文件进行绑定就会有提示-->
<dependency>
    <groupId>org.springframework.boot</groupId>
    <artifactId>spring-boot-configuration-processor</artifactId>
    <optional>true</optional>
</dependency>
测试:
/*
 * spring boot 单元测试
 * <p>
 * 可以在测试期间很方便的类似编码一样进行自动注入等容器功能
 */
@RunWith(SpringRunner.class)
@SpringBootTest
public class SpringBoot02ConfigApplicationTest {
    @Autowired
    Person person;

    @Test
    public void contextLoads() {
        System.out.println(person);
        //Person{lastName='zhangsan', age=18, boss=false, birth=Sun Dec 17 00:00:00 CST 2017,
        // map={k1=v1, k2=12}, list=[lisi, zhaoliu], dog=Dog{name='小狗', age=2}}
    }
}
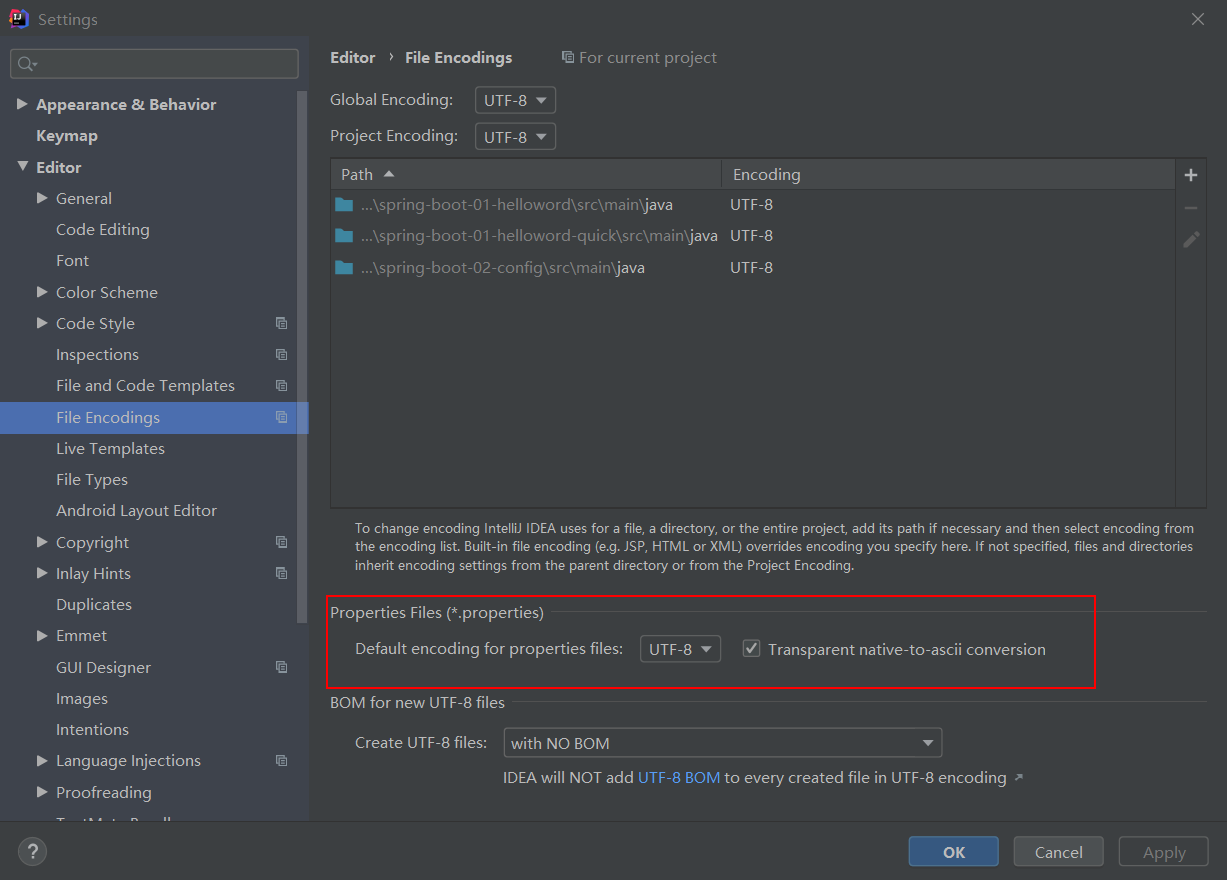
3.1 properties配置文件在 idea中默认 utf-8可能会乱码
3.2 @Value 获取值和 @ConfigurationProperties获取值比较
| # | @ConfigurationProperties | @Value |
|---|---|---|
| 功能 | 批量注入配置文件中的属性 | 一个个指定 |
| 松散绑定(松散语法) | 支持 | 不支持 |
| SpEL | 不支持 | 支持 |
| JSR303数据校验 | 支持 | 不支持 |
-
属性名匹配规则(relaxed binding 松散绑定)
- person.firstName:使用标准方式
- person.first-name:大写用-
- person.first_name:大写用_
- PERSON_FIRST_NAME:
推荐系统属性使用这种写法
-
配置文件 yml还是 properties他们都能获取到值;
如果说,我们只是在某个业务逻辑中需要获取一下配置文件中的某项值,使用 @Value
如果是,我们专门编写一个 JavaBean来配给制文件进行映射,我们直接使用 @ConfigurationProperties
3.3 配置文件注入数据校验
@Validated //JSR303数据校验 注入值的时候进行校验
@Component
@ConfigurationProperties(prefix = "person")
public class Person {
    /*
     * <bean>
     * <property name="lastName" value="字面量/${}从环境变量,配置文件中获取值/#{SpEL}"></property>
     * </bean>
     *
     * */
//    @Value("${person.last-name}")
    @Email //lastName 必须是 邮箱格式
    private String lastName;
    //    @Value("#{11*2}")
    private Integer age;
    //    @Value("true")
    private Boolean boss;
    private Date birth;

    private Map<String, Object> map;
    private List<Object> list;
    private Dog dog;}
3.4 @PropertySource & @ImportResource
-
@PropertySource :加载指定的配置文件;
@PropertySource(value = {"classpath:person.properties"}) //@Validated //JSR303数据校验 注入值的时候进行校验 @Component @ConfigurationProperties(prefix = "person") public class Person { /* * <bean> * <property name="lastName" value="字面量/${}从环境变量,配置文件中获取值/#{SpEL}"></property> * </bean> * * */ // @Value("${person.last-name}") // @Email //lastName 必须是 邮箱格式 //js303 private String lastName; // @Value("#{11*2}") //SpEL 表达式语言 private Integer age; // @Value("true") private Boolean boss; private Date birth; private Map<String, Object> map; private List<Object> list; private Dog dog;} -
@ImportResource;导入 Spring的配置文件,让配给制文件里面的内容生效
spring boot里面没有 Spring的配置文件,我们自己编写的配置文件,也不能自动识别;想让 spring的配置文件生效,加载进来; @ImportResource标注在一个配置类上@ImportResource(locations = {"classpath:beans.xml"}) //导入spring的配置文件让其生效不来编写 Spring配置文件
<?xml version="1.0" encoding="UTF-8"?> <beans xmlns="http://www.springframework.org/schema/beans" xmlns:xsi="http://www.w3.org/2001/XMLSchema-instance" xsi:schemaLocation="http://www.springframework.org/schema/beans http://www.springframework.org/schema/beans/spring-beans.xsd"> <bean id="helloService" class="com.cainiao100.springboot.service.HelloService"> </bean> </beans>- Spring Boot推荐给容器中添加组件的方式;推荐使用全注解的方式
- 配置类===>spring配置文件
- 使用 @Bean给容器中添加组件
/**
 * @Configuration 指明当前类是一个配置类, 代替之前的 spring配置文件
 * 在配置文件中用 <bean></bean>标签添加组件
 */
@Configuration //指明当前类是一个配置类,代替之前的 spring配置文件
public class MyAppConfig {

    //将方法的返回值添加到容器中,容器中这个组件默认的id就是方法名
    @Bean
    public HelloService helloService() {
        System.out.println("配置类 @Bean给容器添加组件了");
        return new HelloService();
    }
}
- Spring Boot推荐给容器中添加组件的方式;推荐使用全注解的方式
4. 配置文件占位符
4.1 随机数
${random.value} ${random.int}   ${random.long}
${random.init(10)}  ${random.int[1024.65536]}
4.2 占位符获取之前配置的值,如果没有可以是用:指定的值
# 配置 person的值
person.last-name=张三${random.uuid}
person.age=${random.int}
person.birth=2017/12/15
person.boss=false
person.map.k1=v1
person.map.k2=14
person.list=a,b,c
person.dog.name=${person.hello:hello }_dog #如果没有 person.hello的值,则使用 hello
person.dog.age=15
# 使用 idea设置 properties文件的编码为 utf-8
5. Profile
-Profile是Spring对不同环境提供不同配置功能的支持,可以通过激活、指定参数等方式快速切换环境
5.1 多 Profile文件
- 我们在主配置文件编写的时候,文件名是 application-{profile}.properties/yml
默认使用 application.properties
5.2 yml支持多文档块方式
server:
  port: 8081
spring:
  profiles:
    active: dev
---
#开发环境
server:
  port: 8083
spring:
  profiles:
    active: dev
---
#生产环境
server:
  port: 8084
spring:
  profiles: pord
5.3 激活指定 profile
-
在配置文件中指定 spring.profiles.active.=dev
-
命令行
--spring.profiles.active=dev
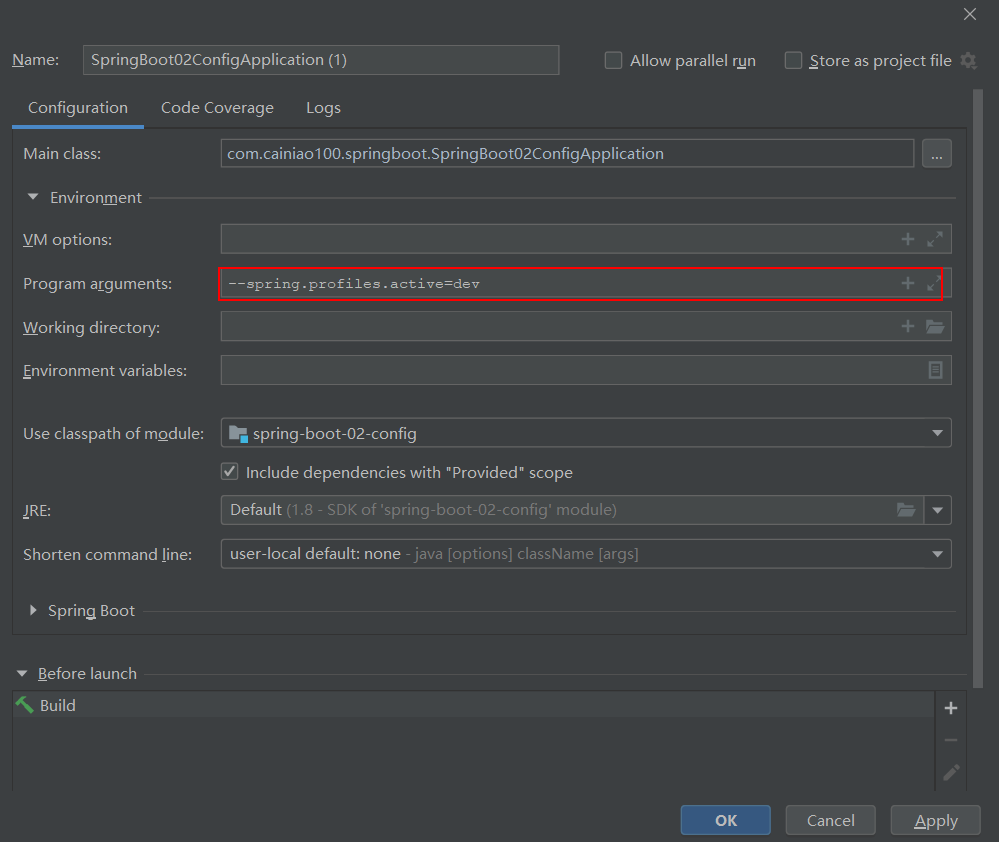
java -jar Xxx.jar --spring.profiles.active=dev
可以直接在测试的时候,配置传入命令行参数 -
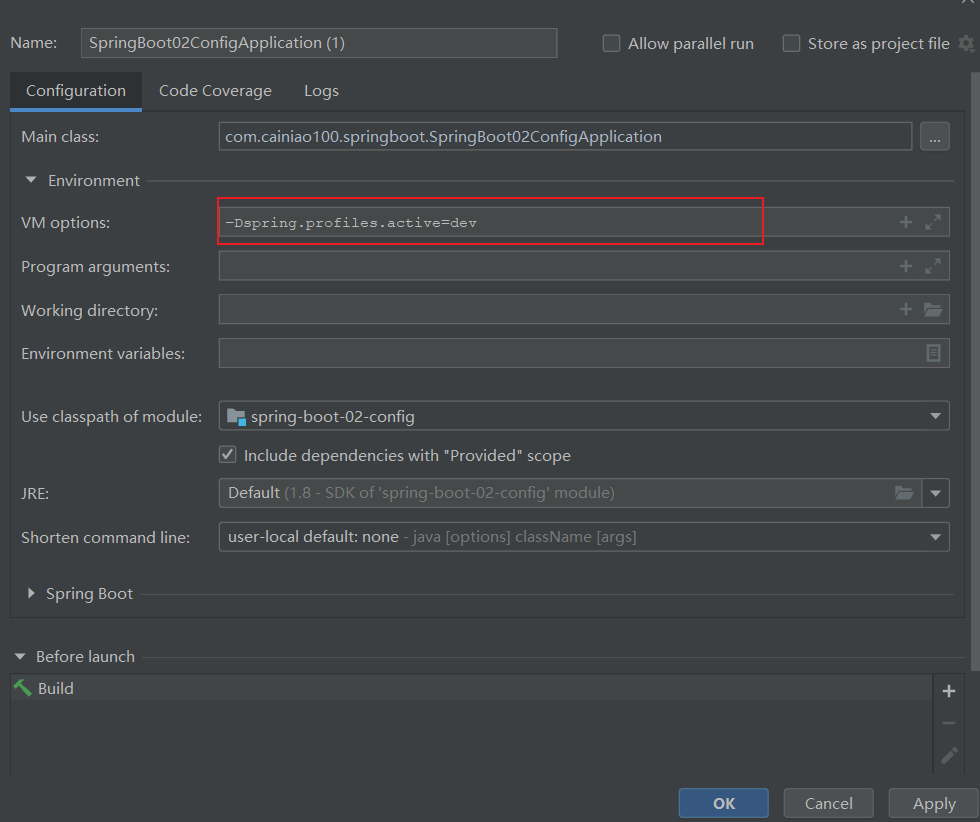
虚拟机参数
–Dspring.profiles.active=dev
6. 配置文件加载位置
-
spring boot启动会扫描一下位置的 application.properties或者 application.yml 或者spring boot的默认配置文件
- file:./config/ (当前项目的config文件夹下)
- file:./ (当前项目文件路径下)
- classpath:/config/ (类路径下config文件下 )
- classpath:/ (类路径下)
以上是按照优先顺序,所有位置的文件都会被加载,高优先级配置内容会覆盖低优先配置内容,spring boot会从这四个位置全部加载主配置文件;互补配置
我们也可以通过配置 spring.config.location来改变默认配置,项目打包好以后,我们可以使用命令行参数的形式,启动项目的时候来指定配置文件的新位置;指定配置文件和默认加载的这些配置文件共同起作用形成互补配置
java -jar xxx.jar --spring.config.location=G:/application.properties
7. 外部配置加载顺序
Spring Boot也可以从一下加载位置加载配置;优先级从高到低;高优先级的配置覆盖低优先级的配置,所有的配置会形成互补配置
- 命令行参数
多个配置用空格分开: --配置项=值 --配置项=值 - 来自java:comp/env的JNDI属性
- Java系统属性(System.getProperties())
- 操作系统环境变量
- RandomValuePropertySource配置的random.*属性值
由 jar包外向 jar内寻找 ,优先加载带 profile - jar包外部的application-{profile}.properties或application.yml(带 spring.profile)配置文件
- jar包内部的application-{profile}.properties或application.yml(带 spring.profile)配置文件
再来加载不带 profile - jar包外部的application.properties或application.yml(不带 spring.profile)配置文件
- jar包内部的application.properties或application.yml(不带 spring.profile)配置文件
- @Configuration注解类上的@PropertySource
- 通过SpringApplication.setDefaultProperties指定的默认属性
8. 自动配置原理
-
配置文件到底能写什么?怎么写?自动配给制原理:
配置文件能配置的属性参照 X. Appendices
8.1自动配置原理
-
spring boot启动的时候加载主配置类,开启了自动配置功能 @EncodingAutoConfiguration
-
@EncodingAutoConfiguration 作用:
-
利用@Import({EnableAutoConfigurationImportSelector.class}) 给容器中导入一些组件?
-
可以查看 selectImports()方法的内容
-
List
configurations = this.getCandidateConfigurations(annotationMetadata, attributes);获取候选的配置 List<String> configurations = SpringFactoriesLoader.loadFactoryNames(this.getSpringFactoriesLoaderFactoryClass(), this.getBeanClassLoader()); //扫描所有 jar包路径下 META-INF/spring.factories //把扫描到的这些文件的内容包装成 properties对象 //从 properties中获取到 EnableAutoConfiguration.class类(类名)对应的值,然后把他们添加在容器中将类路径下 META-INF/spring.factories 里面配置所有 EnableAutoConfiguration的值加入到容器中
每一个这样的 xxxAutoConfiguration类都是容器中的一个组件,都加入到容器中;用他们来做自动配置
-
-
每一个自动配置类进行自动配置功能;
-
以 HttpEncodingAutoConfiguration(http编码自动配置) 为例解释自动配置原理
@Configuration
//表示这是一个配置类,以前编写的配置文件一样,也可以给容器中添加组件
@EnableConfigurationProperties({HttpEncodingProperties.class})
//启动指定类的 ConfigurationProperties功能;将配置文件中对应的值和
//HttpEncodingProperties绑定起来;;并把 HrrpEncodingProperties加入到 ioc容器中
@ConditionalOnWebApplication
//(判断当前应用是否是web应用,如果是当前配置类生效) spring底层 @Conditional注解,
//根据不同的条件,如果满足指定的条件,整个配置类里面的配置就会生效
@ConditionalOnClass({CharacterEncodingFilter.class})
//判断当前项目有没有这个类;(CharacterEncodingFilter:springmvc中进行乱码解决的过滤器)
@ConditionalOnProperty(
    prefix = "spring.http.encoding",
    value = {"enabled"},
    matchIfMissing = true
)  //判断配置文件中是否存在某个配置 spring.http.encoding.enabled,如果不存在,判断也是成立的
   //这句话意思:即使我们配置文件中不配置 pring.http.encoding.enabled=true,也是默认生效的
public class HttpEncodingAutoConfiguration {
    private final HttpEncodingProperties properties;//他已经和 spring boot的配置文件映射了

    //只有一个有参构造器的情况下,参数的值就会从容器中拿
    public HttpEncodingAutoConfiguration(HttpEncodingProperties properties) {
        this.properties = properties;
    }

    @Bean //给容器中添加组件,这个组件的某些值需要从 properties中获取
    @ConditionalOnMissingBean({CharacterEncodingFilter.class})//判断容器没有这个组件;没有就添加
    public CharacterEncodingFilter characterEncodingFilter() {
        CharacterEncodingFilter filter = new OrderedCharacterEncodingFilter();
        filter.setEncoding(this.properties.getCharset().name());
        filter.setForceRequestEncoding(this.properties.shouldForce(Type.REQUEST));
        filter.setForceResponseEncoding(this.properties.shouldForce(Type.RESPONSE));
        return filter;
    }

    @Bean
    public HttpEncodingAutoConfiguration.LocaleCharsetMappingsCustomizer localeCharsetMappingsCustomizer() {
        return new HttpEncodingAutoConfiguration.LocaleCharsetMappingsCustomizer(this.properties);
    }

    private static class LocaleCharsetMappingsCustomizer implements EmbeddedServletContainerCustomizer, Ordered {
        private final HttpEncodingProperties properties;

        LocaleCharsetMappingsCustomizer(HttpEncodingProperties properties) {
            this.properties = properties;
        }

        public void customize(ConfigurableEmbeddedServletContainer container) {
            if (this.properties.getMapping() != null) {
                container.setLocaleCharsetMappings(this.properties.getMapping());
            }

        }

        public int getOrder() {
            return 0;
        }
    }
}
HttpEncodingAutoConfiguration,根据当前不同的条件判断,决定这个配置类是否生效?
一旦这个配置类生效;这个配置类,就会给容器添加各种组件;这些组件的属性是从对应的 properties类中获取的,这些类里面的每一个属性又是和配置文件绑定的.
-
所有在配置文件中能配置的属性都在 xxxProperties类中封装这,配置文件能配置什么就可以参照某个功能对应的这个属性类
- 精髓:
- spring boot启动回家再大量的自动配置类
- 我们看我们需要的功能有没有 spring boot默认写好的自动配置类
- 我们再来看这个自动配置类中到底配置了那些组件(只要我们用的组件有,我们就不需要再来配置了)
- 给容器中自动配置类添加组建的时候,会从 properties类中获取某些属性.我们就可以在配置文件中指定这些属性的值
xxxAutoConfiguration:自动配置类;
给容器中添加组件
xxxProperties:封装配置文件中相关属性;
8.2 细节 @Conditional
-
@Conditional 派生注解(spring注解原生的 @Conditional)
作用:必须是 @Conditional指定的条件成立,才给容器中添加组件,配置配里面的所有内容才生效.
自动配置类必须在一定的条件下才能生效@Conditional扩展注解 作用(判断是否满足当前指定条件) @ConditionalOnJava 系统的java版本是否符合要求 @ConditionalOnBean 容器中存在指定Bean; @ConditionalOnMissingBean 容器中不存在指定Bean; @ConditionalOnExpression 满足SpEL表达式指定 @ConditionalOnClass 系统中有指定的类 @ConditionalOnMissingClass 系统中没有指定的类 @ConditionalOnSingleCandidate 容器中只有一个指定的Bean,或者这个Bean是首选Bean @ConditionalOnProperty 系统中指定的属性是否有指定的值 @ConditionalOnResource 类路径下是否存在指定资源文件 @ConditionalOnWebApplication 当前是web环境 @ConditionalOnNotWebApplication 当前不是web环境 @ConditionalOnJndi JNDI存在指定项
-
我们怎么知道那些自动配置类生效?
我们可以通过启动 debut=true属性;来让控制台打印自动配置报告,这样我们就可以很方便的知道那些自动配置类生效;
=========================
AUTO-CONFIGURATION REPORT
=========================


Positive matches://自动配置类启用的
-----------------

   DispatcherServletAutoConfiguration matched:
      - @ConditionalOnClass found required class 'org.springframework.web.servlet.DispatcherServlet'; @ConditionalOnMissingClass did not find unwanted class (OnClassCondition)
      - @ConditionalOnWebApplication (required) found StandardServletEnvironment (OnWebApplicationCondition)

Negative matches: //没有自动,没有匹配成功的自动配置类
-----------------

   ActiveMQAutoConfiguration:
      Did not match:
         - @ConditionalOnClass did not find required classes 'javax.jms.ConnectionFactory', 'org.apache.activemq.ActiveMQConnectionFactory' (OnClassCondition)