原创:转载请备明链接
程序员有一种惯性思维,就是看见一些会动的东西(带点科技含量的,猫啊,狗啊就算了),总要先想一遍,这玩意用代码是怎么控制的。比如电梯,路边的霓虹灯,遥控器,小孩子的玩具等,都统统被程序员“意淫”过。
有时候还会感觉程序员看世界会看的透彻一点.............
想必大家都玩过刮刮乐,下面就介绍一种刮刮乐的移动端实现方式!用到canvas
1、用HTML 5 canvas globalCompositeOperation 属性实现刮刮乐
思路:
(1)首先需要一个盒子定位,确定刮刮乐区域想要放在哪里
(2)定位盒子里有个放内容的盒子,也就是放奖品的
(3)用一个画布(canvas)把上面的盒子盖住
(4)当手触摸移动的时候,可以擦除部分画布,露出奖品区
(5)当擦除足够多(3/4)的时候,可以选择让画布自动消失,慢慢淡出(这个效果选做)
主要是第四步,如何擦除?
这里选用 globalCompositeOperation,即Canvas中的合成操作。简单来说,Composite(组合),就是对你在绘图中,后绘制的图形与先绘制的图形之间的组合显示效果,比如在国画中,你先画一笔红色,再来一笔绿色,相交的部分是一种混色,而在油画中,绿色就会覆盖掉相交部分的红色,这在程序绘图中的处理就是Composite,Canvas API中对应的函数就是globalCompositeOperation。
globalCompositeOperation中有个属性值是“destination-out",也就是当绘画重叠时显示透明。刚好用到这里,我们就可以在画布上乱画,画过的地方就是重叠的地方,就会变成透明,然后露出画布下的东西,也就是我们想要的效果。
html 代码如下:
<!DOCTYPE html>
<html>
    <head>
        <meta charset="UTF-8">
        <meta name="viewport" content="width=device-width,initial-scale=1,minimum-scale=1,maximum-scale=1,user-scalable=no" />
        <title></title>
        <link rel="stylesheet" type="text/css" href="css/guaguale.css"/>
    </head>
    <body>
        <!-- 大的背景盒子-->
        <div id="main">
            <!-- 定位的盒子-->
            <div class="canvasBox">
                <!-- 放内容的盒子-->
                <span id="prize">
                    恭喜发财,红包拿来
                </span>
                <!-- 蒙版画布-->
                <canvas id="canvas"></canvas>
            </div>
        </div>
    </body>
    <script type="text/javascript">
        var canvas = document.getElementById("canvas");
        var ctx = canvas.getContext('2d');
        /* 画布偏移量,下面用到的时候再介绍*/
        var arr = getOffset(canvas);
        var oLeft = arr[0];
        var oTop = arr[1];

        /* 初始化画布*/
        ctx.beginPath();
        ctx.fillStyle = '#ccc';
        ctx.fillRect(0,0,canvas.width,canvas.height);
        ctx.closePath();

        /* 增加触摸监听*/
        document.addEventListener("touchstart",function(){
            /* 初始化画笔*/
            ctx.beginPath();
            /* 画笔粗细*/
            ctx.lineWidth = 30;
            /* 设置组合效果*/
            ctx.globalCompositeOperation = 'destination-out';
            /* 移动画笔原点*/
            ctx.moveTo(event.touches[0].pageX-oLeft,event.touches[0].pageY-oTop);
        },false)

        document.addEventListener("touchmove",function(){
            /* 根据手指移动画线,使之变透明*/
            ctx.lineTo(event.touches[0].pageX-oLeft,event.touches[0].pageY-oTop);
            /* 填充*/
            ctx.stroke();
        })

        /* 之所以会用到下面的那个函数getOffset(obj)
         * 是因为event.touches[0].pageX、pageY获取的是相对于可视窗口的距离
         * 而lineTo画笔的定位是根据画布位置定位的
         * 所以就要先获取到画布(canvas)相对于可视窗口的距离,然后计算得出触摸点相对于画布的距离
         * */


        /* 获取该元素到可视窗口的距离*/
        function getOffset(obj){
            var valLeft = 0,valTop = 0;
            function get(obj){
                valLeft += obj.offsetLeft;
                valTop += obj.offsetTop;
                /* 不到最外层就一直调用,直到offsetParent为body*/
                if (obj.offsetParent.tagName!='BODY') {
                    get(obj.offsetParent);
                }
                return [valLeft,valTop];
            }
            return get(obj);
        }

    </script>
</html>
css代码如下:
*{
    margin: 0;
    padding: 0;
}
#main{
    width: 100%;
    padding: 20px 0;
    background-color: red;
}

.canvasBox{
    width: 78%;
    height: 160px;
    border-radius: 10px;
    background-color: #FFF;
    margin-left: 11%;
    line-height: 160px;
    text-align: center;
    position: relative;
}

#canvas{
    width: 96%;
    height: 96%;
    position: absolute;
    left: 2%;
    top: 2%;
    background-color: transparent;
}
第五步要用到canvas像素点的获取(这块注意,像素级操作,要在服务器环境下打开)
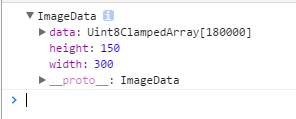
getImageData(int x,int y,int width,int height):该方法获取canvas上从(x,y)点开始,宽为width、高为height的图片区域的数据,该方法返回的是一个CanvasPixelArray对象,该对象具有width、height、data等属性。data属性为一个数组,该数组每4个元素对应一个像素点。
(对图片的反相操作也可以这样做,改变rgba值)
getImageData(int x,int y,int width,int height)返回的对象,data里面存储的是像素点信息

我们再打印data,data属性为一个数组,每4个元素对应一个像素点(以rgba的形式保存每一个像素点的信息)。

所以我们就可以根据像素点的opcity值来判断这个像素点是不是透明,是不是等于0?
透明的像素点数量/总像素点数量 = 擦除比例
js代码:
document.addEventListener("touchend",function(){
            /* 获取imageData对象*/
            var imageDate =    ctx.getImageData(0,0,canvas.width,canvas.height);
            /* */
            var allPX = imageDate.width * imageDate.height;

            var iNum = 0;//记录刮开的像素点个数

            for(var i=0;i<allPX;i++){
                if(imageDate.data[i*4+3] == 0){
                    iNum++;
                }
            }
            if(iNum >= allPX*3/4){
                // disappear里面写了缓慢清除的css3动画效果
                canvas.setAttribute('class','disappear');
            }
        },false)
" .disappear " 的css样式,css3消失动画
.disappear{
    -webkit-animation: disa 2s 1;
    animation: disa 2s 1;
    -webkit-animation-fill-mode: forwards;
    -moz-animation-fill-mode: forwards;
    -o-animation-fill-mode: forwards;
    animation-fill-mode: forwards;
}

@keyframes disa{
    0%{opacity:1;}
    100%{opacity: 0;}
}
相对比网上的其他一些实现方式,这种还是比较简单的一种,大家相互学习。有什么其他的办法可以留言相互学习
参考链接:
1、【HTML5】Canvas之globalCompositeOperation属性详解 (讲属性值)
2、Canvas里的globalCompositeOperation (讲兼容)